10 Breakfast Ideas For Hot Days
You've probably faced those sweltering summer mornings when a hot breakfast feels unbearable. Instead of forcing down warm oatmeal or skipping the day's most important meal, you'll find refreshing alternatives that'll energize your morning routine. From make-ahead chia puddings to protein-rich Mediterranean platters, these ten breakfast options combine nutrition with cooling satisfaction. Let's explore how you can transform your summer breakfast game with minimal kitchen time and maximum flavor impact.
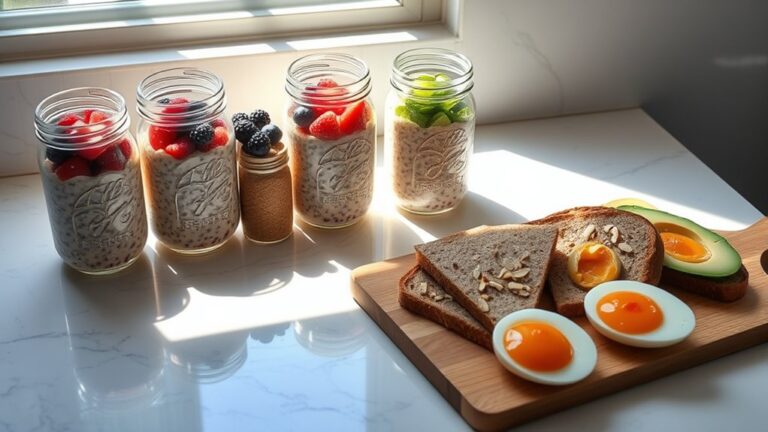
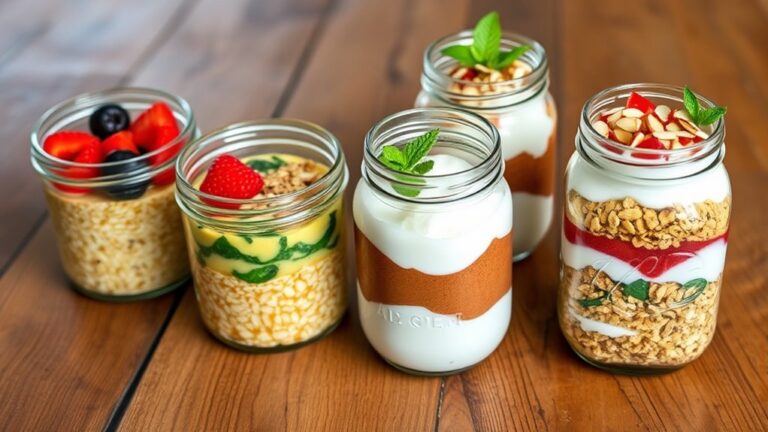
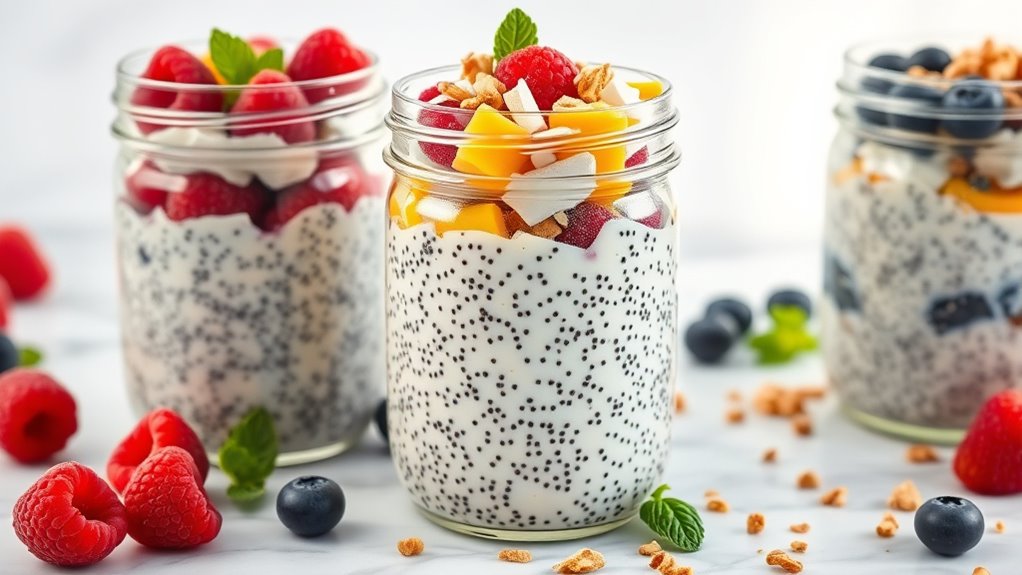
Colorful Berry-Topped Yogurt Parfaits

Colorful Berry-Topped Yogurt Parfaits are a refreshing and nutritious way to start a hot summer morning. These layered treats combine the coolness of yogurt with the natural sweetness of fresh berries, creating a breakfast that's as visually appealing as it's delicious.
The beauty of yogurt parfaits lies in their versatility and simplicity. While this recipe features a classic combination of berries and granola, you can easily customize the ingredients based on seasonal availability or personal preferences. The parfaits can be assembled quickly, making them perfect for busy mornings or when you want to avoid using the stove.
Ingredients:
- 2 cups plain Greek yogurt
- 1 cup mixed fresh berries (strawberries, blueberries, raspberries)
- 1 cup granola
- 2 tablespoons honey
- 1/4 cup sliced almonds
- Fresh mint leaves for garnish (optional)
- 2 tall glasses or mason jars
Begin by washing the berries thoroughly and cutting any larger berries, such as strawberries, into bite-sized pieces. Pat the berries dry with paper towels to prevent excess moisture from making the parfait soggy. If using frozen berries, allow them to thaw partially and drain any excess liquid.
Layer the parfait by starting with a few spoonfuls of yogurt at the bottom of each glass. Add a layer of granola, followed by a drizzle of honey and a handful of berries. Continue layering in this order until you reach the top of the glass, ensuring you have enough berries to create an attractive final layer.
For the finishing touches, top the parfaits with a sprinkle of sliced almonds and any remaining berries. If desired, add a small drizzle of honey and garnish with fresh mint leaves. The parfaits can be served immediately or covered and refrigerated for up to 2 hours before serving.
Extra Tip: To maintain the crunchiness of the granola, consider keeping it separate and adding it just before eating if you're preparing the parfaits in advance. You can also experiment with different yogurt flavors, such as vanilla or honey-flavored Greek yogurt, but remember that these varieties contain more sugar than plain yogurt.
No-Cook Overnight Oats With Summer Fruits
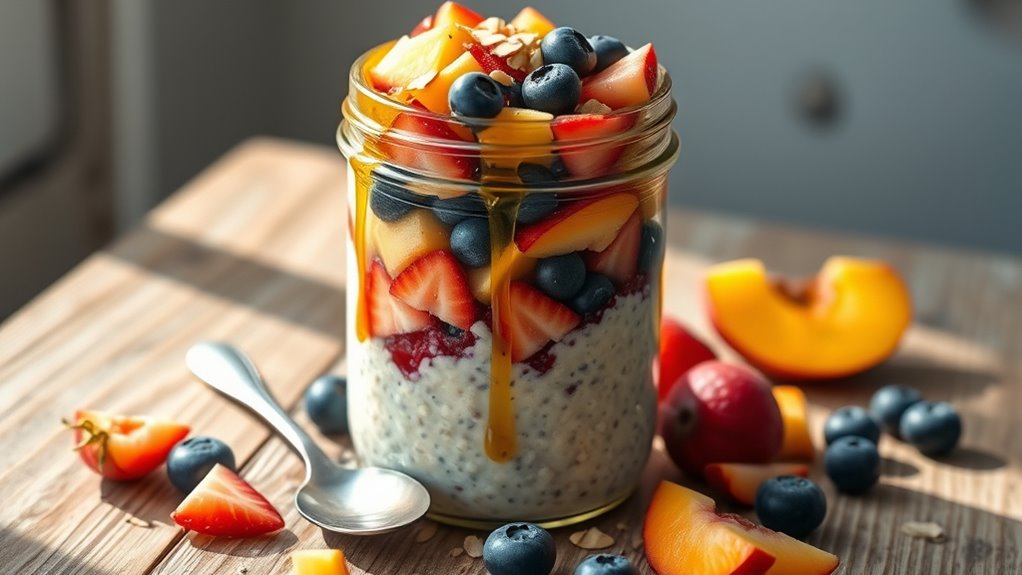
No-cook overnight oats offer the perfect solution for hot summer mornings when the last thing you want is to stand over a hot stove. This make-ahead breakfast combines the wholesome goodness of rolled oats with the refreshing sweetness of seasonal summer fruits, creating a cooling and nutritious start to your day.
The beauty of this recipe lies in its simplicity and versatility. As the oats soak overnight, they become tender and creamy without any cooking required, while the natural sugars from the fruits create a delightful sweetness that eliminates the need for added sweeteners.
Ingredients:
- 1 cup old-fashioned rolled oats
- 1 cup milk (dairy or plant-based)
- 1/2 cup plain yogurt
- 1 tablespoon chia seeds
- 1 tablespoon honey
- 1/4 teaspoon vanilla extract
- 1/8 teaspoon salt
- 1 cup mixed summer fruits (berries, peaches, or nectarines)
- Optional toppings: nuts, seeds, or granola
In a mason jar or container with a lid, combine the rolled oats, milk, yogurt, chia seeds, honey, vanilla extract, and salt. Stir the mixture thoroughly to ensure all ingredients are well incorporated and the oats are fully submerged in the liquid.
Seal the container and refrigerate overnight or for at least 6 hours.
When ready to serve, remove the container from the refrigerator and give the oats a good stir. The mixture should be thick and creamy, with the oats fully softened. If the consistency is too thick, add a splash of milk to achieve your desired texture.
Wash and prepare your chosen summer fruits, cutting larger fruits into bite-sized pieces.
Layer the fruits on top of the oats, or gently fold them into the mixture. Add any optional toppings like nuts, seeds, or granola for extra crunch and nutrition. This recipe can be enjoyed immediately or stored in the refrigerator for up to 24 hours after adding the fruits.
For best results, use fresh, ripe fruits and avoid frozen ones as they can release too much liquid when thawing. The basic oat mixture can be prepared in bulk and stored in individual portions for up to 5 days, adding fresh fruits only when ready to consume.
Adjust the sweetness level by varying the amount of honey or using naturally sweet fruits like ripe peaches or strawberries.
Tropical Green Smoothie Bowls
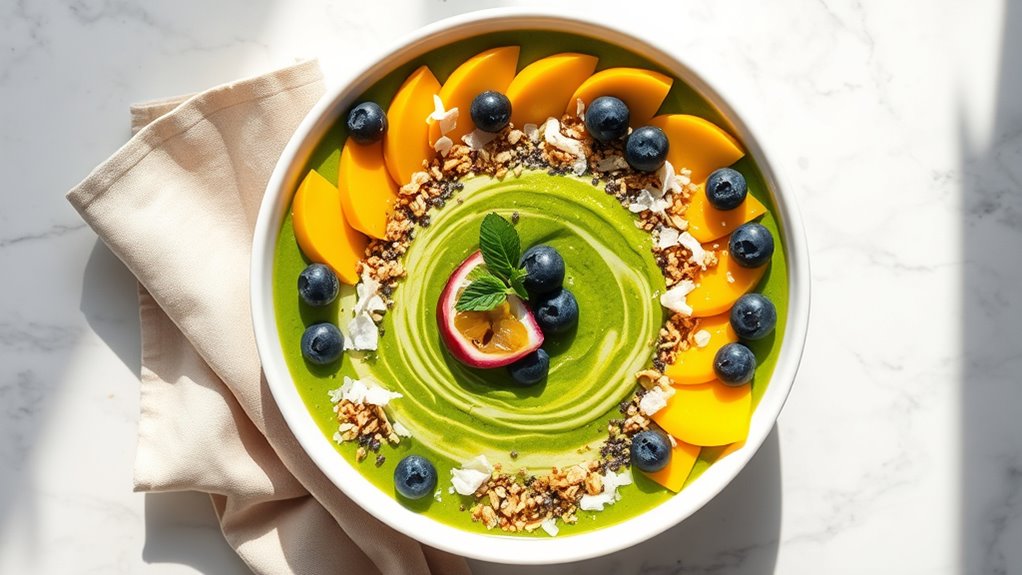
Tropical green smoothie bowls are the perfect breakfast solution for scorching summer mornings when you want something refreshing yet nutritious. The combination of tropical fruits with leafy greens creates a vibrant, Instagram-worthy bowl that's packed with vitamins, minerals, and natural energy boosters.
This recipe balances the sweetness of mango and pineapple with the earthiness of spinach and the creaminess of coconut milk. The best part about smoothie bowls is their versatility – you can adjust the consistency to your liking and top them with various ingredients for added texture and nutritional benefits.
Ingredients:
- 2 cups fresh spinach
- 1 frozen banana
- 1 cup frozen mango chunks
- 1/2 cup frozen pineapple chunks
- 1 cup coconut milk
- 1 tablespoon honey
- 1 tablespoon chia seeds
- Optional toppings: granola, sliced almonds, fresh fruit, coconut flakes, hemp seeds
Start by preparing your frozen ingredients the night before. Cut fresh fruits into chunks and freeze them on a lined baking sheet. This method prevents the pieces from sticking together and ensures a smoother blending process.
If using store-bought frozen fruit, let it sit at room temperature for 5 minutes before blending.
Add the coconut milk to your blender first, followed by the spinach. Blend until the spinach is completely broken down and smooth. Then add the frozen fruits, honey, and chia seeds.
Blend until you achieve a thick, smooth consistency – it should be thicker than a regular smoothie but still pourable. If the mixture is too thick, add small amounts of coconut milk until you reach the desired consistency.
Pour the smoothie mixture into a bowl immediately. The key to a perfect smoothie bowl is serving it right away before it starts to melt.
Arrange your chosen toppings in an organized pattern on top of the smoothie base. This not only makes the bowl more appealing but ensures an even distribution of textures and flavors in every bite.
For best results, use a high-powered blender and keep your bowl in the freezer for 10 minutes before serving – this helps maintain the thick consistency longer.
If meal prepping, you can portion and freeze the main smoothie mixture in containers, then thaw slightly and blend again with a splash of liquid when ready to serve. Always add toppings fresh just before eating.
Cold Chia Seed Pudding Breakfast Jars
Cold Chia Seed Pudding Breakfast Jars are a perfect solution for hot summer mornings when you want something refreshing yet nutritious. This make-ahead breakfast combines the omega-rich benefits of chia seeds with creamy milk and natural sweetness, creating a pudding-like consistency that's both satisfying and cooling.
These breakfast jars can be customized with various toppings and mix-ins, making them versatile enough to enjoy throughout the week without getting bored. The chia seeds expand overnight, creating a delightful texture while absorbing the flavors of whatever liquid and sweeteners you choose to use.
Ingredients:
- 1/4 cup chia seeds
- 1 cup milk (dairy or plant-based)
- 1 tablespoon honey or maple syrup
- 1/2 teaspoon vanilla extract
- Pinch of salt
- Fresh fruits for topping
- Granola
- Nuts or seeds
- Mason jars or containers with lids
In a bowl, combine the chia seeds, milk, sweetener of choice, vanilla extract, and salt. Whisk thoroughly, making sure there are no clumps of chia seeds. Let the mixture sit for 5 minutes, then whisk again to prevent the seeds from settling at the bottom.
Pour the mixture into individual mason jars or containers, leaving some room at the top for toppings. Seal the containers and refrigerate for at least 4 hours or overnight. The pudding will thicken as the chia seeds absorb the liquid and expand to create a gel-like consistency.
Before serving, give the pudding a good stir and add your chosen toppings. Layer fresh fruits, a sprinkle of granola, and a handful of nuts or seeds on top. The pudding can be eaten straight from the jar, making it perfect for grab-and-go breakfasts.
Extra Tips: For the best texture, use whole chia seeds rather than ground ones. If your pudding becomes too thick, simply thin it out with a splash of milk. To prevent clumping, you can blend all ingredients in a blender before refrigerating.
The basic pudding will keep in the refrigerator for up to 5 days, but add toppings just before serving to maintain their freshness and crunch.
Fresh Fruit and Nut Butter Toast
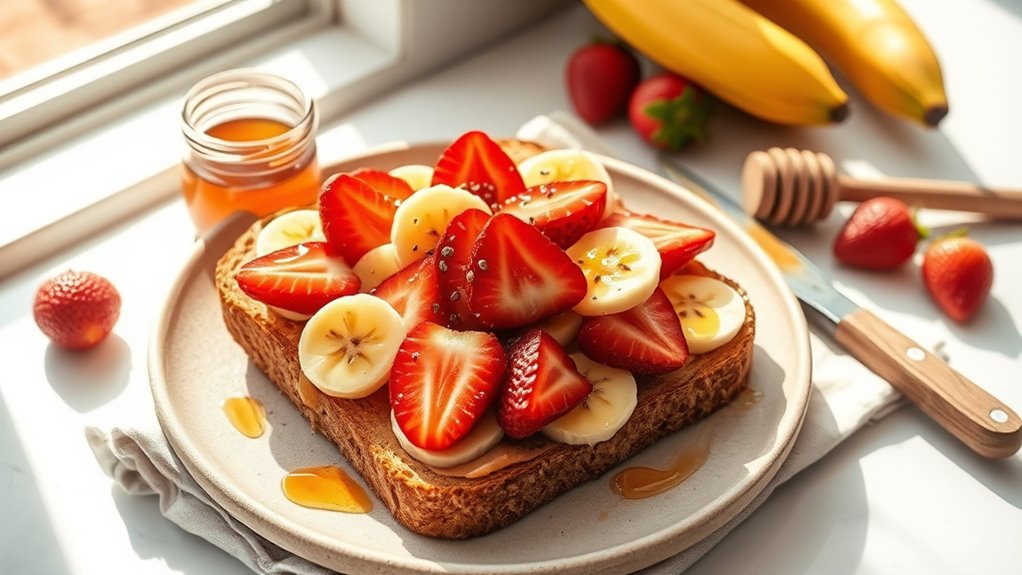
Fresh Fruit and Nut Butter Toast combines the satisfying crunch of toasted bread with creamy nut butter and the natural sweetness of seasonal fruits. This simple yet nutritious breakfast option is perfect for hot summer mornings when you want something light but energizing.
The beauty of this recipe lies in its versatility – you can switch up the fruits and nut butters based on what's available or your personal preferences. While this recipe suggests specific combinations, feel free to experiment with different seasonal fruits and various types of nut butters to create your perfect breakfast toast.
Ingredients:
- 2 slices whole grain bread
- 2 tablespoons almond or peanut butter
- 1 medium banana, sliced
- 4-5 strawberries, sliced
- 1 tablespoon honey
- 1/4 teaspoon chia seeds
- Pinch of sea salt
Toast the bread slices until they reach a golden-brown color and have a crispy texture. This creates a sturdy base that can hold the toppings without becoming soggy.
Allow the toast to cool for about 30 seconds before adding the toppings to prevent the nut butter from melting too quickly.
Spread an even layer of nut butter on each slice of toast, making sure to cover the surface completely. The nut butter acts as a barrier between the bread and fruit, helping maintain the toast's crunchiness.
Arrange the sliced banana and strawberries in an overlapping pattern on top of the nut butter.
Finish by drizzling honey over the fruit, then sprinkle with chia seeds and a tiny pinch of sea salt. The honey adds extra sweetness while the chia seeds provide additional nutrition and texture. The salt helps enhance all the flavors and creates a more complex taste profile.
For best results, serve the toast immediately after preparation. If preparing in advance, store the components separately and assemble just before eating.
Using slightly underripe bananas will help prevent browning, and patting the fruit dry with a paper towel before placing it on the toast will help maintain the bread's crispiness.
Ready-to-Eat Granola and Cold Milk
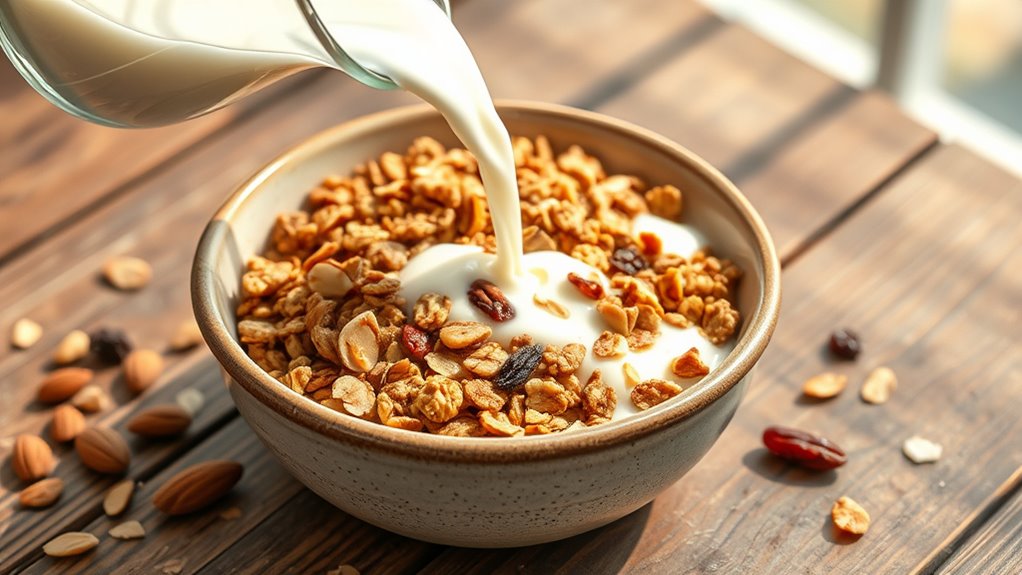
Granola paired with cold milk is a refreshing and energizing breakfast option that's perfect for hot summer mornings. The combination of crunchy, toasted oats, nuts, and dried fruits creates a satisfying texture while requiring minimal effort during those warm days when you'd rather not turn on the stove.
This simple yet nutritious breakfast can be prepared in advance by making a large batch of homemade granola that will last for several weeks when stored properly. The beauty of this recipe lies in its versatility – you can customize the ingredients based on your preferences and what's available in your pantry.
Ingredients:
- 3 cups old-fashioned rolled oats
- 1 cup mixed nuts (almonds, walnuts, pecans)
- 1/2 cup coconut flakes
- 1/4 cup sunflower seeds
- 1/4 cup pumpkin seeds
- 1/3 cup honey or maple syrup
- 1/4 cup coconut oil
- 1 teaspoon vanilla extract
- 1 teaspoon ground cinnamon
- 1/2 teaspoon salt
- 1/2 cup dried fruit (raisins, cranberries, or chopped apricots)
- Cold milk for serving
Preheat your oven to 325°F (165°C). In a large mixing bowl, combine the oats, nuts, coconut flakes, and seeds. In a separate small bowl, warm the honey and coconut oil until liquid, then stir in the vanilla extract, cinnamon, and salt until well combined.
Pour the liquid mixture over the dry ingredients and stir thoroughly until everything is evenly coated. Spread the mixture in a thin, even layer on a parchment-lined baking sheet. Bake for 20-25 minutes, stirring once halfway through, until the granola is golden brown.
Remove from the oven and let it cool completely without stirring to achieve clusters. Once cooled, break the granola into clusters and mix in the dried fruit. Store in an airtight container. To serve, simply pour your desired amount into a bowl and add cold milk to your preferred level.
For best results, store the granola in an airtight container in a cool, dry place for up to three weeks. Avoid adding the dried fruit until after baking and cooling to prevent it from becoming too hard.
You can also experiment with different spices like nutmeg or cardamom, and consider adding a handful of dark chocolate chips after the granola has completely cooled for an indulgent twist.
Chilled Protein-Packed Energy Balls
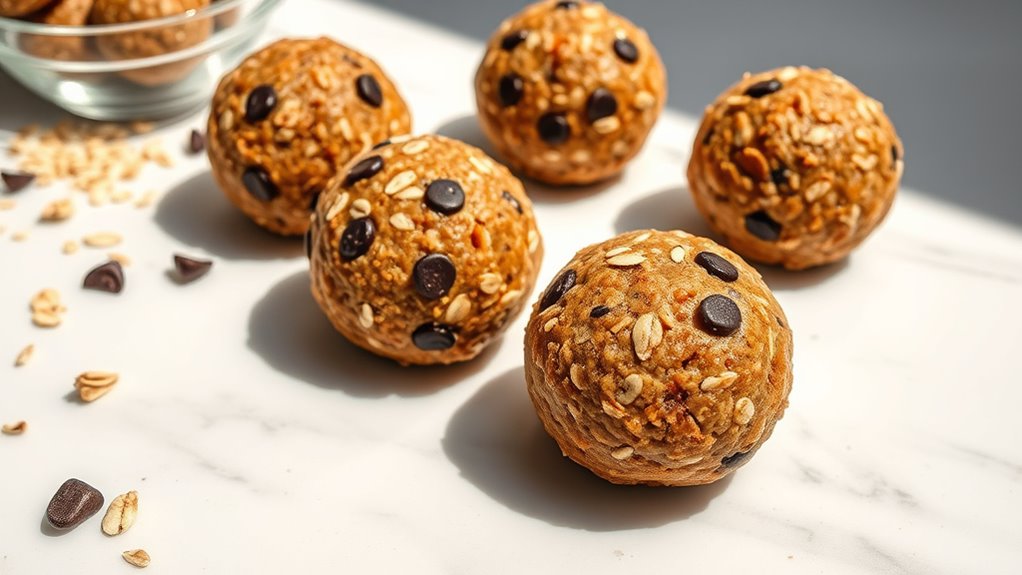
No-Bake Protein Energy Balls are the perfect breakfast solution for scorching summer days when the last thing you want is to turn on the stove or oven. These bite-sized treats combine wholesome ingredients like oats, nut butter, and protein powder to create a satisfying morning meal that can be prepared in advance.
These energy balls provide a balanced mix of protein, healthy fats, and complex carbohydrates to fuel your morning activities. The beauty of this recipe lies in its versatility – you can customize the ingredients based on your dietary preferences while maintaining the core nutritional benefits that make these balls an excellent breakfast choice.
Ingredients:
- 1 cup old-fashioned oats
- 1/2 cup natural peanut butter
- 1/3 cup honey
- 1/4 cup vanilla protein powder
- 1/4 cup ground flaxseed
- 1/4 cup mini dark chocolate chips
- 1 teaspoon vanilla extract
- 1/2 teaspoon cinnamon
- Pinch of salt
In a large mixing bowl, combine the old-fashioned oats, protein powder, ground flaxseed, and cinnamon. Mix these dry ingredients thoroughly to ensure even distribution of the protein powder and spices. This step is crucial for achieving consistent flavor throughout your energy balls.
In a separate bowl, mix the peanut butter, honey, and vanilla extract until well combined. Pour this wet mixture into the bowl with the dry ingredients. Using clean hands or a sturdy spatula, mix everything together until you achieve a uniform, slightly sticky dough.
Add the mini chocolate chips and continue mixing until they're evenly distributed throughout the mixture. Roll the mixture into small balls, approximately 1-inch in diameter. Place each ball on a parchment-lined baking sheet or container. Once all the mixture has been rolled into balls, place them in the refrigerator for at least 30 minutes to firm up.
After chilling, transfer the energy balls to an airtight container for storage.
Extra Tips: The consistency of your energy balls largely depends on the type of peanut butter used – natural peanut butter can vary in oiliness, so you may need to adjust the amount of oats or honey to achieve the right texture. If the mixture is too dry, add a little more honey or peanut butter. If it's too wet, add more oats.
Store these energy balls in the refrigerator for up to one week, or freeze them for up to three months. Let them come to room temperature for about 5 minutes before eating if frozen.
Mediterranean Breakfast Platter
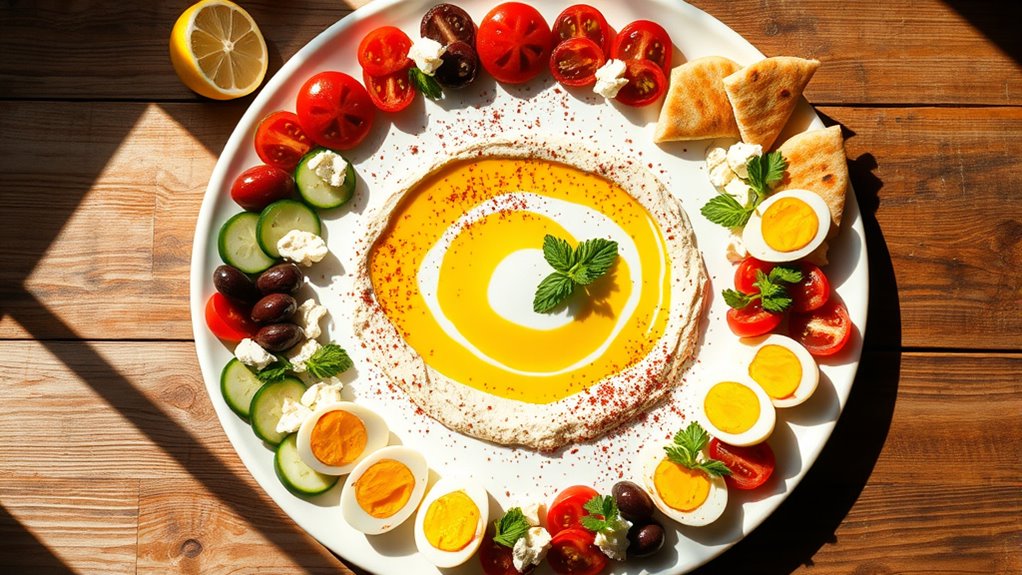
A Mediterranean breakfast platter offers a refreshing and nutritious start to hot summer mornings, combining fresh vegetables, proteins, and wholesome grains. This traditional spread draws inspiration from countries like Greece, Turkey, and Lebanon, where light, cool breakfast dishes are a cultural staple.
This recipe creates a balanced platter that serves 2-3 people and can be prepared in about 15 minutes, making it perfect for busy mornings. The components can be adjusted based on personal preferences, and many items can be prepared the night before to save time during the morning rush.
Ingredients:
- 2 pita breads
- 1 cucumber, sliced
- 2 tomatoes, diced
- 1/2 cup olives, mixed varieties
- 4 oz feta cheese
- 4 hard-boiled eggs
- 1/2 cup hummus
- 1/4 cup olive oil
- 2 tablespoons za'atar seasoning
- Fresh mint leaves
- Fresh parsley
- 1 lemon
- Salt and pepper to taste
Begin by preparing the vegetables. Wash and slice the cucumber into thin rounds, dice the tomatoes, and arrange them on one side of a large serving platter.
Sprinkle the vegetables with a pinch of salt and a drizzle of olive oil to enhance their natural flavors.
In the center of the platter, place the hummus in a small bowl, creating a well in the middle with the back of a spoon. Drizzle with olive oil and sprinkle with za'atar seasoning.
Arrange the olives in a small pile next to the hummus. Cut the pita bread into triangles and lightly toast them if desired.
Complete the platter by arranging the hard-boiled eggs (either halved or whole), crumbling the feta cheese over the vegetables, and garnishing with fresh mint and parsley leaves.
Serve with lemon wedges on the side for an extra burst of freshness. The entire platter should be colorful and inviting, with each component easily accessible.
For best results, use room temperature feta cheese and ensure all vegetables are thoroughly dried after washing to prevent excess water on the platter. The platter can be assembled up to an hour before serving and kept in the refrigerator, though the pita bread should be added just before serving to maintain its texture.
Mixed Berry and Mint Breakfast Popsicles
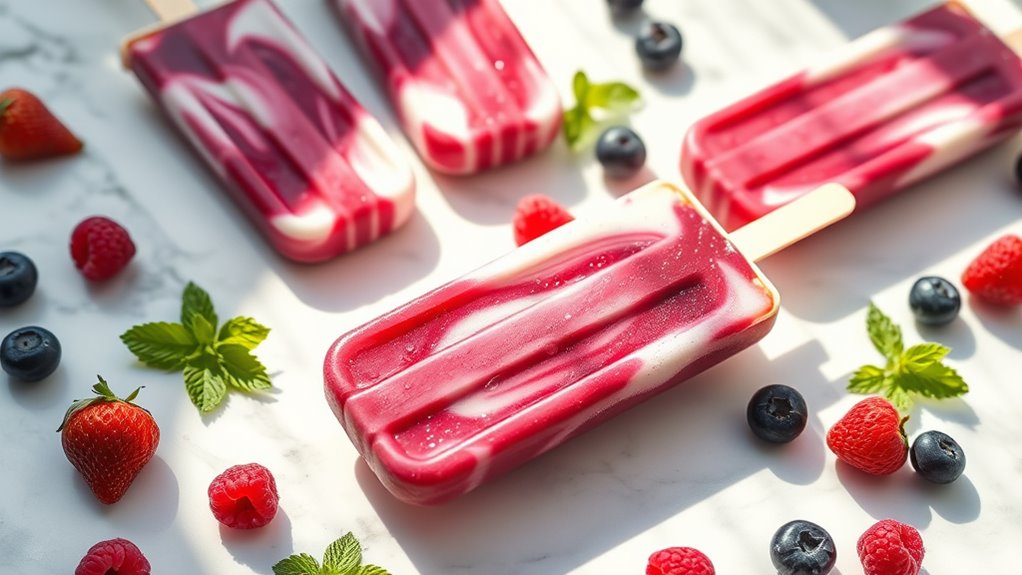
Mixed Berry and Mint Breakfast Popsicles transform the traditional morning meal into a refreshing and nutritious treat perfect for scorching summer days. These vibrant popsicles combine protein-rich Greek yogurt with fresh berries and a hint of mint for an energizing start to your day.
These make-ahead breakfast pops aren't just delicious – they're packed with antioxidants, calcium, and protein to fuel your morning. The combination of tart berries, creamy yogurt, and cool mint creates a balanced flavor profile that's both satisfying and refreshing, while honey adds just the right touch of natural sweetness.
Ingredients:
- 2 cups Greek yogurt (plain)
- 2 cups mixed berries (strawberries, blueberries, raspberries)
- 3 tablespoons honey
- 8-10 fresh mint leaves
- 1/4 cup milk
- 1 tablespoon lemon juice
- 6-8 popsicle molds
- Popsicle sticks
Begin by washing the berries thoroughly and removing any stems. Place the berries in a blender with honey and lemon juice. Pulse until the berries are broken down but still maintain some texture – you don't want a completely smooth puree. Remove half of this mixture and set aside.
In the blender with the remaining berry mixture, add the Greek yogurt, milk, and finely chopped mint leaves. Blend until smooth and well combined. The mixture should be thick but pourable. If it's too thick, add a small amount of milk to achieve the desired consistency.
Layer the popsicle molds by alternating the plain berry mixture with the yogurt-berry mixture. Leave about 1/4 inch of space at the top of each mold for expansion during freezing. Insert popsicle sticks and freeze for at least 6 hours or overnight until completely solid. To unmold, run the popsicle molds briefly under warm water.
For best results, prepare these popsicles using fresh, ripe berries and thick Greek yogurt. If using frozen berries, thaw them completely and drain excess liquid before blending. The popsicles can be stored in the freezer for up to two weeks when wrapped individually in plastic wrap and placed in an airtight container.
For a smoother unmolding process, lightly coat the inside of the molds with cooking spray before filling.
Cold Breakfast Sandwich Wraps

Cold Breakfast Sandwich Wraps are the perfect solution for those sweltering summer mornings when the last thing you want is to turn on the stove. These make-ahead wraps combine fresh ingredients with protein-rich elements to create a satisfying and refreshing morning meal that can be prepared the night before.
The beauty of these wraps lies in their versatility and portability. They can be customized with various ingredients to suit different taste preferences while maintaining their cool, crisp texture. When properly wrapped and stored, they stay fresh in the refrigerator, making them an excellent option for busy mornings or on-the-go breakfasts.
Ingredients:
- Large flour tortillas (8-10 inch)
- Cream cheese, softened
- Sliced turkey or ham
- Fresh spinach leaves
- Cucumber, thinly sliced
- Bell peppers, thinly sliced
- Hard-boiled eggs, sliced
- Salt and pepper
- Plastic wrap for storage
Start by laying out the tortilla flat and spreading a thin layer of softened cream cheese evenly across the surface, leaving about half an inch of space around the edges. This cream cheese layer acts as a moisture barrier, preventing the tortilla from becoming soggy overnight.
Layer the protein elements next, placing sliced turkey or ham across the cream cheese surface. Add a single layer of fresh spinach leaves, followed by the cucumber and bell pepper slices. Place the hard-boiled egg slices in a line across the middle of the wrap, and season with salt and pepper to taste.
To roll the wrap, fold in both sides of the tortilla slightly, then start rolling from the bottom, keeping the ingredients tight as you go. Once rolled, wrap tightly in plastic wrap and refrigerate. For best results, place the wrapped sandwich seam-side down in the refrigerator for at least 2 hours or overnight.
Extra Tips: To prevent sogginess, pat all vegetables dry with paper towels before adding them to the wrap. If preparing multiple wraps for the week, color-code the plastic wrap or use markers to note the preparation date. These wraps can be stored in the refrigerator for up to 2 days, though they're best consumed within 24 hours for optimal freshness and texture.