Cheesecake Cookie Cups Recipe
Ever wonder how a simple cookie can transform into a dessert masterpiece? Cheesecake cookie cups are your ticket to impressing friends and family with minimal culinary skill. You'll love how these bite-sized treats combine the crunch of a sugar cookie with the creamy decadence of cheesecake. They're surprisingly simple to make, requiring just a few basic ingredients and some mini muffin tin magic. Want to learn how to create these showstopping desserts that'll have everyone asking for your secret? Stick around, and I'll walk you through every delicious step.
Recipe Highlights
- Combine refrigerated sugar cookie dough pressed into mini muffin tins with a rich cream cheese filling for an easy, delightful dessert.
- Bake cookie base first at 350°F for 10-12 minutes, then reshape wells before adding cheesecake mixture and baking an additional 15 minutes.
- Create the filling by mixing softened cream cheese, sugar, vanilla extract, and egg until smooth and creamy for a perfect texture.
- Cool the cheesecake cookie cups completely in the refrigerator to set the filling and enhance flavor, storing in an airtight container.
- These miniature treats are versatile for various occasions, requiring minimal baking skills and offering an impressive, gourmet-style dessert experience.
History
Although the exact origins of cheesecake cookie cups are somewhat unclear, these delightful mini desserts represent a modern fusion of traditional cheesecake and cookie recipes.
You'll find their roots in the creative culinary trends of the early 2000s, when home bakers began experimenting with transforming classic desserts into more portable, bite-sized versions.
- Cookie-based dessert cups emerged from:
- Innovative home baking techniques
- Pinterest and food blog culture
- Growing interest in miniature desserts
The concept likely developed from:
- Traditional cheesecake recipes
- Sugar cookie base techniques
- Mini muffin tin baking innovations
You can trace these treats' popularity to the rising trend of shareable, Instagram-worthy desserts that combine familiar flavors in unexpected ways.
Their compact size and playful presentation quickly made them a hit at potlucks, parties, and family gatherings.
Recipe
Cheesecake Cookie Cups blend the rich, creamy decadence of cheesecake with the familiar comfort of sugar cookies. These miniature desserts transform simple ingredients into an elegant and irresistible treat that will impress guests and satisfy sweet tooth cravings.
Perfect for parties, potlucks, or weekend baking projects, these bite-sized delights offer a delightful contrast between a crisp cookie base and smooth cheesecake filling. The recipe is straightforward, requiring minimal technical skill and delivering maximum flavor in every single cup.
Ingredients:
- 1 roll refrigerated sugar cookie dough
- 8 oz cream cheese, softened
- 1/4 cup granulated sugar
- 1 tsp vanilla extract
- 1 large egg
- Optional: Fresh berries or chocolate shavings for garnish
Preheat oven to 350°F and generously spray a mini muffin tin with non-stick cooking spray. Cut cookie dough into small portions and press into each muffin cavity, creating a well in the center. Bake for 10-12 minutes until edges are lightly golden, then remove and immediately press centers down with the back of a spoon to create deeper wells.
In a medium bowl, beat cream cheese, sugar, vanilla, and egg until smooth and creamy. Carefully spoon the cheesecake mixture into the baked cookie cups, filling each almost to the top. Return to oven and bake an additional 15 minutes until the filling is set but still slightly jiggly in the center.
For best results, allow cookie cups to cool completely in the pan before carefully removing. Refrigerate for at least 2 hours to help the filling set and enhance the flavors.
To prevent sticking, ensure the muffin tin is well-greased, and consider using parchment paper liners if desired. These delightful treats can be stored in an airtight container in the refrigerator for up to 5 days, making them an excellent make-ahead dessert option.
Cooking Steps
You'll begin by pressing small portions of refrigerated sugar cookie dough into each cavity of a mini muffin tin, creating perfect little wells that will become your cookie bases.
Next, you'll bake these cookie dough wells at 350°F for 10-12 minutes until they turn a light golden color, using the back of a spoon to gently press down the centers after initial baking.
With your cookie cups prepared, you'll then whip up the creamy cheesecake filling by beating together softened cream cheese, sugar, vanilla extract, and egg until the mixture is smooth and ready to be piped into the warm, waiting cookie shells.
Step 1. Press Cookie Dough
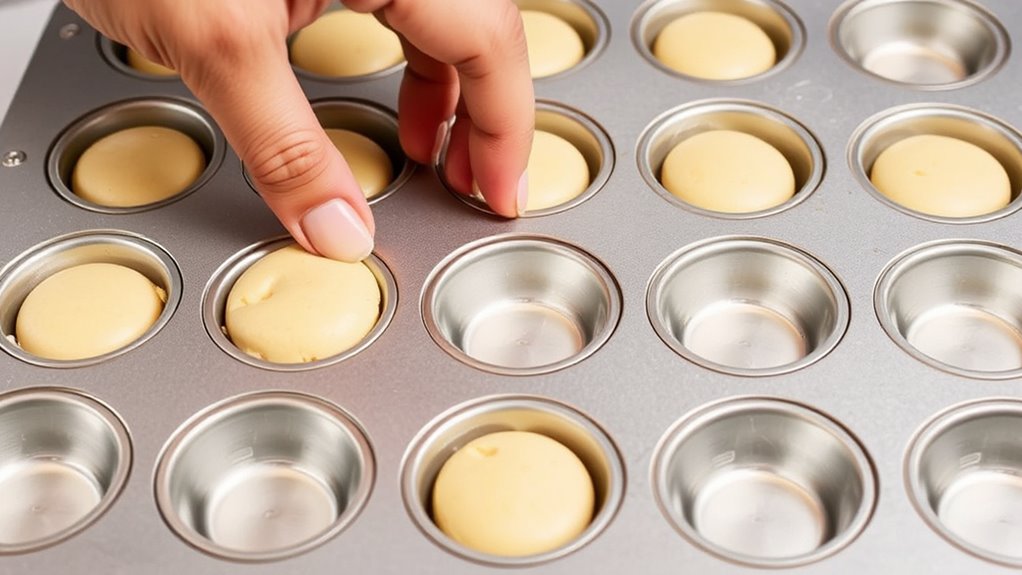
Grab a mini muffin tin and prepare to transform simple sugar cookie dough into delectable cookie cups. Spray the tin with non-stick cooking spray to ensure easy removal later.
Using clean hands or a small cookie scoop, portion out small balls of refrigerated sugar cookie dough, roughly 1 tablespoon each. Gently press each dough ball into the individual muffin wells, carefully spreading the dough up the sides to create a uniform cup shape.
Work methodically to ensure even thickness:
- Press dough evenly with your fingertips
- Create a slightly thicker bottom
- Leave a small well in the center for filling
- Aim for approximately 3/4-inch sides
Smooth any visible cracks to prevent leaking during baking.
Step 2. Bake Cookie Dough Wells
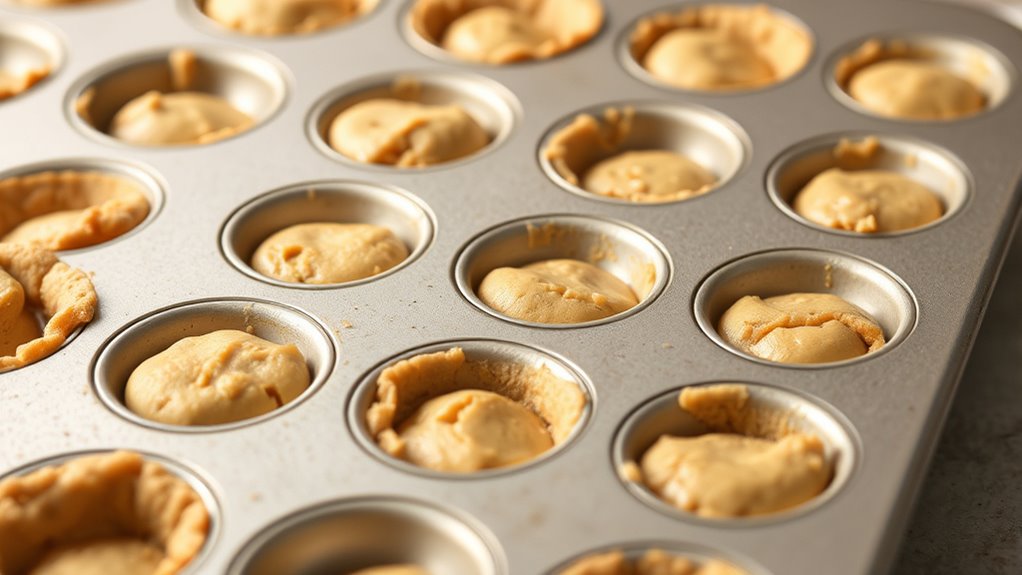
Slide the prepared mini muffin tin into a preheated 350°F oven, setting the stage for transforming raw cookie dough into golden, crisp cookie wells.
Watch closely as the dough begins to spread and rise, creating perfect little cups that'll soon hold your creamy cheesecake filling.
Baking tips for perfect results:
- Set timer for 10-12 minutes
- Look for light golden edges
- Avoid over-browning by checking frequently
- Edges should be slightly firm, centers slightly soft
Once baked, you'll need to reshape the wells immediately.
Use the back of a spoon to gently press down the centers, creating deeper indentations while the cookies are still warm and pliable.
This technique ensures a perfect vessel for your cheesecake filling, giving you uniform, professional-looking cookie cups that'll impress everyone at your gathering.
Step 3. Prepare Cheesecake Filling

Because perfectly smooth cheesecake filling requires precise technique, gather all ingredients at room temperature before beginning your mixing process.
Ensure your cream cheese is soft and pliable, allowing it to blend seamlessly without lumps. Using an electric mixer, beat the cream cheese until it becomes creamy and light, gradually incorporating granulated sugar to create a silky texture.
Add vanilla extract for depth of flavor, then crack in one large egg, mixing until the filling reaches a uniform, glossy consistency.
Key mixing tips include:
- Beat on medium speed
- Scrape down bowl sides frequently
- Stop mixing immediately once ingredients are combined
- Avoid overmixing, which can cause filling to become dense
Your goal? A velvety, smooth mixture that'll perfectly complement those golden cookie cups.
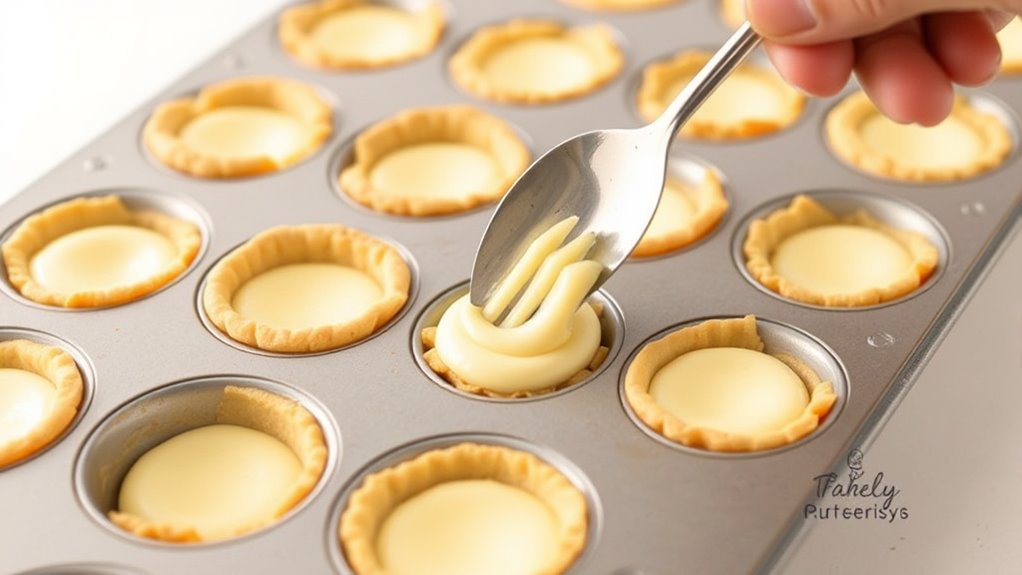
Step 4. Fill Wells With Mixture

When your cookie cups have cooled slightly from their initial baking, you'll want to create perfect wells for the cheesecake filling. Use the back of a small spoon to gently press down the centers, creating deeper indentations that'll hold more creamy mixture. The wells should be evenly shaped and about 1/2-inch deep, ensuring consistent filling distribution.
Carefully spoon the prepared cheesecake mixture into each cookie cup, filling to just below the rim. Use a small offset spatula or the back of a spoon to smooth the tops, creating a clean, professional appearance. Be precise in your movements, avoiding overflow or uneven surfaces.
Return the filled cookie cups to the oven, baking for an additional 15 minutes until the filling sets smoothly and looks slightly firm.
Step 5. Cool and Remove
After removing the cheesecake cookie cups from the oven, you'll want to let them cool completely in the pan, which allows the delicate cheesecake filling to set and the cookie base to firm up.
Use a small offset spatula or butter knife to gently loosen the edges of each cup, creating space for easy removal. Let the cookie cups rest at room temperature for about 30 minutes, ensuring they're stable enough to handle.
When cool, carefully slide a thin spatula under each cup to lift them out of the muffin tin. Transfer the cups to a wire rack or serving platter.
For the cleanest presentation, chill the cookie cups in the refrigerator for at least 2 hours before serving, which helps them maintain their shape and enhances their flavor profile.
Final Thoughts
Deliciousness awaits with these cheesecake cookie cups, a dessert that transforms simple ingredients into an extraordinary treat.
You'll find these miniature masterpieces are surprisingly easy to master, requiring only basic baking skills and standard kitchen tools. The magic lies in the precise technique: cold cookie dough, room-temperature cream cheese, and careful baking times.
Consider these pro tips for guaranteed success:
- Chill cups before serving
- Use a mini muffin tin for uniform shapes
- Press cookie centers gently to create perfect wells
- Monitor oven temperature closely
Your guests will be impressed by the professional presentation and incredible flavor profile.
These versatile desserts work for casual gatherings, elegant parties, and everything in between. With minimal effort, you'll create a show-stopping dessert that looks and tastes like it came from a gourmet bakery.