12 Chicken Breast Recipes For Tight Budgets
When you're watching your grocery budget, chicken breast is your kitchen MVP that won't let you down. You'll find that these budget-conscious recipes transform this lean protein into satisfying meals using just a few basic ingredients from your pantry. From a simple pan-seared chicken that needs only four items to a zesty lemon garlic version that'll make your kitchen smell amazing, these recipes prove that cooking on a budget doesn't mean settling for bland meals. Let's explore how to turn this affordable cut into dishes your family will request again and again.
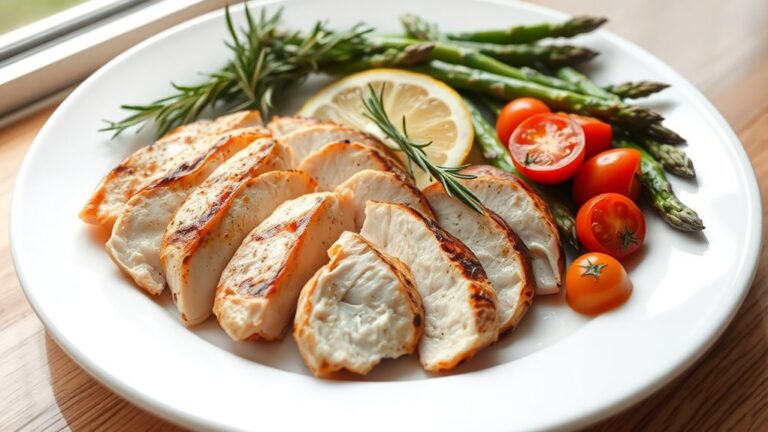
Simple Pan-Seared Chicken Breast
Pan-seared chicken breast is a fundamental cooking technique that delivers juicy, flavorful results with minimal ingredients. The key lies in proper preparation and cooking temperature to achieve a golden-brown exterior while maintaining the meat's natural moisture.
This budget-friendly recipe transforms ordinary chicken breasts into a delicious main course using basic pantry staples. By following these precise cooking instructions, you'll create restaurant-quality chicken that pairs well with virtually any side dish.
- 4 boneless, skinless chicken breasts
- 2 tablespoons olive oil
- 1 tablespoon garlic powder
- 1 teaspoon salt
- 1/2 teaspoon black pepper
Begin by placing the chicken breasts between two sheets of plastic wrap. Using a meat mallet or rolling pin, pound them to an even thickness of about 1/2 inch. This ensures uniform cooking throughout.
Remove the plastic wrap and pat the breasts dry with paper towels to promote better browning. Season both sides of the chicken breasts generously with salt, pepper, and garlic powder.
Heat olive oil in a large skillet over medium-high heat until it shimmers. Place the seasoned chicken breasts in the hot pan, being careful not to overcrowd. Cook for 5-7 minutes on each side, or until golden brown and the internal temperature reaches 165°F (74°C).
Once cooked, transfer the chicken breasts to a cutting board and let them rest for 5 minutes. This allows the juices to redistribute throughout the meat, ensuring maximum tenderness. After resting, slice the chicken against the grain if desired, or serve whole.
For optimal results, remove the chicken from the refrigerator 30 minutes before cooking to ensure even cooking. Avoid moving the chicken around too much in the pan – this interferes with proper browning.
If the chicken breasts are particularly thick, butterfly them before cooking, or adjust cooking time accordingly. Leftover chicken can be stored in an airtight container in the refrigerator for up to three days and used in salads, sandwiches, or other dishes.
One-Pan Lemon Garlic Chicken
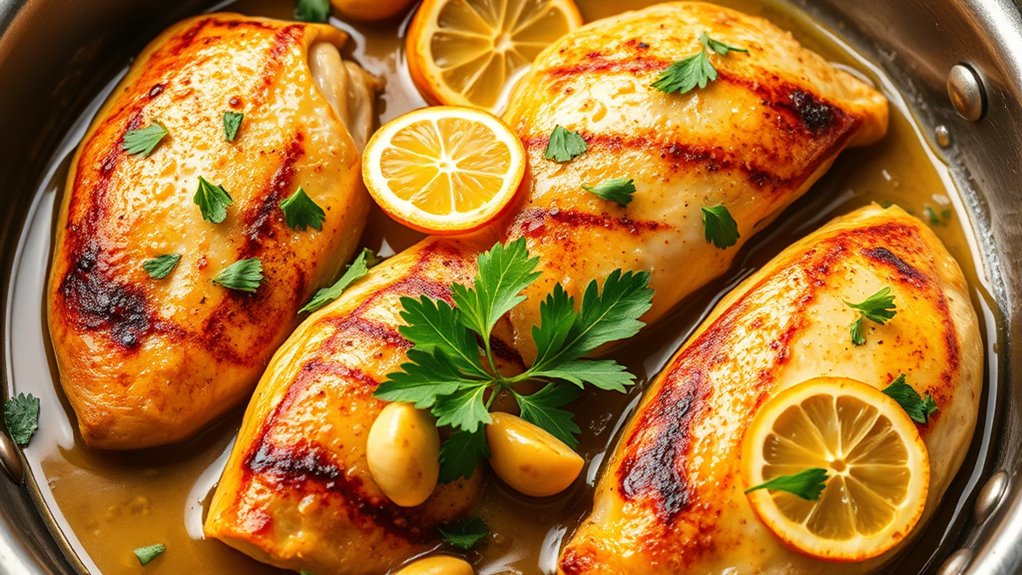
This bright and flavorful one-pan dish transforms basic chicken breasts into a restaurant-worthy meal while keeping cleanup minimal. The combination of fresh lemon, garlic, and herbs creates a delicious sauce that perfectly complements the tender chicken.
The dish comes together in under 30 minutes, making it ideal for busy weeknights while still being elegant enough for entertaining. The pan sauce created during cooking can be spooned over rice, pasta, or vegetables to create a complete meal.
- 4 boneless, skinless chicken breasts
- 4 tablespoons olive oil
- 6 cloves garlic, minced
- 2 lemons (1 sliced, 1 for juice)
- 1 cup chicken broth
- 1 teaspoon dried oregano
- 1 teaspoon dried thyme
- 1 teaspoon salt
- 1/2 teaspoon black pepper
- 2 tablespoons butter
- Fresh parsley for garnish
Place chicken breasts between plastic wrap and pound to even thickness, about 1/2 inch. Season both sides with salt, pepper, oregano, and thyme. Heat 2 tablespoons olive oil in a large skillet over medium-high heat.
Once hot, add chicken breasts and cook for 5-7 minutes on each side until golden brown. Remove chicken from pan and set aside.
In the same pan, add remaining olive oil and minced garlic. Cook for 1 minute until fragrant. Add chicken broth, lemon juice, and lemon slices to the pan, scraping up any browned bits from the bottom.
Bring to a simmer and cook for 2-3 minutes until slightly reduced. Return chicken to the pan and simmer for an additional 3-4 minutes until chicken is cooked through and sauce has thickened slightly.
Add butter and stir until melted. Garnish with fresh parsley before serving.
For the best results, use a heavy-bottomed stainless steel or cast-iron skillet to achieve proper browning and develop a flavorful sauce. If chicken breasts are very thick, butterfly them before pounding.
The sauce can be made ahead and reheated, though the chicken is best served immediately after cooking. Leftover chicken can be stored in an airtight container with the sauce for up to 3 days in the refrigerator.
Budget-Friendly Chicken Fajitas
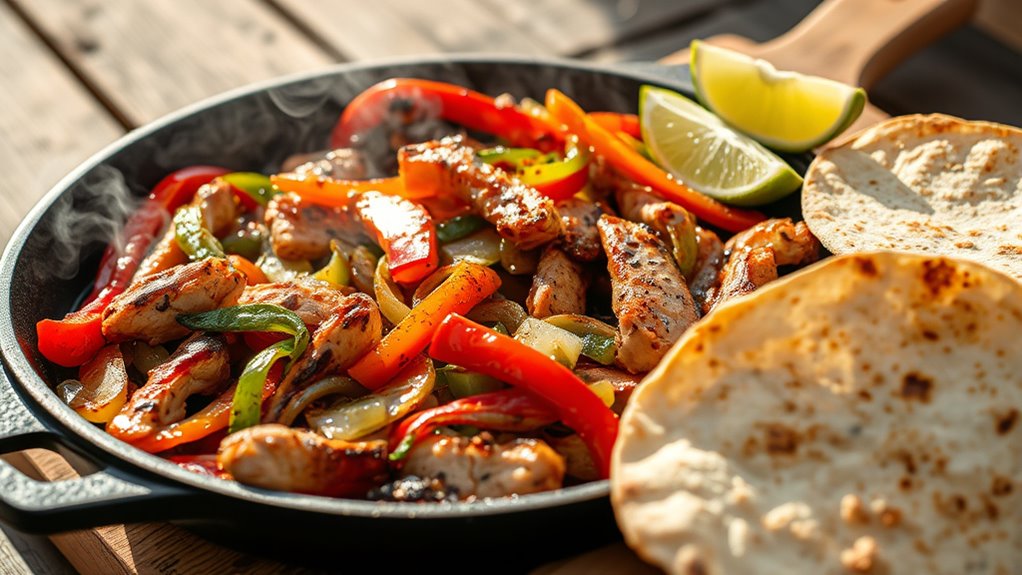
Chicken fajitas are a perfect way to stretch your food budget while creating a satisfying and flavorful meal. Using basic chicken breasts as the foundation, this recipe transforms simple ingredients into a restaurant-style dish that can feed a family for less than the cost of dining out.
The key to delicious fajitas lies in proper seasoning and achieving the right balance of charred vegetables and tender chicken. This recipe uses common pantry spices and fresh produce that's typically inexpensive year-round, making it an excellent choice for budget-conscious cooks.
- 2 large chicken breasts, sliced into strips
- 2 bell peppers, any color, sliced
- 1 large onion, sliced
- 2 tablespoons vegetable oil
- 1 tablespoon chili powder
- 1 teaspoon ground cumin
- 1 teaspoon garlic powder
- 1 teaspoon paprika
- 1/2 teaspoon salt
- 1/4 teaspoon black pepper
- 8 flour tortillas
- Lime wedges for serving
Mix the chili powder, cumin, garlic powder, paprika, salt, and pepper in a small bowl. Place sliced chicken in a large bowl and toss with half of the seasoning mixture until well coated. Let the chicken marinate at room temperature for 15-20 minutes while preparing the vegetables.
Heat 1 tablespoon of oil in a large skillet over medium-high heat. Add the chicken strips and cook for 5-7 minutes, stirring occasionally, until chicken is cooked through and slightly charred on the edges. Remove chicken from the pan and set aside.
Add remaining oil to the same skillet and increase heat to high. Add peppers and onions, sprinkle with remaining seasoning mixture, and cook for 5-7 minutes until vegetables are crisp-tender and slightly charred. Return chicken to the pan, stir to combine, and cook for an additional 2 minutes to heat through.
For best results, heat tortillas directly over a gas flame or in a dry skillet until slightly charred and pliable.
To save money, consider buying whole chicken breasts and slicing them yourself rather than pre-cut strips. Leftover fajita filling can be stored in an airtight container for up to 3 days and repurposed for quesadillas, rice bowls, or salads.
5-Ingredient Honey Mustard Chicken
Honey Mustard Chicken transforms ordinary chicken breasts into a sweet and tangy dish that's both economical and delicious. The combination of honey's natural sweetness with mustard's sharp flavor creates a perfectly balanced sauce that coats the chicken beautifully.
This budget-friendly recipe requires minimal ingredients while delivering restaurant-quality results. The honey mustard sauce not only flavors the chicken but also helps keep the meat moist during cooking, ensuring a juicy final product that pairs well with various side dishes.
- 4 boneless, skinless chicken breasts
- 1/4 cup Dijon mustard
- 1/4 cup honey
- 2 tablespoons olive oil
- 1 teaspoon garlic powder
- 1 teaspoon salt
- 1/2 teaspoon black pepper
- 1 tablespoon apple cider vinegar
Pound the chicken breasts between plastic wrap to achieve even thickness, approximately 1/2 inch throughout. Season both sides with salt, pepper, and garlic powder. In a medium bowl, whisk together honey, Dijon mustard, and apple cider vinegar until well combined.
Heat olive oil in a large skillet over medium-high heat. Once hot, add the seasoned chicken breasts and cook for 5-6 minutes on the first side until golden brown. Flip the chicken and reduce heat to medium. Pour the honey mustard mixture over the chicken, ensuring each piece is well coated.
Continue cooking for another 5-7 minutes, occasionally spooning the sauce over the chicken, until the internal temperature reaches 165°F (74°C). Remove from heat and let the chicken rest for 5 minutes before serving. The sauce will have thickened slightly and created a glossy coating on the chicken.
For best results, avoid using cold chicken straight from the refrigerator – let it sit at room temperature for 30 minutes before cooking. If the honey mustard sauce becomes too thick while cooking, add a tablespoon of water to thin it out.
This dish can be stored in an airtight container in the refrigerator for up to 3 days, though the sauce may need to be reheated gently to restore its original consistency.
Basic Chicken Stir-Fry
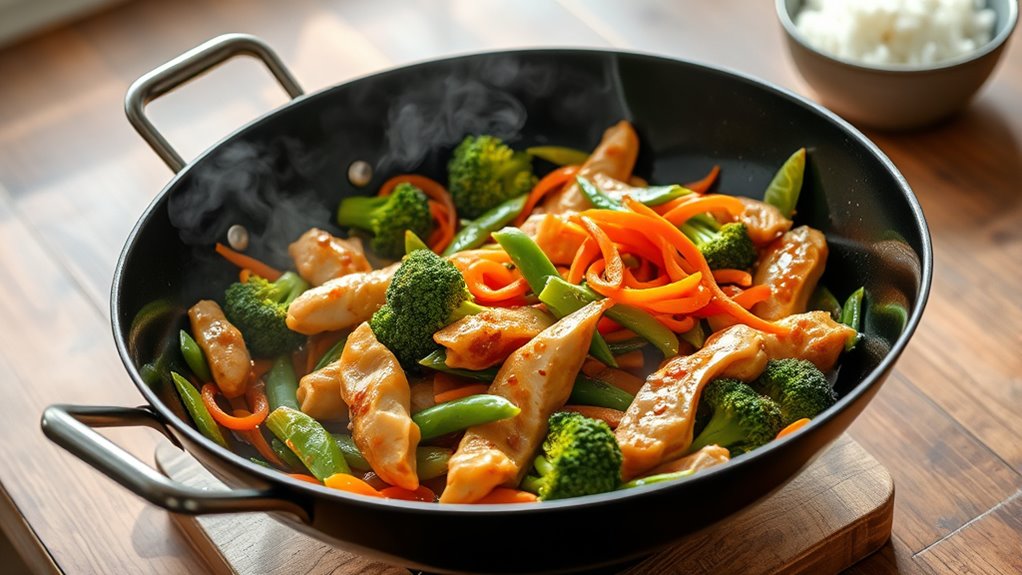
Stir-frying chicken breast offers a quick and economical way to create a satisfying meal while stretching your protein budget. When combined with fresh vegetables and simple seasonings, this versatile cooking method transforms basic ingredients into a flavorful dish that can be served over rice or noodles.
This recipe focuses on creating a basic stir-fry that can be customized based on available vegetables and pantry ingredients. The key lies in proper preparation and timing, ensuring the chicken remains tender while the vegetables maintain their crunch and vibrant colors.
- 2 chicken breasts, cut into thin strips
- 2 tablespoons vegetable oil
- 2 cups mixed vegetables (carrots, broccoli, snap peas)
- 2 cloves garlic, minced
- 1 tablespoon soy sauce
- 1 teaspoon cornstarch
- 1/4 cup water
- 1/2 teaspoon salt
- 1/4 teaspoon black pepper
- 2 cups cooked rice for serving
Begin by cutting the chicken breast into uniform, thin strips against the grain. This ensures quick, even cooking and tender results. Mix the cornstarch with water in a small bowl and set aside. Season the chicken strips with salt and pepper.
Heat oil in a large wok or skillet over medium-high heat until shimmering. Add the chicken strips in a single layer and cook for 3-4 minutes until golden brown, stirring occasionally. Remove the chicken from the pan and set aside.
Add the vegetables to the same pan, starting with harder vegetables like carrots first. Cook for 2-3 minutes, then add softer vegetables like broccoli and snap peas. Add minced garlic and stir-fry for another minute. Return the chicken to the pan, add soy sauce and the cornstarch mixture. Cook for 1-2 minutes until the sauce thickens and coats the ingredients evenly.
For best results, prepare all ingredients before heating the pan, as stir-frying moves quickly. Cut vegetables into similar-sized pieces to ensure even cooking. If using frozen vegetables, thaw and drain them thoroughly to prevent excess moisture in the dish.
The stir-fry can be stored in an airtight container for up to 2 days, though the vegetables may lose some crispness upon reheating.
Creamy Tomato Skillet Chicken
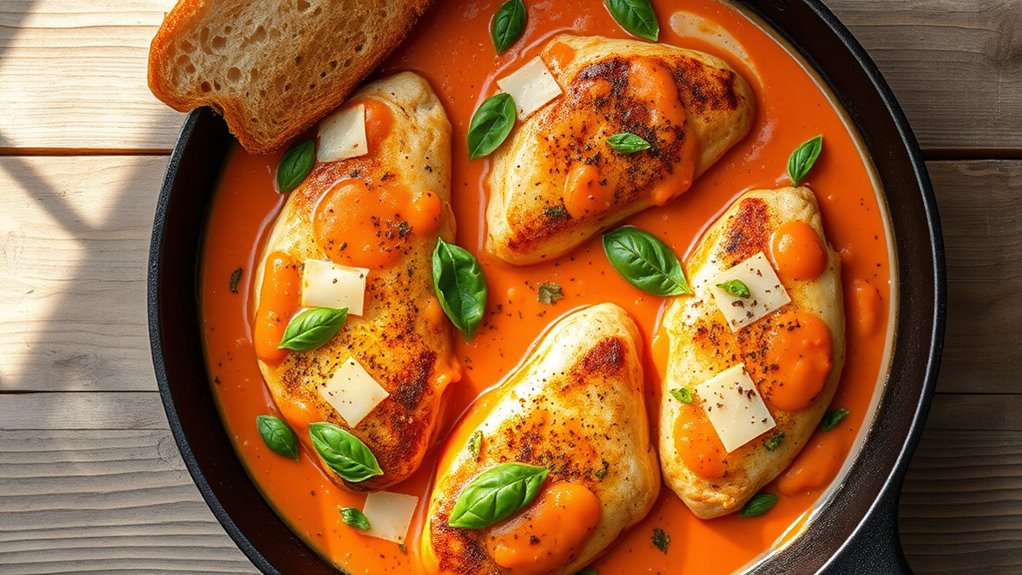
Creamy Tomato Skillet Chicken transforms everyday chicken breasts into a luxurious dinner while remaining budget-friendly. The combination of tangy tomatoes and rich cream creates a velvety sauce that pairs perfectly with pasta, rice, or crusty bread.
This one-pan meal delivers restaurant-quality results using simple pantry staples and basic cooking techniques. The sauce comes together quickly while the chicken cooks, making this an ideal weeknight dinner that's both economical and impressive.
- 4 boneless, skinless chicken breasts
- 2 tablespoons olive oil
- 1 tablespoon Italian seasoning
- 1 teaspoon salt
- 1/2 teaspoon black pepper
- 3 cloves garlic, minced
- 1 can (14 oz) diced tomatoes
- 1 cup heavy cream
- 1/2 cup chicken broth
- 1/2 cup grated Parmesan cheese
- Fresh basil for garnish
Season chicken breasts with Italian seasoning, salt, and pepper. Heat olive oil in a large skillet over medium-high heat. Cook chicken for 5-7 minutes on each side until golden brown. Remove chicken from the pan and set aside.
Reduce heat to medium and add minced garlic to the same skillet, cooking for 30 seconds until fragrant. Add diced tomatoes with their juices, chicken broth, and heavy cream. Stir to combine, scraping any browned bits from the bottom of the pan. Bring the sauce to a gentle simmer and cook for 5 minutes until it starts to thicken.
Return chicken to the pan and spoon sauce over the top. Cover and cook for an additional 5-7 minutes, or until chicken is cooked through and reaches an internal temperature of 165°F (74°C).
Remove from heat, stir in Parmesan cheese, and garnish with fresh basil before serving.
For best results, use room temperature chicken breasts and pat them dry before seasoning. If the sauce becomes too thick, thin it with additional chicken broth. The dish can be made ahead and reheated gently on the stovetop, though you may need to add a splash of cream to restore the sauce's consistency.
Leftovers will keep in an airtight container in the refrigerator for up to three days.
Easy Ranch Chicken Bake
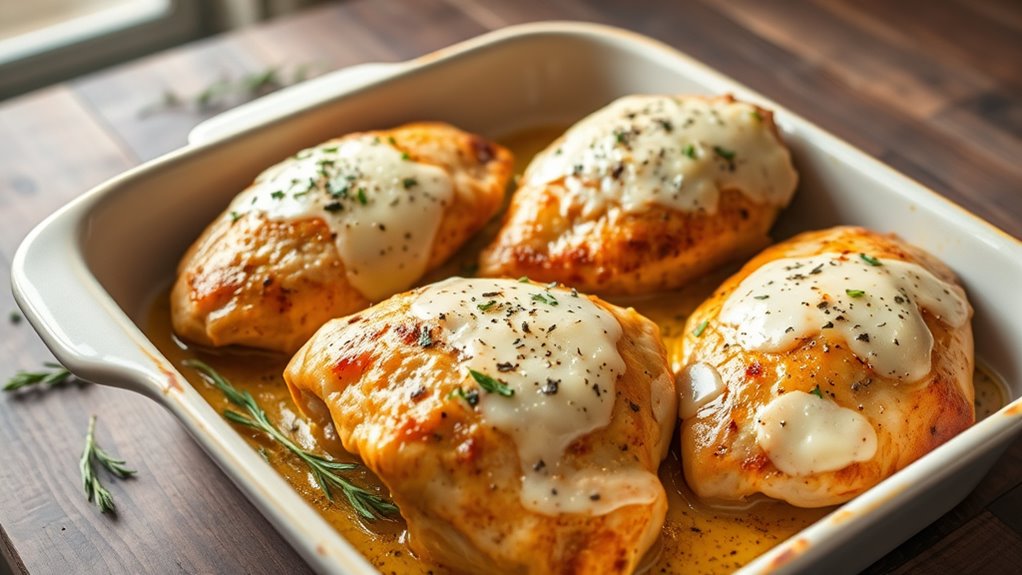
Easy Ranch Chicken Bake transforms simple chicken breasts into a creamy, flavorful dish that's perfect for budget-conscious home cooks. The combination of ranch seasoning and melted cheese creates a crowd-pleasing meal that requires minimal prep work while delivering maximum taste.
This baked chicken recipe offers a convenient way to prepare multiple servings at once, making it ideal for family dinners or meal prep. The ranch seasoning infuses the meat with classic herbs and spices, while the cheese forms a protective layer that helps keep the chicken moist throughout the cooking process.
- 4 boneless, skinless chicken breasts
- 1 packet ranch seasoning mix
- 2 tablespoons olive oil
- 1 cup shredded mozzarella cheese
- 1/2 cup grated parmesan cheese
- 1/2 teaspoon black pepper
- 1/4 teaspoon garlic powder
Preheat the oven to 375°F (190°C) and lightly grease a 9×13-inch baking dish. Place chicken breasts in the dish and drizzle with olive oil. Coat each breast evenly with ranch seasoning mix, black pepper, and garlic powder.
Bake the chicken uncovered for 25 minutes. Remove from oven and top each breast with an even mixture of mozzarella and parmesan cheese. Return to the oven and bake for an additional 10-15 minutes, or until the cheese is melted and golden brown, and the chicken reaches an internal temperature of 165°F (74°C).
Let the chicken rest for 5-10 minutes before serving to allow the juices to redistribute and the cheese to set slightly. This resting period ensures the chicken remains juicy when cut.
For best results, choose chicken breasts of similar size and thickness, or pound them to even thickness before cooking. The recipe can be prepared ahead of time by seasoning the chicken and storing it covered in the refrigerator for up to 24 hours before baking.
Leftover chicken can be stored in an airtight container in the refrigerator for up to 3 days.
Mediterranean Style Chicken
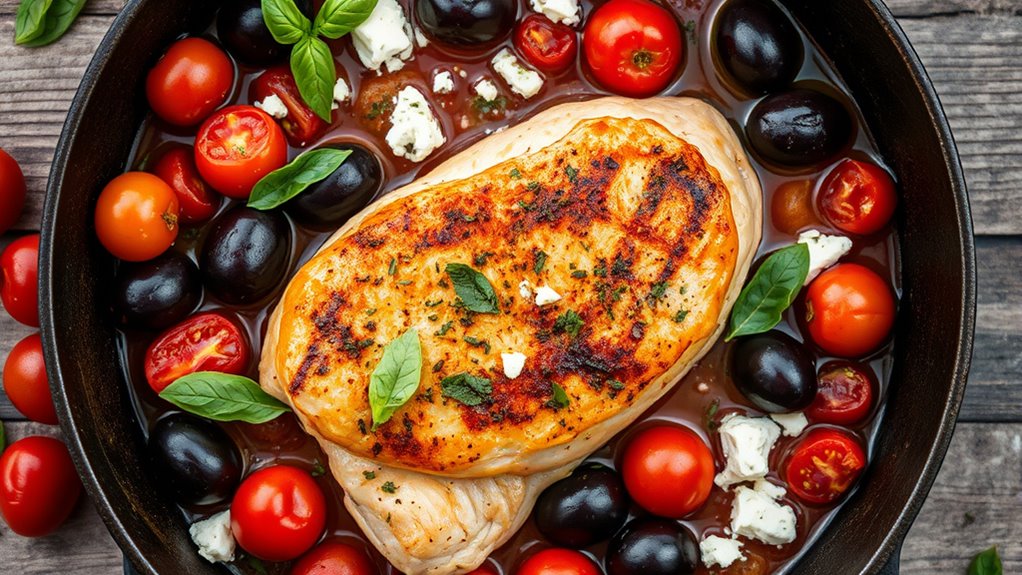
This vibrant and healthy Mediterranean-style chicken transforms basic pan-seared chicken breasts into a colorful, flavor-packed dish inspired by the coastal regions of the Mediterranean. The combination of olive oil, herbs, tomatoes, and olives creates a bright and aromatic meal that's both nutritious and budget-friendly.
The beauty of this recipe lies in its simplicity while delivering complex flavors. By building upon the basic pan-seared chicken technique, we add layers of Mediterranean ingredients that not only enhance the taste but also create a light sauce that keeps the chicken moist and tender.
- 4 boneless, skinless chicken breasts
- 3 tablespoons olive oil
- 2 teaspoons dried oregano
- 1 teaspoon garlic powder
- 1 teaspoon salt
- 1/2 teaspoon black pepper
- 1 pint cherry tomatoes
- 1/2 cup Kalamata olives, pitted
- 1/4 cup fresh basil leaves
- 2 cloves garlic, minced
- 1/2 lemon, juiced
- 1/4 cup crumbled feta cheese
Pound the chicken breasts between plastic wrap to achieve even thickness, approximately 1/2 inch. Season both sides with salt, pepper, garlic powder, and 1 teaspoon of dried oregano.
Heat 2 tablespoons of olive oil in a large skillet over medium-high heat and cook the chicken for 5-7 minutes on each side until golden brown and cooked through.
Remove the chicken from the pan and set aside.
In the same skillet, add the remaining olive oil and minced garlic, cooking until fragrant. Add cherry tomatoes and cook until they begin to burst, about 3-4 minutes.
Stir in olives, remaining oregano, and lemon juice. Return the chicken to the pan and spoon the tomato-olive mixture over the top.
Allow to simmer for 2-3 minutes to combine flavors.
Remove from heat and top with fresh basil and crumbled feta cheese before serving.
For the best results, use room temperature chicken breasts and high-quality olive oil, as these are key ingredients in Mediterranean cooking.
The dish can be made ahead and reheated gently, though the fresh basil and feta should be added just before serving. If Kalamata olives aren't available, any Mediterranean-style olive will work, and the feta cheese can be omitted for a dairy-free version while maintaining the dish's essential flavors.
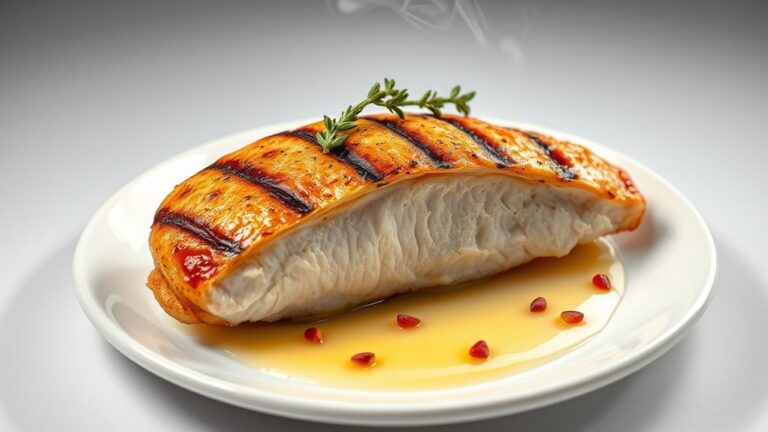
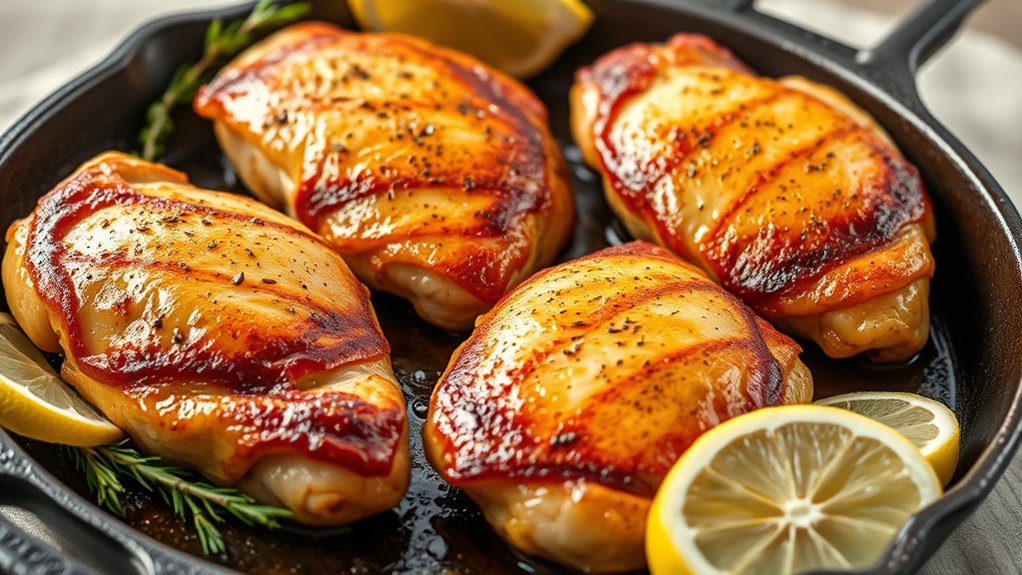
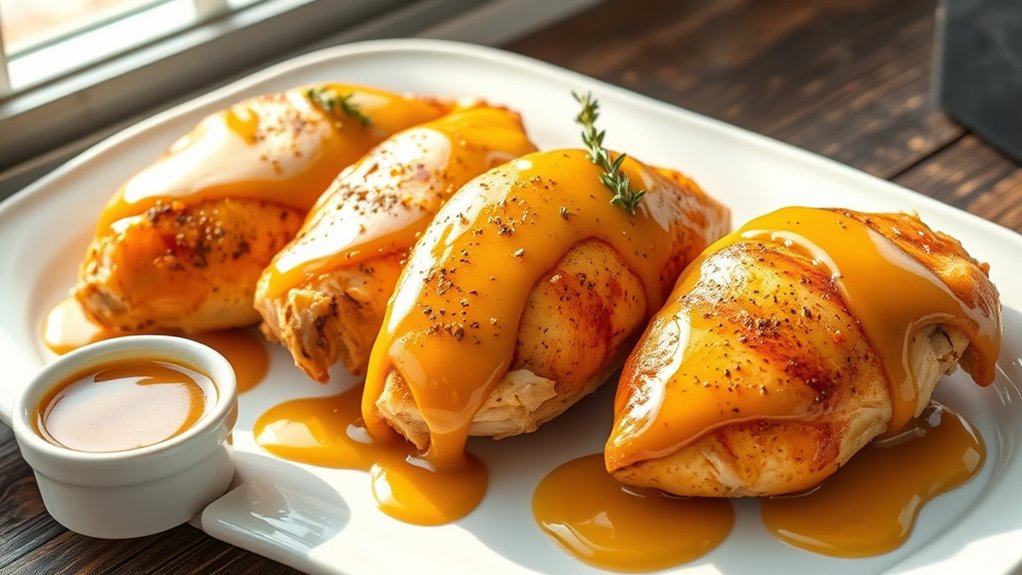
Classic BBQ Chicken Breast
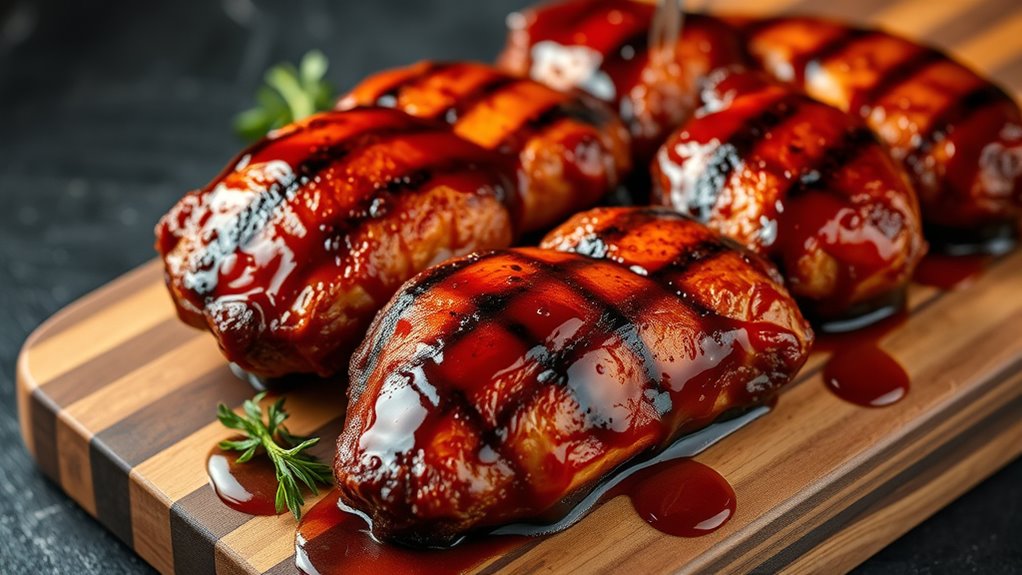
BBQ chicken breast combines the lean protein of chicken with the sweet, tangy flavors of barbecue sauce for a classic American dish that's both economical and satisfying. The key to perfect BBQ chicken breast lies in achieving tender, juicy meat while developing a caramelized glaze that doesn't burn.
This recipe uses a two-step cooking process that first ensures the chicken is properly cooked through before adding the BBQ sauce. This method prevents the sauce from burning while still allowing it to create a delicious glaze, resulting in chicken that's moist on the inside with a flavorful, sticky exterior.
- 4 boneless, skinless chicken breasts
- 1 cup barbecue sauce
- 2 tablespoons olive oil
- 1 teaspoon salt
- 1 teaspoon black pepper
- 1 teaspoon garlic powder
- 1 teaspoon paprika
Begin by pounding the chicken breasts to an even thickness of about 1/2 inch. This ensures uniform cooking throughout. Season both sides of each breast with salt, pepper, garlic powder, and paprika.
Allow the seasoned chicken to rest at room temperature for 15-20 minutes before cooking.
Heat olive oil in a large skillet over medium-high heat. Once hot, place the chicken breasts in the pan and cook for 5-6 minutes on each side until nearly cooked through.
Reduce heat to medium-low and brush each breast generously with barbecue sauce. Cook for an additional 2-3 minutes per side, brushing with more sauce as needed, until the chicken is fully cooked and the sauce has formed a sticky glaze.
Remove the chicken from the pan and let it rest for 5 minutes before serving. During this time, the internal temperature should reach 165°F (74°C), and the juices will redistribute throughout the meat.
Serve with additional warm barbecue sauce if desired. For best results, choose a high-quality barbecue sauce or make your own, as the sauce's flavor will significantly impact the final dish.
If cooking outdoors on a grill, keep the chicken away from direct flame once the sauce is applied to prevent burning. The chicken can be marinated in a portion of the barbecue sauce for up to 4 hours before cooking for enhanced flavor, though be sure to discard any marinade that has touched raw chicken.
Three-Spice Chicken Strips
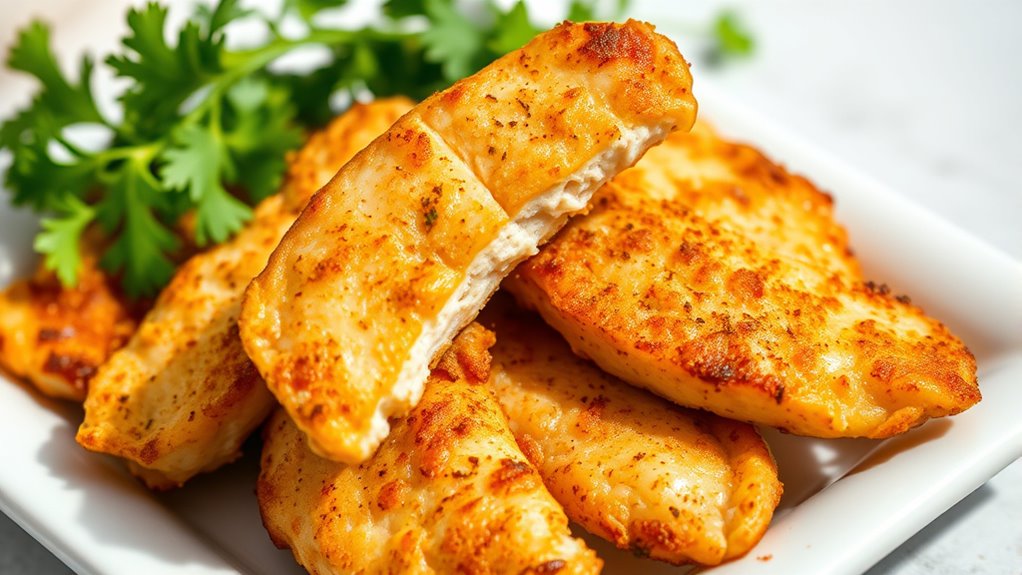
These budget-friendly chicken strips combine the simplicity of pan-seared chicken with a flavorful three-spice blend that transforms ordinary chicken breast into an exciting meal.
The strips cook quickly and evenly, making them perfect for busy weeknight dinners or meal prep.
The key to these chicken strips lies in cutting the breast meat into uniform pieces and seasoning them generously with a blend of common pantry spices. This approach ensures that each strip cooks evenly while developing a deliciously seasoned exterior that seals in moisture.
- 2 large chicken breasts (about 1 pound)
- 1 tablespoon paprika
- 1 tablespoon garlic powder
- 1 tablespoon onion powder
- 1 teaspoon salt
- 1/2 teaspoon black pepper
- 2 tablespoons vegetable oil
Slice the chicken breasts lengthwise into strips approximately 1-inch wide.
In a small bowl, combine paprika, garlic powder, onion powder, salt, and black pepper. Coat the chicken strips evenly with the spice mixture, pressing gently to help the seasonings adhere to the meat.
Heat vegetable oil in a large skillet over medium-high heat. Once the oil is hot but not smoking, place the chicken strips in the pan, being careful not to overcrowd.
Cook for 4-5 minutes on the first side until golden brown.
Turn the strips over and cook for an additional 3-4 minutes, or until the internal temperature reaches 165°F (74°C).
Remove from the pan and let rest for 3-5 minutes before serving.
For optimal results, avoid overcrowding the pan, as this will cause the chicken to steam rather than sear.
If necessary, cook the strips in batches.
The strips can be stored in an airtight container in the refrigerator for up to 3 days and can be reheated in a microwave or briefly in a skillet.
For extra tenderness, consider marinating the strips in buttermilk for 30 minutes before applying the spice mixture.
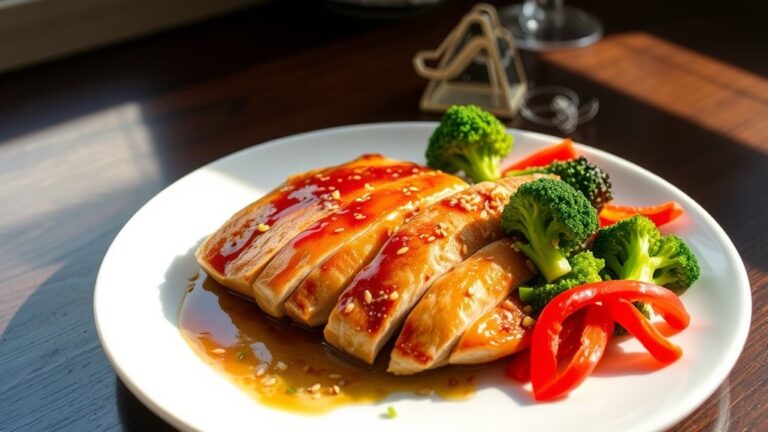
Quick Teriyaki Chicken
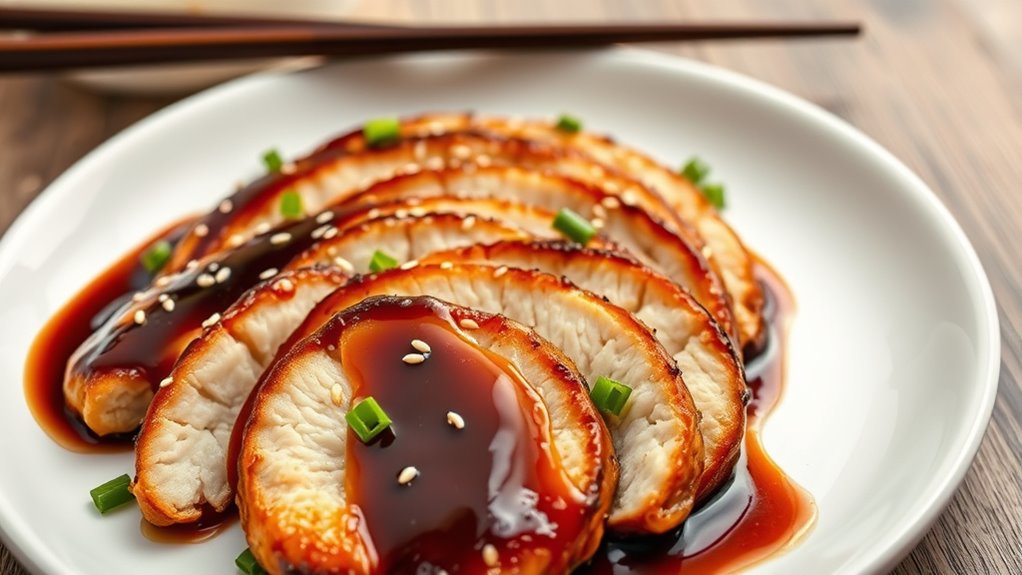
Teriyaki chicken transforms basic chicken breast into a sweet and savory Asian-inspired dish that's both economical and satisfying. The combination of soy sauce, brown sugar, and ginger creates that signature teriyaki flavor profile while keeping preparation time to a minimum.
This simplified version maintains the authentic taste of teriyaki while using readily available ingredients found in most grocery stores. The chicken is first pan-seared to develop a golden crust, then glazed with a homemade teriyaki sauce that thickens to create a glossy coating.
- 4 boneless, skinless chicken breasts
- 1/2 cup soy sauce
- 1/4 cup brown sugar
- 2 tablespoons rice vinegar
- 2 cloves garlic, minced
- 1 teaspoon grated fresh ginger
- 1 tablespoon cornstarch
- 1/4 cup water
- 2 tablespoons vegetable oil
- Sesame seeds for garnish (optional)
Place chicken breasts between plastic wrap and pound to even thickness, approximately 1/2 inch thick. Heat vegetable oil in a large skillet over medium-high heat.
Season chicken breasts lightly with salt and cook for 5-6 minutes on each side until golden brown and nearly cooked through.
While the chicken cooks, prepare the teriyaki sauce. In a bowl, combine soy sauce, brown sugar, rice vinegar, garlic, and ginger. In a separate small bowl, whisk cornstarch with water to create a slurry.
Add the slurry to the soy sauce mixture and stir well. Pour the teriyaki sauce over the chicken in the skillet. Reduce heat to medium-low and let simmer for 3-4 minutes, occasionally spooning the sauce over the chicken.
The sauce will thicken and create a glossy coating. Remove from heat when the chicken reaches an internal temperature of 165°F (74°C) and the sauce has reached desired consistency.
For best results, avoid overcrowding the pan when cooking the chicken, as this can prevent proper browning. The teriyaki sauce can be made ahead of time and stored in the refrigerator for up to a week.
If the sauce becomes too thick while cooking, thin it with a small amount of water. Serve the chicken sliced over rice and garnish with sesame seeds and chopped green onions if desired.
Garlic Parmesan Chicken

Garlic Parmesan Chicken transforms simple chicken breasts into a delicious, Italian-inspired dish that's both budget-friendly and impressive. The combination of fresh garlic, butter, and Parmesan cheese creates a rich, savory coating that keeps the chicken moist while adding layers of flavor.
This recipe takes the basic pan-seared chicken technique and elevates it with a garlic-Parmesan crust that melts and browns beautifully during cooking. The result is a restaurant-quality meal that can be prepared quickly using ingredients commonly found in most kitchens.
- 4 boneless, skinless chicken breasts
- 1/2 cup grated Parmesan cheese
- 4 cloves garlic, minced
- 2 tablespoons butter
- 2 tablespoons olive oil
- 1 teaspoon Italian seasoning
- 1 teaspoon salt
- 1/2 teaspoon black pepper
- 1/4 cup fresh parsley, chopped
Begin by placing the chicken breasts between two sheets of plastic wrap and pounding them to an even thickness of about 1/2 inch. In a shallow dish, combine the Parmesan cheese, minced garlic, Italian seasoning, salt, and pepper. Coat each chicken breast thoroughly in this mixture, pressing gently to help the coating adhere.
Heat the olive oil and butter in a large skillet over medium heat until the butter is melted and bubbling. Add the chicken breasts to the pan and cook for 5-6 minutes on each side, or until golden brown and the internal temperature reaches 165°F (74°C). The Parmesan coating should form a crispy, golden crust.
Once cooked, transfer the chicken to a plate and let it rest for 5 minutes. During this time, scrape any remaining garlic and cheese from the pan and spoon it over the chicken. Sprinkle with fresh parsley before serving.
For the best results, avoid using pre-grated Parmesan cheese, as freshly grated cheese will melt and brown better. If the garlic begins to brown too quickly, lower the heat slightly to prevent burning.
This dish pairs well with pasta, roasted vegetables, or a simple salad, and any leftovers can be stored in an airtight container in the refrigerator for up to 3 days.