15 Easy Family Dinner Recipes
You'll find that having a reliable collection of quick family dinner recipes can transform your weeknight routine from stressful to manageable. These 15 family-friendly meals combine the convenience you need with the flavors your family craves, all ready in 30 minutes or less. From one-pot wonders to sheet pan suppers, each recipe offers both flexibility and foolproof results. Let's start with a closer look at these time-saving dishes that'll make you feel like a kitchen pro.
One-Pot Creamy Chicken and Rice
One-Pot Creamy Chicken and Rice is a comforting and satisfying meal that combines tender chicken, fluffy rice, and a rich, creamy sauce. This classic combination has been a family favorite for generations, offering both convenience and delicious flavors in every bite.
This recipe simplifies the cooking process by using just one pot, reducing cleanup time and making it perfect for busy weeknight dinners. The dish takes about 30 minutes to prepare and cook, serving 4-6 people with wholesome, home-cooked goodness.
- 4 boneless, skinless chicken breasts
- 2 cups long-grain white rice
- 4 cups chicken broth
- 1 cup heavy cream
- 1 medium onion, diced
- 3 cloves garlic, minced
- 2 tablespoons butter
- 2 tablespoons olive oil
- 1 teaspoon dried thyme
- 1 teaspoon dried oregano
- 1 cup frozen peas
- Salt and pepper to taste
- 1/2 cup grated Parmesan cheese
Season chicken breasts with salt and pepper. Heat butter and olive oil in a large pot over medium-high heat. Cook chicken for 5-6 minutes per side until golden brown. Remove chicken and set aside. In the same pot, sauté onions until translucent, add garlic and cook for another minute. Add rice, stirring to coat with oil and butter.
Pour in chicken broth and cream, adding thyme and oregano. Return chicken to the pot, bring to a boil, then reduce heat to low. Cover and simmer for 18-20 minutes until rice is tender and chicken is cooked through. Remove chicken, slice it, then return to the pot. Stir in frozen peas and Parmesan cheese until heated through and creamy.
For best results, let the dish rest for 5-10 minutes before serving, allowing the sauce to thicken and flavors to meld. If the sauce becomes too thick, add a splash of warm chicken broth or cream. The recipe can be easily customized by adding different vegetables or adjusting the seasoning to taste.
Sheet Pan Italian Sausage and Vegetables
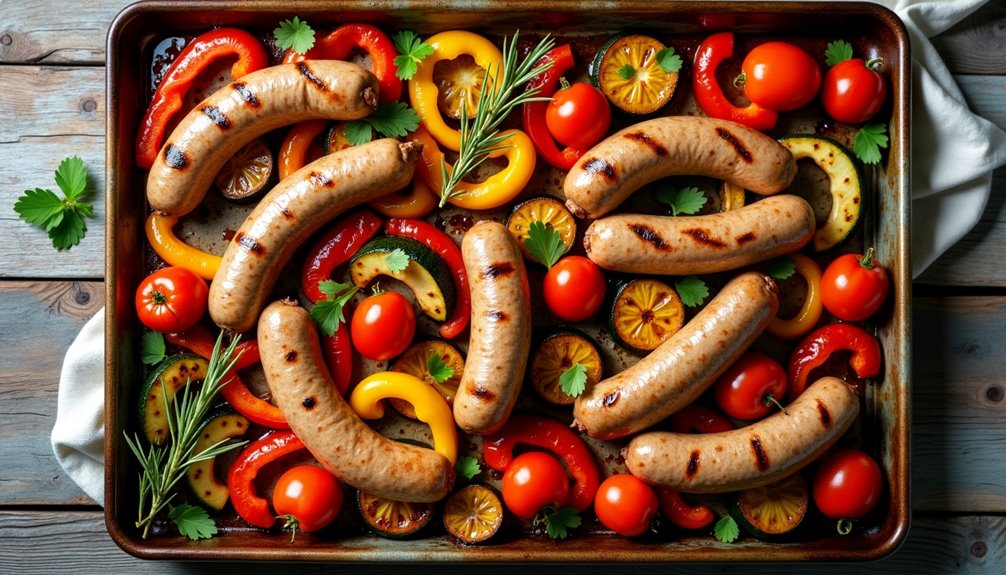
Sheet pan dinners have revolutionized weeknight cooking by combining proteins and vegetables in one easy-to-clean pan. This Italian sausage and vegetable combination delivers a perfect blend of savory flavors and colorful nutrition, making it an ideal choice for busy families seeking a balanced meal.
The beauty of this recipe lies in its versatility – you can swap vegetables based on what's in season or your family's preferences. The natural oils from the Italian sausage help season the vegetables as they roast, creating a delicious medley of flavors with minimal effort.
Ingredients:
- 1 pound Italian sausage links (sweet or spicy)
- 2 bell peppers, sliced
- 1 red onion, cut into wedges
- 2 medium zucchini, sliced
- 1 pint cherry tomatoes
- 3 tablespoons olive oil
- 4 cloves garlic, minced
- 1 tablespoon Italian seasoning
- 1 teaspoon salt
- 1/2 teaspoon black pepper
- 1/4 teaspoon red pepper flakes (optional)
Preheat the oven to 400°F (200°C). Cut the Italian sausage links into 2-inch pieces and arrange them on a large sheet pan. Toss all vegetables with olive oil, garlic, Italian seasoning, salt, and pepper in a large bowl. Spread the seasoned vegetables around the sausage pieces on the sheet pan, ensuring everything is in a single layer for even cooking.
Roast for 25-30 minutes, turning the sausage and stirring the vegetables halfway through cooking. The dish is done when the sausage is cooked through and the vegetables are tender with slightly charred edges. Let rest for 5 minutes before serving.
For best results, avoid overcrowding the pan as this can lead to steaming rather than roasting. If needed, use two sheet pans to ensure proper spacing. The vegetables can be prepped up to 24 hours in advance and stored in an airtight container in the refrigerator, making dinner assembly even quicker when needed.
30-Minute Ground Beef Tacos

Minute Ground Beef Tacos are a reliable weeknight dinner solution that combines seasoned ground beef with crispy taco shells and fresh toppings. This Mexican-inspired dish has become a staple in households across America, offering a perfect balance of flavors and textures that both children and adults enjoy.
The beauty of these tacos lies in their simplicity and quick preparation time. While traditional Mexican tacos often use different cuts of meat and preparation methods, this simplified version delivers satisfying results in about 15 minutes, making it an ideal choice for busy families or last-minute dinner plans.
Ingredients:
- 1 pound ground beef (80/20)
- 1 packet taco seasoning
- 12 hard taco shells
- 1 cup shredded lettuce
- 1 cup diced tomatoes
- 1 cup shredded cheddar cheese
- 1/2 cup diced onions
- 1/2 cup sour cream
- 1 lime
- Salt and pepper to taste
Brown the ground beef in a large skillet over medium-high heat, breaking it up with a wooden spoon until no pink remains, about 7-8 minutes. Drain excess fat if desired, then add the taco seasoning and 2/3 cup water. Reduce heat to medium-low and simmer for 3-4 minutes, stirring occasionally until the sauce thickens.
While the meat cooks, warm the taco shells in the oven at 350°F for 2-3 minutes. Prepare your toppings by shredding the lettuce, dicing the tomatoes and onions, and having the cheese and sour cream ready. Once the meat is done, assemble the tacos by adding the beef first, followed by the cold toppings in your preferred order.
For best results, avoid overfilling the taco shells as this can cause them to break. Store unused ingredients separately in airtight containers, and if you plan to have leftovers, keep the meat mixture separate from the shells and toppings. The meat can be reheated in the microwave or on the stovetop, and actually tastes better the next day as the flavors continue to develop.
Kid-Friendly Mac and Cheese With Hidden Veggies

This creamy, comforting mac and cheese recipe cleverly incorporates nutritious vegetables while maintaining the classic taste kids love. The secret lies in pureeing vegetables like butternut squash and carrots, which blend seamlessly into the cheese sauce while adding vitamins and minerals to this family favorite.
The recipe yields a generous portion that serves 6-8 people and can be prepared in under an hour. The combination of sharp cheddar and mild American cheese creates the perfect balance of flavor, while the pureed vegetables add a natural sweetness and create an even creamier texture.
- 16 oz elbow macaroni
- 2 cups butternut squash, cubed
- 2 medium carrots, chopped
- 3 cups sharp cheddar cheese, shredded
- 1 cup American cheese, chopped
- 2 cups whole milk
- 4 tablespoons butter
- 3 tablespoons all-purpose flour
- 1 teaspoon salt
- 1/2 teaspoon garlic powder
- 1/4 teaspoon black pepper
- 1/4 cup breadcrumbs (optional)
Start by cooking the macaroni according to package directions until al dente. While the pasta cooks, steam the butternut squash and carrots until very tender, about 10-12 minutes. Transfer the vegetables to a blender and puree with 1 cup of the milk until completely smooth.
In a large saucepan, melt the butter over medium heat and whisk in the flour to create a roux. Cook for 1 minute, then gradually whisk in the remaining milk and the vegetable puree. Continue cooking the sauce, stirring constantly, until it begins to thicken. Reduce heat to low and gradually stir in both cheeses until melted and smooth. Season with salt, garlic powder, and pepper. Combine the cheese sauce with the drained pasta, stirring well to coat evenly.
For a crispy top, transfer to a baking dish, sprinkle with breadcrumbs, and broil for 2-3 minutes until golden. For best results, avoid pre-shredded cheese as it contains anti-caking agents that can make the sauce grainy. The vegetable puree can be made ahead and stored in the refrigerator for up to 3 days, and the entire dish can be assembled in advance and reheated in the oven at 350°F for 20-25 minutes. If the sauce seems too thick when reheating, simply stir in a splash of warm milk to reach desired consistency.
Baked Ranch Chicken Tenders

Baked Ranch Chicken Tenders are a family-friendly alternative to traditional fried chicken strips. This healthier version maintains the crispy exterior and juicy interior that kids love, while incorporating the popular ranch seasoning that adds a burst of flavor to every bite.
This simple dish requires minimal prep time and basic pantry ingredients, making it perfect for busy weeknight dinners. The ranch seasoning can be store-bought or homemade, and the panko breadcrumb coating ensures a satisfying crunch without the need for deep frying.
Ingredients:
- 2 pounds chicken tenders
- 2 cups panko breadcrumbs
- 1 packet ranch seasoning mix
- 2 large eggs
- 1/4 cup milk
- 1/2 cup all-purpose flour
- 1/2 teaspoon salt
- 1/4 teaspoon black pepper
- Cooking spray
Preheat the oven to 400°F and line a baking sheet with parchment paper. Set up three shallow dishes: one with flour mixed with salt and pepper, another with beaten eggs and milk, and a third with panko breadcrumbs combined with ranch seasoning. Dip each chicken tender in flour, then egg mixture, and finally coat with the seasoned breadcrumbs. Place the coated tenders on the prepared baking sheet and spray lightly with cooking spray. Bake for 15-20 minutes, flipping halfway through, until golden brown and internal temperature reaches 165°F.
For best results, avoid overcrowding the baking sheet as this can prevent proper crisping. Let the chicken rest for 5 minutes before serving to help the coating adhere better. The tenders can be served immediately with additional ranch dressing, or stored in an airtight container in the refrigerator for up to 3 days. To reheat, place in a 350°F oven for 10 minutes to maintain crispiness.
Quick Veggie Stir-Fry With Noodles
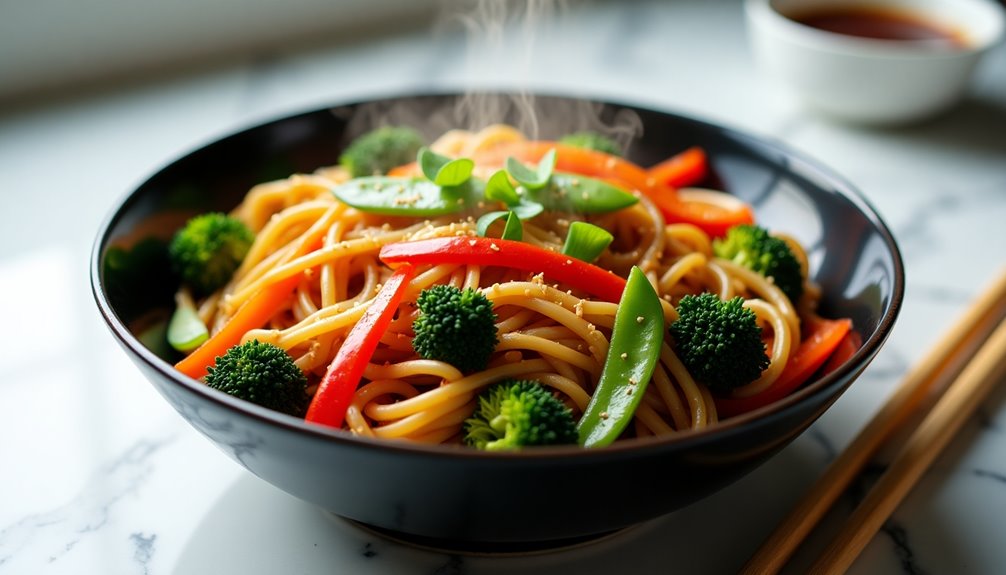
Quick Veggie Stir-Fry With Noodles is a versatile weeknight dinner that comes together in under 30 minutes. The combination of crisp vegetables and tender noodles, coated in a savory Asian-inspired sauce, creates a satisfying meal that both adults and children will enjoy.
This dish allows for endless customization based on available vegetables and personal preferences. The key to a successful stir-fry lies in preparing all ingredients before heating the wok or pan, as the cooking process moves quickly once started.
Ingredients:
- 8 oz rice noodles or lo mein noodles
- 2 carrots, julienned
- 1 red bell pepper, sliced
- 2 cups broccoli florets
- 1 cup snap peas
- 2 cloves garlic, minced
- 1 tbsp ginger, grated
- 3 tbsp soy sauce
- 1 tbsp sesame oil
- 2 tbsp vegetable oil
- 1 tbsp cornstarch
- ¼ cup water
- 2 green onions, chopped
Cook noodles according to package instructions until al dente. Meanwhile, heat vegetable oil in a large wok or skillet over high heat. Add garlic and ginger, stirring quickly for 30 seconds. Add carrots and broccoli, stir-frying for 2-3 minutes, then add bell pepper and snap peas. Continue cooking for another 2 minutes.
Mix cornstarch with water in a small bowl. Add cooked noodles to the vegetables, then pour in soy sauce, sesame oil, and cornstarch mixture. Toss everything together until the sauce thickens and coats the noodles and vegetables evenly. Garnish with green onions before serving.
For best results, cut all vegetables into similarly sized pieces to ensure even cooking. The stir-fry can be made spicier by adding red pepper flakes or sriracha sauce. Leftover stir-fry can be stored in an airtight container in the refrigerator for up to three days, though the noodles may become softer when reheated.
Simple Slow Cooker Pot Roast
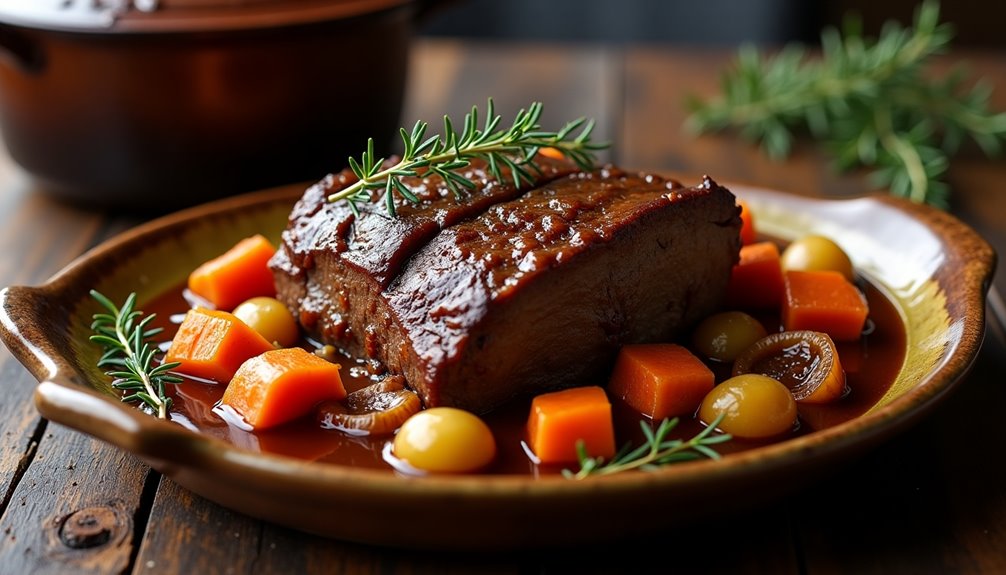
The beauty of this recipe lies in its simplicity. As the meat cooks low and slow, it develops deep, rich flavors while the vegetables absorb the savory juices. The result is a complete meal that practically cooks itself, perfect for busy weekdays or lazy weekends.
Ingredients:
- 3-4 lb chuck roast
- 2 lbs potatoes, quartered
- 4 large carrots, cut into chunks
- 2 onions, roughly chopped
- 4 garlic cloves, minced
- 2 cups beef broth
- 1 tablespoon Worcestershire sauce
- 2 tablespoons olive oil
- 1 teaspoon dried thyme
- 1 teaspoon dried rosemary
- Salt and pepper to taste
- 2 bay leaves
Season the chuck roast generously with salt and pepper. Heat olive oil in a large skillet over medium-high heat and sear the roast on all sides until browned. Transfer the meat to the slow cooker and add the vegetables around it. Mix the beef broth with Worcestershire sauce, herbs, and garlic, then pour over the meat and vegetables.
Cover and cook on low for 8-10 hours or on high for 5-6 hours, until the meat is tender enough to shred with a fork. Remove the bay leaves before serving. The liquid can be thickened into a gravy by transferring it to a saucepan and whisking in a cornstarch slurry (2 tablespoons cornstarch mixed with 1/4 cup cold water) over medium heat until desired consistency is reached.
For best results, choose a well-marbled chuck roast and avoid opening the slow cooker lid during cooking as this releases accumulated heat and moisture. The vegetables can be added later in the cooking process if you prefer them firmer, typically during the last 2-3 hours. Leftovers can be stored in an airtight container in the refrigerator for up to 4 days and often taste even better the next day.
Cheesy Pizza Casserole

Cheesy Pizza Casserole combines the beloved flavors of pizza with the comfort of a hearty casserole. This family-friendly dish transforms traditional pizza ingredients into a satisfying, layered meal that can feed a crowd and provides all the satisfaction of a regular pizza without the hassle of making dough.
Perfect for busy weeknights or casual gatherings, this casserole delivers the taste kids love while incorporating wholesome ingredients parents approve of. The beauty of this recipe lies in its versatility – you can customize the toppings and cheese combinations to suit your family's preferences, making it a reliable go-to meal that pleases everyone at the table.
- 1 pound rotini pasta
- 2 pounds ground beef
- 1 large onion, diced
- 3 cups marinara sauce
- 2 cups shredded mozzarella cheese
- 1 cup shredded cheddar cheese
- 1 package pepperoni slices
- 2 cloves garlic, minced
- 1 tablespoon Italian seasoning
- 1 teaspoon salt
- 1/2 teaspoon black pepper
- 2 tablespoons olive oil
Preheat the oven to 350°F and cook the rotini pasta according to package directions until al dente. While the pasta cooks, brown the ground beef with diced onion and garlic in a large skillet over medium heat, draining any excess fat. Mix the cooked pasta with the meat mixture, marinara sauce, and seasonings in a large bowl. Layer half the pasta mixture in a greased 9×13 baking dish, followed by half the cheeses and pepperoni. Repeat layers with remaining ingredients, ending with cheese and pepperoni on top.
Bake covered with foil for 25 minutes, then remove foil and bake for an additional 10-15 minutes until the cheese is golden and bubbly. Let stand for 5-10 minutes before serving.
For best results, avoid overcooking the pasta since it will continue to cook in the oven. The casserole can be assembled up to 24 hours in advance and refrigerated until ready to bake – just add an extra 10-15 minutes to the covered baking time if cooking from cold. For a crispier top, broil for 2-3 minutes at the end of cooking, watching carefully to prevent burning.
5-Ingredient Honey Garlic Meatballs

Honey Garlic Meatballs are a crowd-pleasing dinner option that combines sweet and savory flavors in every bite. These tender, juicy meatballs are glazed with a sticky sauce that perfectly balances the richness of garlic with the natural sweetness of honey.
This versatile dish can be served over rice, noodles, or even as an appetizer at parties. The recipe is simple enough for weeknight cooking but impressive enough for special occasions, making it an excellent addition to any family's meal rotation.
- 1 pound ground beef
- 1/2 cup breadcrumbs
- 1 egg
- 1/4 cup milk
- 1/3 cup honey
- 4 cloves garlic, minced
- 1/4 cup soy sauce
- 1/2 teaspoon black pepper
- 1/2 teaspoon salt
- 2 tablespoons olive oil
- 1/4 cup water
- 1 tablespoon cornstarch
Mix ground beef, breadcrumbs, egg, milk, salt, and pepper in a large bowl until well combined. Form the mixture into 1-inch meatballs. Heat olive oil in a large skillet over medium heat and cook the meatballs until browned on all sides and cooked through, about 8-10 minutes. Remove meatballs and set aside.
In the same skillet, combine honey, minced garlic, and soy sauce. In a separate small bowl, whisk cornstarch with water to create a slurry. Add the slurry to the skillet and simmer until the sauce thickens, about 2-3 minutes. Return the meatballs to the skillet and coat them evenly with the sauce, cooking for an additional 2-3 minutes until everything is heated through.
For best results, avoid overworking the meat mixture when forming the meatballs, as this can make them tough. The meatballs can be made ahead and frozen raw or cooked, making this recipe perfect for meal prep. If the sauce becomes too thick, simply add a splash of water to reach desired consistency.
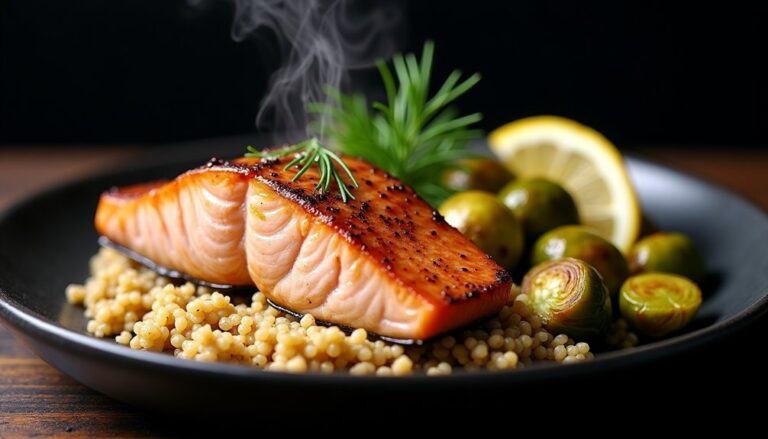
Easy Baked Fish and Chips

Baked fish and chips is a healthier take on the classic British comfort food, offering all the crispy satisfaction without the deep frying. This family-friendly version uses the oven to achieve that perfect golden crunch on both the fish and potatoes, while keeping the preparation simple and mess-free.
This recipe serves 4 people and takes about 45 minutes from start to finish. The key to success lies in timing both components to finish cooking simultaneously, ensuring everything reaches the table hot and crispy.
- 4 large russet potatoes
- 4 cod or haddock fillets (6 oz each)
- 2 cups panko breadcrumbs
- 2 large eggs
- 1 cup all-purpose flour
- 3 tablespoons olive oil
- 1 teaspoon garlic powder
- 1 teaspoon paprika
- 1 teaspoon salt
- 1/2 teaspoon black pepper
- 1 lemon, cut into wedges
- Fresh parsley for garnish
Preheat the oven to 425°F (220°C). Cut the potatoes into even wedges, toss with olive oil, garlic powder, salt, and pepper, then arrange on a baking sheet in a single layer. Bake for 20 minutes, flip, and continue cooking for another 15-20 minutes until golden and crispy.
While the potatoes are cooking, prepare the fish. Set up three shallow dishes: one with flour seasoned with salt and pepper, one with beaten eggs, and one with panko breadcrumbs mixed with paprika. Dip each fillet in flour, then egg, and finally coat with breadcrumbs. Place on a lined baking sheet and spray or drizzle with olive oil. When the potatoes have 15 minutes left, add the fish to the oven and bake until golden and cooked through, about 12-15 minutes.
For best results, avoid overcrowding the baking sheets as this prevents proper crisping. The fish is done when it flakes easily with a fork and reaches an internal temperature of 145°F (63°C). Let the fish rest for 2-3 minutes before serving to help the coating stay intact. Serve immediately with lemon wedges, tartar sauce, and malt vinegar if desired.
Skillet Cheeseburger Helper

Skillet Cheeseburger Helper is a nostalgic comfort food that brings back memories of quick family dinners, but this homemade version elevates the classic boxed meal with fresh ingredients and rich flavors. This one-pan wonder combines seasoned ground beef, tender pasta, and a creamy cheese sauce into a satisfying meal that both kids and adults will love.
Perfect for busy weeknights, this recipe comes together in about 30 minutes and uses pantry staples you likely already have on hand. The beauty of this dish lies in its simplicity and adaptability – you can easily adjust the seasonings and cheese types to suit your family's preferences.
- 1 pound ground beef
- 1 medium onion, diced
- 2 cloves garlic, minced
- 2 cups elbow macaroni, uncooked
- 2 cups beef broth
- 1 can (14.5 oz) diced tomatoes
- 1 tablespoon tomato paste
- 1 teaspoon paprika
- 1 teaspoon mustard powder
- 2 cups shredded cheddar cheese
- 1/2 cup milk
- Salt and pepper to taste
- 2 tablespoons olive oil
Brown the ground beef in a large skillet over medium-high heat, breaking it into small pieces. Add diced onion and garlic, cooking until the onion becomes translucent. Drain excess fat if desired. Add the uncooked macaroni, beef broth, diced tomatoes, tomato paste, and seasonings to the skillet. Bring to a boil, then reduce heat and simmer covered for 12-15 minutes, stirring occasionally until the pasta is tender and most of the liquid is absorbed.
Remove from heat and stir in the milk and shredded cheese until melted and creamy. Let stand for 5 minutes to allow the sauce to thicken before serving.
For best results, use a large, heavy-bottomed skillet or Dutch oven to ensure even heating and prevent sticking. The pasta will continue to absorb liquid as it sits, so if reheating leftovers, add a splash of milk to restore the creamy consistency. For a more complex flavor profile, try using a combination of different cheeses, such as sharp cheddar and monterey jack.
BBQ Pulled Pork Sandwiches
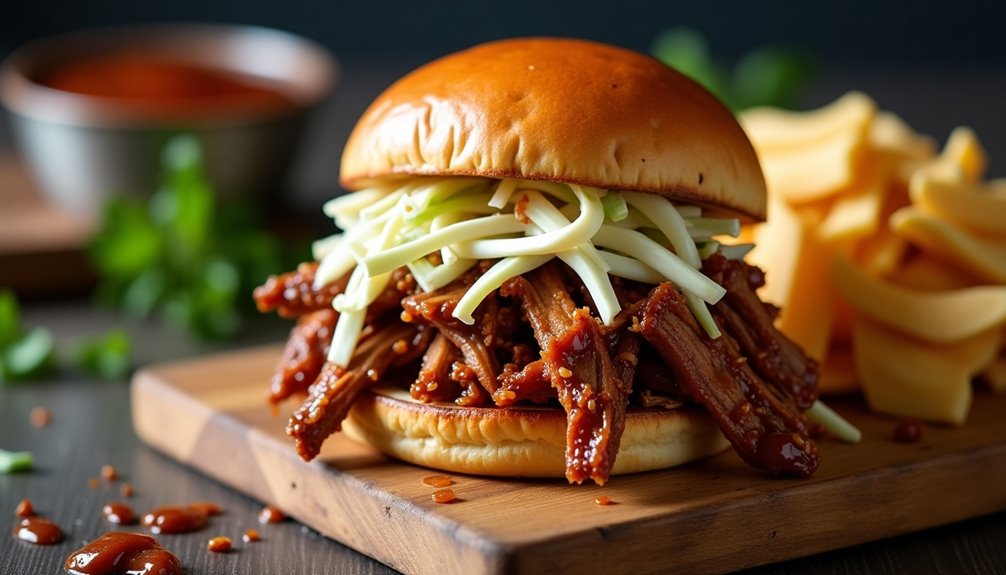
BBQ Pulled Pork Sandwiches are a classic comfort food that brings the whole family together. The tender, juicy meat combined with tangy barbecue sauce creates an irresistible combination that's perfect for casual dinners or weekend gatherings.
This recipe takes several hours to cook, but most of that time is hands-off as the pork slowly transforms in your slow cooker. The result is fall-apart tender meat that shreds effortlessly and soaks up all the delicious flavors of the seasonings and sauce.
- 4-5 lb pork shoulder (Boston butt)
- 2 tablespoons brown sugar
- 2 tablespoons paprika
- 1 tablespoon garlic powder
- 1 tablespoon onion powder
- 1 tablespoon black pepper
- 2 teaspoons salt
- 1 cup chicken broth
- 1½ cups BBQ sauce
- 12 hamburger buns
- Optional: coleslaw for topping
Mix the dry seasonings (brown sugar, paprika, garlic powder, onion powder, black pepper, and salt) and rub thoroughly all over the pork shoulder. Place the seasoned meat in a slow cooker and add chicken broth. Cook on low for 8-10 hours or on high for 5-6 hours, until the meat is tender enough to shred easily with a fork. Once done, remove the pork from the slow cooker and shred it using two forks, discarding any excess fat.
Drain most of the cooking liquid from the slow cooker, leaving about ¼ cup. Return the shredded pork to the slow cooker and stir in the BBQ sauce. Cook on low for an additional 30 minutes to allow the meat to absorb the sauce. Serve the pulled pork on hamburger buns, topped with additional BBQ sauce and coleslaw if desired.
For best results, choose a pork shoulder with good marbling, as the fat content helps keep the meat moist during the long cooking process. The BBQ sauce can be adjusted to taste, and leftovers can be stored in an airtight container in the refrigerator for up to 5 days or frozen for up to 3 months. To reheat, simply warm in a covered dish in the microwave or on the stovetop with a splash of water or additional BBQ sauce to maintain moisture.
Turkey and Sweet Potato Shepherd's Pie
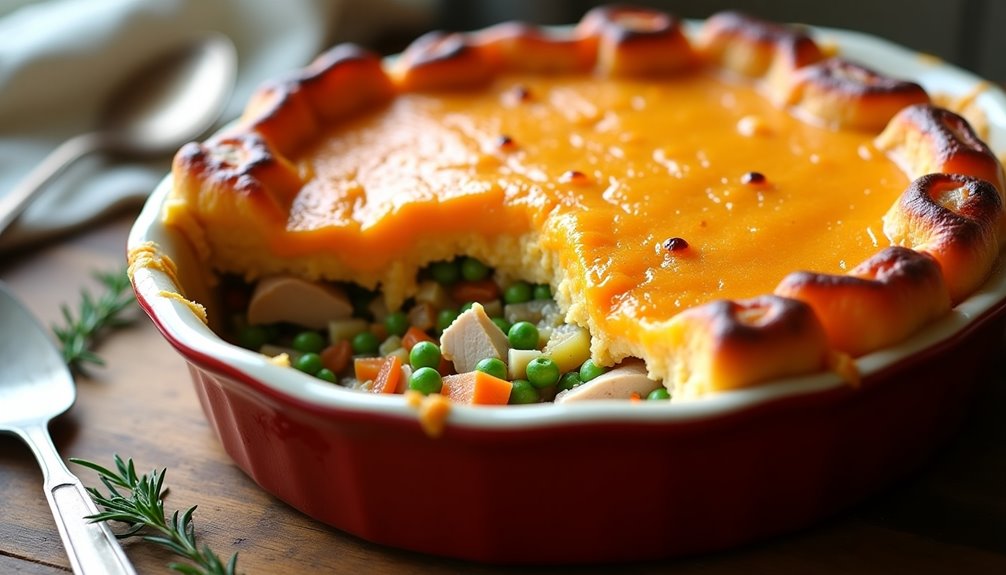
Turkey and Sweet Potato Shepherd's Pie transforms the classic comfort food into a healthier version by substituting ground turkey for traditional lamb or beef, and sweet potatoes for regular mashed potatoes. This protein-rich, nutrient-dense meal delivers the perfect balance of lean meat, vegetables, and complex carbohydrates.
The combination of sweet and savory flavors makes this dish particularly appealing to children while sneaking in extra vegetables and nutrients. The sweet potato topping provides beta-carotene and fiber, while the turkey filling offers lean protein with less saturated fat than red meat versions.
Ingredients:
- 2 lbs ground turkey
- 3 large sweet potatoes, peeled and cubed
- 1 onion, diced
- 2 carrots, diced
- 2 celery stalks, diced
- 2 garlic cloves, minced
- 1 cup frozen peas
- 1 cup chicken broth
- 2 tablespoons tomato paste
- 1 tablespoon Worcestershire sauce
- 1 teaspoon dried thyme
- 1/2 cup milk
- 3 tablespoons butter
- Salt and pepper to taste
- 1 tablespoon olive oil
Start by boiling the sweet potatoes until tender, about 15 minutes. While they cook, brown the ground turkey in a large skillet with olive oil. Remove the turkey and in the same pan, sauté onions, carrots, celery, and garlic until softened. Return the turkey to the pan, add the peas, broth, tomato paste, Worcestershire sauce, and thyme. Simmer until the liquid reduces.
Mash the sweet potatoes with milk, butter, salt, and pepper until smooth. Transfer the turkey mixture to a baking dish, top with the mashed sweet potatoes, and bake at 375°F for 25-30 minutes until the top is lightly browned and the edges are bubbling.
For best results, let the shepherd's pie rest for 10-15 minutes before serving to allow the filling to set. The dish can be assembled up to 24 hours in advance and refrigerated before baking, and leftovers freeze well for up to three months. If the sweet potato topping appears too wet, adding a beaten egg to the mash before baking will help it set better and create a more golden crust.
15-Minute Tortellini Soup
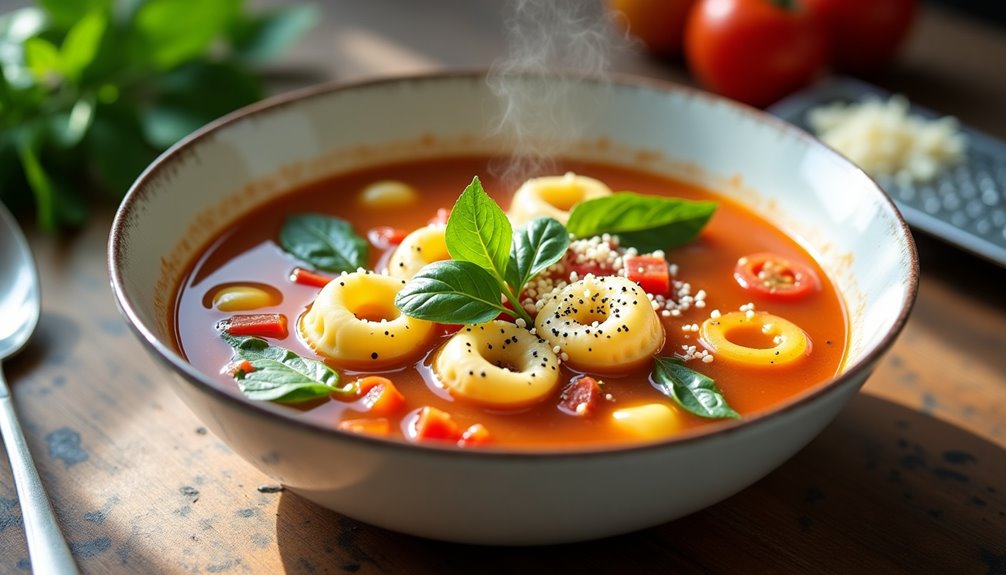
Minute Tortellini Soup is a quick and satisfying meal that combines the richness of Italian-style tortellini with a flavorful broth and vegetables. This hearty soup can be prepared in under 30 minutes, making it perfect for busy weeknights when you need to get dinner on the table quickly.
The beauty of this recipe lies in its versatility and convenience. Store-bought cheese tortellini serves as the foundation, while the combination of broth, vegetables, and seasonings creates a warming soup that tastes like it's been simmering for hours. Whether you're feeding a family or looking for leftovers, this recipe easily scales up or down.
- 1 package (20 oz) refrigerated cheese tortellini
- 8 cups chicken broth
- 2 cups fresh spinach
- 1 can (14.5 oz) diced tomatoes
- 1 medium onion, diced
- 3 cloves garlic, minced
- 2 tablespoons olive oil
- 1 teaspoon Italian seasoning
- 1/2 teaspoon black pepper
- 1/4 teaspoon red pepper flakes
- Salt to taste
- Grated Parmesan cheese for serving
Heat olive oil in a large pot over medium heat. Add diced onions and cook until translucent, about 5 minutes. Add minced garlic and cook for another minute. Pour in the chicken broth and diced tomatoes, bringing the mixture to a boil. Add Italian seasoning, black pepper, and red pepper flakes.
Once boiling, add the tortellini and cook according to package instructions, usually 7-9 minutes. In the last 2 minutes of cooking, add the fresh spinach and stir until wilted. Taste and adjust seasonings as needed.
For best results, avoid overcooking the tortellini as they can become mushy. If planning to have leftovers, consider cooking and storing the tortellini separately from the broth, combining them only when ready to serve. The soup can be stored in an airtight container in the refrigerator for up to 3 days.
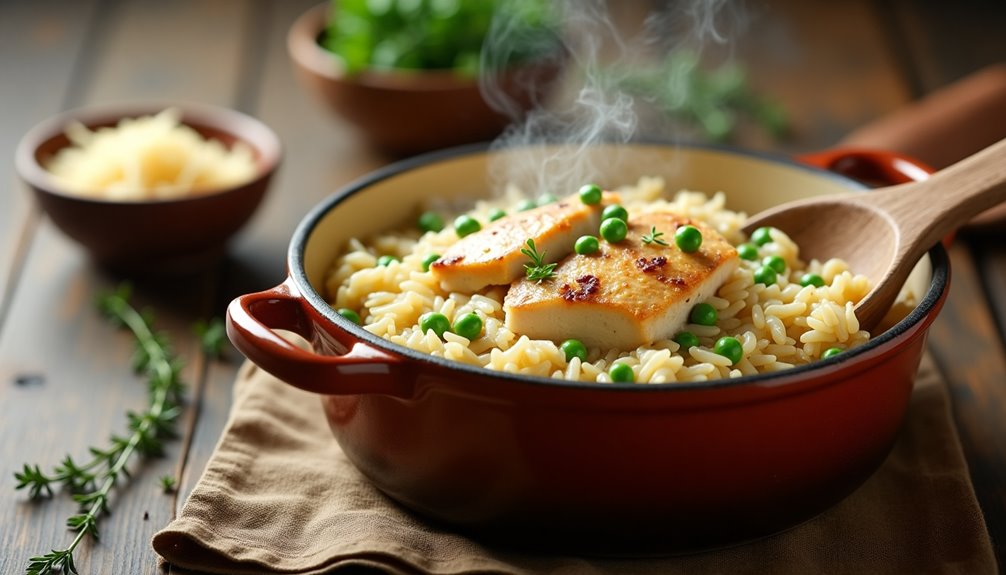
Crispy Parmesan Chicken Tenders

Crispy Parmesan chicken tenders are a family-friendly meal that transforms ordinary chicken into a crunchy, flavorful dish. The combination of seasoned breadcrumbs and grated Parmesan cheese creates a satisfying coating that both children and adults will love.
This recipe takes less than 30 minutes to prepare and cook, making it perfect for busy weeknight dinners. The tenders can be served with various sides like roasted vegetables, mashed potatoes, or a fresh salad, and they're equally delicious when paired with dipping sauces such as ranch, honey mustard, or marinara.
- 1.5 pounds chicken tenderloins
- 1 cup Italian-seasoned breadcrumbs
- 1/2 cup grated Parmesan cheese
- 1 teaspoon garlic powder
- 1/2 teaspoon black pepper
- 1/2 teaspoon salt
- 2 large eggs
- 2 tablespoons milk
- 3 tablespoons olive oil
Preheat the oven to 400°F (200°C). In a shallow dish, combine breadcrumbs, Parmesan cheese, garlic powder, pepper, and salt. In a separate bowl, whisk together eggs and milk. Dip each chicken tender in the egg mixture, then coat thoroughly in the breadcrumb mixture, pressing gently to ensure the coating adheres.
Heat olive oil in a large oven-safe skillet over medium-high heat. Place the coated tenders in the hot oil and cook for 2-3 minutes on each side until golden brown. Transfer the skillet to the preheated oven and bake for 8-10 minutes, or until the chicken is cooked through and registers 165°F (74°C) on a meat thermometer.
For best results, avoid overcrowding the pan when frying the tenders, as this can prevent proper browning. Let the cooked tenders rest on a paper towel-lined plate for a few minutes before serving to maintain maximum crispiness. If preparing for a larger group, you can keep the first batch warm in a low-temperature oven while cooking the remaining tenders.