8 Easy Healthy Dessert Recipes
You're about to discover eight dessert recipes that'll transform how you think about healthy treats. These kitchen-tested favorites combine wholesome ingredients like protein powder, fresh fruit, and natural sweeteners to create indulgences you can feel good about enjoying. From no-bake brownies to creamy frozen yogurt, each recipe takes less than 30 minutes to prepare and requires minimal cooking skills. Let's explore how these nutritious alternatives can satisfy your sweet tooth while supporting your wellness goals.
No-Bake Protein Brownies
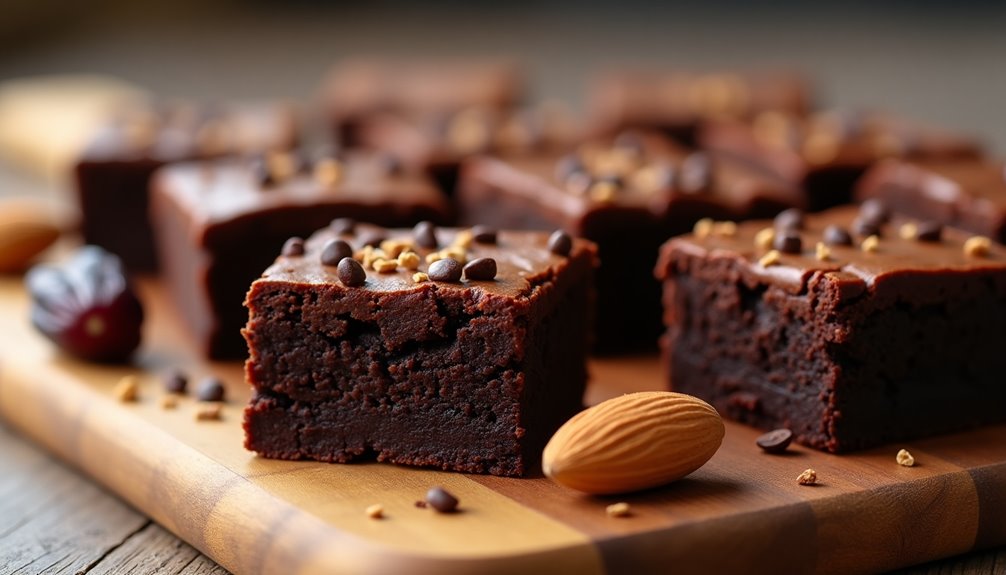
No-bake protein brownies are a perfect solution for health-conscious dessert lovers who want to indulge without compromising their nutritional goals. These brownies are packed with protein, healthy fats, and natural sweeteners, making them an excellent post-workout treat or guilt-free snack.
The beauty of these no-bake brownies lies in their simplicity and versatility. They can be customized with different protein powders, nuts, or toppings to suit individual preferences, while maintaining their fudgy texture and rich chocolate flavor that rivals traditional brownies.
Line a 8×8-inch pan with parchment paper. In a food processor, blend almonds until finely ground. Add dates and process until well combined. Add protein powder, cocoa powder, almond butter, coconut oil, and salt. Process until the mixture forms a dough-like consistency, adding water as needed.
Press the mixture firmly into the lined pan, ensuring an even surface. If desired, sprinkle chocolate chips on top and gently press them into the surface. Refrigerate for at least 2 hours or until firm.
Store these protein brownies in an airtight container in the refrigerator to maintain their texture. The brownies can become slightly soft at room temperature due to the coconut oil content, so it's best to serve them chilled. They can be stored for up to two weeks in the refrigerator or frozen for up to three months.
3-Ingredient Banana Ice Cream
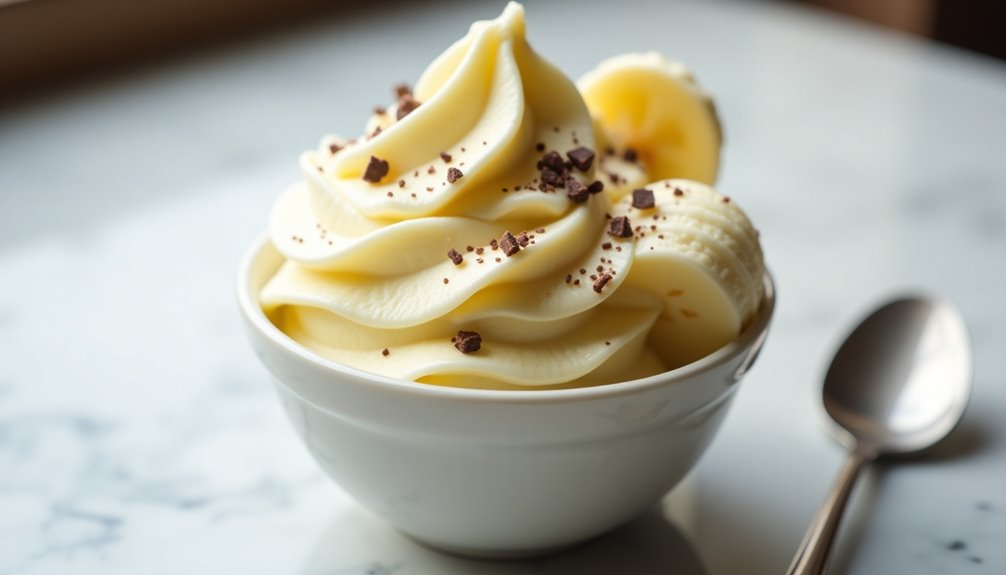
Banana ice cream, often called "nice cream," is a dairy-free alternative that transforms frozen bananas into a creamy, smooth dessert. This simple yet satisfying treat provides the same indulgent experience as traditional ice cream while being naturally sweet and nutritious.
This versatile dessert can be customized with various mix-ins and toppings, making it perfect for those following vegan, dairy-free, or health-conscious diets. The natural sweetness of ripe bananas eliminates the need for added sugars, while their creamy texture creates the perfect ice cream base.
Ingredients:
- 4 ripe bananas, peeled and frozen
- 1/4 cup plant-based milk (optional)
- 1/2 teaspoon vanilla extract (optional)
- Pinch of salt
Slice ripe bananas into coins and freeze them for at least 6 hours or overnight. Once frozen, place the banana pieces in a food processor or high-powered blender. Pulse until the bananas break down into smaller chunks. Continue processing, scraping down the sides as needed, until the mixture becomes smooth and creamy. Add a splash of plant-based milk if needed to achieve desired consistency. For additional flavor, blend in vanilla extract and a pinch of salt.
Transfer the mixture to a freezer-safe container and freeze for 1-2 hours to firm up, or serve immediately for a soft-serve consistency. If frozen solid, let sit at room temperature for 5-10 minutes before scooping.
For best results, use bananas that are ripe with brown spots on the peel, as they'll provide the sweetest flavor. Store leftover banana ice cream in an airtight container in the freezer for up to one month. To prevent ice crystals from forming, place plastic wrap directly on the surface of the ice cream before securing the container lid.
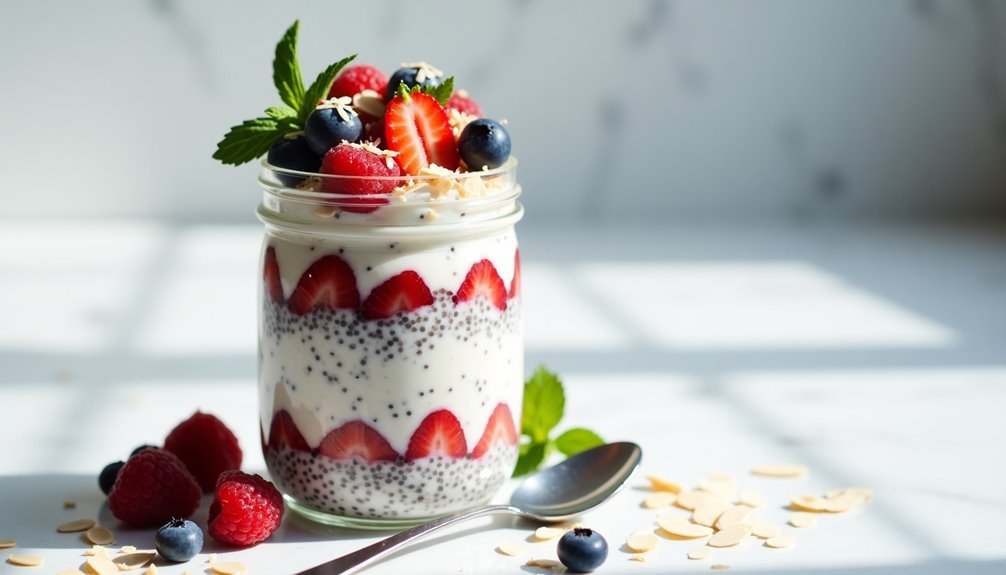
Greek Yogurt Berry Parfait

A Greek yogurt berry parfait combines the creamy richness of yogurt with fresh, vibrant berries to create a nutritious dessert that's both satisfying and guilt-free. This layered treat delivers protein from the yogurt, antioxidants from the berries, and a delightful crunch from granola, making it a well-balanced option for health-conscious individuals.
This versatile dessert can be customized to suit different dietary preferences and seasonal fruit availability. While traditional parfaits often use sweetened yogurt and candied toppings, this healthier version relies on natural sweetness from fresh fruit and honey, allowing you to control the sugar content while maintaining the dessert's indulgent appeal.
Ingredients:
- 2 cups plain Greek yogurt
- 2 cups mixed berries (strawberries, blueberries, raspberries)
- 1 cup low-fat granola
- 2 tablespoons honey
- 1/2 teaspoon vanilla extract
- Fresh mint leaves for garnish (optional)
Begin by washing and preparing the berries – slice larger strawberries into bite-sized pieces while leaving smaller berries whole. In a separate bowl, combine the Greek yogurt with honey and vanilla extract, stirring until well blended.
To assemble the parfait, start with a layer of the honey-vanilla yogurt mixture at the bottom of a clear glass or jar. Add a layer of mixed berries, followed by a sprinkle of granola. Repeat these layers until you reach the top of the container, finishing with a final garnish of berries and a light sprinkle of granola.
For best results, serve the parfait immediately after assembly to maintain the granola's crunchiness. If preparing in advance, store the components separately and layer just before serving. The parfait can be made up to 2 hours ahead if kept refrigerated, though the granola may soften slightly over time.
Baked Cinnamon Apple Crisps
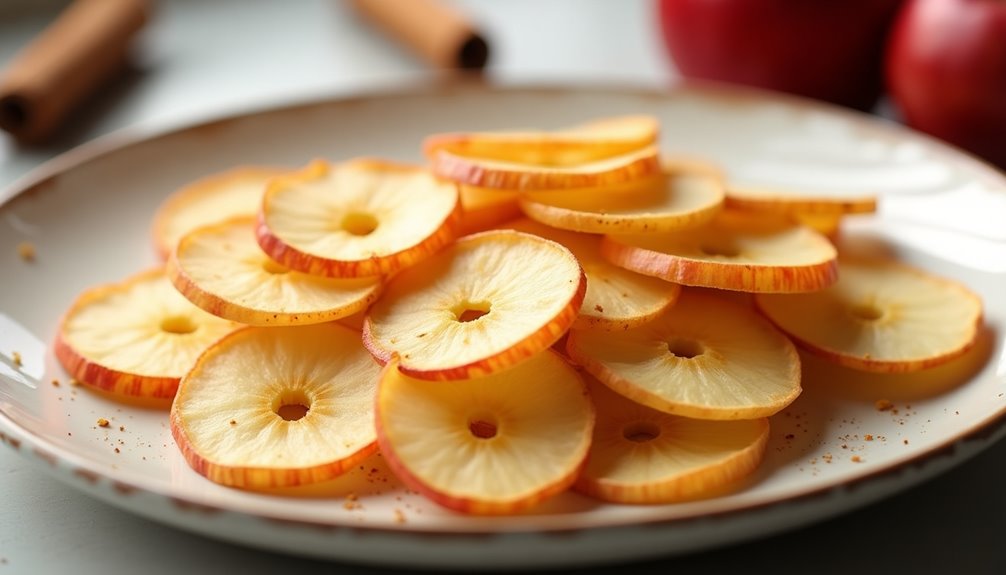
Baked Cinnamon Apple Crisps are a wholesome alternative to traditional potato chips, offering a sweet and satisfying crunch without the guilt. These delicate, wafer-thin slices transform ordinary apples into crispy treats that deliver natural sweetness and warming cinnamon flavor.
Perfect for both snacking and garnishing other desserts, these apple crisps require minimal ingredients and mainly just patience during the slow baking process. The low-temperature dehydration concentrates the apple's natural sugars while creating that sought-after crispy texture that makes them so addictive.
Preheat the oven to 200°F (95°C). Wash and core the apples, then use a mandolin or very sharp knife to slice them as thinly as possible (approximately 1/8 inch thick). Arrange the slices in a single layer on baking sheets lined with parchment paper or lightly coated with cooking spray, ensuring no overlap. Combine cinnamon and salt in a small bowl, then sprinkle the mixture evenly over the apple slices.
Bake for 2-3 hours, flipping the slices halfway through cooking time. The crisps are done when they're completely dry and crispy, with no moisture remaining. Remove from the oven and let cool completely on the baking sheets, during which time they'll crisp up further.
For best results, use a mandolin slicer to achieve uniform thickness – this ensures even cooking and consistent crispiness. Store the finished crisps in an airtight container for up to one week, though they may begin to lose their crispness after a few days. If they become soft, they can be re-crisped in a 200°F oven for 10 minutes.
- 2 large apples (Honeycrisp or Granny Smith preferred)
- 1 teaspoon ground cinnamon
- 1/8 teaspoon salt
- Cooking spray or parchment paper
Dark Chocolate Avocado Mousse
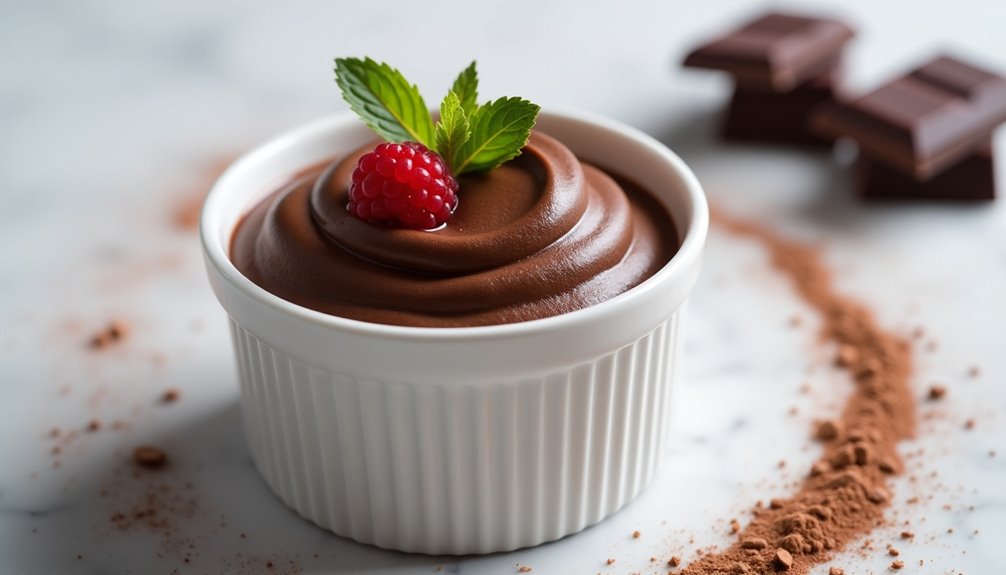
Dark chocolate avocado mousse offers a guilt-free approach to indulgent desserts, combining the rich, velvety texture of ripe avocados with the intense flavor of dark chocolate. This unique pairing creates a smooth, creamy treat that's packed with healthy fats and antioxidants.
While traditional chocolate mousse relies on heavy cream and eggs, this version utilizes the natural creaminess of avocados to achieve its luxurious consistency. The result is a dairy-free, gluten-free dessert that satisfies chocolate cravings while providing nutritional benefits.
- 2 ripe medium avocados
- 1/2 cup unsweetened cocoa powder
- 1/3 cup pure maple syrup
- 1/4 cup almond milk
- 1 teaspoon pure vanilla extract
- 1/8 teaspoon sea salt
- 4 ounces dark chocolate (70% cocoa or higher), melted
- Fresh berries for garnish (optional)
Remove the flesh from the avocados and place in a food processor. Add cocoa powder, maple syrup, almond milk, vanilla extract, and sea salt. Process until completely smooth, stopping occasionally to scrape down the sides. Add the melted dark chocolate and process again until fully incorporated and silky smooth. Transfer the mixture to serving bowls or ramekins.
Refrigerate for at least 2 hours or overnight to allow the mousse to set and the flavors to develop. The mousse can be garnished with fresh berries, mint leaves, or a light dusting of cocoa powder just before serving.
For best results, choose avocados that yield slightly when pressed but aren't overripe. The success of this dessert depends largely on achieving the right consistency, so ensure all ingredients are at room temperature before mixing. The mousse can be stored in an airtight container in the refrigerator for up to 3 days, though the top layer may darken slightly due to the avocado's natural oxidation process.
Almond Butter Energy Balls
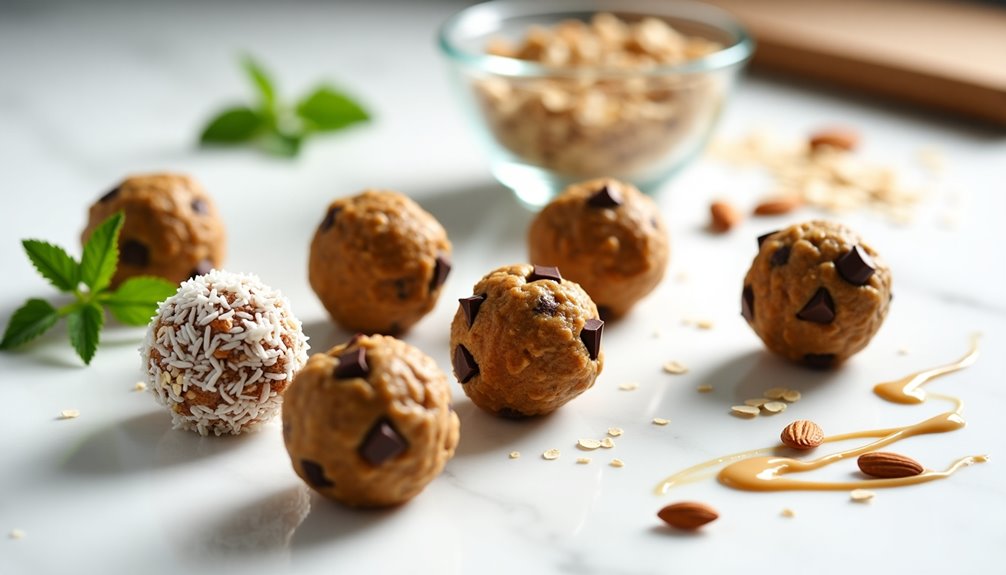
Almond butter energy balls are the perfect healthy treat that satisfies sweet cravings while providing sustained energy throughout the day. These no-bake bites combine the richness of almond butter with natural sweetness from dates and honey, creating a delicious snack that's both nutritious and convenient.
These protein-packed balls are incredibly versatile and can be customized with various add-ins to suit your taste preferences. They're ideal for meal prep, post-workout refueling, or as a quick breakfast on busy mornings. Plus, they're gluten-free and can easily be made vegan by substituting honey with maple syrup.
- 1 cup almond butter
- 1 cup old-fashioned oats
- 1/2 cup honey
- 1/4 cup ground flaxseed
- 1/4 cup mini dark chocolate chips
- 1/2 cup pitted dates
- 1 teaspoon vanilla extract
- 1/4 teaspoon sea salt
- 1/2 cup shredded coconut (optional)
In a food processor, blend the dates until they form a paste. Add almond butter, honey, and vanilla extract, pulsing until well combined. Transfer the mixture to a large bowl and add oats, flaxseed, chocolate chips, and salt. Mix thoroughly until all ingredients are evenly distributed and the mixture holds together when pressed.
Roll the mixture into 1-inch balls, using about 1 tablespoon of mixture per ball. If using coconut, roll the balls in it to coat. Place the energy balls on a parchment-lined baking sheet and refrigerate for at least 30 minutes to set.
For best results, store these energy balls in an airtight container in the refrigerator for up to two weeks. If the mixture is too sticky to roll, refrigerate it for 15-20 minutes before shaping. The balls can also be frozen for up to three months – just thaw in the refrigerator before eating.
Chia Seed Pudding With Fresh Fruit
Chia seed pudding is a nutrient-rich dessert that combines the powerful health benefits of chia seeds with natural sweetness from fresh fruits. This versatile treat can be prepared ahead of time and customized with various toppings and flavor combinations to suit individual preferences.
This recipe creates a creamy, satisfying pudding that serves as an excellent breakfast option or healthy dessert alternative. The chia seeds, when soaked in liquid, create a gel-like consistency while providing omega-3 fatty acids, fiber, and protein. The addition of fresh fruits adds natural sweetness and essential vitamins.
- 1/4 cup chia seeds
- 1 cup unsweetened almond milk
- 1 tablespoon maple syrup or honey
- 1/2 teaspoon vanilla extract
- Pinch of salt
- 1 cup mixed fresh fruits (berries, mango, or kiwi)
- Optional: nuts, coconut flakes, or granola for topping
In a medium bowl, combine the chia seeds, almond milk, maple syrup, vanilla extract, and salt. Whisk thoroughly to prevent clumping, ensuring all chia seeds are evenly distributed throughout the liquid. Cover the bowl and refrigerate for at least 4 hours or overnight, allowing the chia seeds to absorb the liquid and develop a pudding-like consistency. After the initial 2 hours, give the mixture a quick stir to break up any clumps that may have formed.
Once the pudding has set, give it a final stir and check the consistency. If it's too thick, add a splash of almond milk; if too thin, add more chia seeds and let it sit for another 30 minutes. Divide the pudding into serving bowls and top with fresh fruits and optional toppings just before serving.
For best results, use fresh, room temperature fruit as cold fruit can make the pudding too firm. The pudding can be stored in an airtight container in the refrigerator for up to 5 days, making it perfect for meal prep. If you prefer a smoother texture, blend the set pudding in a food processor until it reaches your desired consistency.
Honey-Roasted Peach Frozen Yogurt
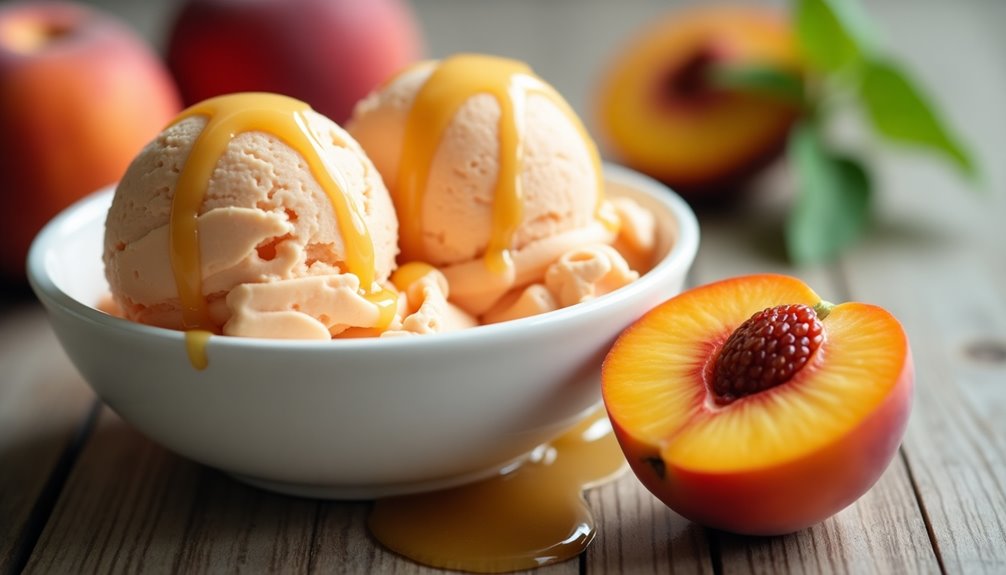
Honey-roasted peaches bring out the natural sweetness of summer fruit, creating a perfect base for this creamy frozen yogurt. The roasting process caramelizes the peaches and intensifies their flavor, while honey adds a subtle floral sweetness that complements the tanginess of Greek yogurt.
This frozen dessert is a healthier alternative to traditional ice cream, as it's made with protein-rich Greek yogurt and contains no artificial sweeteners. The combination of warm roasted peaches with cold, creamy yogurt creates a sophisticated dessert that's both refreshing and satisfying.
Ingredients:
- 6 ripe peaches, pitted and quartered
- 1/3 cup honey, divided
- 2 cups plain Greek yogurt
- 1 teaspoon vanilla extract
- 1/4 teaspoon salt
- 2 tablespoons lemon juice
- 1/4 cup heavy cream (optional)
Preheat the oven to 375°F (190°C). Place peach quarters on a baking sheet and drizzle with half the honey. Roast for 20-25 minutes until soft and caramelized, turning once halfway through. Let cool completely. Once cooled, puree the roasted peaches in a food processor until smooth.
In a large bowl, combine the peach puree, remaining honey, Greek yogurt, vanilla extract, salt, and lemon juice. Mix until well combined. If using heavy cream, fold it in at this point for added creaminess. Pour the mixture into an ice cream maker and churn according to manufacturer's instructions, usually 20-25 minutes. Transfer to a freezer-safe container and freeze for at least 2 hours before serving.
For best results, remove the frozen yogurt from the freezer 10-15 minutes before serving to allow it to soften slightly. If you don't have an ice cream maker, you can pour the mixture into a shallow freezer-safe container and freeze, stirring vigorously every 30 minutes for the first 2 hours to break up ice crystals. Choose perfectly ripe peaches for optimal flavor, and adjust honey quantity based on the natural sweetness of your fruit.