15 Easy Healthy Snack Recipes
Studies show that 90% of Americans snack daily, but only 10% opt for nutritious choices. You'll find that preparing healthy snacks doesn't require hours in the kitchen or complex ingredients. These 15 recipes combine wholesome ingredients with simple preparation methods, letting you create satisfying bites that support your wellness goals. From protein-packed energy balls to crispy veggie chips, you're about to discover how easy it is to transform your snacking habits with these foolproof options.
No-Bake Peanut Butter Energy Balls

No-bake peanut butter energy balls are the perfect healthy snack for busy individuals looking for a quick energy boost throughout the day. These protein-packed treats combine the natural sweetness of honey with wholesome oats and nutritious peanut butter, creating a satisfying bite-sized snack that's both delicious and beneficial.
These energy balls are incredibly versatile and can be customized with various add-ins to suit your taste preferences. They're an excellent option for meal prep as they can be stored in the refrigerator for up to two weeks, making them perfect for grab-and-go snacking, pre-workout fuel, or a healthy dessert alternative.
In a large mixing bowl, combine old-fashioned oats, peanut butter, and honey until well mixed. Add the mini chocolate chips, ground flaxseed, vanilla extract, and salt, stirring until all ingredients are evenly distributed. If the mixture seems too sticky, add more oats; if too dry, add more peanut butter or honey.
Roll the mixture into 1-inch balls using your hands. Place the formed balls on a parchment-lined baking sheet and refrigerate for at least 30 minutes to allow them to firm up. Once set, transfer the energy balls to an airtight container.
For best results, store these energy balls in the refrigerator and allow them to come to room temperature for about 5 minutes before eating. The mixture can be adjusted to achieve your desired consistency – if it's too sticky to roll, add more oats; if it's too crumbly, add more peanut butter. You can also roll the finished balls in additional oats, coconut flakes, or cocoa powder for variety in texture and flavor.
- 1 cup old-fashioned oats
- 1/2 cup natural peanut butter
- 1/3 cup honey
- 1/4 cup mini chocolate chips
- 1/4 cup ground flaxseed
- 1 teaspoon vanilla extract
- Pinch of salt
Crunchy Roasted Chickpeas
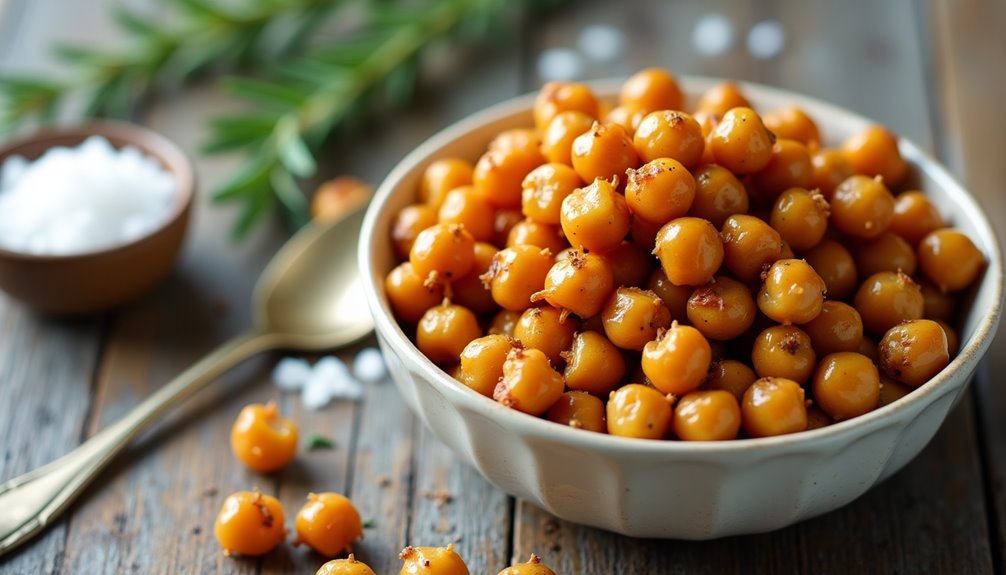
Crunchy roasted chickpeas are a protein-rich alternative to traditional salty snacks like chips and nuts. These versatile legumes transform into a crispy, satisfying treat when roasted at high temperatures, making them perfect for healthy snacking or as a salad topping.
What makes this recipe particularly appealing is its simplicity and adaptability. The basic preparation method remains the same, but you can experiment with different seasonings to create various flavor profiles, from spicy cajun to zesty ranch or simple sea salt and black pepper.
Ingredients:
- 2 (15 oz) cans chickpeas
- 2 tablespoons olive oil
- 1 teaspoon salt
- 1 teaspoon black pepper
- 1 teaspoon garlic powder
- Optional seasonings of choice
Drain and thoroughly rinse the chickpeas, then pat them completely dry with paper towels or a clean kitchen towel. Removing excess moisture is crucial for achieving maximum crispiness. Spread the dried chickpeas on a large baking sheet lined with parchment paper. Drizzle with olive oil and season with your chosen spices, tossing to ensure even coating. Roast in a preheated 400°F (200°C) oven for 30-40 minutes, shaking the pan every 10 minutes for even cooking.
Let the chickpeas cool completely on the baking sheet before storing them in an airtight container. They'll continue to crisp up as they cool. For the best texture, consume within 2-3 days of preparation.
For optimal results, remove any loose skins from the chickpeas before roasting, as these can burn in the oven. If your chickpeas aren't as crispy as desired after the initial cooking time, you can continue roasting them for an additional 5-10 minutes, watching carefully to prevent burning. Different ovens may require slightly different cooking times, so adjust accordingly based on your equipment.
Apple Cinnamon Yogurt Parfait
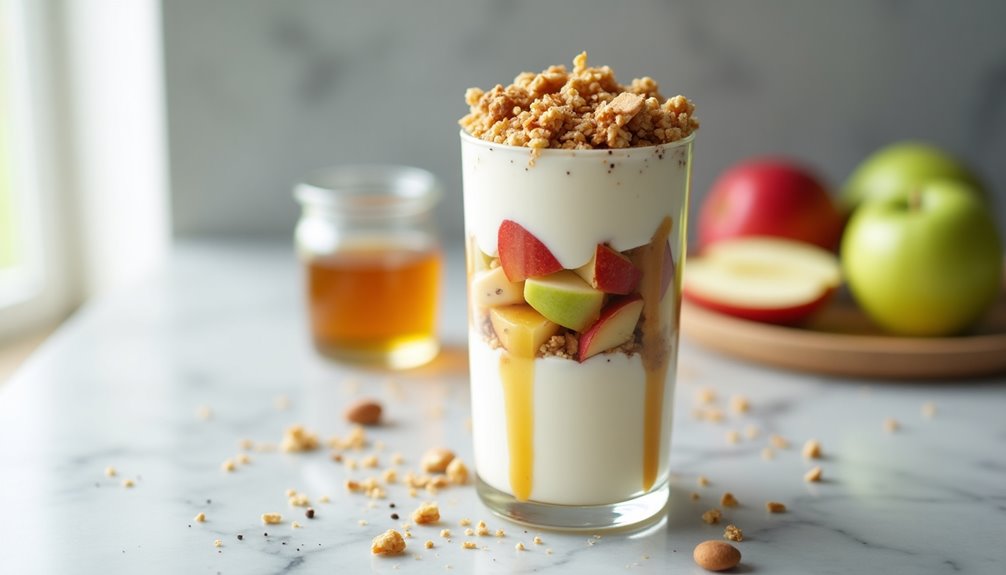
A parfait combining crisp apples, creamy yogurt, and warm cinnamon creates a perfect balance of flavors and textures that can satisfy both sweet cravings and hunger. This healthy snack option provides protein from the yogurt, fiber from the apples, and additional nutrients from optional toppings like nuts or granola.
This apple cinnamon yogurt parfait can be prepared in under 10 minutes and works well as a breakfast, afternoon snack, or even dessert. The recipe is highly customizable, allowing you to adjust ingredients based on dietary preferences or available items in your kitchen.
Ingredients:
- 1 cup plain Greek yogurt
- 1 medium apple
- 1/2 teaspoon ground cinnamon
- 1 tablespoon honey
- 1/4 cup granola
- 1/4 cup chopped walnuts (optional)
- 1 tablespoon chia seeds (optional)
Core and dice the apple into small, bite-sized pieces. In a clear glass or bowl, layer 1/3 of the yogurt, followed by a sprinkle of cinnamon and a drizzle of honey. Add a layer of diced apples and granola. Repeat these layers two more times, finishing with a final sprinkle of cinnamon and optional toppings like walnuts or chia seeds.
For best results, serve immediately to maintain the crunchiness of the granola and freshness of the apples. The parfait can be assembled ahead of time without the granola; add the granola just before serving to prevent it from becoming soggy. To prevent the apples from browning if preparing in advance, toss them in a small amount of lemon juice before layering.
Homemade Trail Mix
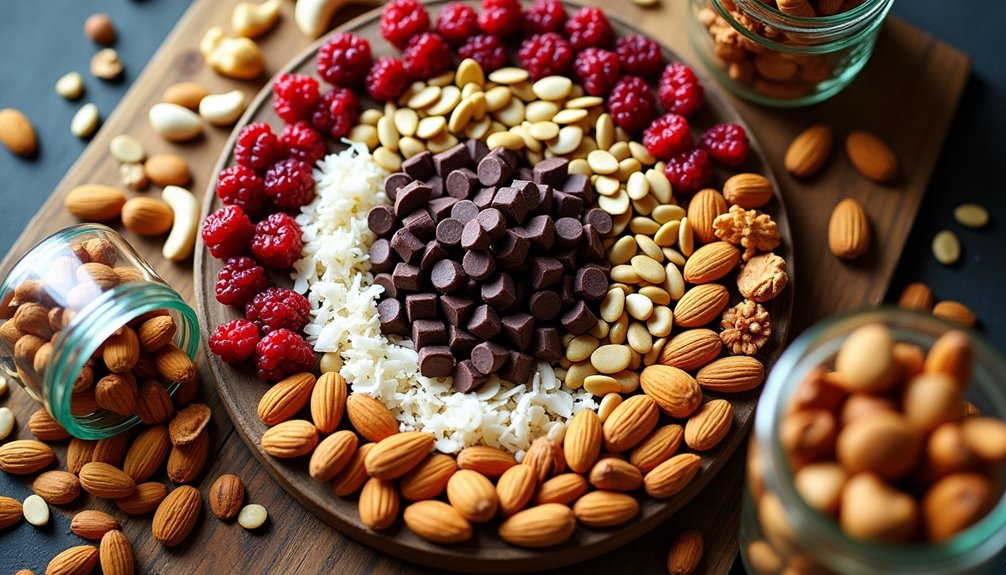
Homemade trail mix is a versatile and nutritious snack that combines the perfect balance of protein, healthy fats, and natural sugars. By making your own trail mix, you can control the ingredients, avoid unnecessary additives, and customize the flavors to your preferences.
This recipe creates a classic trail mix combination that provides sustained energy throughout the day. The mixture of nuts delivers essential omega-3 fatty acids and protein, while dried fruits add natural sweetness and important vitamins and minerals.
Ingredients:
- 1 cup raw almonds
- 1 cup cashews
- 1 cup walnuts
- ½ cup pumpkin seeds
- ½ cup sunflower seeds
- 1 cup raisins
- 1 cup dried cranberries
- ½ cup dark chocolate chips
- ½ cup dried coconut flakes
To prepare the trail mix, start by ensuring all nuts are raw and unsalted. If using raw nuts, you can enhance their flavor by lightly toasting them in the oven at 350°F (175°C) for 8-10 minutes, stirring halfway through. Allow the nuts to cool completely before mixing with other ingredients.
Combine all ingredients in a large mixing bowl, stirring thoroughly to ensure even distribution.
For optimal freshness, store the trail mix in an airtight container at room temperature for up to two weeks, or in the refrigerator for up to one month. Keep the container away from direct sunlight and heat to prevent the chocolate from melting and the nuts from becoming rancid. You can adjust the ratios of ingredients based on personal preference, and substitute different nuts, seeds, or dried fruits to create your own unique blend.
Baked Sweet Potato Chips
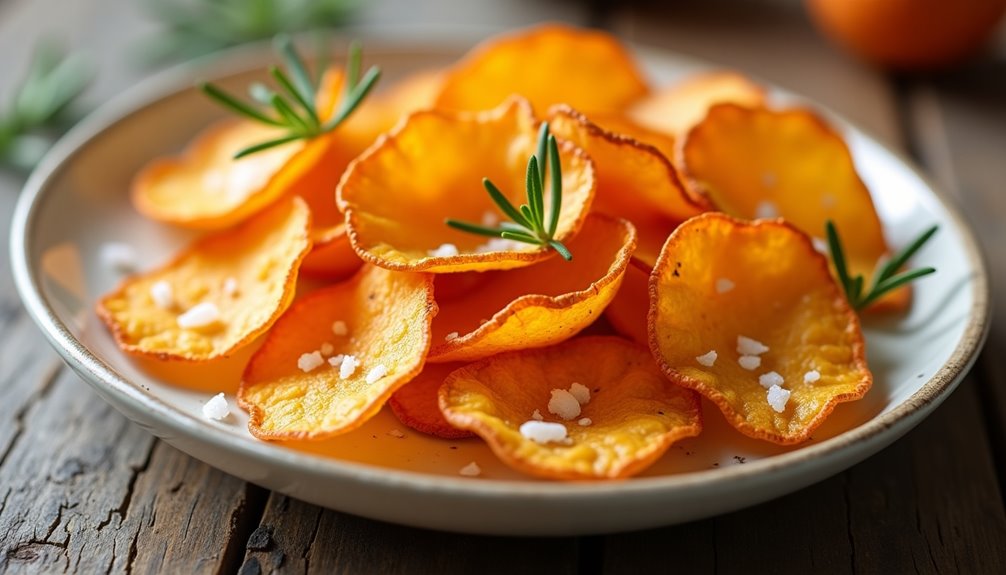
Baked sweet potato chips are a nutritious alternative to store-bought potato chips, offering a perfect balance of sweetness and crispiness. These homemade chips aren't only delicious but also packed with vitamins A and C, making them an excellent choice for health-conscious snackers.
This simple recipe transforms ordinary sweet potatoes into crispy, golden-brown chips that can be seasoned to your liking. Whether you prefer them simply salted or with creative seasonings like rosemary or paprika, these chips provide a satisfying crunch without the guilt of deep-fried alternatives.
Ingredients:
- 2 medium sweet potatoes
- 2 tablespoons olive oil
- 1 teaspoon sea salt
- Optional seasonings (paprika, rosemary, black pepper)
Preheat your oven to 375°F (190°C). Wash and peel the sweet potatoes, then slice them into very thin rounds (approximately 1/8 inch thick) using a mandoline or sharp knife. Place the slices in a large bowl and toss with olive oil and salt until evenly coated. Arrange the slices in a single layer on baking sheets lined with parchment paper, ensuring they don't overlap. Bake for 20-25 minutes, flipping the chips halfway through cooking time, until they're golden brown and crispy around the edges.
For best results, let the chips cool completely on the baking sheets before serving, as they'll continue to crisp up during this time. Store in an airtight container for up to 3 days, though they're best enjoyed fresh. Remember to monitor them closely during the last few minutes of baking, as they can quickly go from perfectly crispy to burnt due to their natural sugar content.
Greek Cucumber Bites
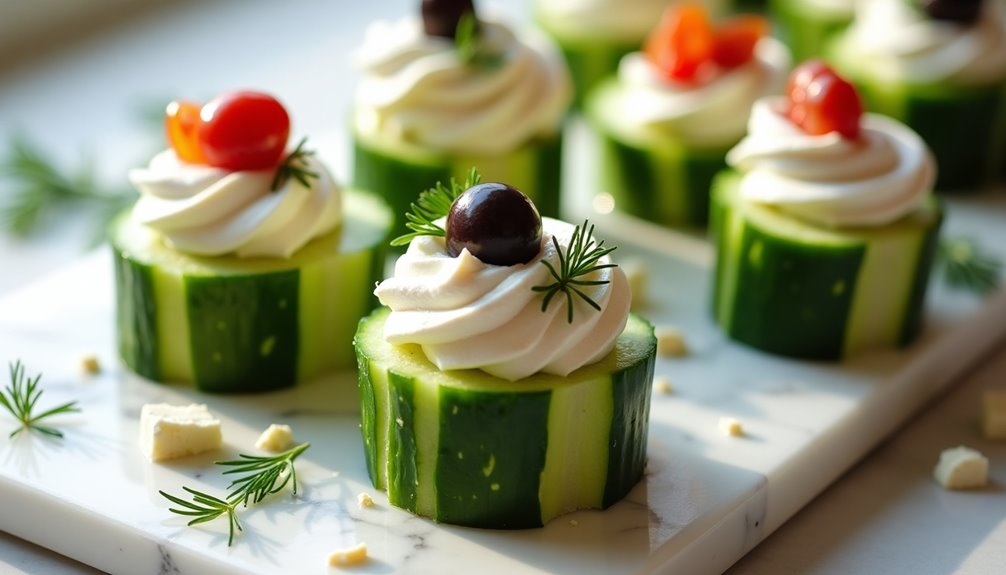
Greek Cucumber Bites are a refreshing and nutritious appetizer that combines the crispness of fresh cucumbers with the creamy richness of Greek yogurt-based topping. These bite-sized treats are perfect for summer gatherings, afternoon snacks, or as a light appetizer before dinner.
These Mediterranean-inspired morsels aren't only delicious but also packed with protein from the Greek yogurt and beneficial nutrients from fresh vegetables. They're naturally low in calories and carbohydrates, making them an excellent choice for health-conscious individuals or those following specific dietary plans.
Wash and slice cucumbers into 1-inch thick rounds. Using a small spoon, carefully scoop out some of the center of each cucumber slice to create a small well, being careful not to go all the way through to the bottom. Pat the cucumber rounds dry with paper towels to remove excess moisture.
In a mixing bowl, combine Greek yogurt, crumbled feta, chopped dill, minced garlic, salt, and pepper. Stir until well combined. Transfer the mixture to a piping bag or use a small spoon to fill each cucumber cup with the yogurt mixture. Top each bite with half a cherry tomato and a small piece of Kalamata olive. Garnish with additional fresh dill.
For best results, prepare these cucumber bites no more than 2 hours before serving and store them in the refrigerator until ready to serve. To prevent the cucumber rounds from becoming watery, avoid salting them before assembly and ensure they're thoroughly dried after scooping. The yogurt mixture can be prepared up to 24 hours in advance and stored separately in an airtight container in the refrigerator.
- 2 large English cucumbers
- 1 cup Greek yogurt
- 1/2 cup crumbled feta cheese
- 1 tablespoon fresh dill, chopped
- 1 clove garlic, minced
- 1/4 teaspoon black pepper
- 1/4 teaspoon sea salt
- Cherry tomatoes
- Kalamata olives
- Extra dill for garnish
Banana Oat Muffins

Banana oat muffins are a wholesome and nutritious snack that combines the natural sweetness of ripe bananas with hearty oats. These muffins are perfect for breakfast on the go, afternoon snacks, or as a healthier alternative to traditional desserts.
Made with simple ingredients, these muffins are packed with fiber, potassium, and complex carbohydrates. They can be stored for several days and maintain their moisture thanks to the bananas, making them an excellent meal prep option for busy weekdays.
- 3 ripe bananas, mashed
- 2 cups rolled oats
- 2 large eggs
- 1/3 cup honey
- 1/4 cup coconut oil, melted
- 1 teaspoon vanilla extract
- 1 teaspoon baking soda
- 1/2 teaspoon cinnamon
- 1/4 teaspoon salt
- 1/2 cup whole wheat flour
- 1/4 cup milk
- Optional: 1/2 cup chopped walnuts or chocolate chips
Preheat oven to 350°F (175°C) and line a 12-cup muffin tin with paper liners. In a large bowl, mash the bananas until smooth, then mix in the eggs, honey, melted coconut oil, and vanilla extract.
In a separate bowl, combine the oats, whole wheat flour, baking soda, cinnamon, and salt. Gradually fold the dry ingredients into the wet mixture, adding milk as needed to achieve a proper muffin batter consistency. If using nuts or chocolate chips, fold them in last.
Fill each muffin cup about 3/4 full with batter. Bake for 20-25 minutes, or until a toothpick inserted into the center comes out clean. Allow muffins to cool in the pan for 5 minutes before transferring to a wire rack to cool completely.
For best results, use very ripe bananas with brown spots for maximum sweetness and moisture. These muffins can be stored in an airtight container at room temperature for up to 3 days, or frozen for up to 3 months. To prevent the muffins from becoming too dense, avoid overmixing the batter and make sure not to overbake them.
Crispy Kale Chips
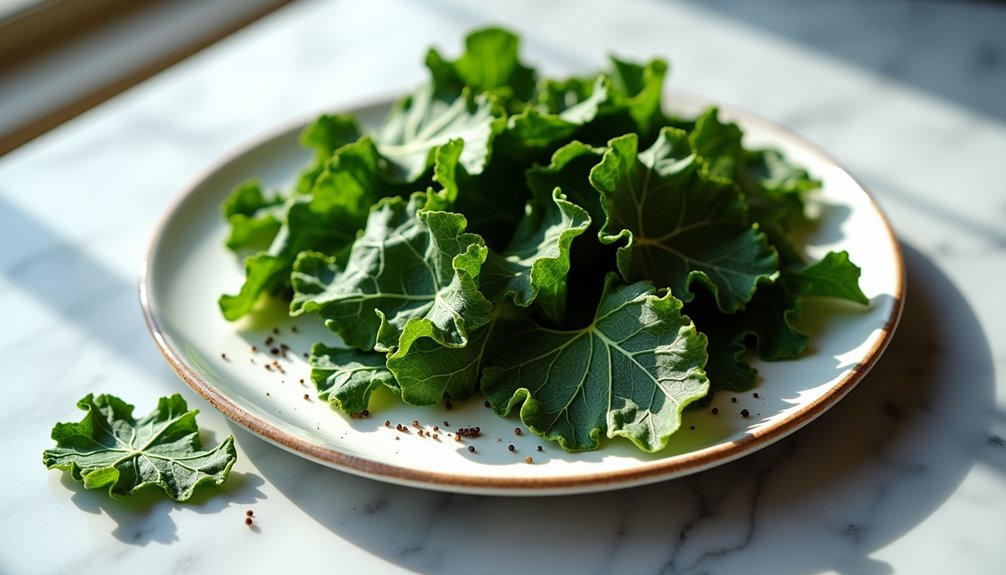
Crispy kale chips have become increasingly popular as a healthy alternative to traditional potato chips. These light and airy snacks deliver a satisfying crunch while providing essential nutrients like vitamin K, vitamin C, and antioxidants.
Making kale chips at home isn't only cost-effective but also allows you to control the ingredients and seasonings to suit your taste preferences. The key to perfect kale chips lies in ensuring the leaves are completely dry before baking and maintaining the right oven temperature to achieve the desired crispiness without burning.
- 1 large bunch fresh kale
- 2 tablespoons olive oil
- 1/2 teaspoon sea salt
- 1/4 teaspoon black pepper
- Optional seasonings: garlic powder, nutritional yeast, or paprika
Preheat the oven to 300°F (150°C). Remove the kale leaves from the thick stems and tear them into bite-sized pieces. Wash the kale thoroughly and dry completely using a salad spinner or paper towels – any remaining moisture will prevent the leaves from crisping properly. In a large bowl, massage the olive oil into the kale leaves, ensuring even coating. Spread the kale pieces in a single layer on baking sheets, being careful not to overlap them. Sprinkle with salt, pepper, and any additional seasonings.
Bake for 20-25 minutes, rotating the baking sheets halfway through. Watch closely during the last few minutes as kale can quickly go from perfectly crispy to burnt. The chips are done when they're crisp to the touch but still maintain their green color. Remove from the oven and let cool completely before storing.
Store your kale chips in an airtight container with a paper towel to absorb any excess moisture. For best results, consume within 2-3 days, as they can become chewy if exposed to humidity. If they lose their crispiness, you can refresh them by placing them in a warm oven for 2-3 minutes.
Mixed Berry Smoothie Bowl
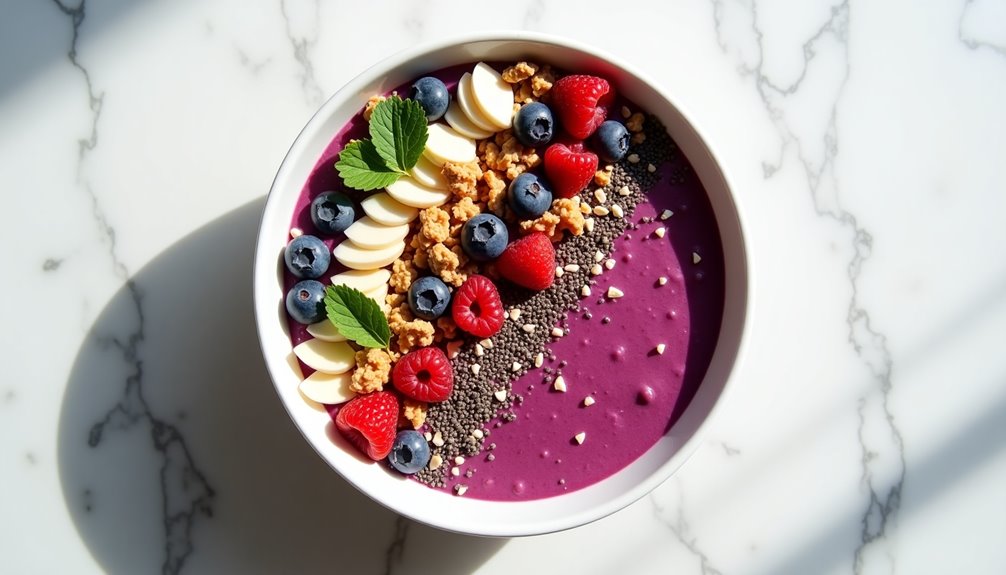
Mixed berry smoothie bowls are a vibrant and nutritious way to start your day or enjoy as a refreshing snack. This Instagram-worthy dish combines the wholesome goodness of frozen berries, creamy yogurt, and customizable toppings that not only look beautiful but provide a perfect balance of nutrients.
The beauty of smoothie bowls lies in their versatility and ease of preparation. Unlike regular smoothies, these bowls have a thicker consistency that allows for artistic topping arrangements and a more satisfying eating experience with both smooth and crunchy textures in each spoonful.
Ingredients:
- 2 cups mixed frozen berries
- 1 banana (frozen)
- 1 cup Greek yogurt
- 1/4 cup almond milk
- 1 tablespoon honey
- Fresh berries for topping
- Granola
- Chia seeds
- Sliced almonds
- Coconut flakes
Add frozen berries, banana, Greek yogurt, almond milk, and honey to a high-powered blender. Blend until smooth, maintaining a thick consistency. If the mixture is too thick to blend, add small amounts of almond milk gradually. The final texture should be thicker than a regular smoothie but still smooth enough to pour.
Pour the smoothie mixture into a bowl and immediately begin arranging toppings. Start with fresh berries, then sprinkle granola, chia seeds, sliced almonds, and coconut flakes in sections or patterns. Serve immediately while the base is still frozen and thick.
For best results, freeze the serving bowl for 15 minutes before use to help maintain the thick consistency longer. The smoothie base can be made ahead and frozen, then briefly blended again just before serving. Avoid adding too much liquid during blending, as this will make the bowl too runny and prevent toppings from staying on top.
Avocado Toast With Seeds

Avocado toast has become a modern breakfast and snack staple, combining the creamy richness of avocados with the satisfying crunch of toasted bread. Adding a variety of seeds not only enhances the nutritional profile but also creates an interesting texture contrast that makes this simple dish even more appealing.
This recipe elevates the basic avocado toast by incorporating a mix of nutrient-rich seeds, including pumpkin, sunflower, and sesame seeds. The combination provides essential omega-3 fatty acids, protein, and fiber, making it a perfect option for a filling snack or light meal that will keep you energized throughout the day.
Toast the bread slices until golden brown and crispy. While the bread is toasting, cut the avocado in half, remove the pit, and scoop the flesh into a bowl. Mash the avocado with a fork until it reaches your desired consistency, then add salt, pepper, and a squeeze of fresh lemon juice.
Spread the mashed avocado mixture evenly over the toasted bread slices. Sprinkle the pumpkin, sunflower, and sesame seeds over the avocado layer. If desired, add a pinch of red pepper flakes for heat.
For the best results, choose avocados that yield slightly when gently pressed but aren't too soft. Store unused seeds in an airtight container in the refrigerator to maintain freshness. To prevent the avocado from browning, prepare this dish just before serving and use the lemon juice liberally, as it acts as a natural preservative.
- 2 slices whole grain bread
- 1 ripe avocado
- 1 tablespoon pumpkin seeds
- 1 tablespoon sunflower seeds
- 1 teaspoon sesame seeds
- 1/4 teaspoon sea salt
- 1/8 teaspoon black pepper
- 1/2 lemon
- Optional: red pepper flakes
Frozen Yogurt Bark

Frozen yogurt bark is a refreshing and nutritious treat that combines the creamy texture of yogurt with the delightful crunch of various toppings. This versatile snack can be customized with different fruits, nuts, and other healthy ingredients to create a satisfying combination of flavors.
This recipe provides a protein-rich alternative to traditional desserts while offering essential nutrients from fresh fruits and nuts. The frozen nature of this treat makes it perfect for hot summer days, and it can be prepared in advance for convenient snacking throughout the week.
Ingredients:
- 2 cups plain Greek yogurt
- 2 tablespoons honey
- 1 teaspoon vanilla extract
- 1 cup mixed berries (strawberries, blueberries, raspberries)
- ¼ cup chopped nuts (almonds, pistachios, or walnuts)
- 2 tablespoons dark chocolate chips
- 1 tablespoon chia seeds
Line a baking sheet with parchment paper. In a medium bowl, mix the Greek yogurt with honey and vanilla extract until well combined. Spread the yogurt mixture evenly on the prepared baking sheet, creating a layer approximately ¼ inch thick. Scatter the berries, nuts, chocolate chips, and chia seeds evenly across the yogurt surface, gently pressing them into the mixture.
Transfer the baking sheet to the freezer and let it freeze completely for at least 2 hours or overnight. Once frozen, break or cut the yogurt bark into pieces of desired size. Store the pieces in an airtight container in the freezer.
For best results, allow the frozen yogurt bark to sit at room temperature for 1-2 minutes before eating to achieve the optimal texture. If using frozen fruits, thaw and pat them dry before adding to prevent ice crystals from forming. Different yogurt varieties can be used, but Greek yogurt is recommended for its thicker consistency and higher protein content.
Spiced Mixed Nuts
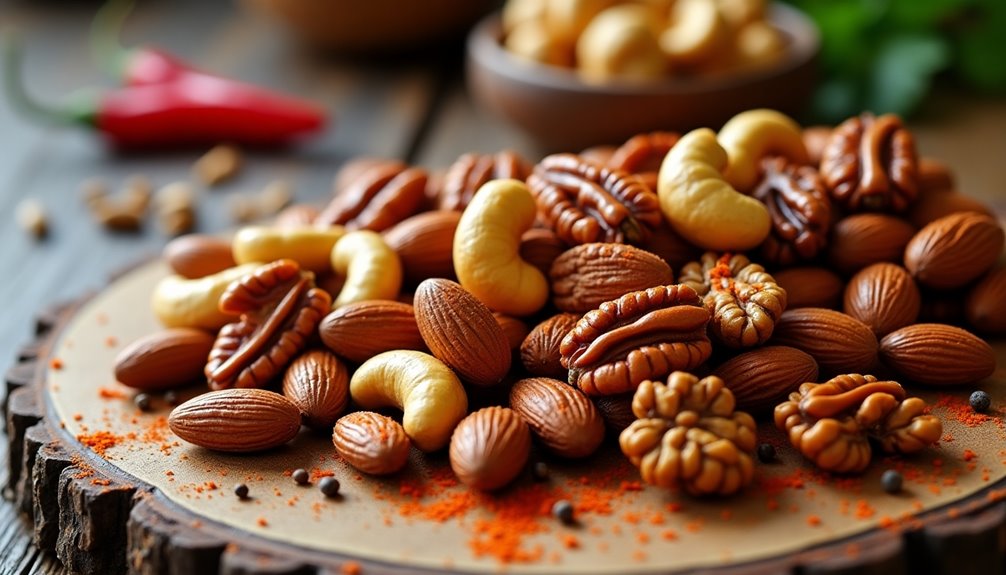
Spiced mixed nuts are a perfect combination of protein, healthy fats, and bold flavors that make for an ideal healthy snack option. The blend of different nuts provides varying textures and tastes, while the carefully selected spices create a complex flavor profile that keeps you coming back for more.
This recipe transforms plain nuts into an irresistible treat that's both nutritious and satisfying. Whether you're looking for an afternoon pick-me-up or a party snack, these spiced nuts are easy to prepare and can be stored for weeks in an airtight container.
- 2 cups raw almonds
- 1 cup raw cashews
- 1 cup raw pecans
- 1 cup raw walnuts
- 2 tablespoons olive oil
- 2 teaspoons smoked paprika
- 1 teaspoon ground cumin
- 1 teaspoon garlic powder
- 1 teaspoon sea salt
- 1/2 teaspoon cayenne pepper
- 1/2 teaspoon black pepper
Preheat your oven to 325°F (165°C). In a large bowl, combine all the nuts and drizzle with olive oil, ensuring even coating. Mix all the spices in a separate small bowl, then sprinkle over the nuts, tossing thoroughly to distribute the seasonings evenly.
Spread the seasoned nuts in a single layer on a large baking sheet lined with parchment paper. Roast for 20-25 minutes, stirring halfway through to ensure even cooking. The nuts should be golden brown and aromatic when done. Allow them to cool completely on the baking sheet, during which time they'll become crispier.
For best results, allow the nuts to cool completely before storing, as any residual heat can create unwanted moisture in the storage container. Taste and adjust seasonings while the nuts are still warm, as the flavors will mellow slightly upon cooling. If you prefer less heat, reduce the amount of cayenne pepper, or for a more intense flavor, double the spice quantities.
Chia Seed Pudding
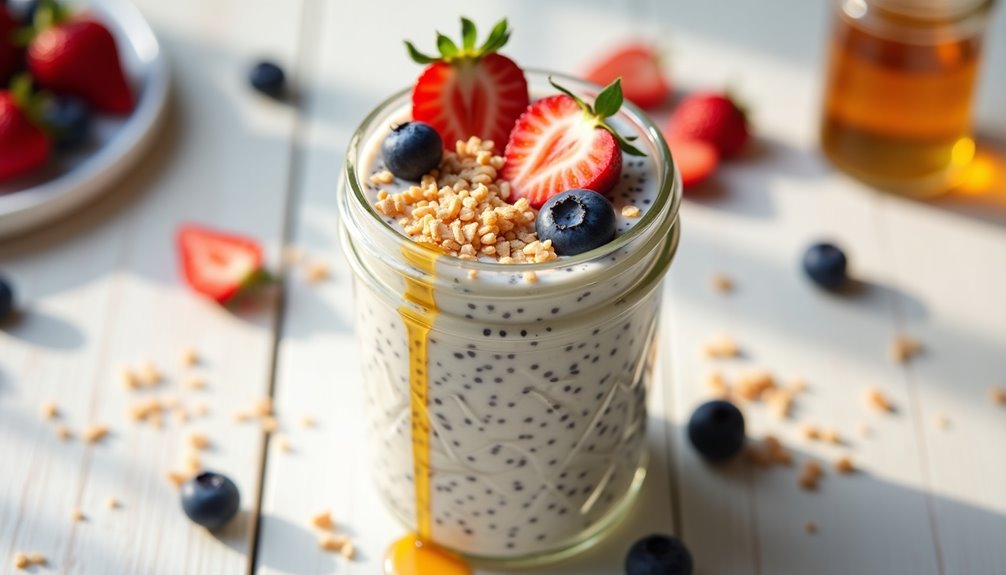
Chia seed pudding has become increasingly popular as a nutritious breakfast or snack option, combining the amazing health benefits of chia seeds with a delightfully creamy texture. These tiny seeds are packed with omega-3 fatty acids, fiber, protein, and various micronutrients that support overall health and wellness.
What makes chia seed pudding particularly appealing is its versatility and simplicity. The basic recipe requires minimal ingredients and no cooking, yet it can be customized with countless flavor combinations and toppings to suit any taste preference. The chia seeds work their magic overnight, absorbing liquid and creating a tapioca-like consistency.
Ingredients:
- 2 cups unsweetened almond milk
- ½ cup chia seeds
- 2 tablespoons honey or maple syrup
- 1 teaspoon vanilla extract
- Pinch of salt
In a medium bowl, whisk together almond milk, honey, vanilla extract, and salt until well combined. Add the chia seeds and whisk thoroughly to prevent clumping. Let the mixture sit for 5 minutes, then whisk again to break up any clusters that may have formed. Transfer to an airtight container or individual serving jars, cover, and refrigerate for at least 4 hours or overnight until the pudding has thickened to desired consistency.
For the best results, stir the pudding once more about 30 minutes after refrigerating to ensure even distribution of the chia seeds. When ready to serve, the pudding should have a thick, creamy consistency. Top with fresh fruits, nuts, granola, or any preferred toppings.
The pudding can be stored in the refrigerator for up to 5 days. If the pudding becomes too thick, simply thin it out with a splash of milk. For a smoother texture, blend the finished pudding in a high-speed blender. The basic recipe can be modified by using different milk alternatives, sweeteners, or adding cocoa powder, matcha, or fruit purees for variety.
Zucchini Hummus Roll-Ups
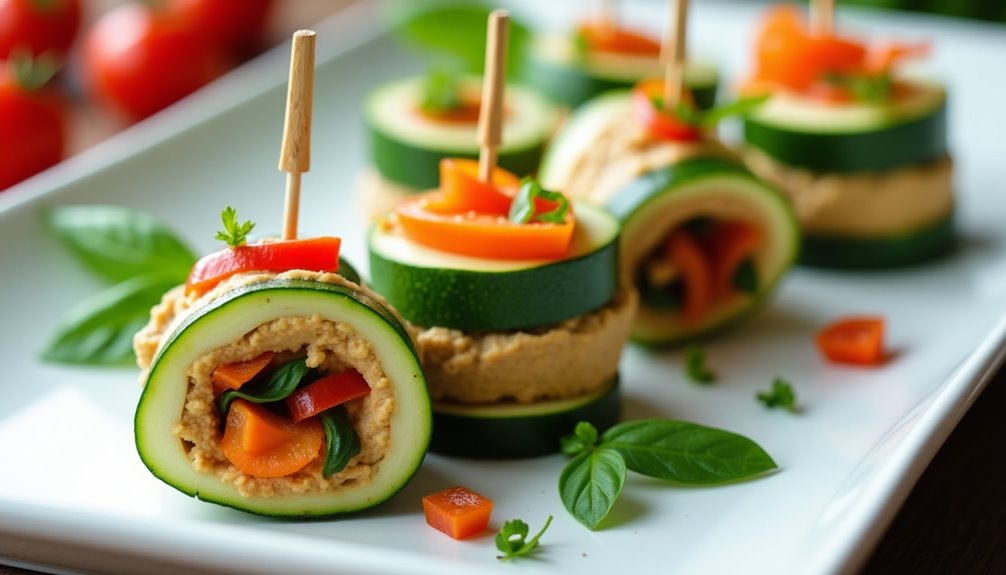
Zucchini hummus roll-ups are a refreshing and nutritious snack that combines the crispness of fresh vegetables with creamy hummus. These bite-sized treats are perfect for those seeking a low-carb alternative to traditional wraps and sandwiches, while still maintaining a satisfying texture and flavor profile.
This recipe is incredibly versatile and can be customized based on personal preferences or dietary restrictions. The zucchini strips act as a healthy vessel for the protein-rich hummus, making these roll-ups an excellent option for both vegetarians and those following a gluten-free diet.
Ingredients:
- 2 medium zucchini
- 1 cup prepared hummus
- 1 red bell pepper, thinly sliced
- 1 cucumber, cut into thin strips
- 1 carrot, julienned
- Fresh spinach leaves
- Salt and pepper to taste
- Toothpicks for securing
Begin by washing the zucchini and trimming off the ends. Using a vegetable peeler or mandoline, carefully slice the zucchini lengthwise into thin, flexible strips. Lay the strips on paper towels and sprinkle with a small amount of salt to draw out excess moisture. Let them rest for 10-15 minutes, then pat dry.
Spread a thin layer of hummus onto each zucchini strip, leaving a small border around the edges. Layer the vegetables of your choice across the hummus-covered portion. Starting from one end, carefully roll up the zucchini strip, keeping the filling tight as you go. Secure each roll-up with a toothpick.
For best results, chill the roll-ups in the refrigerator for at least 30 minutes before serving to help them maintain their shape. These can be made up to 24 hours in advance, but be sure to store them in an airtight container with paper towels to absorb any excess moisture. The thickness of the zucchini strips is crucial – too thick and they won't roll properly, too thin and they may tear during rolling. If the strips are too wet, they won't hold the hummus well, so don't skip the salt and pat-dry step.
Dark Chocolate Covered Almonds

Dark chocolate covered almonds are a perfect balance of healthy fats, protein, and just the right amount of sweetness. This simple yet elegant snack combines the heart-healthy benefits of almonds with the antioxidant properties of dark chocolate, creating a satisfying treat that can be enjoyed guilt-free.
Making these at home allows you to control the quality of ingredients and customize the chocolate coating to your preference. Whether you prefer a thick chocolate shell or just a thin coating, this recipe can be adjusted to create your ideal version of this classic treat.
Ingredients:
- 2 cups raw almonds
- 8 ounces dark chocolate (70% cocoa or higher)
- 1 tablespoon coconut oil
- 1/4 teaspoon sea salt
- Optional: 2 tablespoons cocoa powder for dusting
Toast the almonds in a single layer on a baking sheet at 350°F (175°C) for 8-10 minutes, stirring halfway through, until fragrant. Let them cool completely. Meanwhile, chop the dark chocolate into small pieces and melt it with coconut oil using a double boiler or microwave in 30-second intervals, stirring between each interval until smooth. Add sea salt to the melted chocolate and stir well.
Working in batches, drop the cooled almonds into the melted chocolate mixture and use two forks to coat them evenly. Remove the almonds one at a time, tapping off excess chocolate, and place them on a parchment-lined baking sheet. Once all almonds are coated, refrigerate for 15-20 minutes until the chocolate is completely set.
For best results, store these chocolate-covered almonds in an airtight container in the refrigerator for up to two weeks. If you live in a warm climate, keeping them refrigerated is essential to prevent the chocolate from melting. For a professional finish, you can dust the finished almonds with cocoa powder or temper the chocolate before coating, which will give them a glossy finish and allow them to stay stable at room temperature.