10 Easy Homemade Ice Cream Recipes
Like a blank canvas waiting for an artist's touch, your kitchen is ready to become an ice cream parlor. You'll discover that crafting homemade ice cream isn't just about mixing ingredients—it's about mastering the perfect balance of flavors and textures. From classic vanilla bean to exotic lavender honey, these ten recipes will transform your dessert game. Whether you're a dairy devotee or seeking vegan alternatives, you're about to unlock the secrets of professional-quality frozen treats at home.
Classic Vanilla Bean Ice Cream
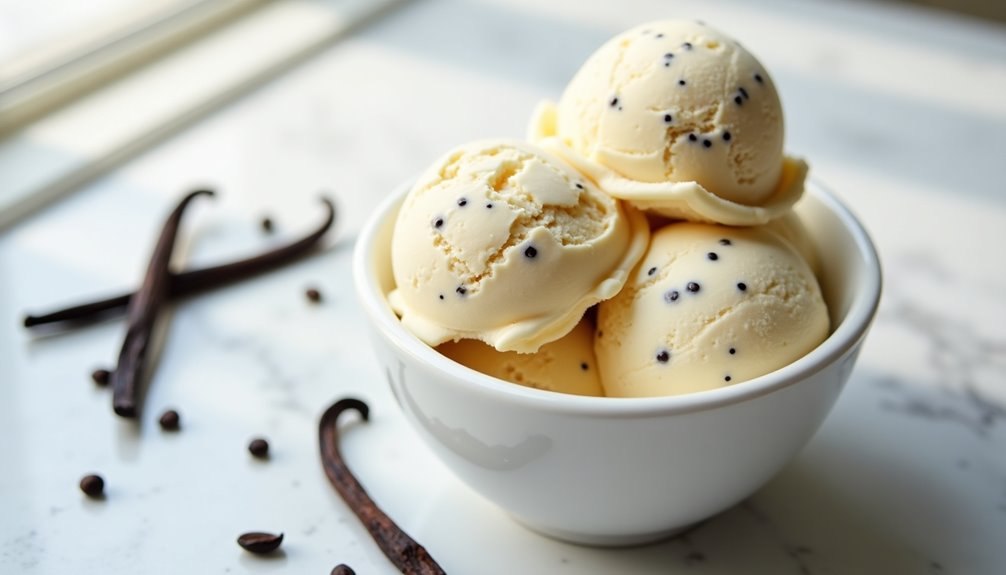
Classic vanilla bean ice cream represents the gold standard of homemade frozen desserts. The rich, creamy texture combined with pure vanilla flavoring creates an indulgent treat that surpasses anything available in stores. When made properly, this ice cream showcases the perfect balance between sweet cream and complex vanilla notes.
The key to exceptional vanilla bean ice cream lies in using high-quality ingredients, particularly the vanilla beans. Fresh vanilla beans provide intense flavor and the signature black specks that indicate authentic vanilla bean ice cream. The combination of heavy cream and whole milk creates the ideal fat content for a smooth, creamy consistency.
Split the vanilla beans lengthwise and scrape out the seeds. In a medium saucepan, combine the cream, milk, vanilla beans, and seeds. Heat the mixture until it just starts to simmer, then remove from heat and let steep for 30 minutes. In a separate bowl, whisk together the egg yolks, sugar, and salt until pale and thick. Slowly pour the warm cream mixture into the egg mixture, whisking constantly to prevent curdling.
Return the mixture to the saucepan and cook over medium heat, stirring constantly with a wooden spoon, until it thickens enough to coat the back of the spoon (around 175°F). Strain the custard through a fine-mesh sieve into a clean bowl and stir in the vanilla extract. Cover with plastic wrap directly on the surface and refrigerate until completely chilled, at least 4 hours or overnight.
Churn the chilled custard in an ice cream maker according to manufacturer's instructions, usually 20-25 minutes or until the consistency of soft-serve. Transfer to a freezer-safe container and freeze until firm, about 4 hours.
For best results, remove the ice cream from the freezer 5-10 minutes before serving to allow it to soften slightly. This helps achieve the optimal scooping texture and allows the full vanilla flavor to develop. Store-bought vanilla beans can be expensive, so consider buying them online in bulk or reusing the pods to make vanilla sugar for future recipes.
- 2 cups heavy cream
- 1 cup whole milk
- 2 vanilla beans
- 3/4 cup granulated sugar
- 5 large egg yolks
- 1/4 teaspoon salt
- 1 teaspoon pure vanilla extract
No-Churn Chocolate Fudge Ice Cream
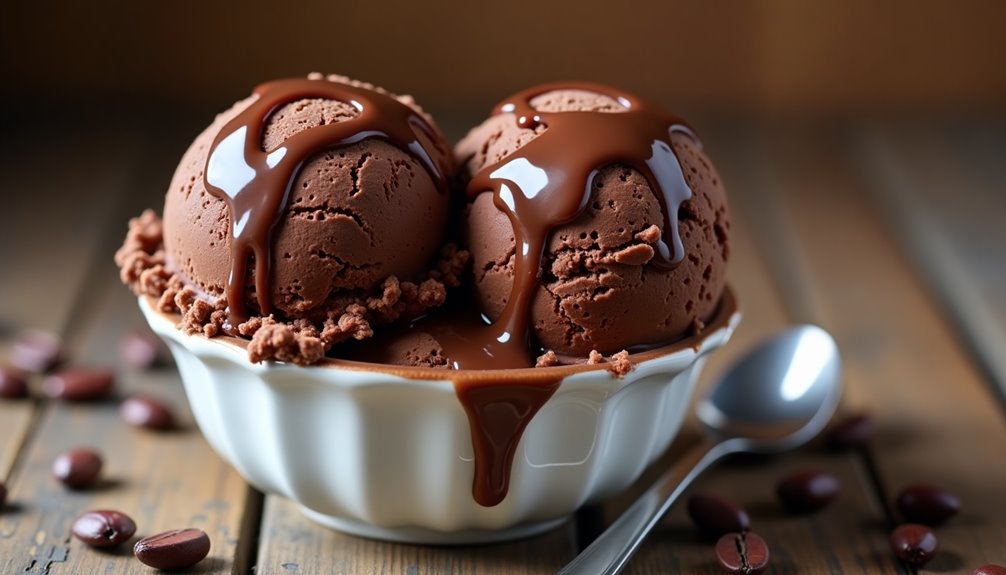
No-churn ice cream has revolutionized homemade frozen desserts, making it possible to create rich, creamy treats without specialized equipment. This chocolate fudge version delivers an intensely chocolatey experience with a smooth, velvety texture that rivals store-bought premium ice creams.
The secret to achieving the perfect consistency lies in the combination of sweetened condensed milk and whipped cream, which creates a stable base that freezes beautifully. The addition of cocoa powder and melted chocolate chips produces deep chocolate notes, while a ribbon of fudge sauce adds an extra layer of decadence.
Ingredients:
- 2 cups heavy whipping cream
- 1 (14 oz) can sweetened condensed milk
- 1/2 cup unsweetened cocoa powder
- 1 cup semi-sweet chocolate chips
- 1 teaspoon vanilla extract
- 1/4 teaspoon salt
- 1/2 cup store-bought chocolate fudge sauce
In a medium microwave-safe bowl, melt the chocolate chips in 30-second intervals, stirring between each interval until smooth. Let it cool slightly. In a large mixing bowl, whisk together the sweetened condensed milk, cocoa powder, vanilla extract, and salt until well combined. Stir in the melted chocolate until the mixture is smooth and free of lumps.
In a separate bowl, whip the heavy cream until stiff peaks form. Gently fold the whipped cream into the chocolate mixture, taking care not to deflate the air bubbles. Pour half of the mixture into a freezer-safe container, drizzle with half of the fudge sauce, then repeat with remaining ice cream mixture and fudge sauce. Use a knife to gently swirl the fudge through the ice cream. Cover tightly and freeze for at least 6 hours or overnight until firm.
For best results, store the ice cream in a container with a tight-fitting lid and place plastic wrap directly on the surface before covering to prevent ice crystals from forming. Allow the ice cream to sit at room temperature for 5-10 minutes before scooping. This recipe can be customized by adding chopped nuts, cookie pieces, or additional mix-ins of your choice before the final freeze.
Fresh Strawberry Ice Cream
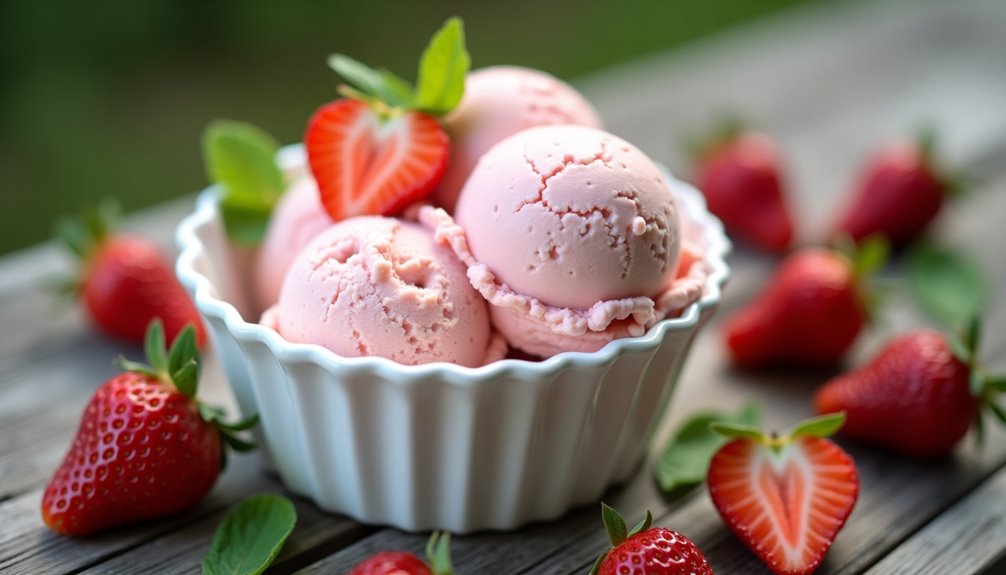
Fresh strawberry ice cream is a beloved summer dessert that captures the pure essence of ripe, sun-kissed berries in a rich, creamy base. This homemade version delivers a more intense flavor and natural pink color than store-bought alternatives, allowing you to control the sweetness and texture to your preference.
The key to exceptional strawberry ice cream lies in using the ripest, most flavorful berries available. When strawberries are cooked briefly with sugar, they release their juices and develop a more concentrated flavor, creating an ice cream that tastes like fresh berries in every spoonful.
- 2 cups fresh strawberries, hulled and quartered
- 2 cups heavy cream
- 1 cup whole milk
- 3/4 cup granulated sugar
- 1/4 teaspoon salt
- 4 large egg yolks
- 1 teaspoon pure vanilla extract
- 1 tablespoon lemon juice
Combine the strawberries with 1/4 cup of the sugar in a saucepan. Cook over medium heat for 5 minutes, stirring occasionally, until the berries release their juices. Remove from heat and puree until smooth, then refrigerate until completely chilled.
In a separate saucepan, heat the cream, milk, remaining sugar, and salt until steaming. Whisk the egg yolks in a bowl, then slowly stream in the hot cream mixture while whisking constantly. Return the mixture to the saucepan and cook over medium heat, stirring continuously, until it thickens enough to coat the back of a spoon.
Strain the custard through a fine-mesh sieve into a bowl and stir in the vanilla extract. Combine with the chilled strawberry puree and lemon juice, then refrigerate for at least 4 hours or overnight. Pour the chilled mixture into an ice cream maker and churn according to manufacturer's instructions, usually 20-25 minutes. Transfer to a freezer container and freeze until firm, about 4 hours.
For the best texture and flavor, remove the ice cream from the freezer 10-15 minutes before serving to soften slightly. Fresh strawberry ice cream tends to freeze harder than commercial versions due to the lack of stabilizers, so proper tempering is essential. Consider adding a tablespoon of vodka or corn syrup to the mixture before churning to help maintain a softer consistency and prevent ice crystals from forming.
Salted Caramel Ice Cream

Salted Caramel Ice Cream combines the rich, buttery sweetness of caramel with a perfect touch of salt, creating a sophisticated twist on traditional ice cream. The interplay between sweet and salty flavors creates an irresistible depth that has made this flavor a modern classic in ice cream parlors worldwide.
Making this indulgent dessert at home allows you to control the caramel's darkness and salt level, customizing it to your exact preferences. While the process requires attention during the caramel-making stage, the end result is worth every minute of careful preparation.
Begin by making the caramel base. Heat sugar and water in a heavy-bottomed saucepan over medium heat, swirling occasionally until the mixture turns amber. Remove from heat and carefully stir in 1 cup of cream (mixture will bubble vigorously). Once settled, add remaining cream and milk. In a separate bowl, whisk egg yolks until pale, then slowly stream in the warm caramel mixture while whisking constantly.
Return the mixture to the saucepan and cook over medium-low heat, stirring continuously until it thickens enough to coat the back of a spoon. Remove from heat, stir in vanilla and both salts, then strain through a fine-mesh sieve. Chill the mixture thoroughly in the refrigerator for at least 4 hours or overnight. Process in an ice cream maker according to manufacturer's instructions, then transfer to a freezer-safe container and freeze until firm, about 4 hours.
For best results, remove the ice cream from the freezer 5-10 minutes before serving to achieve the optimal creamy texture. Watch the caramel carefully while cooking – it can go from perfect to burnt quickly. If you prefer a darker caramel flavor, let the sugar cook slightly longer, but be mindful that darker caramel will have a more bitter edge. Store leftovers in an airtight container with plastic wrap pressed directly onto the surface to prevent ice crystals from forming.
- 2 cups heavy cream
- 1 cup whole milk
- 1 cup granulated sugar
- 1/4 cup water
- 4 large egg yolks
- 1 teaspoon pure vanilla extract
- 1 1/4 teaspoons flaky sea salt
- 1/4 teaspoon fine salt
Mint Chocolate Chip Ice Cream
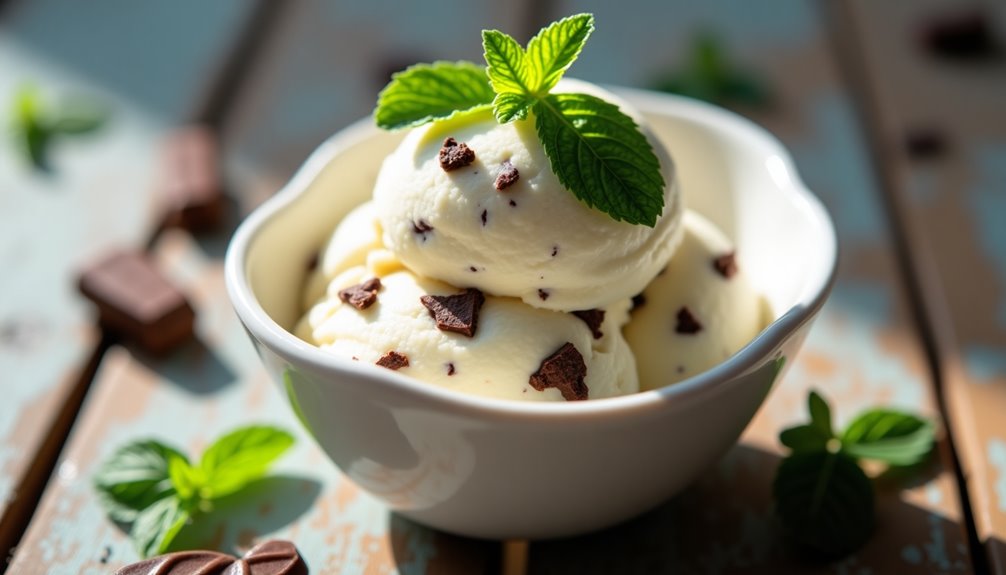
Mint Chocolate Chip Ice Cream is a beloved classic that combines the refreshing taste of mint with the rich decadence of dark chocolate. This homemade version delivers a smoother, creamier texture than store-bought alternatives, allowing you to control the intensity of both the mint flavor and chocolate content.
Making this ice cream from scratch ensures you get a natural mint taste without the artificial green coloring often found in commercial versions. The key is using fresh mint leaves for steeping, though pure mint extract can be substituted when fresh herbs aren't available. The chocolate chips should be finely chopped to prevent them from becoming too hard when frozen.
Ingredients:
- 2 cups heavy cream
- 1 cup whole milk
- 3/4 cup granulated sugar
- 1/4 teaspoon salt
- 1 cup fresh mint leaves
- 5 large egg yolks
- 1/2 teaspoon pure vanilla extract
- 1/4 teaspoon pure mint extract (optional)
- 6 ounces dark chocolate, finely chopped
In a medium saucepan, combine the cream, milk, sugar, and salt. Add the fresh mint leaves and heat until just simmering. Remove from heat, cover, and let steep for 1 hour. Strain the mixture and discard the mint leaves. Reheat the cream mixture until hot. In a separate bowl, whisk the egg yolks. Slowly pour the hot cream mixture into the egg yolks while whisking constantly. Return the entire mixture to the saucepan and cook over medium heat, stirring continuously, until it thickens enough to coat the back of a spoon.
Strain the custard into a clean bowl and stir in the vanilla and mint extract if using. Cover with plastic wrap directly on the surface and refrigerate until completely chilled, at least 4 hours or overnight. Pour the chilled custard into an ice cream maker and churn according to manufacturer's instructions. In the last few minutes of churning, add the chopped chocolate. Transfer to a freezer-safe container and freeze until firm, about 4 hours.
For best results, remove the ice cream from the freezer 5-10 minutes before serving to allow it to soften slightly. When chopping the chocolate, aim for very small pieces to prevent them from becoming too hard when frozen. If fresh mint leaves aren't available, increase the mint extract to 1 teaspoon, but add it gradually and taste as you go to achieve your desired mint intensity.
Coffee Mocha Ice Cream
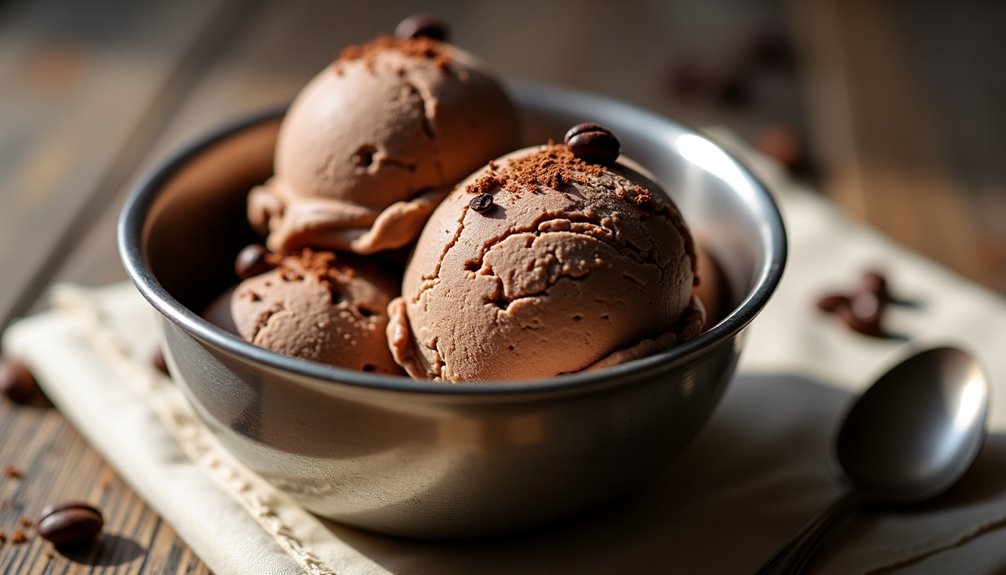
Coffee Mocha Ice Cream is a rich, creamy dessert that combines the bold flavors of coffee and chocolate into a luxurious frozen treat. The intense coffee notes are perfectly balanced with dark chocolate, creating a sophisticated ice cream that's perfect for both coffee and dessert enthusiasts.
This homemade version surpasses store-bought varieties by using real coffee and high-quality chocolate, resulting in a more authentic and robust flavor profile. The custom preparation method ensures a smooth, creamy texture without ice crystals, making it an ideal dessert for special occasions or as an indulgent treat.
Begin by combining the heavy cream and milk in a medium saucepan over medium heat. Add the espresso powder and stir until dissolved. Heat the mixture until it just starts to simmer, then remove from heat. In a separate bowl, whisk together the egg yolks and sugar until pale and slightly thickened. Slowly pour the hot cream mixture into the egg mixture, whisking constantly to prevent the eggs from curdling.
Return the entire mixture to the saucepan and cook over medium-low heat, stirring constantly with a wooden spoon, until the custard thickens enough to coat the back of the spoon. Remove from heat and add the chopped chocolate, stirring until completely melted and smooth. Stir in the brewed coffee, salt, and vanilla extract. Strain the mixture through a fine-mesh sieve into a clean bowl and let cool to room temperature.
Cover the custard with plastic wrap, pressing it directly onto the surface to prevent a skin from forming, and refrigerate for at least 4 hours or overnight. Once chilled, churn the mixture in an ice cream maker according to manufacturer's instructions, usually 20-25 minutes. Transfer to a freezer-safe container and freeze for at least 2 hours before serving.
For the best results, let the ice cream sit at room temperature for 5-10 minutes before scooping. The coffee flavor will become more pronounced after the ice cream has had time to mature in the freezer for 24 hours. To prevent ice crystals from forming, store the ice cream in an airtight container with a piece of plastic wrap pressed directly onto the surface of the ice cream.
- 2 cups heavy cream
- 1 cup whole milk
- 2/3 cup granulated sugar
- 4 large egg yolks
- 1/4 cup strong brewed coffee
- 2 tablespoons instant espresso powder
- 4 ounces dark chocolate, finely chopped
- 1/4 teaspoon salt
- 1 teaspoon vanilla extract
Lavender Honey Ice Cream
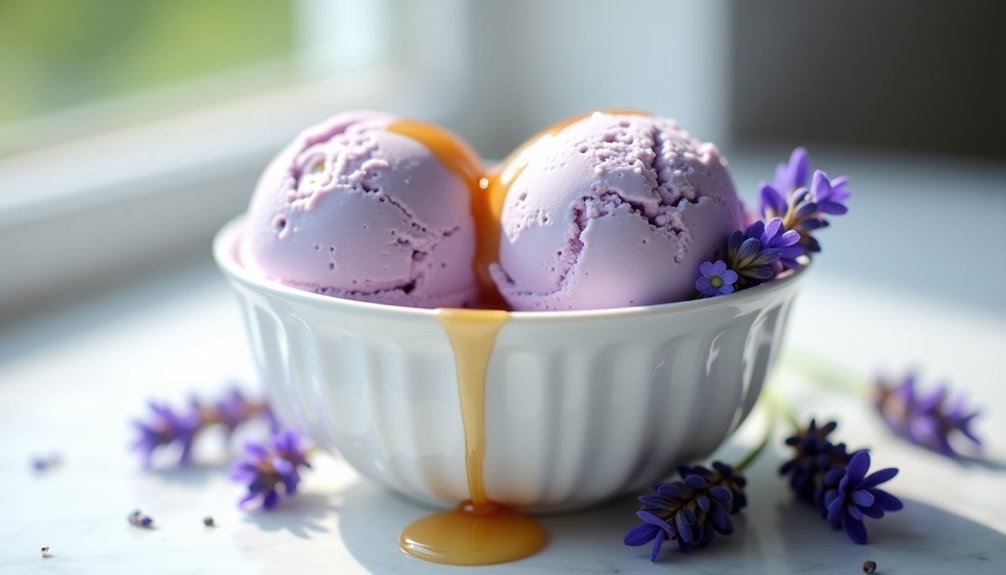
Lavender and honey combine to create an elegant and sophisticated ice cream flavor that brings the essence of Provençal summers to your dessert bowl. The floral notes of culinary lavender perfectly complement the sweet richness of honey, resulting in a uniquely aromatic frozen treat.
This recipe produces a French-style ice cream base using egg yolks for a silky, custard-like texture. The lavender is steeped in warm cream to extract its flavor, while the honey adds both sweetness and a subtle complexity that balances the floral elements.
Ingredients:
- 2 cups heavy cream
- 1 cup whole milk
- 4 egg yolks
- 1/3 cup honey
- 2 tablespoons dried culinary lavender
- 1/4 cup granulated sugar
- 1/4 teaspoon vanilla extract
- Pinch of salt
In a medium saucepan, combine the cream and milk. Add the lavender and heat until just beginning to simmer. Remove from heat, cover, and let steep for 30 minutes. Strain the mixture to remove the lavender. In a separate bowl, whisk together egg yolks, sugar, and honey until pale. Slowly stream the warm cream mixture into the egg mixture while whisking constantly. Return the entire mixture to the saucepan and cook over medium-low heat, stirring continuously, until it thickens enough to coat the back of a spoon.
Strain the custard into a clean bowl and stir in the vanilla extract and salt. Cover the surface directly with plastic wrap to prevent a skin from forming, then refrigerate until completely chilled, at least 4 hours or overnight. Once chilled, churn in an ice cream maker according to manufacturer's instructions. Transfer to a freezer-safe container and freeze until firm, about 4 hours.
For best results, use only culinary lavender, as ornamental varieties can be too potent and may impart a bitter taste. The ice cream should be removed from the freezer 5-10 minutes before serving to achieve the optimal creamy texture. If you find the lavender flavor too strong, reduce the steeping time or the amount of lavender used in your next batch.
Three-Ingredient Banana Ice Cream
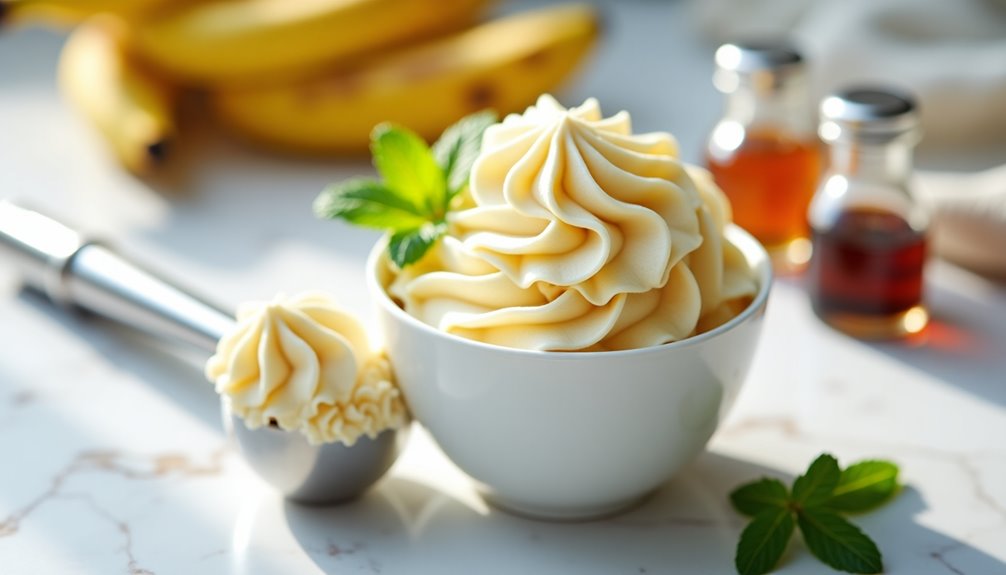
Three-ingredient banana ice cream offers a healthier alternative to traditional ice cream while maintaining a creamy, indulgent texture. This dairy-free dessert uses frozen bananas as its base, creating a naturally sweet treat that can be enjoyed guilt-free.
The beauty of this recipe lies in its simplicity and versatility. While the basic version requires just three ingredients, you can customize it with various mix-ins and toppings to create your perfect frozen dessert. The result is a smooth, rich ice cream that's particularly appealing to those following vegan or dairy-free diets.
Let the frozen bananas thaw slightly for about 5 minutes. Break them into chunks and place them in a food processor or high-powered blender. Add the almond milk and vanilla extract. Process the mixture until completely smooth, stopping occasionally to scrape down the sides of the bowl. The texture should resemble soft-serve ice cream.
Transfer the mixture to a freezer-safe container and freeze for at least 2 hours until firm. For the best texture, remove the ice cream from the freezer about 5 minutes before serving to allow it to soften slightly.
For optimal results, use very ripe bananas with brown spots on the peel, as they provide the sweetest flavor. When freezing bananas, peel them first and store them in an airtight container or zip-top bag. If the mixture becomes too thick during processing, add almond milk one teaspoon at a time until reaching the desired consistency. The ice cream can be stored in the freezer for up to two weeks.
Ingredients:
- 4 ripe bananas, peeled and frozen
- 2 tablespoons almond milk
- 1 teaspoon vanilla extract
Cookies and Cream Ice Cream
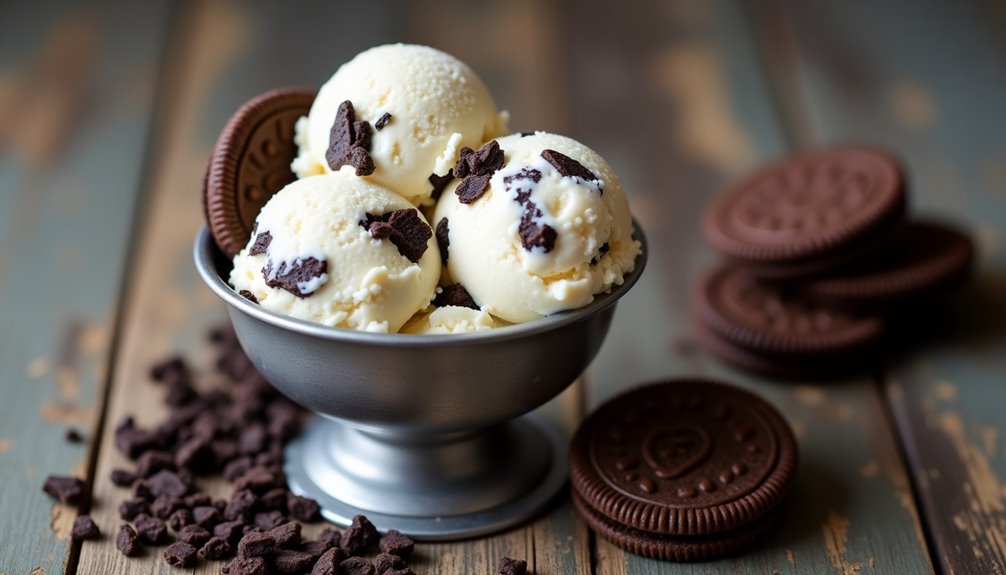
Cookies and cream ice cream represents the perfect fusion of smooth, creamy vanilla ice cream and the delightful crunch of chocolate sandwich cookies. This beloved flavor combination has become a classic dessert that appeals to both children and adults alike, making it an ideal homemade treat for any occasion.
Creating this ice cream at home allows you to control the quality of ingredients and customize the cookie-to-cream ratio to your liking. The basic recipe starts with a rich vanilla base that serves as the perfect canvas for crushed chocolate sandwich cookies, resulting in a dessert that rivals any store-bought version.
Ingredients:
- 2 cups heavy cream
- 1 cup whole milk
- 3/4 cup granulated sugar
- 1/4 teaspoon salt
- 2 teaspoons pure vanilla extract
- 4 large egg yolks
- 15 chocolate sandwich cookies, crushed
- Ice and rock salt (if using traditional ice cream maker)
Combine the heavy cream, milk, half of the sugar, and salt in a medium saucepan over medium heat, stirring occasionally until it nearly reaches a simmer. In a separate bowl, whisk together the egg yolks and remaining sugar until pale and slightly thickened. Slowly pour about 1 cup of the hot cream mixture into the egg mixture, whisking constantly to temper the eggs. Pour the tempered egg mixture back into the saucepan and cook over medium heat, stirring constantly, until the mixture thickens enough to coat the back of a spoon.
Strain the custard through a fine-mesh sieve into a clean bowl and stir in the vanilla extract. Cover the surface directly with plastic wrap and refrigerate until completely chilled, at least 4 hours or overnight. Once chilled, churn the mixture in an ice cream maker according to manufacturer's instructions. During the last few minutes of churning, add the crushed cookies and allow them to incorporate evenly.
For best results, allow the freshly churned ice cream to "ripen" in the freezer for at least 2 hours before serving. This allows the cookies to soften slightly and the flavors to meld together. When crushing the cookies, aim for a mixture of both fine crumbs and larger chunks to create varying textures throughout the ice cream. If the ice cream becomes too hard after freezing, let it sit at room temperature for 5-10 minutes before scooping.
Creamy Peanut Butter Ice Cream
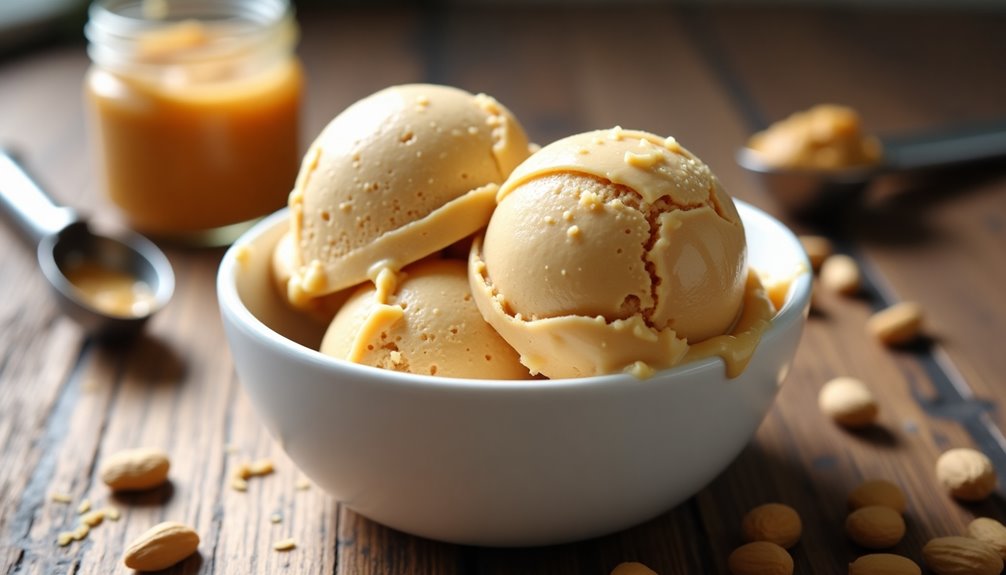
Rich, decadent, and silky smooth, homemade peanut butter ice cream delivers the perfect balance of sweet and nutty flavors that will satisfy any dessert craving. This classic frozen treat transforms simple ingredients into a luxurious dessert that rivals any premium store-bought version.
This recipe creates an ultra-creamy base enhanced with natural peanut butter, resulting in a smooth, scoopable texture that maintains its consistency even after freezing. The combination of heavy cream and whole milk provides the perfect foundation for the rich peanut butter flavor to shine through.
Combine the heavy cream, milk, sugar, and salt in a medium saucepan over medium heat. Warm the mixture until it starts to simmer, stirring occasionally to dissolve the sugar. In a separate bowl, whisk the egg yolks until pale. Slowly pour about 1 cup of the hot cream mixture into the egg yolks while whisking constantly to temper the eggs. Pour the tempered egg mixture back into the saucepan and cook over medium heat, stirring constantly until the mixture thickens enough to coat the back of a spoon.
Remove from heat and whisk in the peanut butter, vanilla extract, and corn syrup until smooth. Strain the mixture through a fine-mesh sieve into a clean bowl. Cover the surface directly with plastic wrap and refrigerate until completely chilled, at least 4 hours or overnight. Once chilled, churn in an ice cream maker according to manufacturer's instructions, usually 20-25 minutes, until it reaches a soft-serve consistency. Transfer to a freezer-safe container and freeze for at least 4 hours until firm.
- 2 cups heavy cream
- 1 cup whole milk
- 3/4 cup granulated sugar
- 1/2 teaspoon salt
- 1 cup smooth peanut butter
- 1 teaspoon vanilla extract
- 5 large egg yolks
- 1/4 cup light corn syrup
For the best results, use smooth, natural peanut butter without added sugars or oils, and ensure all ingredients are very cold before churning. Let the ice cream sit at room temperature for 5-10 minutes before scooping to achieve the perfect serving consistency. The corn syrup helps prevent ice crystals from forming, resulting in a smoother texture, but can be omitted if desired.