10 Easy Lunch Box Recipes
You're about to discover how to transform your daily lunch routine with 10 carefully crafted recipes that'll save you time and money. Whether you're packing lunch for work, school, or a day trip, these make-ahead options combine fresh ingredients with smart meal prep strategies. From protein-packed Mediterranean wraps to colorful pasta salads, each recipe offers practical tips for portion control, storage, and creative variations. Let's explore how these convenient options can revolutionize your midday meals.
Mediterranean Chickpea Wrap
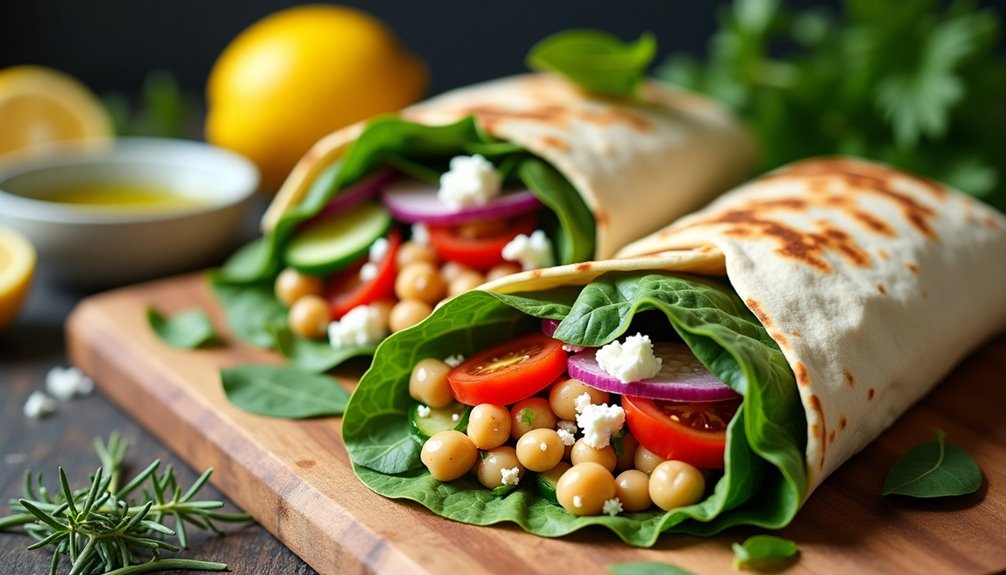
Mediterranean Chickpea Wrap is a protein-rich vegetarian lunch option that combines the hearty texture of chickpeas with fresh Mediterranean flavors. The wrap can be prepared in advance and stays fresh in the refrigerator, making it an ideal choice for meal prep and busy weekday lunches.
This nutritious wrap features a flavorful chickpea filling seasoned with classic Mediterranean spices and mixed with crisp vegetables. The combination of protein from chickpeas, healthy fats from olive oil, and fresh vegetables creates a balanced meal that will keep you satisfied throughout the day.
Ingredients:
- 2 large flour tortillas or flatbreads
- 1 can (15 oz) chickpeas, drained and rinsed
- 1/4 cup red onion, finely diced
- 1 cucumber, diced
- 1 cup cherry tomatoes, halved
- 1/2 cup crumbled feta cheese
- 2 cups fresh spinach leaves
- 2 tablespoons olive oil
- 1 tablespoon lemon juice
- 1 teaspoon dried oregano
- 1/2 teaspoon ground cumin
- Salt and pepper to taste
- Optional: Greek yogurt for spreading
Mash the chickpeas in a bowl until they're slightly crushed but still have some texture. Mix in the olive oil, lemon juice, oregano, and cumin. Add the diced red onion, cucumber, and tomatoes to the chickpea mixture, stirring to combine. Season with salt and pepper to taste.
Lay out the tortillas and spread a thin layer of Greek yogurt if using. Add a layer of fresh spinach leaves, followed by the chickpea mixture. Top with crumbled feta cheese. Fold in the sides of the tortilla and roll tightly from bottom to top, ensuring the filling stays secure.
For best results, wrap the prepared Mediterranean Chickpea Wrap tightly in parchment paper or plastic wrap before storing in the refrigerator. The wrap can be made up to 24 hours in advance, but add the spinach just before serving to prevent wilting. If packing for lunch, keep any dressing separate and add just before eating to maintain the wrap's texture.
Rainbow Pasta Salad

Rainbow Pasta Salad is a vibrant and nutritious dish that combines colorful vegetables with tender pasta, creating a perfect balance of textures and flavors. It's an ideal option for meal prep, picnics, or potluck gatherings, as it can be served both cold and at room temperature.
This versatile recipe allows for customization based on seasonal vegetables and personal preferences. The combination of fresh, crunchy vegetables with al dente pasta and a tangy vinaigrette creates a satisfying meal that's both healthy and visually appealing.
- 16 oz rotini pasta
- 1 red bell pepper, diced
- 1 yellow bell pepper, diced
- 1 orange bell pepper, diced
- 2 cups cherry tomatoes, halved
- 1 cucumber, diced
- 1 cup red onion, finely chopped
- 2 cups broccoli florets
- 1 cup black olives, sliced
- 1/2 cup extra virgin olive oil
- 1/4 cup red wine vinegar
- 2 tablespoons Italian seasoning
- 1 teaspoon garlic powder
- Salt and pepper to taste
- 1/2 cup grated Parmesan cheese
Cook the pasta in a large pot of salted water according to package instructions until al dente. While the pasta cooks, prepare all vegetables by washing and chopping them into uniform, bite-sized pieces. Once the pasta is cooked, drain it and rinse under cold water to stop the cooking process.
In a large mixing bowl, combine the cooled pasta with all the chopped vegetables and olives. In a separate small bowl, whisk together the olive oil, red wine vinegar, Italian seasoning, garlic powder, salt, and pepper to create the dressing. Pour the dressing over the pasta mixture and toss gently to combine. Add the Parmesan cheese and toss once more until everything is evenly distributed.
For best results, refrigerate this salad for at least 2 hours before serving to allow the flavors to meld. The pasta may absorb some of the dressing during storage, so consider reserving a portion of the dressing to add just before serving. This salad can be stored in an airtight container in the refrigerator for up to 5 days.
Protein Power Box
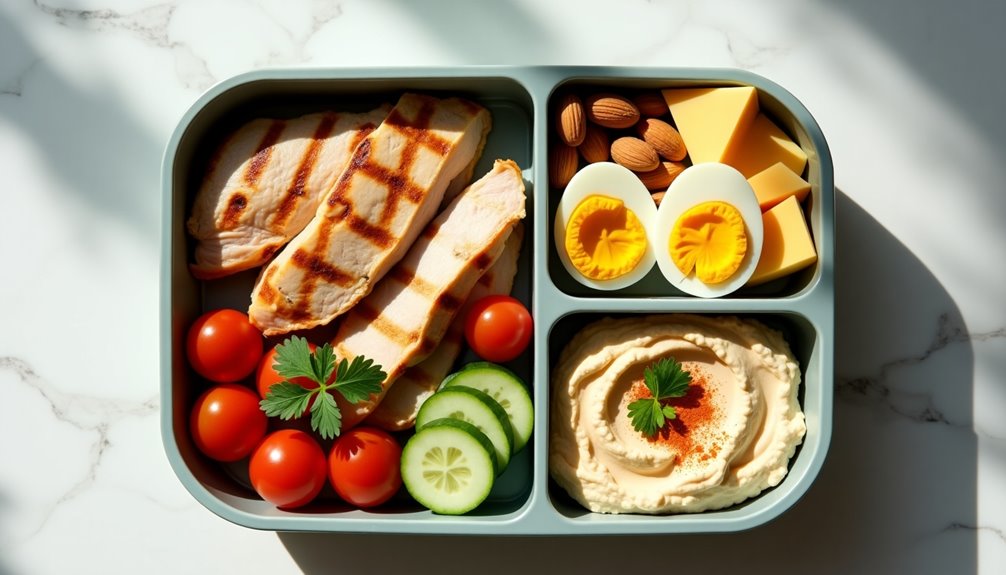
Protein Power Box is a versatile and nutritious meal prep option that combines lean proteins with complementary ingredients for a perfectly balanced lunch. This no-cook assembly makes it an ideal choice for busy professionals and students who need sustained energy throughout the day.
The beauty of the Protein Power Box lies in its customization potential and make-ahead convenience. Each component can be prepared in advance and assembled the night before, staying fresh for up to three days when properly refrigerated. The combination of proteins, healthy fats, and complex carbohydrates provides sustained energy without the mid-afternoon crash.
- 4 oz grilled chicken breast, sliced
- 2 hard-boiled eggs
- 1/4 cup almonds
- 1 oz cheese cubes
- 1/2 cup cherry tomatoes
- 1/2 cup cucumber slices
- 2 tablespoons hummus
- 4-5 whole grain crackers
- 1 small container Greek yogurt
- Fresh herbs for garnish
Start by preparing the protein components. Grill the chicken breast seasoned with salt and pepper until fully cooked, then slice into strips. Simultaneously, prepare hard-boiled eggs by placing them in boiling water for 8 minutes, then immediately transferring to an ice bath. Once cooled, peel and cut in half.
Arrange the components in a compartmentalized lunch container. Place the sliced chicken in the largest section, followed by the hard-boiled eggs, cheese cubes, and almonds in separate compartments. Fill the remaining sections with cherry tomatoes, cucumber slices, and a small container of hummus. Place crackers in a separate bag to maintain crispness.
For optimal freshness, store the assembled box in an airtight container and keep refrigerated until ready to eat. Consider packing dressings or sauces separately to prevent soggy ingredients, and include an ice pack if the lunch box will be out of refrigeration for more than 2 hours. Proteins can be swapped with alternatives like tuna, tofu, or turkey to maintain variety throughout the week.
Veggie-Loaded Pinwheels
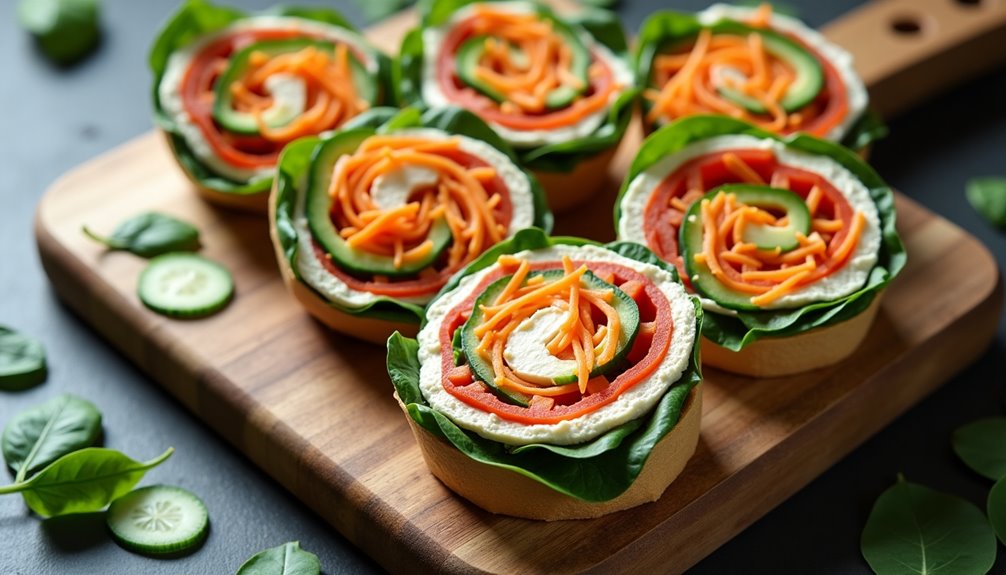
Veggie-Loaded Pinwheels are a perfect lunch box solution that combines the convenience of a sandwich with the fun presentation of bite-sized spirals. These colorful roll-ups not only look appetizing but also pack a nutritious punch with their variety of fresh vegetables and spreads.
These pinwheels can be prepared the night before, making them ideal for busy mornings when time is limited. The tortilla base provides a sturdy foundation while the cream cheese spread helps hold all the ingredients together, ensuring the pinwheels maintain their shape until lunchtime.
- Large flour tortillas
- Cream cheese, softened
- Bell peppers (red, yellow, or orange), thinly sliced
- Cucumber, julienned
- Carrots, shredded
- Baby spinach leaves
- Red onion, thinly sliced
- Italian seasoning
- Salt and pepper to taste
Spread a thin, even layer of softened cream cheese over each tortilla, leaving a small border around the edges. Season with Italian seasoning, salt, and pepper. Layer the vegetables evenly across the cream cheese, starting with spinach leaves, followed by bell peppers, cucumber, carrots, and red onion.
Carefully roll each tortilla tightly, applying gentle pressure to keep the filling compact. Wrap the rolled tortillas in plastic wrap and refrigerate for at least 30 minutes to help them set. Once chilled, unwrap and slice into 1-inch pieces using a sharp knife.
To prevent soggy pinwheels, pat all vegetables dry before adding them to the tortilla. If preparing the night before, place paper towels between layers when storing to absorb any excess moisture. For the best results, slice the pinwheels just before packing them in the lunch box, and arrange them cut-side up to maintain their shape during transport.
Mason Jar Taco Salad
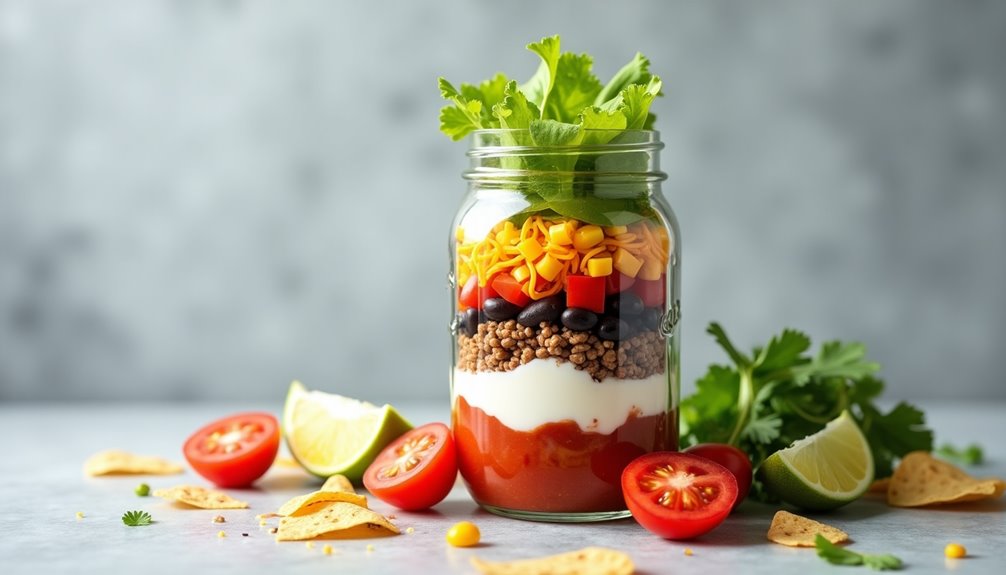
Mason jar taco salads are a convenient and healthy meal prep solution that brings the vibrant flavors of Mexican cuisine to your workday lunch. The layered ingredients stay fresh throughout the week when properly assembled, and the vertical presentation in a mason jar not only looks appetizing but also keeps ingredients crisp and separate until ready to eat.
This portable version of the classic taco salad can be customized to match your dietary preferences while maintaining the essential components that make it delicious. The key to success lies in the strategic layering of ingredients, with dressing at the bottom and delicate greens at the top to prevent sogginess.
Ingredients:
- 1 pound ground beef or turkey
- 1 packet taco seasoning
- 2 cups cherry tomatoes, halved
- 1 can black beans, drained and rinsed
- 1 cup corn kernels
- 1 red onion, diced
- 2 cups shredded lettuce
- 1 cup shredded cheddar cheese
- 1 cup crushed tortilla chips
- 1/2 cup salsa
- 1/2 cup sour cream
- 4 (32-ounce) mason jars
Brown the meat in a large skillet over medium heat, drain excess fat, and season with taco seasoning according to package instructions. Allow the meat to cool completely before assembling the jars. Start layering in each mason jar with wet ingredients first: divide the salsa and sour cream between the jars, followed by tomatoes, black beans, corn, and onions. Add the cooled seasoned meat, then cheese, and finally top with shredded lettuce.
Pack the crushed tortilla chips separately to maintain their crunch. When ready to eat, simply shake the contents onto a plate or eat directly from the jar after adding the chips. The jars can be prepared up to 5 days in advance when stored properly in the refrigerator.
For best results, make sure all ingredients are completely cool before layering and avoid overpacking the jars. If using avocado, either add it fresh before eating or toss the chunks in lime juice before adding to help prevent browning. The mason jars should be tightly sealed and stored upright in the refrigerator to maintain the layered effect and keep ingredients fresh.
Quinoa Buddha Bowl
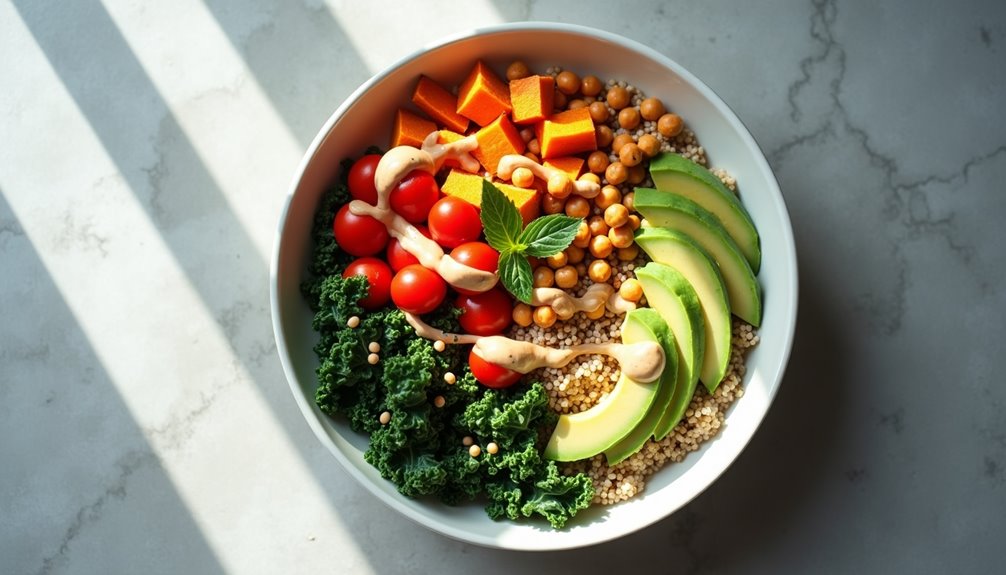
This recipe features a colorful mix of roasted vegetables, protein-rich quinoa, and a zesty tahini dressing that brings all the flavors together. The combination of textures and flavors creates a satisfying meal that will keep you energized throughout the day.
Ingredients:
- 1 cup quinoa
- 2 cups water
- 1 sweet potato, cubed
- 1 cup chickpeas, drained and rinsed
- 2 cups kale, chopped
- 1 avocado, sliced
- 1 cup cherry tomatoes, halved
- 2 tablespoons olive oil
- 3 tablespoons tahini
- 1 lemon, juiced
- 1 clove garlic, minced
- Salt and pepper to taste
- Optional: sesame seeds for garnish
Start by cooking the quinoa. Rinse it thoroughly under cold water, then combine with 2 cups of water in a medium saucepan. Bring to a boil, reduce heat, cover, and simmer for 15-20 minutes until the water is absorbed and the quinoa is fluffy.
While the quinoa cooks, preheat your oven to 400°F (200°C). Toss the sweet potato cubes and chickpeas with 1 tablespoon of olive oil, salt, and pepper, then spread them on a baking sheet. Roast for 20-25 minutes until the sweet potatoes are tender and the chickpeas are crispy.
For the dressing, whisk together tahini, lemon juice, minced garlic, remaining olive oil, and 2-3 tablespoons of water until smooth. Season with salt and pepper. Massage the chopped kale with a small amount of the dressing to soften it.
Assemble the bowls by dividing the quinoa among containers, then arranging the roasted vegetables, chickpeas, kale, cherry tomatoes, and avocado on top. Drizzle with the remaining tahini dressing and sprinkle with sesame seeds if desired.
For best results, store the avocado and dressing separately until ready to eat. The vegetables can be roasted in advance and stored in an airtight container for up to four days. To prevent the quinoa from becoming dry, splash a small amount of water or broth when reheating. You can also customize the bowl with different vegetables or proteins based on your preferences or what's in season.
Turkey and Apple Roll-Ups
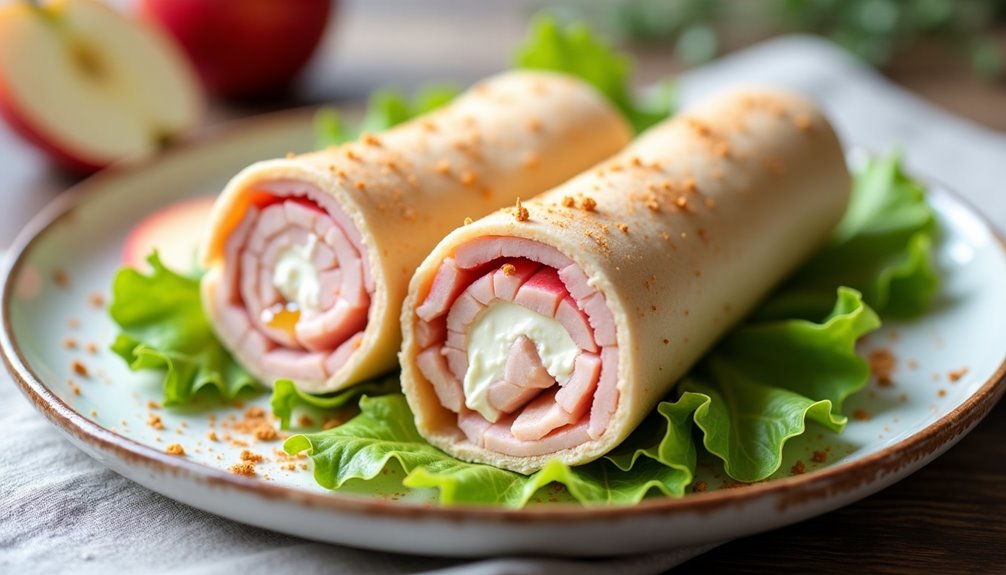
Turkey and Apple Roll-Ups are a delicious and nutritious lunch option that combines lean protein with fresh fruit and creamy elements. This balanced combination provides sustained energy throughout the day while satisfying both sweet and savory cravings.
Perfect for both children and adults, these roll-ups can be prepared in advance and are highly customizable based on personal preferences. The contrast between the crisp apple and tender turkey creates an appealing texture, while the spread adds richness and helps hold everything together.
Ingredients:
- 8 slices turkey breast deli meat
- 2 medium apples, thinly sliced
- 4 oz cream cheese, softened
- 2 tablespoons honey
- 8 large lettuce leaves
- 1/4 teaspoon cinnamon
- 1/8 teaspoon salt
Mix the softened cream cheese with honey, cinnamon, and salt until well combined. Lay out a slice of turkey breast and spread a thin layer of the cream cheese mixture evenly across it. Place a lettuce leaf on top, followed by 3-4 thin apple slices in a line near one end. Starting from the end with the apple slices, tightly roll the turkey slice, keeping the filling secure inside. Repeat with remaining ingredients.
For best results, slice apples just before assembling to prevent browning, and ensure cream cheese is at room temperature for easy spreading. If packing for lunch, wrap each roll-up individually in parchment paper or plastic wrap and store in an airtight container. These roll-ups can be made up to 24 hours in advance when properly stored in the refrigerator.
Asian-Style Noodle Box
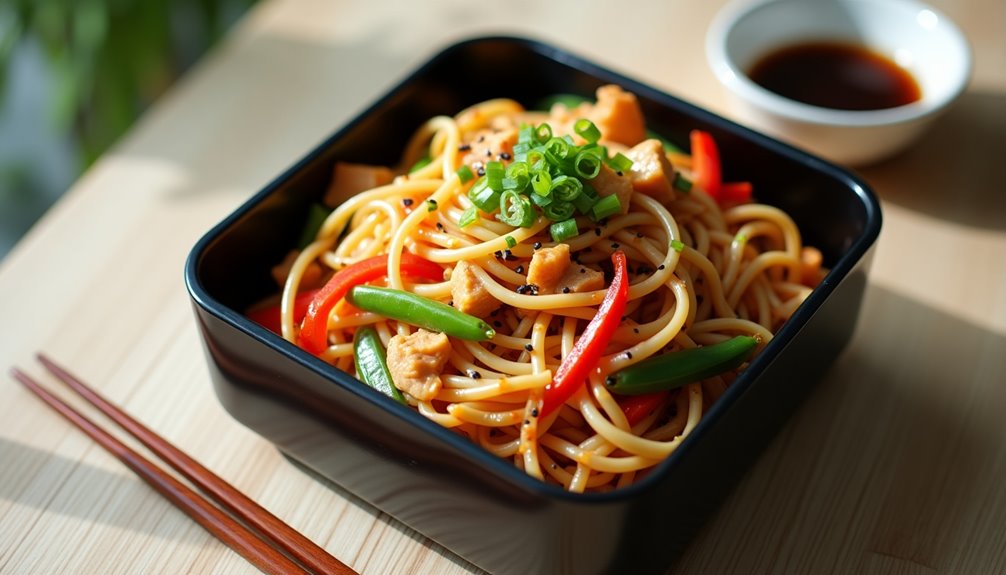
The beauty of this recipe lies in its flexibility – you can customize the vegetables and protein according to your preferences or what you have available. The sauce can be prepared ahead of time, making this an ideal meal prep option for busy weekdays.
Ingredients:
- 8 oz rice noodles or egg noodles
- 2 cups shredded carrots
- 1 red bell pepper, sliced
- 2 cups snap peas
- 1 cup bean sprouts
- 2 cups cooked chicken or tofu
- 3 tablespoons sesame oil
- 3 tablespoons soy sauce
- 2 tablespoons rice vinegar
- 1 tablespoon honey
- 1 tablespoon grated ginger
- 2 cloves minced garlic
- ¼ cup chopped green onions
- 2 tablespoons sesame seeds
Cook the noodles according to package instructions until al dente. While the noodles cook, whisk together sesame oil, soy sauce, rice vinegar, honey, ginger, and garlic in a small bowl. Heat a large wok or skillet over medium-high heat, add half the sauce mixture and stir-fry the vegetables until crisp-tender.
Add the cooked noodles and protein to the wok, then pour in the remaining sauce. Toss everything together until well combined and heated through. Garnish with green onions and sesame seeds before transferring to lunch boxes.
For best results, allow the dish to cool completely before sealing the lunch boxes. The noodles will continue to absorb the sauce as they sit, so consider adding a small extra portion of sauce in a separate container if planning to eat the dish cold. To prevent the noodles from becoming mushy, avoid overcooking them initially, as they'll continue to soften slightly as they cool.
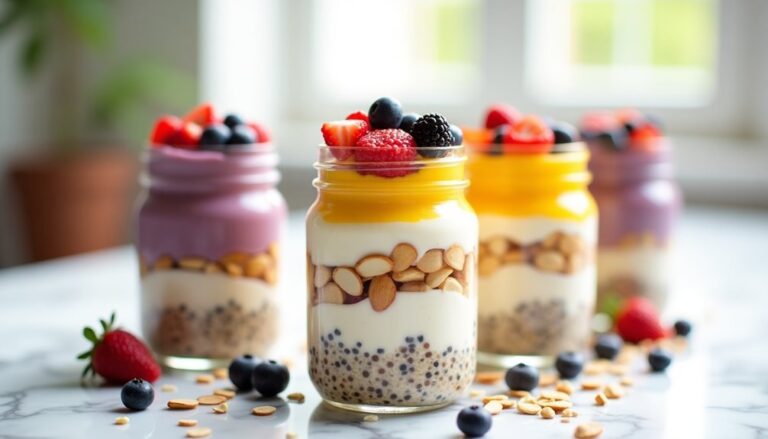
Greek Yogurt Parfait Station
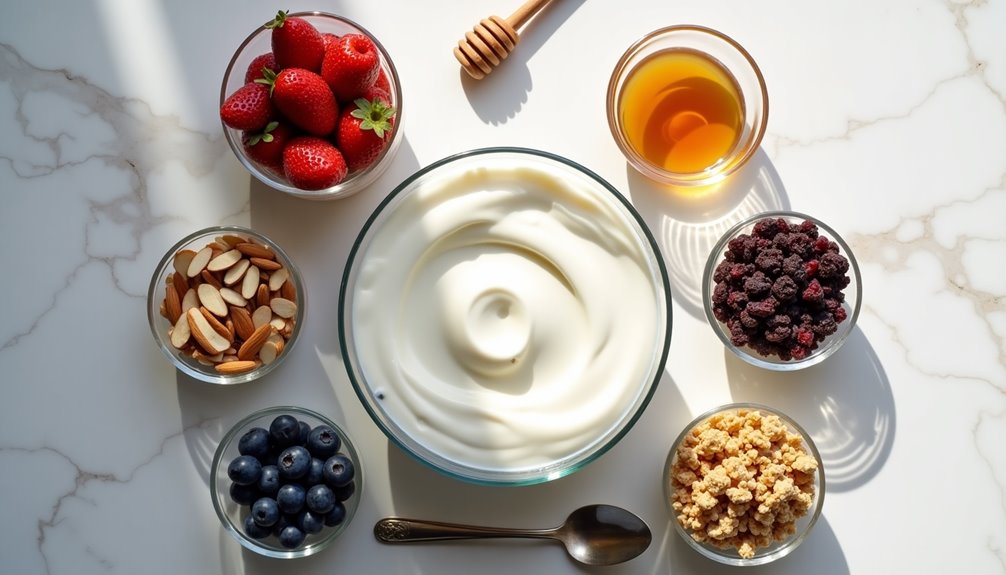
A Greek yogurt parfait station is a versatile and healthy lunch box option that combines protein-rich yogurt with various toppings for a customizable meal. This no-cook recipe can be assembled quickly in the morning or prepared the night before, making it perfect for busy schedules.
The beauty of a parfait station lies in its flexibility – you can mix and match ingredients based on preferences and dietary needs. When packed properly in separate containers, the components stay fresh and crunchy until lunchtime, allowing for assembly just before eating.
Ingredients:
- 2 cups plain Greek yogurt
- 1 cup mixed berries (strawberries, blueberries, raspberries)
- 1/2 cup granola
- 2 tablespoons honey
- 1/4 cup chopped nuts (almonds, walnuts, or pecans)
- 2 tablespoons chia seeds
- 1/4 cup dried fruit
- Small containers or compartment lunch box
- Ice pack for transport
Pack each component of the parfait station in separate containers or compartments of a lunch box. Place the Greek yogurt in the largest container, and distribute the toppings among smaller containers. If using fresh berries, wash and dry them thoroughly before packing. Include a small container of honey for drizzling.
For best results, keep all ingredients chilled with an ice pack during transport. When ready to eat, layer the yogurt with desired toppings, starting with yogurt at the bottom, followed by fruits, granola, nuts, and a drizzle of honey. Mix and match toppings according to preference.
Store-bought granola can be replaced with homemade versions for better control over ingredients and sugar content. If packing for someone with nut allergies, substitute nuts with seeds or additional dried fruit. The yogurt can be flavored with vanilla extract or cinnamon before packing, and frozen berries can be used as they'll thaw by lunchtime while helping keep the yogurt cold.
Bento Box Combinations
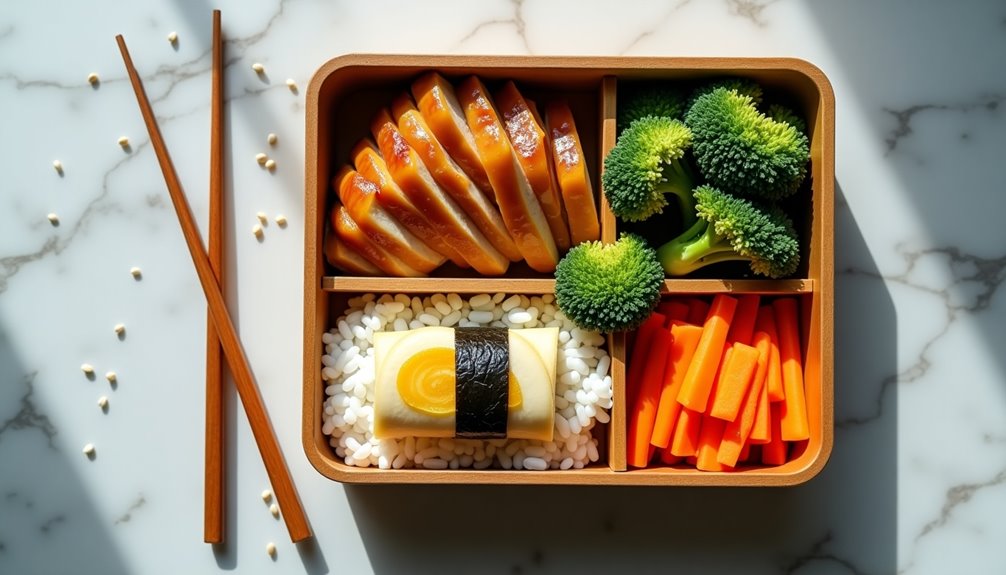
A bento box is a perfectly portioned, visually appealing meal that combines various elements of a balanced diet into one convenient container. Traditional bento boxes typically include rice, protein, vegetables, and sometimes fruit, arranged in an aesthetically pleasing way that makes lunchtime more enjoyable.
This recipe focuses on a classic Japanese-style bento that features teriyaki chicken, seasoned rice, tamagoyaki (rolled omelet), and colorful vegetables. The combination provides a good balance of nutrients while maintaining the traditional bento box principles of variety in colors, textures, and flavors.
Ingredients:
- 1 cup sushi rice
- 1 chicken breast
- 2 eggs
- 2 tablespoons soy sauce
- 2 tablespoons mirin
- 1 tablespoon sugar
- 1 cup broccoli florets
- 1 carrot
- 1 sheet nori (seaweed)
- 1 tablespoon rice vinegar
- 1 teaspoon sesame oil
- Salt and pepper to taste
- 2 tablespoons vegetable oil
Start by cooking the rice according to package instructions. While the rice cooks, prepare the teriyaki sauce by combining soy sauce, mirin, and sugar in a small bowl. Cook the chicken breast in the teriyaki sauce until well-glazed and cooked through. For the tamagoyaki, beat the eggs with a pinch of salt and cook in thin layers, rolling each layer as you go. Steam the broccoli until tender-crisp and julienne the carrots.
Once the rice is done, season it with rice vinegar and arrange all components in the bento box compartments, placing the nori strip between the rice and other ingredients.
When assembling the bento box, place the rice in the largest compartment, followed by the sliced teriyaki chicken, rolled tamagoyaki, and vegetables in their respective sections. Remember to let all components cool completely before closing the bento box to prevent condensation, which can make the food soggy.
To ensure the best results, prepare the components the night before and assemble the box in the morning. Use food dividers or lettuce leaves to keep different items separate and maintain their individual flavors. The bento will stay fresh for up to 4-6 hours at room temperature if properly packed and stored in a cool place until lunchtime.