Easy Roast Beef And Cheddar Sliders Recipe
Picture your game day party transforming from ordinary to extraordinary with just one simple recipe. You'll want to master these roast beef and cheddar sliders that come together faster than a quarterback's pass. These mini sandwiches combine tender deli roast beef, sharp cheddar, and soft Hawaiian rolls into a crowd-pleasing appetizer that'll have your guests asking for the recipe. Curious how such a simple dish can become the star of your next gathering? Let's break down this foolproof slider strategy that guarantees culinary success.
Recipe Highlights
- These sliders combine thinly sliced deli roast beef and sharp cheddar cheese on soft Hawaiian rolls for a quick and delicious appetizer.
- Prepare by layering roast beef and cheese on horizontally sliced rolls, then brush with melted butter and optional dried onion flakes.
- Bake at 350°F for approximately 15-20 minutes, covered with foil, to ensure cheese melts and rolls become lightly crispy.
- Perfect for game day gatherings, potlucks, and family dinners, these sliders offer maximum flavor with minimal preparation effort.
- Serve immediately after baking to enjoy the optimal texture of melted cheese and warm, slightly crisp rolls.
History
While sliders might seem like a modern culinary trend, their roots actually stretch back to the early 20th century in American food culture.
White Castle, a famous fast-food chain, popularized these miniature hamburgers in 1921, creating small, affordable sandwiches that quickly became a nationwide sensation.
These compact sandwiches earned their name from their ability to "slide" across the griddle during cooking, and they soon became a staple in diners and casual restaurants.
By mid-century, creative cooks began experimenting with different fillings, moving beyond traditional beef to include variations like roast beef and cheese.
The slider's versatility and convenience made it a beloved menu item, eventually transitioning from diner fare to a popular party food that could be easily customized and enjoyed by people of all ages.
Recipe
Roast Beef and Cheddar Sliders are a crowd-pleasing appetizer that combines savory roast beef, sharp cheddar cheese, and soft, buttery rolls into one irresistible bite-sized sandwich.
Perfect for game day gatherings, potlucks, or family dinners, these sliders offer maximum flavor with minimal preparation time.
The key to exceptional sliders is using high-quality ingredients and creating a balance of flavors and textures. Thinly sliced deli roast beef and sharp cheddar cheese provide a rich, robust taste, while Hawaiian rolls offer a soft, slightly sweet foundation that complements the meat and cheese perfectly.
Ingredients:
- 12 slider buns (Hawaiian rolls preferred)
- 1 pound thinly sliced deli roast beef
- 8 ounces sharp cheddar cheese, sliced
- 4 tablespoons butter, melted
- 1 tablespoon dried onion flakes
- Optional: 1 teaspoon garlic powder
Preheat the oven to 350°F and prepare a baking dish. Slice the slider buns horizontally, keeping them connected as one unit.
Arrange the bottom half of the buns in the baking dish, creating a base for the sliders. Layer the thinly sliced roast beef evenly across the buns, followed by a layer of sharp cheddar cheese.
Place the top half of the buns over the cheese and beef. Brush the tops generously with melted butter, ensuring even coverage.
Sprinkle dried onion flakes and optional garlic powder over the buttered buns. Cover the baking dish with aluminum foil and bake for 10-12 minutes, allowing the cheese to melt completely.
Remove the foil and bake for an additional 2-3 minutes to achieve a golden-brown top.
For best results, assemble the sliders no more than a few hours before baking and store them covered in the refrigerator.
Avoid overloading the sliders with too much meat or cheese, as this can make them difficult to eat and potentially soggy.
Serve immediately after baking for the most enjoyable eating experience, and consider offering complementary condiments like horseradish sauce or Dijon mustard on the side.
Cooking Steps
You'll start by carefully slicing the Hawaiian rolls horizontally, ensuring they remain connected to create a convenient slider base for even layering.
Next, spread the roast beef and cheese across the bottom half of the rolls with precision, making sure each slider gets a balanced portion of savory meat and sharp cheddar.
Finish by brushing the top buns with melted butter and sprinkling dried onion flakes, which will add a golden, aromatic finish to your sliders.
Step 1. Slice Hawaiian Rolls Horizontally
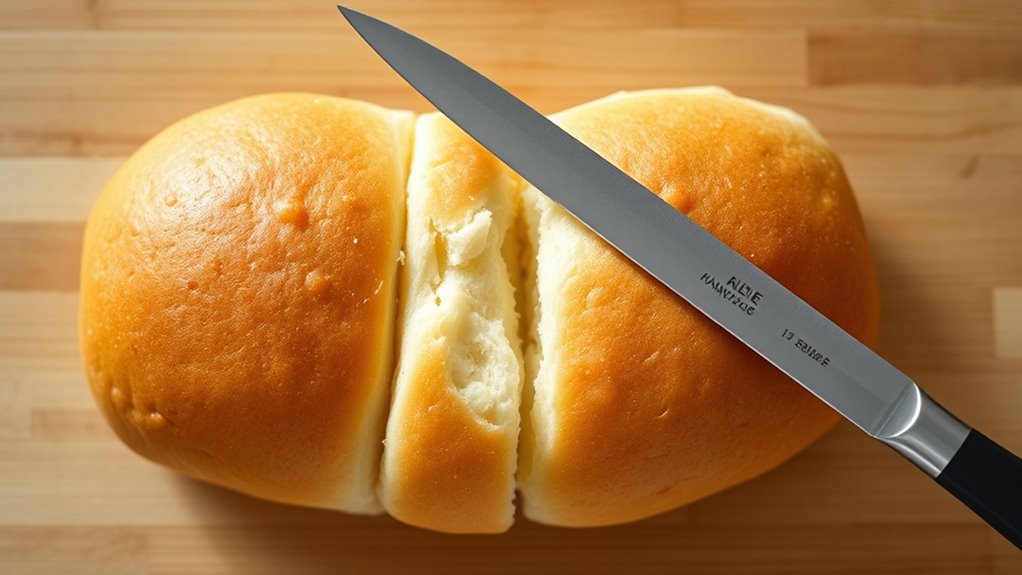
Because perfectly sliced Hawaiian rolls are crucial to making delectable sliders, you'll want to approach this step with precision and care. Start by placing your package of Hawaiian rolls on a clean cutting board, then use a long, serrated knife for a smooth, even cut.
Key slicing tips:
- Keep rolls connected at base
- Cut horizontally through entire package
- Maintain consistent 1/2-inch thickness
- Use gentle, sawing motion
- Apply light, steady pressure
You'll want to slice in one smooth motion, keeping the blade parallel to the work surface. Ensure your knife is sharp to prevent crushing the delicate rolls.
After slicing, gently separate the top and bottom halves, creating a perfect base for layering roast beef and melted cheddar. This technique guarantees uniform sliders that look as good as they taste.
Step 2. Layer Roast Beef Evenly
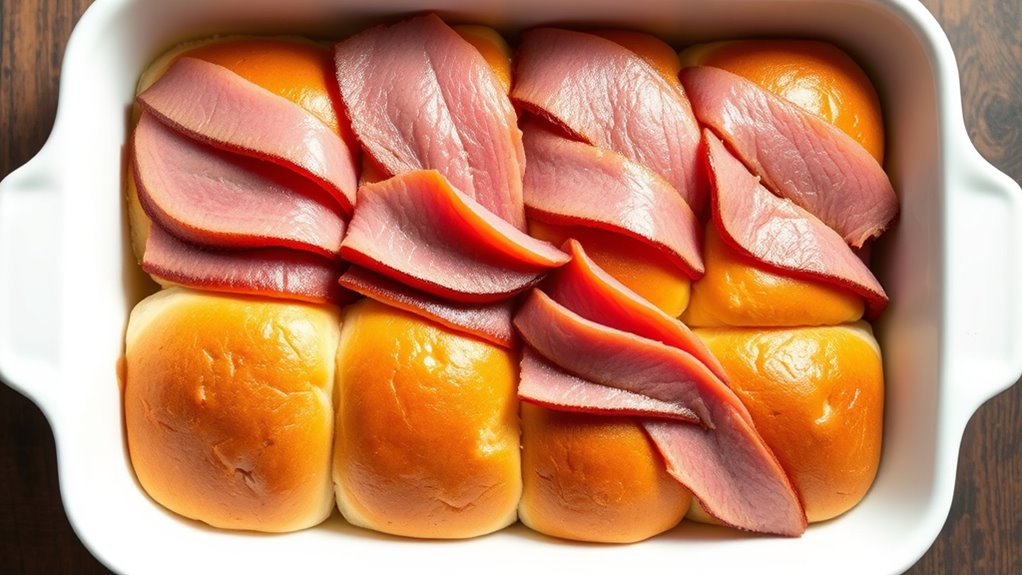
When preparing to layer roast beef for your sliders, start by ensuring your deli-sliced meat is at room temperature, which helps it spread more evenly across the Hawaiian rolls.
Aim to create a uniform layer that covers each roll's surface without excessive bunching or gaps. Use kitchen tongs or clean hands to gently separate and arrange thin slices, overlapping them slightly to create full coverage.
Your goal is approximately 1-2 ounces of roast beef per slider, which provides substantial flavor without overwhelming the delicate roll.
Press the meat down lightly to ensure good contact with the bottom bun, creating a stable foundation for the upcoming cheese layer.
Work methodically and deliberately, maintaining consistent thickness across all sliders for uniform cooking and presentation.
Step 3. Layer Cheese Carefully
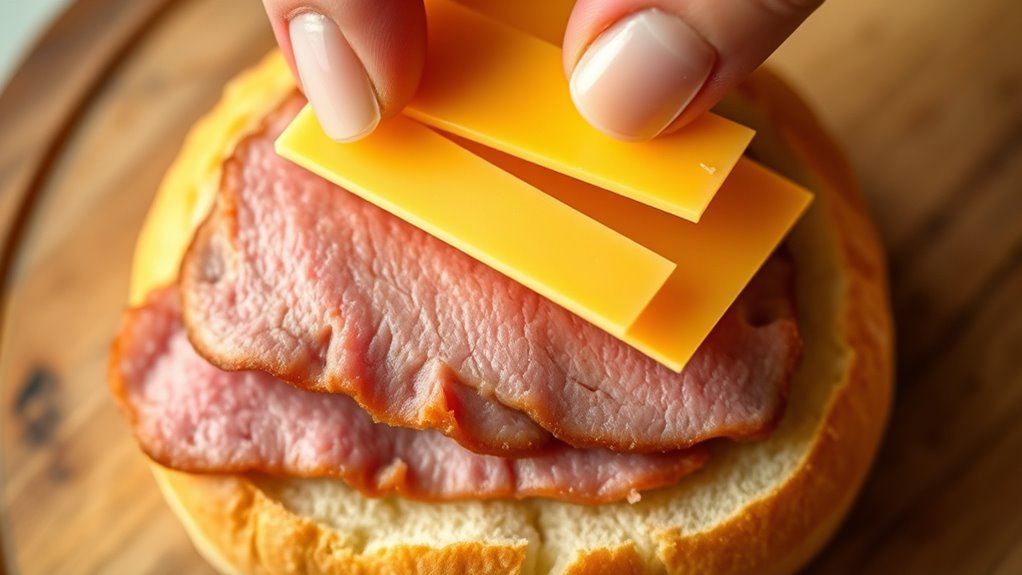
Slice the sharp cheddar cheese into thin, even pieces that perfectly match the dimensions of your slider buns. You'll want to create uniform slices, about 1/8-inch thick, ensuring complete coverage without overwhelming the delicate balance of your sandwich.
Work systematically, laying each slice directly onto the roast beef, allowing slight overlap to guarantee melting coverage.
Select high-quality sharp cheddar for maximum flavor impact.
Consider these cheese placement tips:
- Center slices precisely on meat layer
- Leave minimal bare spots
- Use room-temperature cheese for smoother melting
- Trim edges if necessary for clean presentation
Press cheese gently to help it adhere to the roast beef. This careful layering technique ensures each bite delivers consistent, gooey cheese goodness without making the slider messy or difficult to eat.
Step 4. Brush Buns With Butter
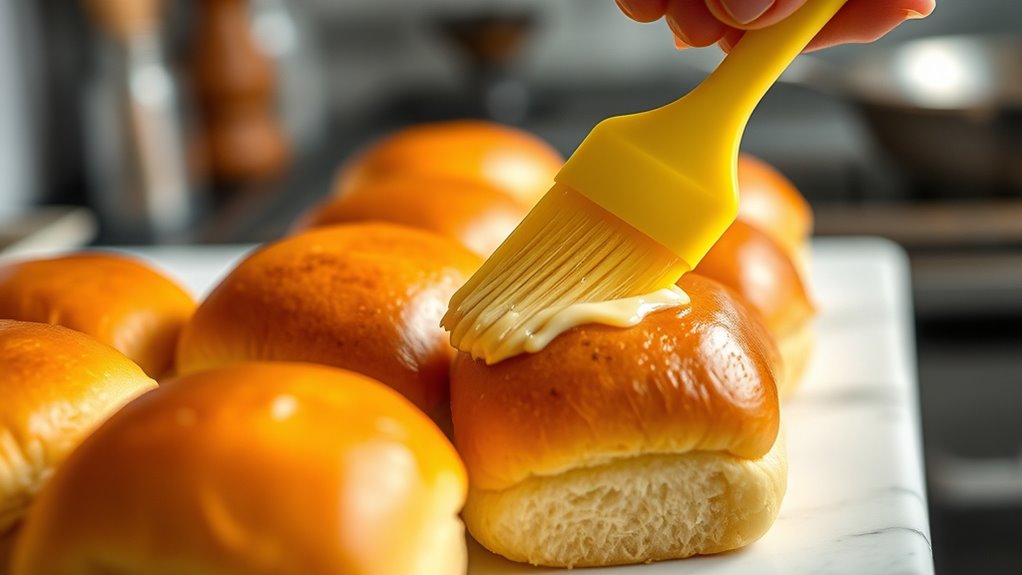
After carefully positioning your cheese slices, you'll want to elevate these sliders with a rich, buttery finish that'll transform ordinary rolls into golden, flavor-packed mini sandwiches.
Melt 4 tablespoons of butter and grab a pastry brush for even distribution. Gently brush the tops of the slider buns, ensuring a thin, uniform layer that'll create a gorgeous golden-brown sheen during baking.
Key butter brushing tips:
- Use unsalted butter for better control of saltiness
- Brush in smooth, consistent strokes
- Cover entire top surface evenly
- Consider adding garlic powder or dried herbs to melted butter for extra flavor
The butter not only enhances visual appeal but also helps create a crisp, slightly crunchy exterior that complements the tender roast beef and melty cheddar inside.
Step 5. Sprinkle Dried Onion Flakes

Enhance your roast beef and cheddar sliders with a sprinkle of dried onion flakes, transforming these mini sandwiches from good to unforgettable. These dehydrated allium nuggets add a concentrated burst of savory flavor that elevates your entire dish with minimal effort.
When sprinkling, aim for an even distribution across the top of the buttered slider buns, creating a uniform layer that'll infuse each bite with aromatic depth.
Key tips for perfect application:
- Use approximately 1 tablespoon of dried onion flakes
- Scatter flakes gently to prevent clumping
- Focus on creating a light, consistent coverage
- Press flakes lightly so they adhere to the melted butter
The result? Sliders with complex, restaurant-quality flavor that'll impress your guests.
Final Thoughts
Because roast beef and cheddar sliders represent a culinary gem in party appetizers, you'll find these miniature sandwiches are both impressive and surprisingly simple to master.
Whether you're hosting a game day gathering or a casual family dinner, these sliders will become your go-to recipe. They're versatile, quick to prepare, and guaranteed to please diverse crowds.
Key tips include using quality deli roast beef, sharp cheddar, and not overloading your rolls. The butter and dried onion flakes elevate the flavor profile, transforming basic ingredients into a crowd-pleasing dish.
Remember to serve immediately after baking, ensuring maximum cheese meltiness and roll crispness. Your guests will appreciate the thoughtful preparation and delectable combination of tender meat and melty cheese.