10 Easy Thanksgiving Recipes
You're about to discover how to create a stress-free Thanksgiving feast with recipes that won't keep you trapped in the kitchen all day. These 10 foolproof dishes combine classic flavors with smart shortcuts, helping you serve up everything from a perfectly moist turkey to a velvety pumpkin pie. Whether you're a first-time host or a seasoned cook, you'll find time-saving techniques and make-ahead options that'll let you actually enjoy the holiday alongside your guests.
No-Fuss Herb-Roasted Turkey
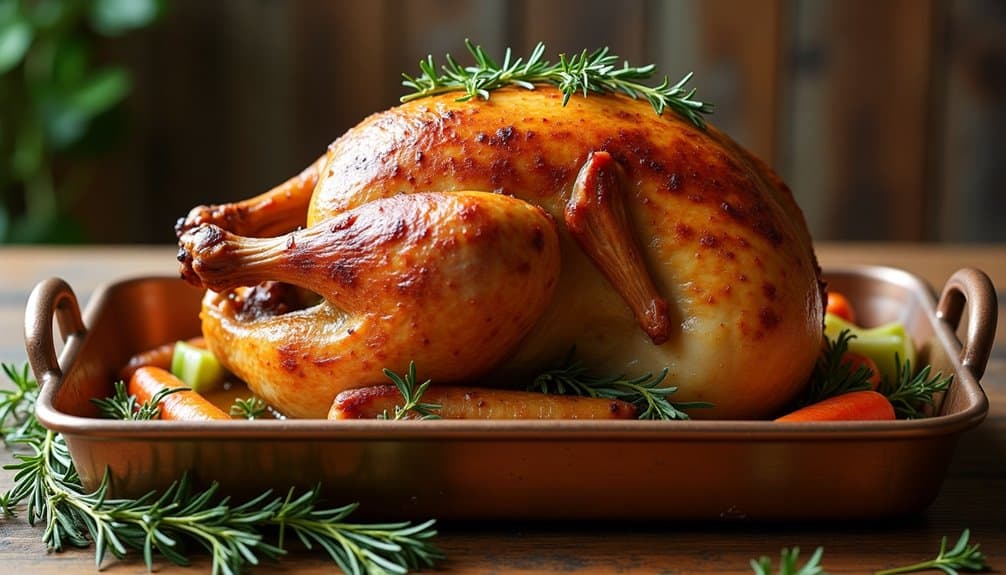
No-Fuss Herb-Roasted Turkey delivers the perfect combination of crispy skin and juicy meat while keeping the preparation simple and straightforward. This recipe eliminates the need for brining or complicated techniques, relying instead on a flavorful herb butter and proper cooking temperatures to achieve excellent results.
The key to this recipe's success lies in allowing the turkey to come to room temperature before cooking and ensuring the skin is thoroughly dried. These steps, combined with a generous coating of herb-seasoned butter, create that sought-after golden-brown exterior while maintaining moistness throughout the meat.
- 12-14 pound whole turkey, thawed
- 1 cup (2 sticks) unsalted butter, softened
- 3 tablespoons fresh sage, chopped
- 3 tablespoons fresh thyme leaves
- 2 tablespoons fresh rosemary, chopped
- 3 tablespoons garlic, minced
- 2 tablespoons kosher salt
- 1 tablespoon black pepper
- 2 medium onions, quartered
- 2 celery stalks, roughly chopped
- 2 carrots, roughly chopped
- 2 cups chicken broth
Remove turkey from refrigerator 1-2 hours before cooking. Preheat oven to 425°F. Pat turkey dry with paper towels, inside and out. Mix softened butter with herbs, garlic, salt, and pepper. Gently loosen skin over breast and thighs, then spread two-thirds of the herb butter mixture under the skin. Rub remaining butter over the entire exterior. Stuff cavity with vegetables and tie legs together with kitchen twine. Place turkey breast-side up in a roasting pan and pour broth into the bottom of the pan.
Roast at 425°F for 30 minutes, then reduce temperature to 325°F. Continue roasting for approximately 15 minutes per pound, or until a meat thermometer inserted into the thickest part of the thigh registers 165°F. Baste turkey with pan juices every 30-45 minutes. If skin browns too quickly, cover with foil. Let rest for 20-30 minutes before carving.
For best results, avoid opening the oven door frequently as this releases heat and extends cooking time. If using a frozen turkey, ensure it's completely thawed before cooking (allow approximately 24 hours of thawing time in the refrigerator for every 4-5 pounds). The pan drippings from this recipe make an excellent base for gravy, so consider saving them.
Make-Ahead Mashed Potatoes
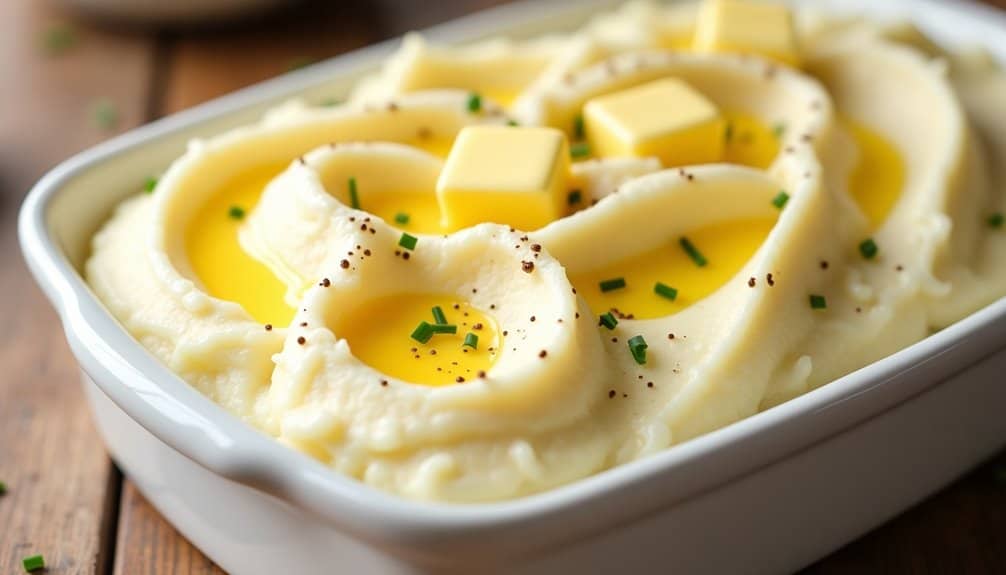
The secret to successful make-ahead mashed potatoes lies in adding extra fat through cream cheese and butter, which prevents the potatoes from becoming dry or gummy when reheated. This recipe produces perfectly smooth, rich mashed potatoes that taste like they were made just moments ago.
Ingredients:
- 5 pounds Yukon Gold potatoes
- 8 ounces cream cheese, softened
- 1 cup butter, divided
- 1 cup whole milk
- 1/2 cup heavy cream
- 2 teaspoons salt
- 1/2 teaspoon white pepper
- 1/4 teaspoon garlic powder
Peel and cut potatoes into 1-inch cubes, then place in a large pot covered with cold water. Bring to a boil and cook until tender, about 15-20 minutes. Drain thoroughly and return to the hot pot. Add softened cream cheese, 3/4 cup butter, milk, and heavy cream. Mash until smooth and free of lumps, then stir in salt, white pepper, and garlic powder.
Transfer the mashed potatoes to a buttered 9×13 baking dish. Dot the top with the remaining 1/4 cup butter. Cover with plastic wrap directly on the surface of the potatoes, then cover with foil. Refrigerate for up to 48 hours. When ready to serve, remove from refrigerator 1 hour before baking. Bake at 350°F for 30-40 minutes until heated through and butter is melted.
For best results, avoid using a food processor or blender to mash the potatoes, as this can make them gummy. Instead, use a potato masher or ricer for the ideal texture. If the potatoes seem too thick when reheating, stir in additional warm milk or cream until reaching the desired consistency.
5-Ingredient Classic Stuffing
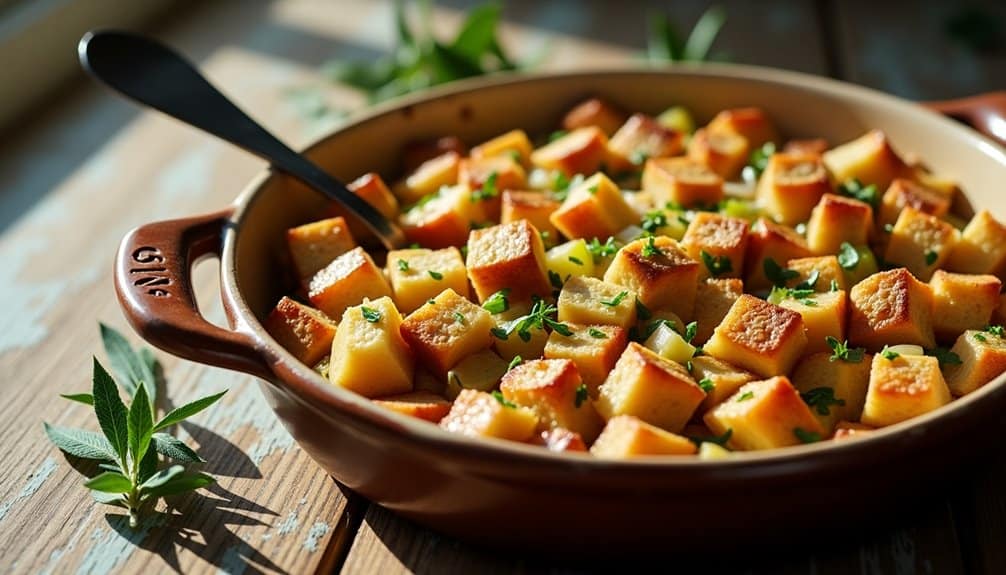
Classic bread stuffing is a cornerstone of the traditional Thanksgiving feast, bringing warmth and comfort to the holiday table. This timeless recipe combines simple ingredients to create a savory side dish that perfectly complements roasted turkey and other seasonal favorites.
The key to exceptional stuffing lies in using the right bread and allowing it to dry properly before preparation. While some prefer to stuff their turkey with this mixture, this recipe is designed for baking separately in a casserole dish, ensuring food safety and consistent results every time.
Ingredients:
- 1 pound day-old white bread, cut into 1-inch cubes
- 1 pound day-old wheat bread, cut into 1-inch cubes
- 2 large onions, diced
- 4 celery stalks, diced
- 3/4 cup butter
- 2 1/2 cups chicken broth
- 2 large eggs, beaten
- 1/4 cup fresh parsley, chopped
- 1 tablespoon fresh sage, chopped
- 1 tablespoon fresh thyme, chopped
- 1 teaspoon salt
- 1/2 teaspoon black pepper
Spread bread cubes on baking sheets and let them dry out for 1-2 days, or toast them in a 250°F oven for 45 minutes until completely dry. In a large skillet, melt butter over medium heat and sauté onions and celery until soft and translucent, about 8-10 minutes.
In a large mixing bowl, combine dried bread cubes with sautéed vegetables, herbs, and seasonings. Pour in chicken broth and beaten eggs, gently tossing until everything is evenly moistened.
Transfer the mixture to a buttered 9×13-inch baking dish. Cover with foil and bake at 350°F for 30 minutes, then remove foil and bake for an additional 15-20 minutes until the top is golden brown and crispy.
For best results, avoid over-mixing the stuffing as this can make it gummy. The bread should be moistened but not soggy – if the mixture seems dry, add broth gradually until it reaches the desired consistency. The stuffing can be assembled up to 24 hours in advance and refrigerated before baking, making it an ideal make-ahead dish for busy holiday cooking.
One-Pan Roasted Root Vegetables
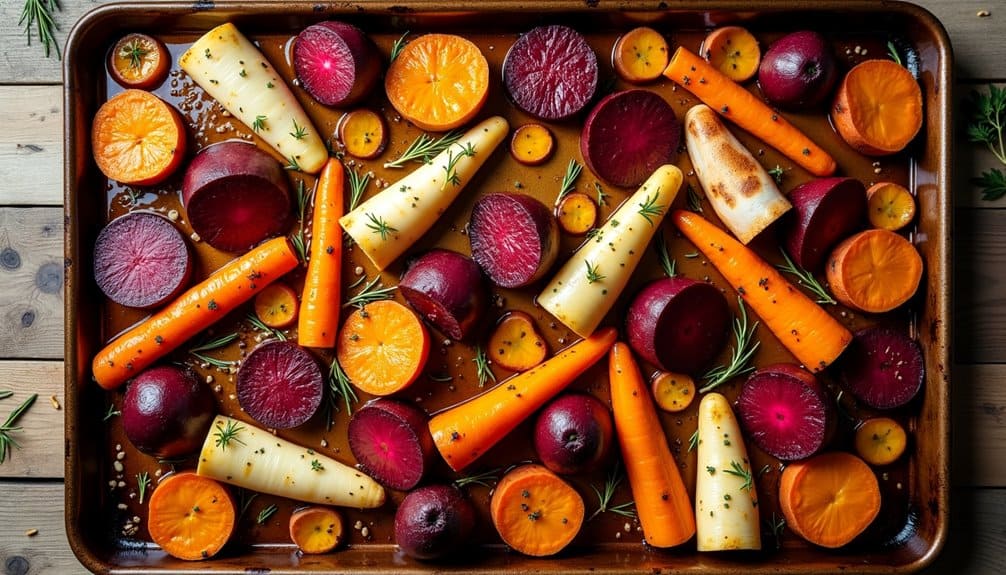
One-Pan Roasted Root Vegetables is a classic autumn dish that brings out the natural sweetness and earthy flavors of seasonal vegetables. The caramelization that occurs during roasting transforms simple root vegetables into a delectable side dish that pairs perfectly with any holiday meal.
This versatile recipe allows you to mix and match your favorite root vegetables while maintaining the same cooking technique. The key to success lies in cutting the vegetables into similarly sized pieces to ensure even cooking and creating a beautiful presentation with various colors and textures.
- 2 medium sweet potatoes, cut into 1-inch chunks
- 3 large carrots, cut into 1-inch pieces
- 2 parsnips, cut into 1-inch pieces
- 1 large red onion, cut into wedges
- 2 medium golden beets, peeled and cut into 1-inch chunks
- 4 tablespoons olive oil
- 4 cloves garlic, minced
- 2 tablespoons fresh thyme leaves
- 1 tablespoon fresh rosemary, chopped
- 1 teaspoon kosher salt
- 1/2 teaspoon black pepper
- 2 tablespoons maple syrup (optional)
Preheat your oven to 425°F (220°C). In a large mixing bowl, combine all the cut vegetables with olive oil, minced garlic, thyme, rosemary, salt, and pepper. Toss thoroughly to ensure even coating of oil and seasonings. Transfer the vegetables to a large rimmed baking sheet, spreading them in a single layer with space between pieces to promote proper caramelization.
Roast for 40-45 minutes, stirring the vegetables halfway through cooking time. If using maple syrup, drizzle it over the vegetables during the last 10 minutes of cooking. The vegetables are done when they're tender when pierced with a fork and have developed golden-brown caramelized edges.
For best results, choose root vegetables of similar density and cut them into uniform sizes to ensure even cooking. If using beets, consider placing them in a separate section of the pan, as they can stain other vegetables. The vegetables can be cut and seasoned up to 24 hours in advance and stored in an airtight container in the refrigerator until ready to roast.
30-Minute Turkey Gravy
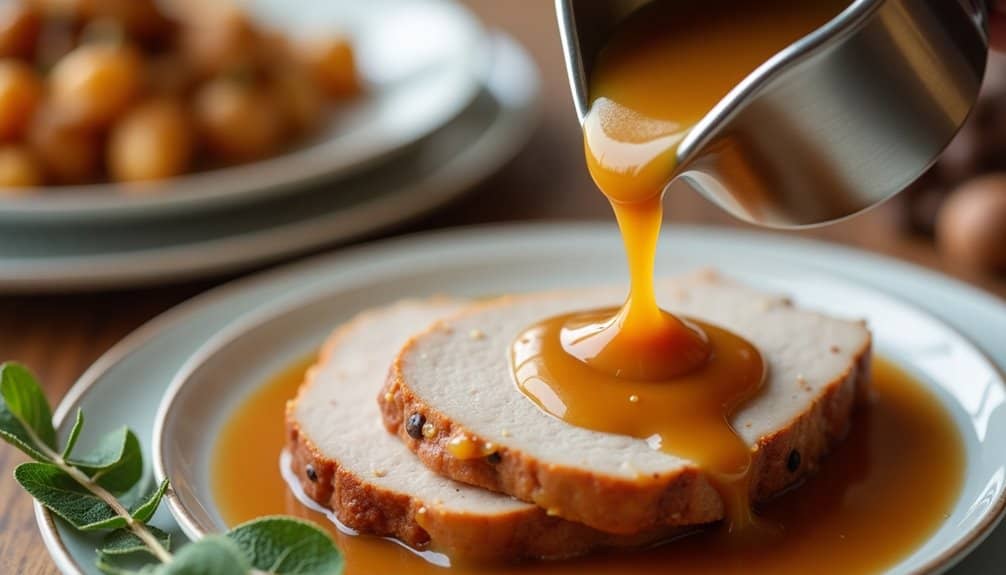
Minute Turkey Gravy is the perfect solution when you need a quick but flavorful gravy for your Thanksgiving feast. This recipe delivers rich, smooth gravy in a fraction of the time compared to traditional methods, without sacrificing taste or quality.
While traditional turkey gravy requires drippings from a roasted turkey, this version uses readily available ingredients to create a delicious alternative. The combination of turkey stock, butter, and seasonings creates a savory base that mimics the depth of flavor found in classic pan drippings.
Ingredients:
- 2 cups turkey stock or broth
- 4 tablespoons butter
- 1/4 cup all-purpose flour
- 1/2 teaspoon poultry seasoning
- 1/4 teaspoon black pepper
- 1/4 teaspoon onion powder
- 1/2 teaspoon garlic powder
- Salt to taste
Melt butter in a medium saucepan over medium heat. Once melted, gradually whisk in the flour to create a roux, cooking for 1-2 minutes until it turns light golden brown. Slowly pour in the turkey stock while continuously whisking to prevent lumps from forming. Add all seasonings and continue to cook, stirring frequently, until the gravy thickens to desired consistency, approximately 3-5 minutes.
For a smoother gravy, strain through a fine-mesh sieve before serving. If the gravy becomes too thick, thin it with additional warm turkey stock or water. If it's too thin, continue simmering until it reaches the desired thickness. This gravy can be made up to 24 hours in advance and reheated when needed.
Tips: Store leftover gravy in an airtight container in the refrigerator for up to 3 days. When reheating, whisk constantly over low heat and add a splash of stock or water to maintain the proper consistency. To prevent a skin from forming on top of the gravy while it sits, place a piece of plastic wrap directly on the surface.
Simple Cranberry Orange Sauce
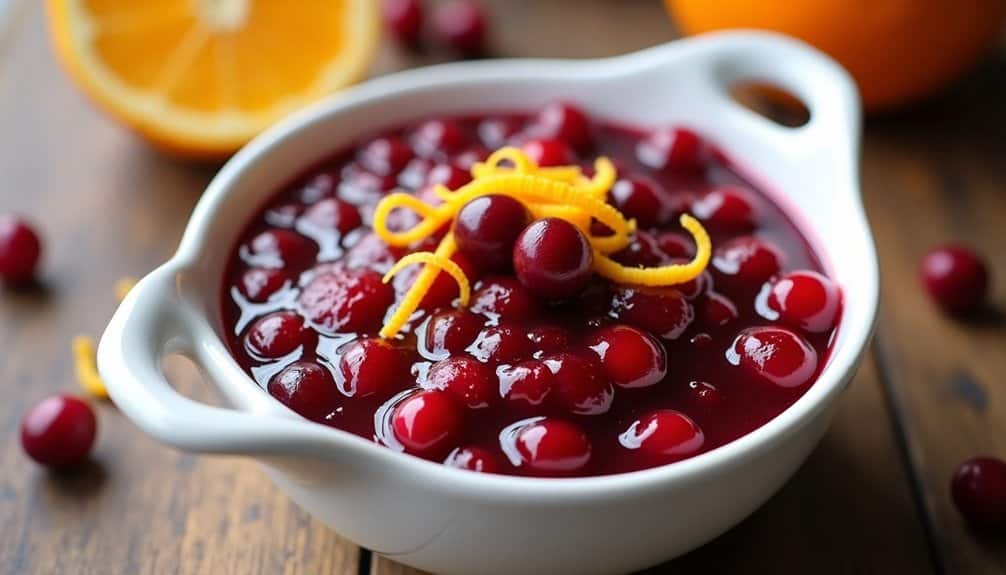
This cranberry orange sauce combines the tartness of fresh cranberries with the sweet, citrusy notes of orange. The addition of orange zest and juice adds depth to the traditional recipe while maintaining its classic appeal. This sauce can be made several days ahead, making it an ideal make-ahead dish for your holiday meal planning.
Ingredients:
- 12 oz fresh cranberries
- 1 cup granulated sugar
- 1 cup water
- 1 large orange (zested and juiced)
- 1/4 teaspoon salt
- 1/8 teaspoon ground cinnamon (optional)
Combine water and sugar in a medium saucepan over medium-high heat, stirring until sugar dissolves completely. Add cranberries, orange zest, orange juice, salt, and cinnamon if using. Bring mixture to a boil, then reduce heat to medium-low and simmer for 10-12 minutes, stirring occasionally. The cranberries will begin to pop and the sauce will thicken. Remove from heat when desired consistency is reached, as the sauce will continue to thicken as it cools.
Transfer the sauce to a heat-safe container and let it cool to room temperature. For the best flavor development, refrigerate for at least 4 hours or overnight before serving. The sauce will keep in an airtight container in the refrigerator for up to 2 weeks.
For the best results, avoid using frozen cranberries unless fresh ones are unavailable. If the sauce becomes too thick after refrigeration, stir in a small amount of orange juice or water to reach desired consistency. Taste the sauce before it cools completely and adjust sweetness if needed, as cranberries can vary in tartness. The sauce will thicken significantly as it cools, so stop cooking while it's still a bit looser than your desired final consistency.
Quick Green Bean Casserole
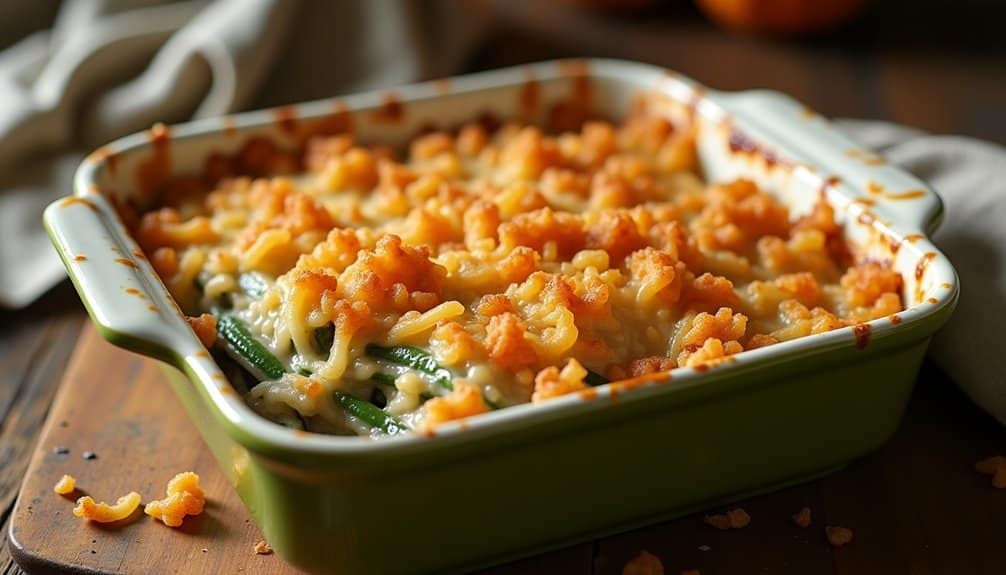
This quick version maintains all the classic flavors while streamlining the preparation process. Using canned green beans and pre-made fried onions saves valuable time during busy holiday cooking, without sacrificing the beloved taste that makes this dish a holiday favorite.
- 2 (10.5 oz) cans cream of mushroom soup
- 4 (14.5 oz) cans green beans, drained
- 1 1/2 cups French-fried onions
- 1/2 cup milk
- 1 teaspoon black pepper
- 1/2 teaspoon garlic powder
- 1 teaspoon soy sauce
- Salt to taste
Preheat the oven to 350°F (175°C). In a large mixing bowl, combine the cream of mushroom soup, milk, pepper, garlic powder, and soy sauce, stirring until well blended. Add the drained green beans and stir gently to coat them evenly with the soup mixture. Transfer the mixture to a 9×13 inch baking dish and spread it evenly.
Bake uncovered for 25 minutes, then remove from the oven and top with the French-fried onions. Return to the oven and bake for an additional 5 minutes, or until the onions are golden brown and crispy.
For best results, avoid overmixing the green beans to prevent them from becoming mushy. The casserole can be assembled up to 24 hours in advance and stored in the refrigerator, but add the fried onions just before the final baking to maintain their crunch. If the mixture seems too thick when combining, add a splash of milk to reach desired consistency.
Easy Sweet Potato Casserole
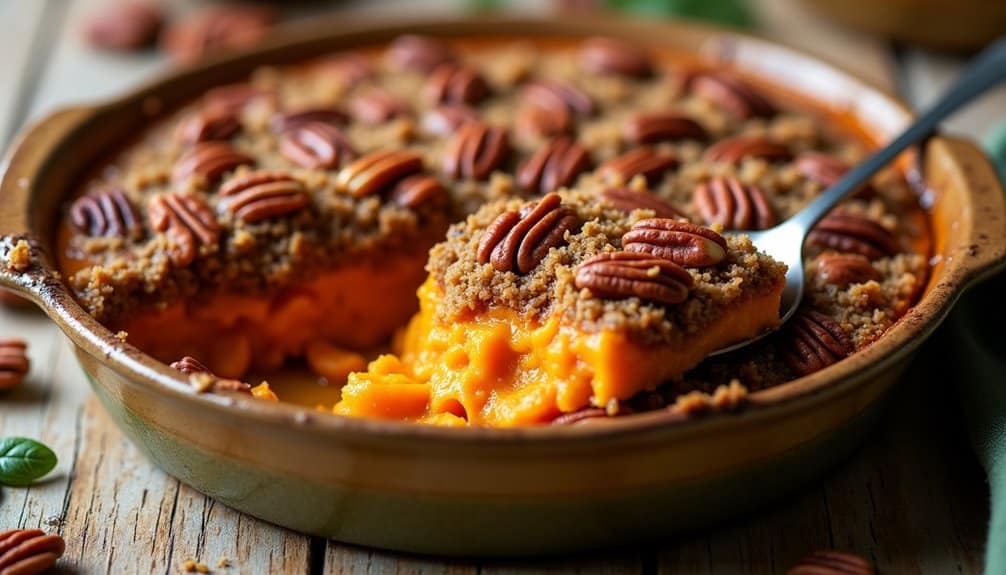
Sweet potato casserole is a beloved Thanksgiving staple that combines the natural sweetness of sweet potatoes with a delightful crunchy topping. This crowd-pleasing side dish strikes the perfect balance between savory and sweet, making it an essential addition to any holiday feast.
This easy version simplifies the traditional recipe while maintaining its classic flavors and textures. The smooth, creamy sweet potato base is topped with a buttery pecan streusel that creates an irresistible contrast in every bite.
- 4 large sweet potatoes (about 3 pounds)
- 1/2 cup butter, melted
- 1/3 cup milk
- 1/2 cup brown sugar
- 2 eggs
- 1 teaspoon vanilla extract
- 1/2 teaspoon cinnamon
- 1/4 teaspoon nutmeg
- 1/4 teaspoon salt
Topping:
- 1/3 cup butter, melted
- 1/3 cup flour
- 2/3 cup brown sugar
- 1 cup chopped pecans
- 1/4 teaspoon cinnamon
Preheat oven to 375°F. Peel and cut sweet potatoes into chunks, then boil until tender, about 15-20 minutes. Drain and transfer to a large bowl. Mash the sweet potatoes, then mix in melted butter, milk, brown sugar, eggs, vanilla, cinnamon, nutmeg, and salt until smooth. Spread mixture into a greased 9×13 inch baking dish.
For the topping, combine melted butter, flour, brown sugar, chopped pecans, and cinnamon in a bowl. Sprinkle evenly over the sweet potato mixture. Bake for 25-30 minutes until the topping is golden brown and the edges are bubbly.
For best results, let the casserole rest for 5-10 minutes before serving. The sweet potatoes can be boiled and mashed a day ahead and stored in the refrigerator – just bring to room temperature before adding the topping and baking. If the topping starts browning too quickly during baking, cover loosely with foil to prevent burning.
3-Step Dinner Rolls
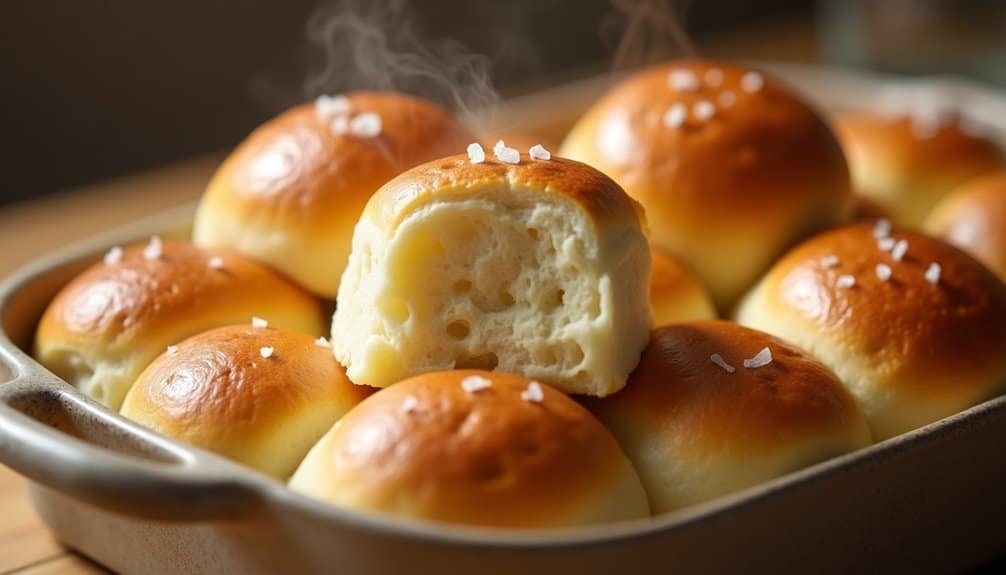
Making these rolls from scratch allows you to control the texture and flavor while filling your home with the irresistible aroma of freshly baked bread. While the process requires some patience for the dough to rise properly, the end result is well worth the effort and far superior to store-bought alternatives.
- 4 cups all-purpose flour
- 1 package active dry yeast (2¼ teaspoons)
- ¼ cup granulated sugar
- 1 teaspoon salt
- 1 cup warm milk
- ⅓ cup unsalted butter, softened
- 2 large eggs
- 2 tablespoons melted butter (for brushing)
Combine warm milk, yeast, and 1 teaspoon of sugar in a bowl, letting it stand for 5-10 minutes until foamy. In a large mixing bowl, combine flour, remaining sugar, and salt. Add the softened butter, eggs, and yeast mixture to the dry ingredients. Mix until a soft dough forms, then knead for 8-10 minutes until smooth and elastic. Place the dough in a greased bowl, cover with a damp cloth, and let rise in a warm place for about 1 hour or until doubled in size.
Punch down the dough and divide it into 24 equal portions. Shape each portion into a ball and place in a greased 13×9-inch baking pan. Cover and let rise again for 30 minutes. Preheat oven to 375°F. Brush the tops with melted butter and bake for 15-20 minutes until golden brown.
For best results, ensure all ingredients are at room temperature before starting, except for the warm milk which should be around 110°F. The rolls can be made ahead and frozen for up to one month – simply thaw completely and warm in the oven before serving. If the dough seems too sticky during kneading, resist adding too much extra flour as this can make the rolls dense and heavy.
Foolproof Pumpkin Pie

A perfectly baked pumpkin pie is the quintessential Thanksgiving dessert, combining smooth, spiced custard with buttery, flaky crust. This classic recipe produces a rich, creamy filling with just the right balance of warm autumn spices and pure pumpkin flavor.
Making a foolproof pumpkin pie doesn't require advanced baking skills, but attention to detail is crucial. The key lies in properly blind-baking the crust and ensuring the filling is thoroughly mixed but not over-beaten, which can lead to cracks in the finished pie.
- 1 unbaked 9-inch pie crust
- 1 (15 oz) can pure pumpkin puree
- 1 (14 oz) can sweetened condensed milk
- 2 large eggs
- 1 teaspoon ground cinnamon
- 1/2 teaspoon ground ginger
- 1/2 teaspoon ground nutmeg
- 1/2 teaspoon salt
- 1/4 teaspoon ground cloves
Preheat the oven to 425°F (220°C). Place the pie crust in a 9-inch pie dish, crimping the edges decoratively. Line the crust with parchment paper and fill with pie weights or dried beans. Blind bake for 15 minutes, then remove weights and paper, and bake for an additional 5 minutes until light golden.
While the crust is baking, whisk together the pumpkin puree, sweetened condensed milk, eggs, and all spices in a large bowl until smooth and well combined. Pour the filling into the pre-baked crust. Reduce oven temperature to 350°F (175°C) and bake for 40-45 minutes, or until a knife inserted near the center comes out clean.
For best results, cool the pie completely on a wire rack for at least 2 hours before serving. The filling will continue to set as it cools. If the edges of the crust begin to brown too quickly during baking, cover them with aluminum foil. Never test for doneness by inserting a knife in the center of the pie, as this will cause cracking – instead, gently shake the pie; it should be mostly set with a slight jiggle in the center.