Halloween Deviled Eggs Recipe That’s Super Spooky Recipe
Imagine transforming ordinary deviled eggs into a spine-chilling Halloween masterpiece that'll make your guests do a double-take! You're about to embark on a culinary adventure that turns classic appetizers into ghoulishly gorgeous party treats. These aren't just any deviled eggs—they're a creepy-cute canvas waiting for your spooky creativity. Whether you're hosting a Halloween bash or just want to surprise your family with a wickedly fun snack, this recipe will elevate your festive food game. Ready to create some eerily delicious magic?
Recipe Highlights
- Marinate hard-boiled eggs in black food coloring for 30 minutes to create a spooky, marbled eggshell effect that sets a haunting Halloween tone.
- Use a piping bag with a star tip to create intricate yolk designs that resemble creepy textures or monster-like patterns in your deviled eggs.
- Garnish eggs with black olive "spiders", paprika blood splatter, and chive cobwebs to transform simple deviled eggs into a terrifyingly realistic Halloween appetizer.
- Create monstrous eye effects by adding roasted red pepper accents and strategically placed food coloring to make eggs look eerily lifelike.
- Serve on dark-colored or themed Halloween platters with precise garnish placement using tweezers to maximize the spine-chilling visual impact of your spooky deviled eggs.
History
Although deviled eggs have been a staple of American cuisine for generations, their Halloween-themed variations represent a modern twist on a classic appetizer.
You'll find that the tradition of deviled eggs dates back to ancient Rome, where eggs were seasoned with spicy mustard—the origin of the term "deviled." By the 1940s, these creamy, protein-packed bites became a quintessential party food in the United States.
The Halloween adaptation emerged in the early 2000s as home cooks began experimenting with food coloring and creative presentations.
Your Halloween deviled eggs build on this culinary innovation, transforming a traditional recipe into a festive, eye-catching dish. Food bloggers and social media platforms have since popularized these spooky variations, making them a must-have for seasonal gatherings.
Recipe
Halloween Deviled Eggs transport traditional appetizers into a spooky seasonal delight with minimal effort and maximum visual impact. These marbled black-and-white eggs combine classic deviled egg flavors with a haunting aesthetic perfect for Halloween gatherings.
Creatively transforming a beloved party staple requires careful technique and attention to color detail. By gently cracking eggshells and using black food coloring, home cooks can achieve a striking marble effect that will surprise and delight party guests.
Ingredients:
- 6 large eggs
- 1/4 cup mayonnaise
- 1 teaspoon black food coloring
- 1 teaspoon mustard
- 1/4 teaspoon salt
Begin by hard-boiling eggs for exactly 10 minutes, then immediately transfer them to an ice water bath to halt the cooking process. Once cooled, gently crack the eggshells all over, creating fine lines without breaking the membrane, which will help create an intricate marble pattern.
Submerge the cracked eggs in cold water mixed with black food coloring for 30 minutes, allowing the color to seep into the cracks. After coloring, carefully peel the eggs to reveal the marbled effect. Slice the eggs lengthwise, removing the yolks and mixing them with mayonnaise, mustard, and salt until smooth and creamy.
For optimal presentation, pipe or spoon the yolk mixture back into the marbled egg white halves, creating a professional and visually appealing finish that will impress Halloween party guests.
When preparing these deviled eggs, remember that gentle shell cracking is key to achieving a sophisticated marble effect. The eggs can be prepared up to 24 hours in advance and stored in an airtight container, making them an excellent make-ahead appetizer. If the filling becomes too firm, let it sit at room temperature for 10 minutes before piping to ensure a smooth, creamy texture.
Cooking Steps
You'll transform ordinary eggs into spine-chilling Halloween appetizers by mastering these key cooking steps: first, hard-boil your eggs with precision, ensuring they're cooked to creamy perfection without becoming rubbery.
Next, carefully crack and color the eggshells using black food coloring, creating an eerie marbled effect that'll make your guests do a double-take.
Finally, peel the eggs with a gentle touch, mix the yolks into a smooth, savory filling, and artfully pipe the mixture back into the shell halves, setting the stage for a truly haunting presentation.
Step 1. Hard-Boil Eggs Precisely
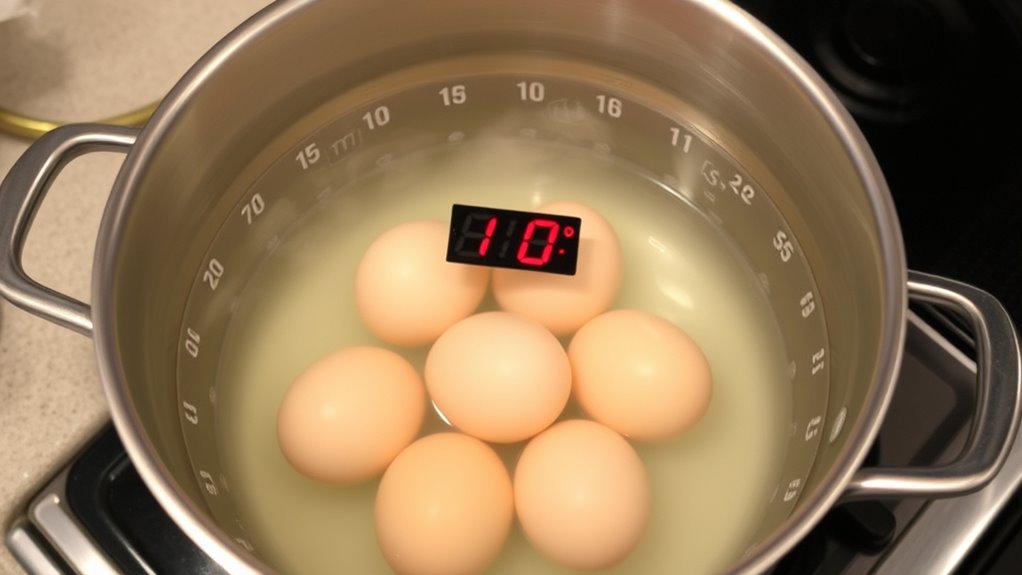
Perfecting hard-boiled eggs requires precision and attention to detail, especially when preparing Halloween-themed deviled eggs. Start by selecting fresh, room-temperature eggs to prevent cracking during boiling.
Place eggs gently in a pot, covering them with cold water by one inch. Add a pinch of salt to help prevent egg whites from leaking if a shell cracks.
Key hard-boiling steps:
- Bring water to a rolling boil
- Reduce heat to low simmer
- Cook eggs exactly 10 minutes
- Immediately transfer to ice water bath
Watch for visual cues during cooking:
- Steady, gentle bubbling
- Consistent water temperature
- No rapid, aggressive boiling
Remove eggs after 10 minutes, ensuring they're firm but not overcooked. The perfect hard-boiled egg will have a bright yellow, creamy yolk without a green ring.
Step 2. Color Egg Shells Gently
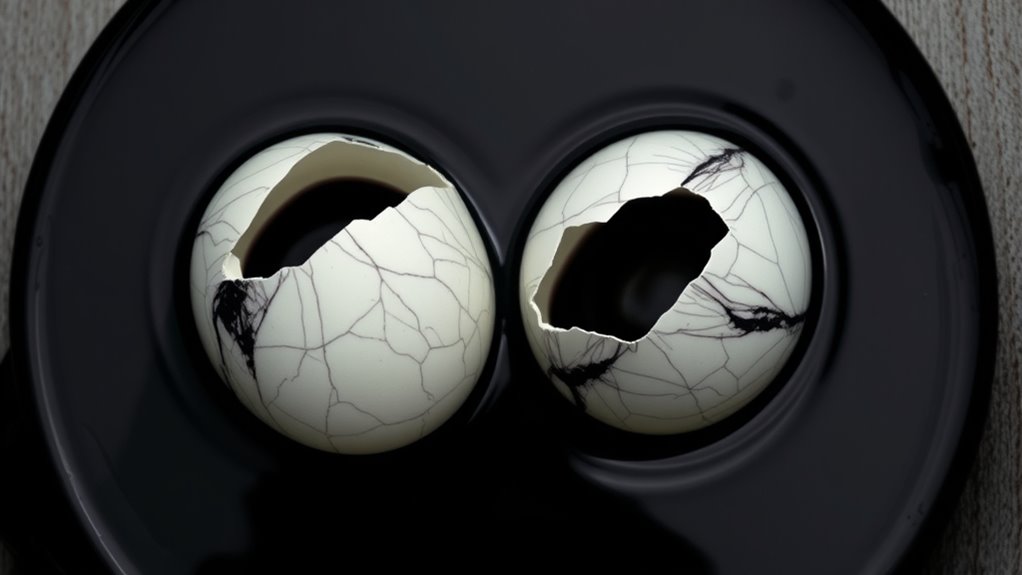
After mastering the perfect hard-boil technique, you'll want to create that marbled, spooky look for your Halloween deviled eggs.
Gently crack the eggshells all over, using light, controlled taps to maintain delicate surface integrity.
You'll need:
- 1 teaspoon black food coloring
- Cold water
- A large mixing bowl
Submerge the cracked eggs in the colored water, ensuring they're fully covered.
The key is patience—let them sit for exactly 30 minutes. This timeframe allows the food coloring to seep through the micro-cracks, creating an intricate, spider-web-like marble effect.
Avoid aggressive handling, which can cause large fractures and disrupt the subtle pattern.
When you're ready to peel, do so carefully under cool running water, revealing the hauntingly beautiful, mottled egg whites perfect for your Halloween appetizer.
Step 3. Peel Eggs Carefully
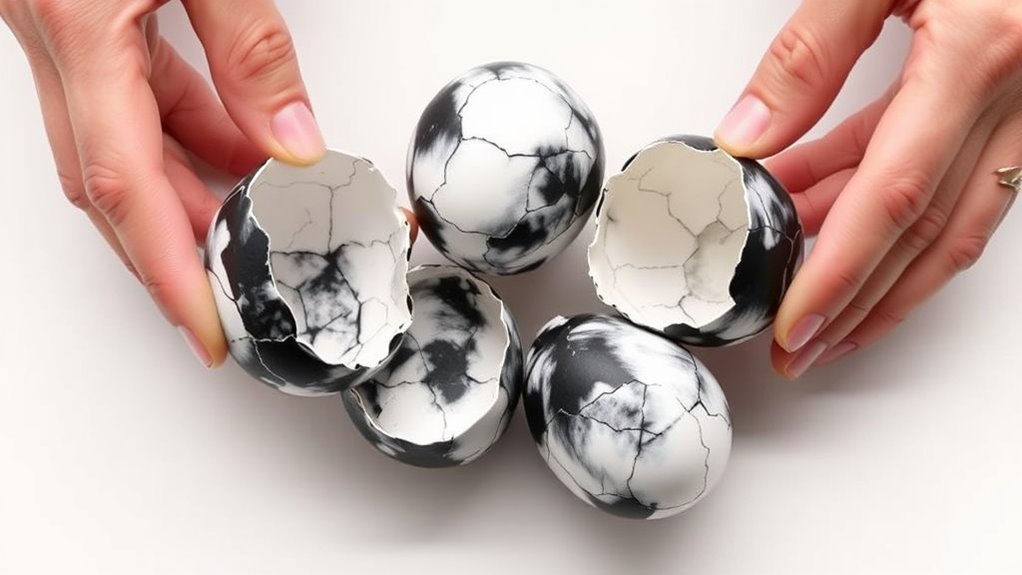
The delicate art of peeling hard-boiled eggs requires a gentle touch and strategic approach, especially when crafting Halloween-themed deviled eggs with a marbled shell.
Start by rolling each egg gently between your palms, applying light pressure to crack the shell uniformly. Work under cool running water, which helps separate the membrane from the egg white, reducing tears and maintaining the intricate marble pattern.
Peel from the wider end, where an air pocket typically forms, making removal easier. Use your fingertips to carefully slide the shell away, taking care not to dig into the delicate egg white surface.
If stubborn pieces remain, continue peeling under water, ensuring a smooth, unblemished egg white that'll showcase your spooky Halloween design perfectly.
Step 4. Fill Yolk Mixture Attractively
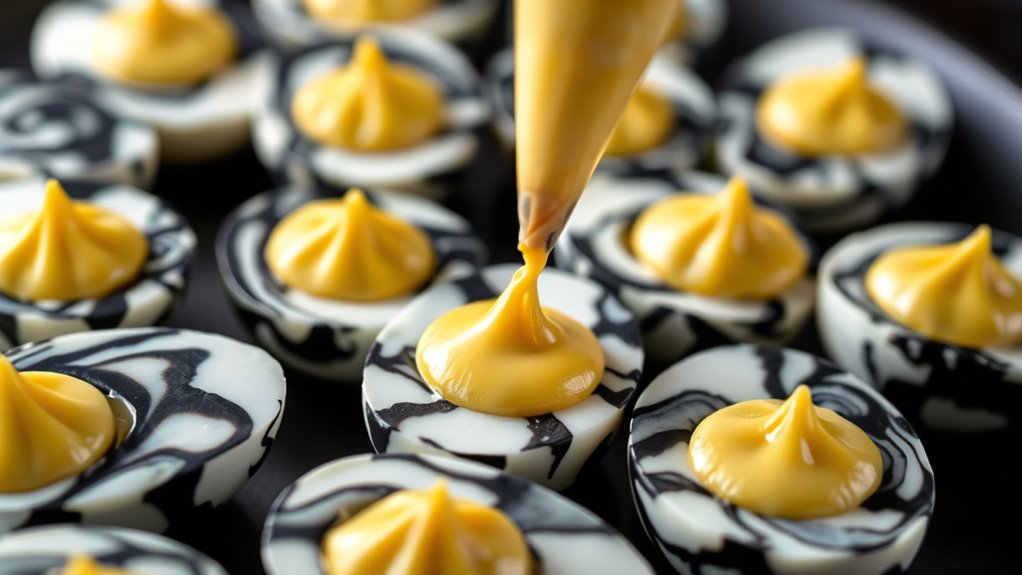
Halloween deviled eggs demand a touch of artistry when filling their marbled white halves with the creamy yolk mixture. Select a piping bag with a star tip for elegant presentation, which creates beautiful swirled texture and professional-looking edges. Fill the bag carefully, ensuring no air pockets interrupt your smooth filling technique.
Pro tips for attractive filling:
- Pipe mixture in a gentle circular motion
- Keep consistent height and shape for each egg half
- Use steady, even pressure on the piping bag
- Fill to slightly rounded, not overfilled, peak
- Wipe edges clean with a damp paper towel
For precision, transfer your yolk mixture to the piping bag using a spatula. Hold the bag at a 45-degree angle above each egg white, creating uniform, sculptural mounds that'll impress your Halloween party guests.
Step 5. Garnish With Spooky Decor
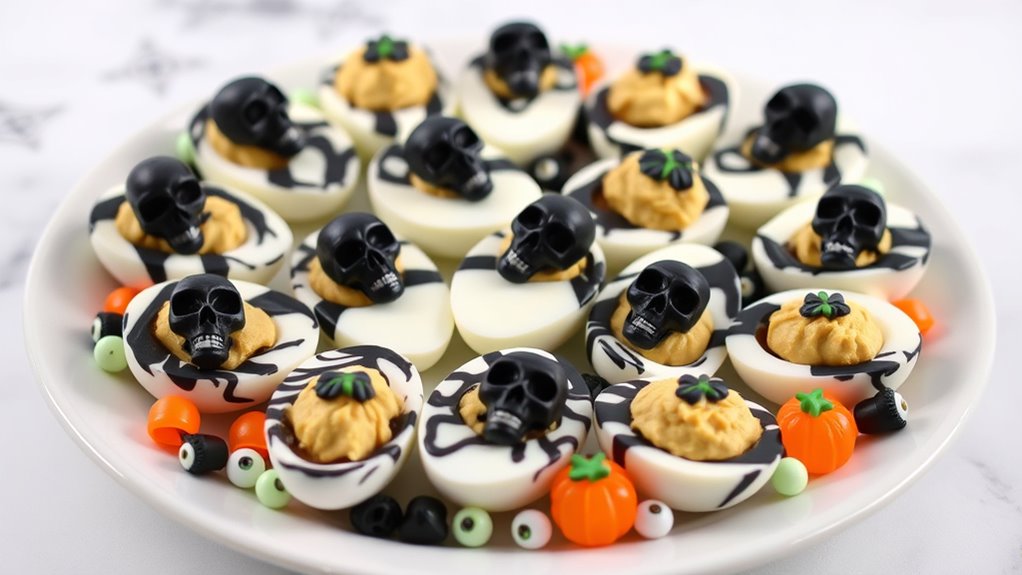
When transforming your marbled deviled eggs into spine-chilling Halloween masterpieces, strategic garnishing becomes your secret weapon for creating visual drama.
Consider these spine-tingling decoration techniques:
- Black olive "spider" garnish: Slice olives into thin leg-like strips and carefully arrange on egg surfaces
- Paprika "blood spatter" technique: Lightly sprinkle red paprika for a gruesome splattered effect
- Chive "web" design: Cut thin chive strands and delicately drape across egg halves to mimic cobwebs
- Roasted red pepper "monster eye" accent: Cut small triangular pupils from pepper and place strategically
Pro tip: Use tweezers for precise placement of tiny garnish elements.
Keep decorations small and understated—you want creepy, not cartoonish.
Refrigerate immediately after garnishing to maintain structural integrity and prevent wilting of delicate herb or vegetable accents.
Final Thoughts
Despite the intricate process, you'll find these spooky deviled eggs are easier to make than they look. With just a few simple techniques, you'll transform ordinary eggs into a Halloween showstopper that'll impress your guests.
The key is patience during the marbling process and attention to detail when preparing the filling. Your success hinges on gentle shell cracking, precise coloring, and smooth yolk mixing.
Pro tips for Halloween deviled egg mastery:
- Use room temperature ingredients
- Crack shells uniformly for best marble effect
- Chill eggs before serving
- Experiment with different food coloring techniques