20 Quick and Easy Meals
You'll find that mastering quick and easy meals can transform your weeknight dinner routine. With just a few key ingredients and smart cooking techniques, you can create satisfying dishes in 30 minutes or less. From one-pan stir-fries to sheet pan dinners, these recipes combine convenience with flavor while minimizing cleanup. Whether you're craving Asian-inspired dishes or Mediterranean flavors, there's a speedy solution that'll fit your schedule and taste preferences. Let's explore these time-saving recipes that'll make you wonder why you ever relied on takeout.
15-Minute One-Pan Chicken Stir-Fry

One-Pan Chicken Stir-Fry is the perfect solution for busy weeknights when time is limited but you still want a nutritious, homemade meal. This versatile dish combines tender chicken pieces with colorful vegetables in a savory sauce, all cooked together in a single pan for minimal cleanup.
The beauty of this recipe lies in its adaptability – you can use whatever vegetables you have on hand and adjust the seasonings to suit your taste preferences. The entire meal comes together in about 15 minutes, making it faster than ordering takeout and considerably healthier.
- 1 pound boneless, skinless chicken breast, cut into 1-inch pieces
- 2 cups mixed vegetables (broccoli, carrots, snap peas)
- 3 cloves garlic, minced
- 1 tablespoon ginger, grated
- 3 tablespoons vegetable oil
- 1/4 cup soy sauce
- 1 tablespoon cornstarch
- 1/2 cup chicken broth
- 1 tablespoon sesame oil
- Salt and pepper to taste
- 2 green onions, chopped
Heat oil in a large skillet or wok over medium-high heat. Add chicken pieces and cook until golden brown, about 5-6 minutes. Add garlic and ginger, stirring frequently to prevent burning. Push chicken to one side of the pan and add vegetables to the empty space.
While vegetables are cooking, whisk together soy sauce, cornstarch, and chicken broth in a small bowl. Pour the sauce mixture over the chicken and vegetables, stirring everything together until the sauce thickens and coats all ingredients evenly. Finish with a drizzle of sesame oil and garnish with green onions.
For best results, prep all ingredients before starting to cook, as stir-frying moves quickly. Cut chicken and vegetables into similarly sized pieces to ensure even cooking. If the sauce becomes too thick, add a splash of chicken broth or water to reach desired consistency.
Sheet Pan Mediterranean Fish
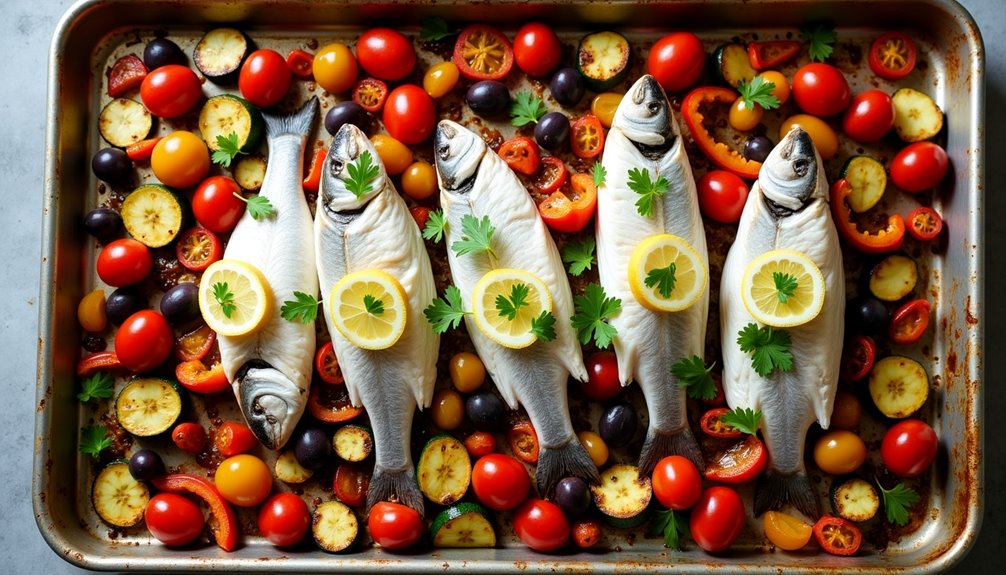
The dish features tender fish fillets surrounded by colorful vegetables like cherry tomatoes, bell peppers, and zucchini, all roasted to perfection with Mediterranean seasonings. The natural juices from the vegetables and fish create a light sauce that's perfect for drizzling over the finished dish.
- 4 white fish fillets (cod, halibut, or sea bass)
- 2 cups cherry tomatoes
- 1 large zucchini, sliced
- 1 red bell pepper, chopped
- 1 red onion, sliced
- 4 tablespoons olive oil
- 3 cloves garlic, minced
- 2 lemons
- 2 teaspoons dried oregano
- 1 teaspoon dried thyme
- Salt and pepper to taste
- 1/4 cup fresh parsley, chopped
- 1/2 cup kalamata olives
Preheat the oven to 400°F (200°C). Toss the vegetables with half the olive oil, garlic, and half the herbs on a large sheet pan. Spread them evenly and roast for 10 minutes. Remove the pan from the oven and create spaces among the vegetables for the fish fillets. Place the fish on the pan, drizzle with remaining olive oil, and season with remaining herbs, salt, and pepper. Arrange lemon slices on top of the fish and scatter olives around the pan.
Return the pan to the oven and bake for 12-15 minutes, or until the fish is cooked through and flakes easily with a fork. The vegetables should be tender and slightly caramelized.
For best results, choose fish fillets of similar thickness to ensure even cooking. If using frozen fish, make sure to thaw completely and pat dry before cooking. The dish can be made ahead by preparing the vegetables and storing them separately until ready to cook with the fish.
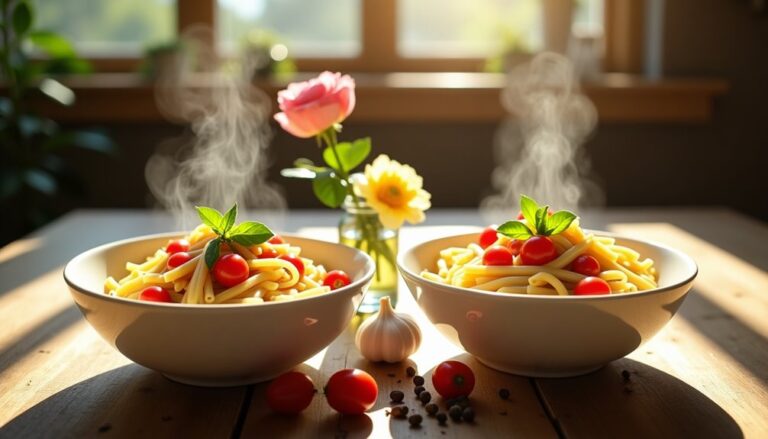
5-Ingredient Creamy Garlic Pasta

Creamy garlic pasta combines the comfort of al dente noodles with a rich, velvety sauce that clings perfectly to each strand. This classic dish transforms simple ingredients into a restaurant-quality meal that can be prepared in under 30 minutes, making it ideal for busy weeknights or when you're craving something indulgent.
The key to this recipe's success lies in properly cooking the garlic to release its aromatic flavors without burning it, and creating a smooth, well-balanced sauce that complements rather than overwhelms the pasta. The result is a satisfying dish that pairs wonderfully with a variety of proteins or can stand alone as a vegetarian main course.
- 1 pound fettuccine or spaghetti
- 6 cloves garlic, minced
- 2 tablespoons olive oil
- 4 tablespoons butter
- 2 cups heavy cream
- 1 cup freshly grated Parmesan cheese
- 1/2 teaspoon salt
- 1/4 teaspoon black pepper
- 1/4 teaspoon red pepper flakes (optional)
- Fresh parsley for garnish
Cook pasta in a large pot of salted water according to package instructions until al dente. While the pasta cooks, heat olive oil and butter in a large skillet over medium heat. Add minced garlic and sauté for 1-2 minutes until fragrant but not browned. Pour in the heavy cream, bring to a gentle simmer, and cook for 3-4 minutes until slightly thickened. Stir in the Parmesan cheese, salt, pepper, and red pepper flakes if using.
Reserve 1 cup of pasta water before draining the pasta. Add the drained pasta to the sauce, tossing well to coat. If the sauce is too thick, gradually add reserved pasta water until desired consistency is reached. Cook for an additional 1-2 minutes to allow the pasta to absorb some of the sauce.
For best results, use freshly grated Parmesan cheese rather than pre-grated varieties, as it melts more smoothly and provides better flavor. Also, avoid rinsing the pasta after cooking, as the starch helps the sauce adhere better to the noodles. The sauce will continue to thicken as it cools, so serve immediately for optimal texture and garnish with fresh parsley if desired.
Speedy Black Bean Tacos

These quick black bean tacos are a lifesaver on busy weeknights when you need a satisfying meal in under 15 minutes. The combination of seasoned black beans, fresh toppings, and warm tortillas creates a balanced and flavorful dish that's both nutritious and budget-friendly.
The beauty of this recipe lies in its versatility. You can easily customize the toppings and seasonings to suit your taste preferences, and the basic preparation method remains simple enough for even novice cooks to master.
- 2 (15 oz) cans black beans, drained and rinsed
- 8-10 corn or flour tortillas
- 1 tablespoon olive oil
- 1 teaspoon ground cumin
- 1 teaspoon chili powder
- 1/2 teaspoon garlic powder
- 1/2 teaspoon salt
- 1/4 teaspoon black pepper
- 1 lime
- 1 cup shredded lettuce
- 1 cup diced tomatoes
- 1/2 cup diced onions
- 1 cup shredded cheese
- Sour cream (optional)
- Fresh cilantro (optional)
Heat olive oil in a large skillet over medium heat. Add the drained black beans and all dry seasonings, stirring to combine. Mash about half of the beans with a potato masher or fork while cooking, creating a partially refried consistency. Cook for 5-7 minutes, stirring occasionally, until heated through and slightly thickened.
While the beans cook, warm the tortillas either in the microwave wrapped in damp paper towels, or directly over a gas flame for a slight char. Assemble the tacos by spreading the warm bean mixture on each tortilla and topping with lettuce, tomatoes, onions, cheese, and any additional desired toppings. Finish with a squeeze of fresh lime juice.
For best results, don't skip the bean-mashing step, as this helps the filling hold together better in the tortillas. Store any leftover bean mixture in an airtight container in the refrigerator for up to 5 days, and reheat with a splash of water to restore the original consistency. To make the dish spicier, add diced jalapeños or a dash of hot sauce to the bean mixture while cooking.
Skillet Italian Sausage and Peppers

Skillet Italian Sausage and Peppers combines the rich, savory flavors of Italian sausage with the sweet, smoky taste of bell peppers. This classic combination has been a staple in Italian-American cuisine for generations, offering a perfect balance of proteins and vegetables in one satisfying dish.
This one-pan meal comes together in under 30 minutes, making it an excellent choice for busy weeknight dinners or casual weekend lunches. The natural juices from the sausage help create a flavorful sauce that coats the peppers and onions, while the simple seasonings enhance the overall taste without overwhelming the main ingredients.
- 1 pound Italian sausage links (sweet or hot)
- 3 bell peppers (mixed colors), sliced
- 2 medium onions, sliced
- 4 cloves garlic, minced
- 2 tablespoons olive oil
- 1 teaspoon dried oregano
- 1 teaspoon dried basil
- Salt and black pepper to taste
- ½ cup chicken broth
- 1 tablespoon tomato paste
Heat olive oil in a large skillet over medium heat. Add the sausage links and cook for 8-10 minutes, turning occasionally until browned on all sides. Remove sausages and set aside. In the same skillet, add sliced peppers and onions, cooking until they begin to soften, about 5-6 minutes. Add garlic, herbs, salt, and pepper, stirring frequently. Return sausages to the pan, add chicken broth and tomato paste, and simmer covered for 10-12 minutes until sausages are fully cooked and vegetables are tender.
For best results, allow the sausages to reach room temperature before cooking and avoid piercing them while cooking to retain their juices. The dish can be served immediately or held warm for up to 30 minutes, during which time the flavors will continue to develop. It pairs well with crusty bread, rice, or pasta.
20-Minute Teriyaki Rice Bowl
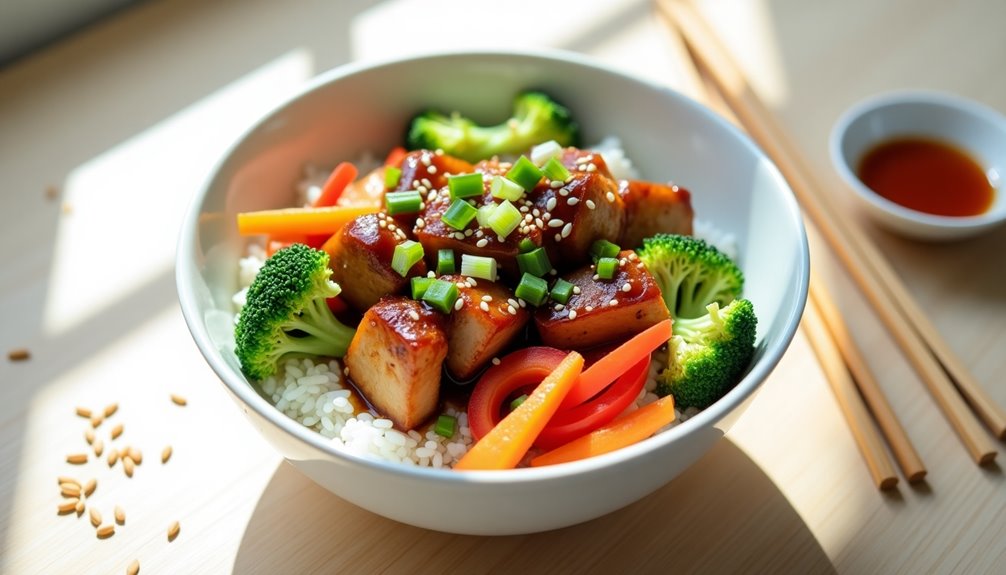
Minute Teriyaki Rice Bowl is a versatile dish that combines the sweet and savory flavors of teriyaki sauce with tender chicken and fresh vegetables. This Asian-inspired meal can be prepared in under 30 minutes, making it perfect for busy weeknights when time is limited but you still want a satisfying, homemade dinner.
The beauty of this recipe lies in its adaptability. While this version uses chicken as the main protein, you can easily substitute it with beef, shrimp, or tofu to suit your preferences. The combination of crisp vegetables and fluffy rice creates a complete meal that's both nutritious and delicious.
Ingredients:
- 2 cups cooked white rice
- 1 pound boneless chicken breasts, cut into bite-sized pieces
- 1 cup broccoli florets
- 1 red bell pepper, sliced
- 1 cup carrots, julienned
- 1/2 cup teriyaki sauce
- 2 tablespoons vegetable oil
- 2 cloves garlic, minced
- 1 tablespoon ginger, grated
- 2 green onions, chopped
- Sesame seeds for garnish
Heat oil in a large skillet over medium-high heat. Add chicken pieces and cook until golden brown, about 5-6 minutes. Remove chicken and set aside. In the same pan, add garlic and ginger, sautéing for 30 seconds until fragrant. Add vegetables and stir-fry for 3-4 minutes until crisp-tender. Return chicken to the pan, pour in teriyaki sauce, and simmer for 2-3 minutes until the sauce thickens slightly and everything is heated through.
To serve, divide the cooked rice among bowls, top with the chicken and vegetable mixture, and garnish with chopped green onions and sesame seeds. For best results, ensure all ingredients are prepped before starting to cook, as this dish comes together quickly. The chicken should be cut into uniform pieces to ensure even cooking.
Important tip: To prevent the teriyaki sauce from becoming too thick or sticky, add it at the end of cooking. If the sauce becomes too thick, you can thin it with a tablespoon of water or chicken broth. For meal prep purposes, this dish can be made ahead and stored in the refrigerator for up to 3 days, though the vegetables may lose some of their crispness when reheated.
Quick Caprese Flatbread Pizza
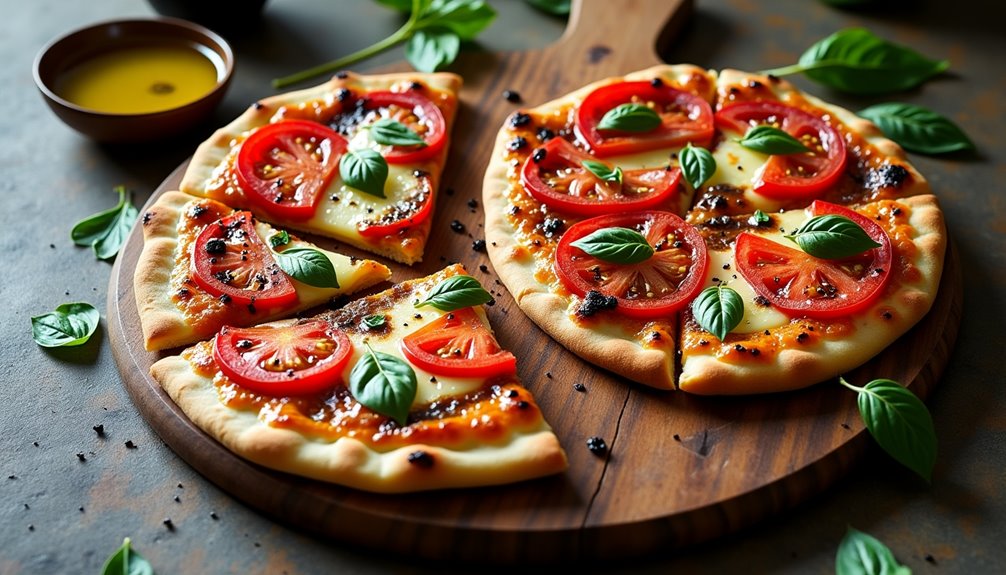
Quick Caprese Flatbread Pizza brings the classic Italian flavors of fresh mozzarella, tomatoes, and basil to a convenient flatbread base. This simplified version of traditional pizza delivers the same satisfaction in a fraction of the time, making it perfect for busy weeknights or casual entertaining.
The beauty of this recipe lies in its versatility and simplicity. By using pre-made flatbread as the base, you eliminate the time-consuming process of making pizza dough from scratch while still achieving a crispy, flavorful crust that serves as the perfect foundation for fresh Caprese toppings.
- 2 large flatbreads or naan breads
- 8 oz fresh mozzarella, sliced
- 2 medium tomatoes, sliced
- 1/4 cup fresh basil leaves
- 2 tablespoons olive oil
- 2 cloves garlic, minced
- 1/2 teaspoon salt
- 1/4 teaspoon black pepper
- Balsamic glaze for drizzling
Preheat your oven to 400°F (200°C). Mix the olive oil with minced garlic and brush it evenly over the flatbreads. Layer the sliced mozzarella and tomatoes on top, then sprinkle with salt and pepper. Place the flatbreads directly on the oven rack or on a preheated pizza stone and bake for 10-12 minutes, until the cheese is melted and bubbly, and the edges are crispy.
Remove from the oven and immediately scatter fresh basil leaves over the top. Drizzle with balsamic glaze before serving. Cut into slices and serve while hot.
For best results, avoid overloading the flatbread with toppings as this can make the center soggy. If using particularly watery tomatoes, consider patting them dry with paper towels before placing them on the pizza. The flatbreads can be prepared up to the point of baking and stored in the refrigerator for up to 4 hours before cooking.
No-Fuss Shrimp Scampi
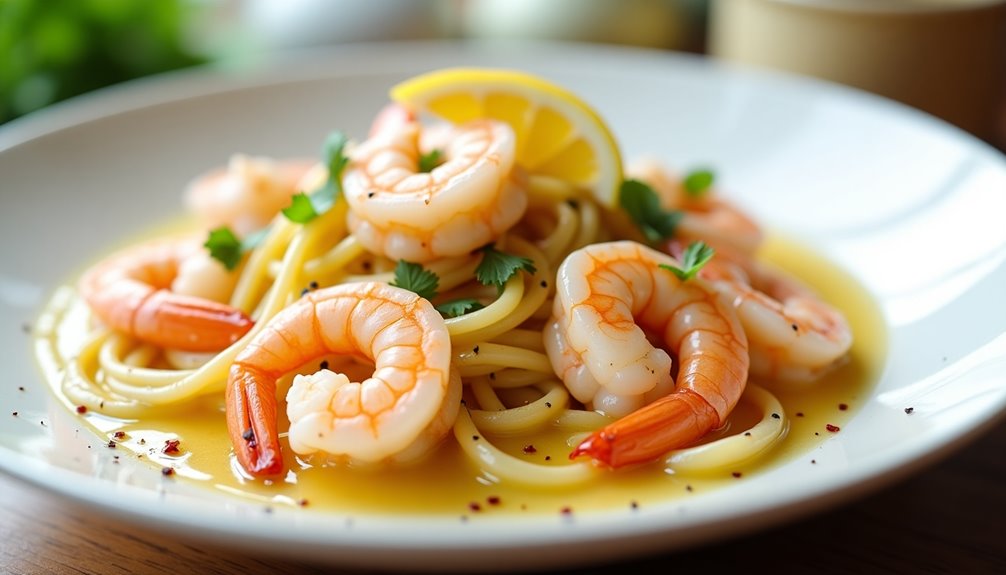
Shrimp scampi is a classic Italian-American dish that combines succulent shrimp with a rich, garlicky butter sauce and white wine. This seafood favorite is perfect for both weeknight dinners and special occasions, taking only about 15 minutes from start to finish.
While traditional recipes can be complex, this simplified version maintains all the signature flavors while reducing prep time and ingredients. The key is using fresh shrimp and good quality butter, which form the foundation of this elegant yet straightforward dish.
- 1 pound large shrimp, peeled and deveined
- 8 tablespoons butter, divided
- 6 cloves garlic, minced
- 1/4 cup white wine
- 2 tablespoons lemon juice
- 1/4 cup fresh parsley, chopped
- 1/2 teaspoon red pepper flakes
- Salt and black pepper to taste
- 8 ounces linguine or spaghetti
Melt 4 tablespoons of butter in a large skillet over medium-high heat. Add garlic and sauté for 1 minute until fragrant. Add shrimp to the pan and cook for 2-3 minutes per side until they turn pink. Remove shrimp from the pan and set aside.
Add wine and lemon juice to the pan, scraping up any browned bits. Simmer for 2 minutes until slightly reduced. Return shrimp to the pan, add remaining butter, parsley, and red pepper flakes. Toss until butter is melted and shrimp is coated. Season with salt and pepper. Serve over cooked pasta.
For best results, avoid overcooking the shrimp as they can become tough and rubbery. Fresh shrimp is preferred, but frozen shrimp can work well if thawed properly and patted dry before cooking. The wine can be substituted with chicken broth for an alcohol-free version, though the flavor profile will be slightly different.
3-Ingredient Pesto Tortellini
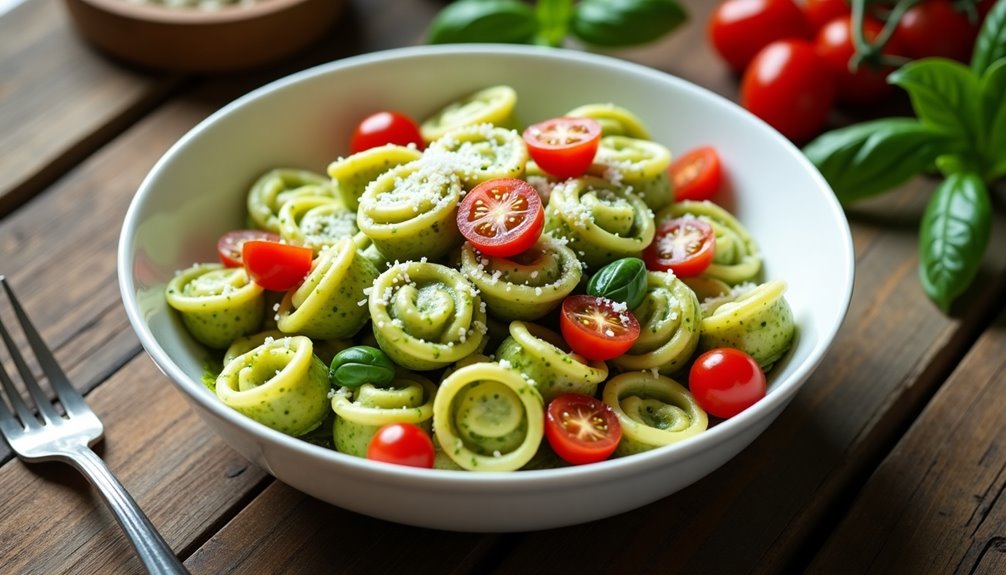
Pesto tortellini combines the convenience of store-bought ingredients with the satisfaction of a home-cooked meal. This Italian-inspired dish transforms simple cheese-filled pasta into a vibrant, flavorful dinner that can be prepared in under 20 minutes.
The beauty of this recipe lies in its versatility and simplicity. The combination of tender tortellini, rich pesto sauce, and fresh ingredients creates a balanced meal that works equally well for casual weeknight dinners or elegant entertaining.
Ingredients:
- 20 oz cheese tortellini (fresh or frozen)
- 1 cup basil pesto
- 1 cup cherry tomatoes, halved
- 1/4 cup grated Parmesan cheese
- 2 tablespoons olive oil
Bring a large pot of salted water to a boil and cook the tortellini according to package instructions until al dente. While the pasta cooks, halve the cherry tomatoes and warm the pesto in a large skillet over medium heat. Once the tortellini is cooked, reserve 1/2 cup of pasta water before draining. Add the cooked tortellini to the skillet with pesto, stirring gently to coat. Add a splash of reserved pasta water if needed to create a smoother sauce.
Transfer the tortellini to serving bowls and top with halved cherry tomatoes, fresh Parmesan cheese, and a drizzle of olive oil. The residual heat from the pasta will slightly warm the tomatoes while maintaining their fresh texture.
For best results, avoid rinsing the tortellini after cooking, as the starch helps the pesto sauce adhere better to the pasta. The dish can be customized by adding grilled chicken, sautéed vegetables, or pine nuts. If using store-bought pesto, opt for refrigerated varieties rather than shelf-stable options for better flavor.
Easy Thai Curry Noodles
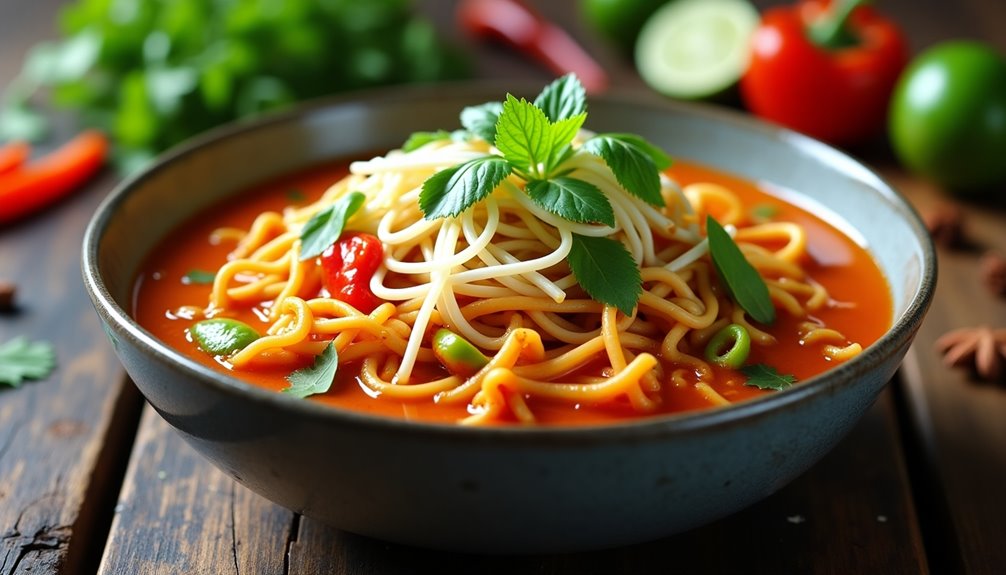
Thai curry noodles offer a perfect balance of creamy, spicy, and aromatic flavors that can transport you straight to the streets of Bangkok. This dish combines the richness of coconut milk with the bold flavors of Thai curry paste, creating a satisfying meal that can be prepared in under 30 minutes.
While traditional Thai curry noodles often require numerous specialty ingredients, this simplified version maintains authentic flavors while using items commonly found in most grocery stores. The recipe is also versatile, allowing you to adjust the spice level and add your preferred proteins or vegetables.
Ingredients:
- 8 oz rice noodles
- 2 tablespoons vegetable oil
- 3 tablespoons Thai red curry paste
- 1 can (14 oz) coconut milk
- 2 cups vegetable or chicken broth
- 2 tablespoons fish sauce
- 1 tablespoon brown sugar
- 2 cups mixed vegetables (bell peppers, carrots, snap peas)
- 1 pound protein of choice (chicken, shrimp, or tofu)
- 2 cloves garlic, minced
- 1 tablespoon ginger, minced
- Fresh lime wedges
- Fresh cilantro and Thai basil
- Bean sprouts for garnish
Soak the rice noodles in warm water according to package instructions until they become pliable. In a large wok or deep skillet, heat oil over medium heat and sauté garlic and ginger until fragrant. Add the curry paste and cook for 1-2 minutes until aromatic. Pour in the coconut milk and broth, stirring to combine, then add fish sauce and brown sugar.
Once the liquid comes to a simmer, add your chosen protein and cook until nearly done. Add the vegetables and cook for 2-3 minutes until crisp-tender. Drain the noodles and add them to the pan, tossing everything together until the noodles are fully cooked and have absorbed some of the sauce. Garnish with fresh herbs, bean sprouts, and lime wedges before serving.
For best results, prepare all ingredients before starting to cook, as the dish comes together quickly once heat is applied. The curry paste can be adjusted to taste, and coconut milk can be substituted with light coconut milk for a lower-calorie version. Store leftovers in an airtight container for up to three days, though the noodles may become softer over time.
Microwave Egg Fried Rice
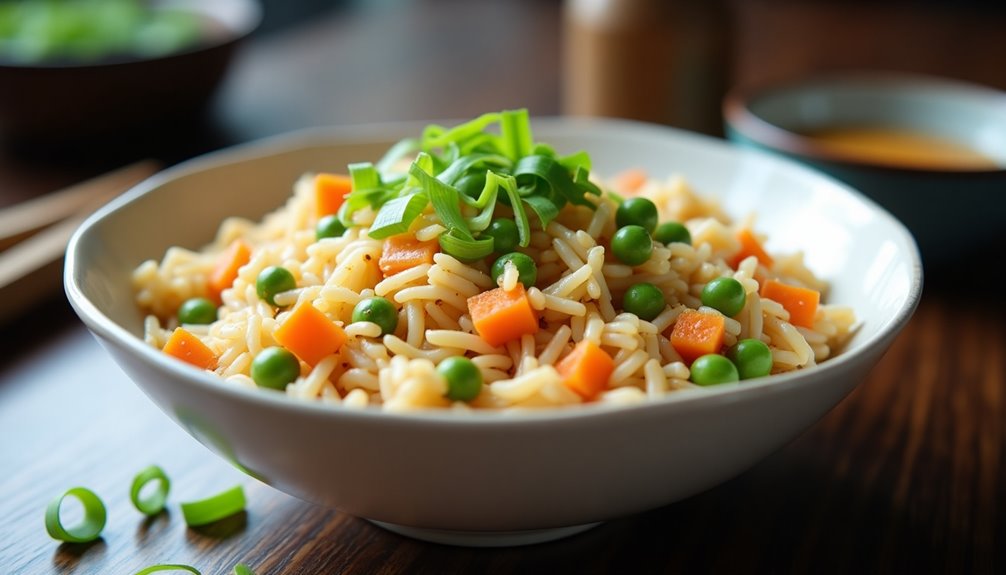
Microwave Egg Fried Rice is a convenient alternative to traditional wok-fried rice, perfect for those times when you need a quick meal but don't want to deal with multiple pots and pans. This simplified version delivers satisfying results in just minutes, using your microwave as the primary cooking tool.
While purists might argue that proper fried rice requires a wok and high heat, this microwave version offers a practical solution for busy individuals, college students, or anyone with limited kitchen access. The key is using day-old rice, which has the ideal texture for this preparation method.
- 2 cups cooked white rice (day-old)
- 2 large eggs
- 1/2 cup frozen peas and carrots
- 2 tablespoons soy sauce
- 1 tablespoon sesame oil
- 2 green onions, chopped
- 1/4 teaspoon white pepper
- 1/4 teaspoon garlic powder
- Salt to taste
Place the cold rice in a microwave-safe bowl and break up any clumps with a fork. In a separate small bowl, beat the eggs with a pinch of salt. Pour the beaten eggs over the rice and stir to combine. Add the frozen vegetables, soy sauce, sesame oil, and seasonings, mixing everything thoroughly.
Microwave the mixture on high for 2 minutes, then stir well. Continue microwaving in 1-minute intervals, stirring between each interval, until the eggs are fully cooked and the vegetables are heated through (approximately 4-5 minutes total). Once done, stir in the chopped green onions.
For best results, use rice that has been refrigerated overnight, as fresh rice contains too much moisture and can become mushy. If you notice the rice sticking together during cooking, sprinkle a few drops of water and fluff with a fork between heating intervals. Avoid overcooking, as the eggs can become rubbery in the microwave.
Pan-Seared Salmon With Lemon
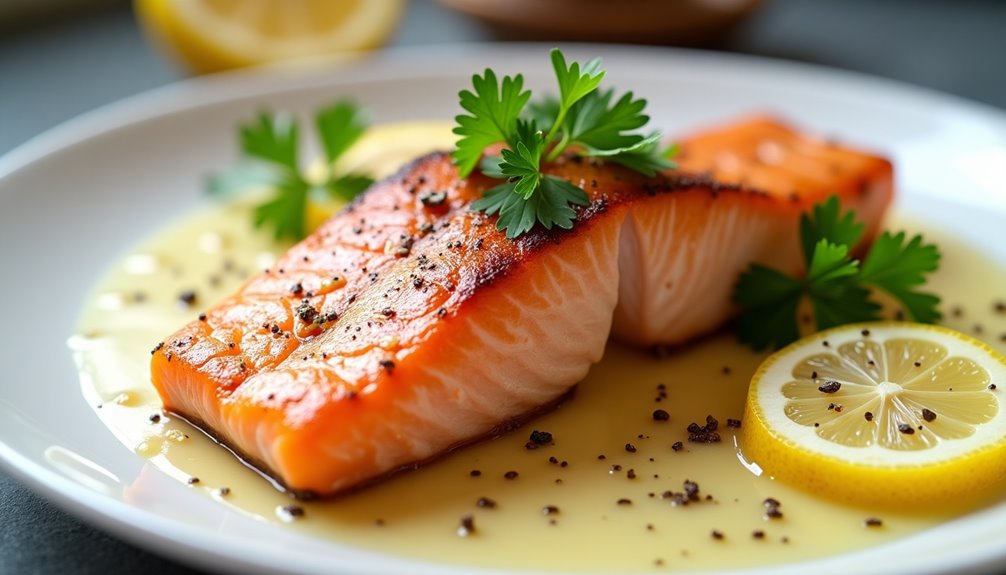
Pan-seared salmon with lemon is a classic dish that combines the rich, tender texture of salmon with bright citrus notes. The preparation method creates a perfectly crispy exterior while maintaining a moist, flaky interior that practically melts in your mouth.
This dish can be prepared in under 15 minutes, making it an ideal choice for busy weeknight dinners or elegant entertaining. The simplicity of the ingredients allows the natural flavor of the salmon to shine through, while the lemon adds a perfect balance of acidity.
- 4 (6-ounce) salmon fillets, skin-on
- 2 tablespoons olive oil
- 1 lemon
- 1 teaspoon sea salt
- 1/2 teaspoon black pepper
- 2 tablespoons butter
- 2 cloves garlic, minced
- Fresh parsley for garnish
Pat the salmon fillets dry with paper towels and season both sides with salt and pepper. Heat olive oil in a large skillet over medium-high heat until shimmering. Place the salmon skin-side up in the pan and cook for 4 minutes until golden brown. Flip the salmon and cook for an additional 3-4 minutes. Add butter and minced garlic to the pan, and baste the salmon with the melted butter mixture. Squeeze fresh lemon juice over the fillets and cook until the internal temperature reaches 145°F (63°C).
For best results, use a cast-iron or stainless-steel skillet, as these materials provide even heat distribution and superior browning. Avoid moving the salmon during the first few minutes of cooking to ensure proper crust formation. Always bring the salmon to room temperature for 15-20 minutes before cooking to ensure even cooking throughout the fillet.
10-Minute Greek Couscous
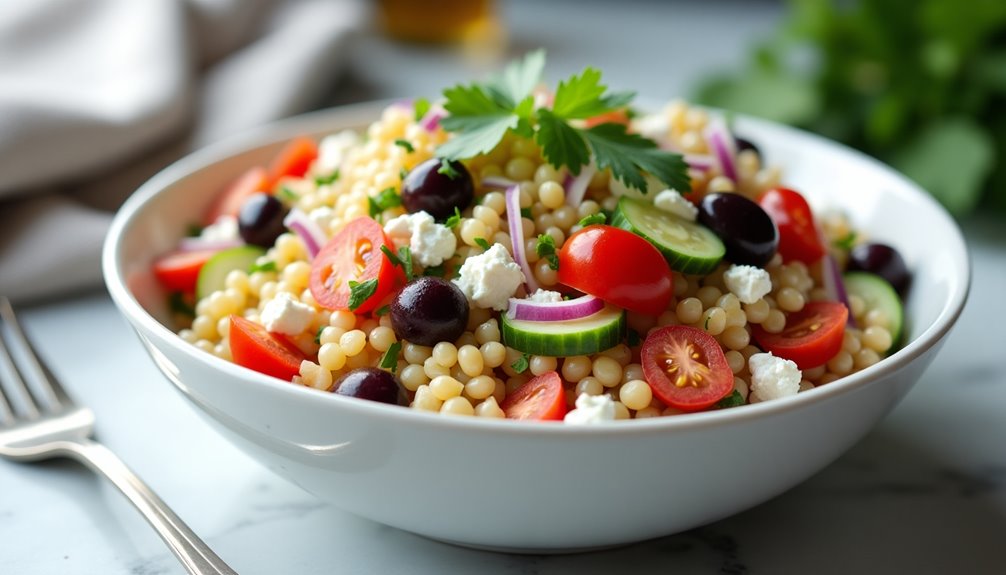
Minute Greek Couscous delivers a perfect balance of Mediterranean flavors in a dish that comes together in just minutes. This versatile grain-based meal combines the nutty taste of couscous with fresh vegetables, tangy feta cheese, and aromatic herbs.
This quick-cooking dish is ideal for busy weeknights or last-minute dinner plans, requiring minimal preparation and cooking time. The combination of ingredients creates a light yet satisfying meal that can be served warm or cold, making it perfect for meal prep or picnics.
Ingredients:
- 1 cup couscous
- 1¼ cups vegetable or chicken broth
- 1 cucumber, diced
- 1 cup cherry tomatoes, halved
- ½ red onion, finely chopped
- ½ cup crumbled feta cheese
- ⅓ cup Kalamata olives, pitted and halved
- 2 tablespoons extra virgin olive oil
- 1 lemon, juiced
- 2 tablespoons fresh parsley, chopped
- 1 teaspoon dried oregano
- Salt and pepper to taste
Bring the broth to a boil in a medium saucepan. Remove from heat, add couscous, stir once, and cover. Let stand for 5 minutes until the liquid is absorbed. Fluff with a fork and let cool for 5 minutes. While the couscous cools, prepare the vegetables and herbs.
In a large bowl, combine the cooled couscous with cucumber, tomatoes, red onion, feta cheese, and olives. In a small bowl, whisk together olive oil, lemon juice, parsley, and oregano. Pour the dressing over the couscous mixture and toss gently to combine. Season with salt and pepper to taste.
For best results, refrigerate the dish for at least 30 minutes before serving to allow the flavors to meld together. The vegetables can be cut larger or smaller based on preference, and the dish can be customized with additional Mediterranean ingredients such as roasted red peppers, artichoke hearts, or grilled chicken for a heartier meal.
Lightning-Fast Beef Quesadillas

Lightning-Fast Beef Quesadillas are the perfect solution for busy weeknights when you need a satisfying meal in minutes. This Mexican-inspired dish combines seasoned ground beef, melted cheese, and crispy tortillas to create a crowd-pleasing meal that can be customized with various toppings and sides.
The beauty of these quesadillas lies in their versatility and quick preparation time. Using pre-seasoned ground beef or leftover taco meat can further reduce cooking time, making this recipe even more convenient for those hectic evenings when time is limited.
Ingredients:
- 1 pound ground beef
- 2 tablespoons taco seasoning
- 8 large flour tortillas
- 2 cups shredded Mexican cheese blend
- 1 small onion, diced
- 1 bell pepper, diced
- 2 tablespoons vegetable oil
- Salt and pepper to taste
- Optional toppings: sour cream, guacamole, salsa, chopped cilantro
Brown the ground beef in a large skillet over medium-high heat, breaking it up as it cooks. Add the diced onion and bell pepper, cooking until the vegetables are softened. Stir in the taco seasoning and cook for an additional 2-3 minutes.
While the meat cooks, heat a separate large skillet over medium heat. Place a tortilla in the heated skillet, add a portion of the beef mixture on one half of the tortilla, and sprinkle with cheese. Fold the empty half over the filling and cook for 2-3 minutes until golden brown. Flip carefully and cook the other side until crispy and the cheese is fully melted. Repeat with remaining tortillas and filling.
For best results, keep the heat at medium to prevent burning the tortillas before the cheese melts. It's also important not to overfill the quesadillas, as this can make them difficult to flip and may cause the filling to spill out. Store any leftover beef mixture in an airtight container in the refrigerator for up to three days, making future quesadilla preparation even faster.
Instant Pot Mac and Cheese
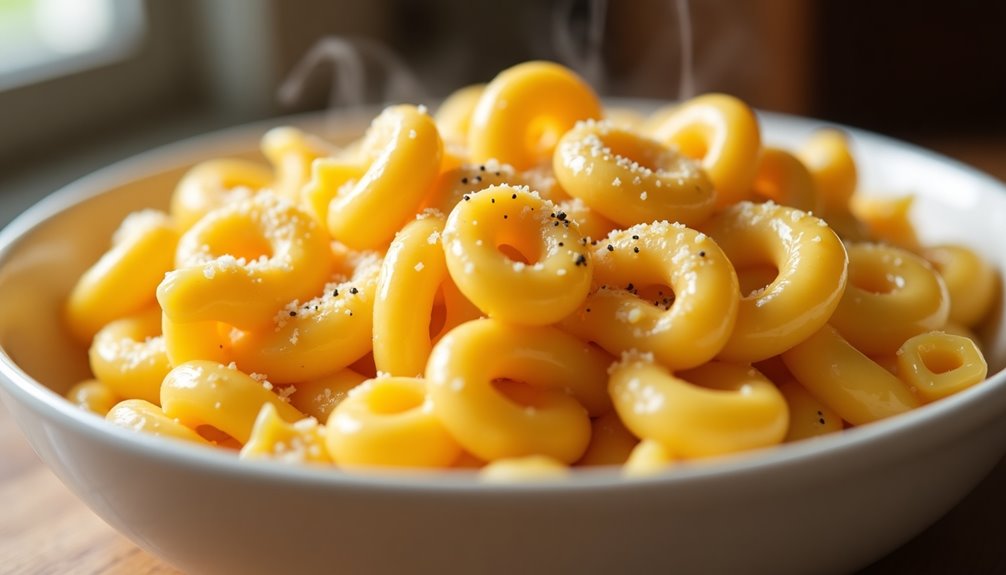
Instant Pot Mac and Cheese combines classic comfort food with modern convenience, transforming a traditional stovetop dish into a quick, one-pot meal. The pressure cooking method ensures perfectly cooked pasta while maintaining a creamy, rich texture that rivals any traditional recipe.
The beauty of this version lies in its simplicity and speed, taking only about 15 minutes from start to finish. The Instant Pot creates an ideal environment for the pasta to cook evenly while absorbing the perfect amount of liquid, resulting in a consistently delicious outcome every time.
- 16 oz elbow macaroni
- 4 cups water
- 2 tablespoons butter
- 1 teaspoon salt
- 1/2 teaspoon black pepper
- 1 teaspoon mustard powder
- 2 cups sharp cheddar cheese, shredded
- 1 cup mozzarella cheese, shredded
- 1/2 cup heavy cream
- 1/4 cup Parmesan cheese, grated
Add macaroni, water, butter, salt, pepper, and mustard powder to the Instant Pot. Close the lid and set valve to sealing position. Cook on high pressure for 4 minutes, followed by a quick release of pressure once the cooking cycle is complete.
Once the pressure is released, open the lid and stir in the heavy cream and cheeses. Stir continuously until the cheese is completely melted and the sauce is smooth and creamy. Let the mixture stand for 5 minutes to thicken.
For best results, use freshly grated cheese rather than pre-shredded varieties, as they contain anti-caking agents that can affect the smoothness of the sauce. The pasta may appear slightly soupy when first opened, but it will continue to thicken as it stands. If the sauce becomes too thick, add a splash of warm milk to adjust the consistency.
Veggie-Loaded Ramen Upgrade
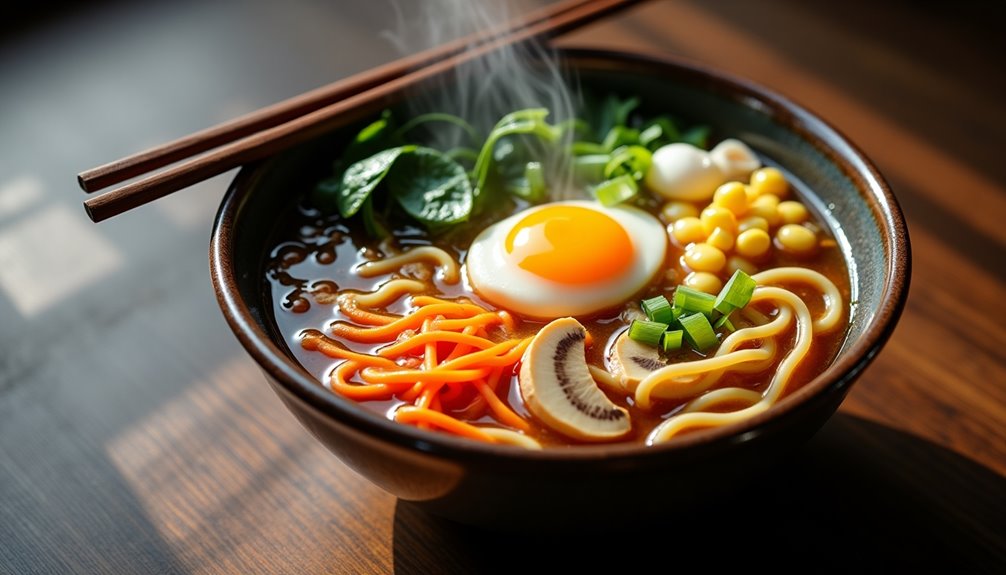
Veggie-Loaded Ramen Upgrade takes the humble packet of instant noodles and transforms it into a nutritious, satisfying meal. By adding fresh vegetables, protein, and aromatics, this dish elevates convenience food into something truly delicious and wholesome.
This 15-minute recipe maintains the comforting aspects of instant ramen while incorporating healthy ingredients that provide essential nutrients. The combination of crisp vegetables, tender noodles, and savory broth creates a balanced meal that works for lunch or dinner.
Ingredients:
- 1 packet instant ramen noodles
- 2 cups mixed vegetables (carrots, spinach, mushrooms, corn)
- 1 egg
- 2 green onions, sliced
- 1 clove garlic, minced
- 1-inch piece ginger, grated
- 1 tablespoon soy sauce
- 1 teaspoon sesame oil
- 2½ cups water
- Optional: protein (tofu, chicken, or shrimp)
Begin by bringing water to a boil in a medium pot. Add the garlic and ginger, then reduce heat to medium. Add the harder vegetables like carrots and let them cook for 2 minutes. Add the ramen noodles and cook according to package instructions, typically 3 minutes. When noodles are almost done, add softer vegetables like spinach and mushrooms.
Crack the egg directly into the simmering broth and let it cook for 2-3 minutes until the white is set but the yolk remains runny. Add the seasoning packet (use half for less sodium), soy sauce, and sesame oil. Stir gently to combine all ingredients.
For best results, prep all vegetables before starting to cook, as this dish comes together quickly. The vegetables can be changed based on what's available, and the broth can be adjusted to taste by adding more water or reducing the amount of seasoning packet used. Store any leftovers separately from the broth to prevent the noodles from becoming mushy.
Tuna Melt Panini
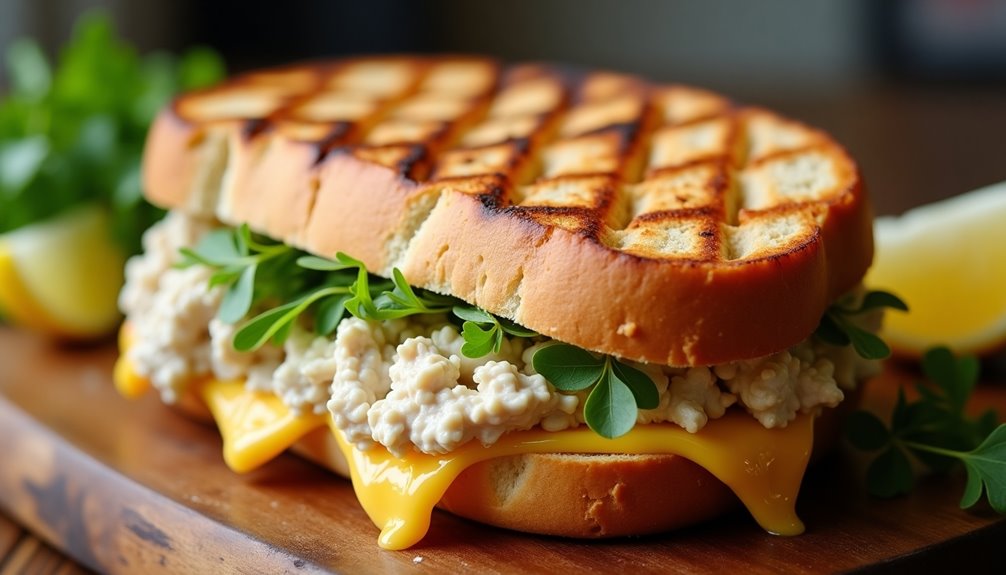
The classic tuna melt gets a sophisticated upgrade when transformed into a crispy, golden-brown panini. This elevated sandwich combines the comfort of a traditional tuna sandwich with the gourmet touch of melted cheese and perfectly toasted bread, creating a satisfying meal that can be prepared in minutes.
While tuna melts are often served open-faced or as basic grilled sandwiches, the panini preparation method ensures even heating and creates those distinctive grill marks that make the sandwich more visually appealing. The pressure from the panini press also helps meld the flavors together while creating the perfect contrast between the crispy exterior and warm, creamy interior.
Mix the drained tuna with mayonnaise, diced red onion, celery, lemon juice, pepper, and salt in a bowl until well combined. Spread butter on the outside of both bread slices and Dijon mustard on the inside if desired. Layer one slice with the tuna mixture and top with cheese slices. Close the sandwich with the second piece of bread, buttered side up.
Heat the panini press to medium-high heat. Place the sandwich in the press and cook for 3-4 minutes, or until the bread is golden brown and crispy, and the cheese has completely melted. If using a regular pan instead of a panini press, place a heavy skillet on top of the sandwich to create pressure, cooking each side for about 2-3 minutes.
For best results, drain the tuna thoroughly to prevent a soggy sandwich, and allow the panini press to fully heat before cooking. If the bread browns too quickly before the cheese melts, lower the temperature slightly. The sandwich can be assembled ahead of time and refrigerated, but should be brought to room temperature before grilling for even cooking.
- 2 slices sourdough bread
- 1 (5 oz) can chunk light tuna, drained
- 3 tablespoons mayonnaise
- 1 tablespoon diced red onion
- 1 tablespoon diced celery
- 1/2 teaspoon lemon juice
- 1/4 teaspoon black pepper
- 1/8 teaspoon salt
- 2 slices cheddar cheese
- 1 tablespoon butter, softened
- 1 tablespoon Dijon mustard (optional)
Air Fryer Honey Garlic Chicken
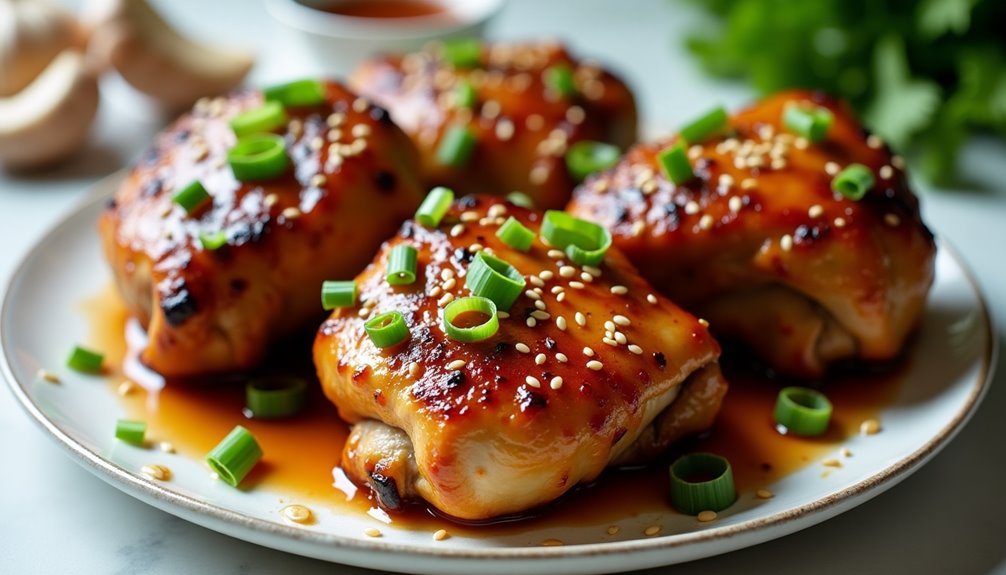
Air Fryer Honey Garlic Chicken combines the convenience of air frying with the irresistible flavors of sweet honey and savory garlic. This dish delivers crispy edges and juicy centers while requiring minimal oil, making it a healthier alternative to traditional fried chicken.
The secret to this recipe's success lies in its sticky, flavorful sauce that caramelizes perfectly in the air fryer. The combination of honey, soy sauce, and garlic creates a glaze that coats each piece of chicken with a perfect balance of sweet and savory notes.
Ingredients:
- 4 chicken thighs, boneless and skinless
- 1/4 cup honey
- 4 cloves garlic, minced
- 3 tablespoons soy sauce
- 1 tablespoon rice vinegar
- 1 teaspoon sesame oil
- 1/2 teaspoon black pepper
- 1/2 teaspoon ginger powder
- 1 tablespoon cornstarch
- Cooking spray
Mix honey, minced garlic, soy sauce, rice vinegar, sesame oil, black pepper, and ginger powder in a bowl. Reserve half the sauce for later use. Coat the chicken thighs in the remaining marinade and let them sit for 15-30 minutes. Preheat the air fryer to 380°F (193°C).
Spray the air fryer basket with cooking oil and place the marinated chicken pieces inside, ensuring they don't overlap. Cook for 12-15 minutes, flipping halfway through. While the chicken cooks, mix the reserved sauce with cornstarch in a small saucepan and heat until it thickens. Brush the thickened sauce over the chicken during the last 2-3 minutes of cooking.
For best results, avoid overcrowding the air fryer basket as this can prevent proper air circulation and affect crispiness. Always check the internal temperature of the chicken reaches 165°F (74°C) before serving. If the sauce starts to burn in the air fryer, reduce the temperature slightly or cover the chicken with a small piece of foil.
Microwave Sweet Potato Bowl
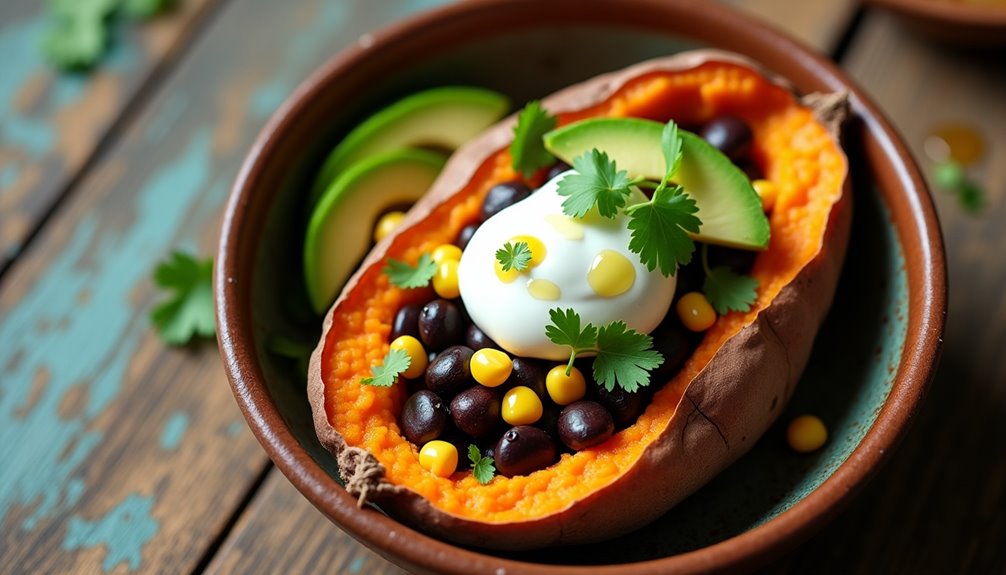
This recipe transforms a simple sweet potato into a complete meal by adding protein-rich toppings and fresh vegetables. The microwave cooking method preserves the potato's nutrients while significantly reducing cooking time compared to conventional oven baking.
Ingredients:
- 1 medium sweet potato
- 1/4 cup black beans, drained and rinsed
- 1/4 cup corn kernels
- 2 tablespoons Greek yogurt
- 1 tablespoon olive oil
- 1/4 avocado, sliced
- 2 tablespoons chopped cilantro
- Salt and pepper to taste
- Optional: hot sauce or lime wedges
Pierce the sweet potato several times with a fork and place it on a microwave-safe plate. Microwave on high for 5-7 minutes, rotating halfway through, until the potato is tender when pierced with a fork. While the potato cooks, prepare your toppings.
Once done, slice the potato lengthwise and gently mash the inside with a fork.
Layer the toppings on the warm sweet potato in this order: drizzle with olive oil, add black beans and corn, top with Greek yogurt, arrange avocado slices, and sprinkle with cilantro. Season with salt and pepper to taste.
For best results, choose a sweet potato that's uniform in shape for even cooking. If the potato is still firm after the initial cooking time, continue microwaving in 1-minute intervals until done. The sweet potato can be cooked in advance and reheated when ready to serve, though the toppings should be added fresh for optimal taste and texture.
15-Minute Breakfast for Dinner
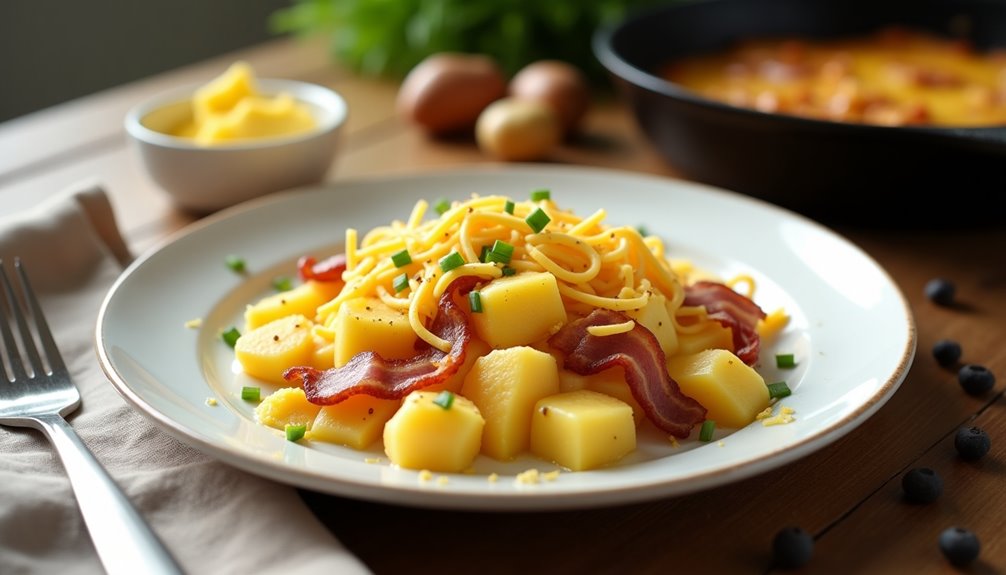
Breakfast for dinner, often called "brinner," is a comforting and practical meal option that can be prepared in minutes. This versatile dish combines classic breakfast elements into a satisfying dinner that both adults and children enjoy.
This recipe takes traditional breakfast staples and transforms them into a hearty evening meal. The combination of protein-rich eggs, crispy potatoes, and savory meat creates a balanced plate that satisfies dinner cravings while maintaining the ease of breakfast preparation.
Ingredients:
- 6 large eggs
- 4 slices of bacon
- 2 medium potatoes, diced
- 1 small onion, diced
- 2 tablespoons butter
- 1/2 cup shredded cheese
- Salt and pepper to taste
- 2 tablespoons vegetable oil
- 4 slices of bread (optional)
Start by cooking the diced potatoes in vegetable oil over medium-high heat until golden brown and crispy, about 10-12 minutes. While the potatoes cook, prepare the bacon in a separate pan until crisp, then crumble it into pieces. In the same pan used for bacon, retain some of the fat and scramble the eggs, adding salt and pepper to taste.
Once the components are ready, combine the crispy potatoes with the scrambled eggs, crumbled bacon, and shredded cheese in the pan. Stir gently until the cheese begins to melt. If desired, toast the bread to serve alongside the mixture.
To enhance this meal, consider preparing the potatoes ahead of time or using pre-cooked potatoes to reduce cooking time. The dish can be customized with different cheeses, meats, or vegetables, and leftovers can be stored in an airtight container for up to two days in the refrigerator. For a crispier texture, avoid overcrowding the pan when cooking the potatoes.