18 Quick and Easy Meals for Two
When you're craving a restaurant-quality lemon garlic shrimp dish but don't want to leave home, you'll find these recipes are your perfect solution. Whether you're cooking for yourself and a partner or planning intimate dinner dates, this collection of 18 quick meals transforms everyday ingredients into impressive two-person portions. From one-pan wonders to 15-minute Asian-inspired bowls, you'll discover just how simple it can be to create flavorful, portion-perfect meals that'll make weeknight dining feel special.
One-Pan Lemon Garlic Shrimp and Asparagus
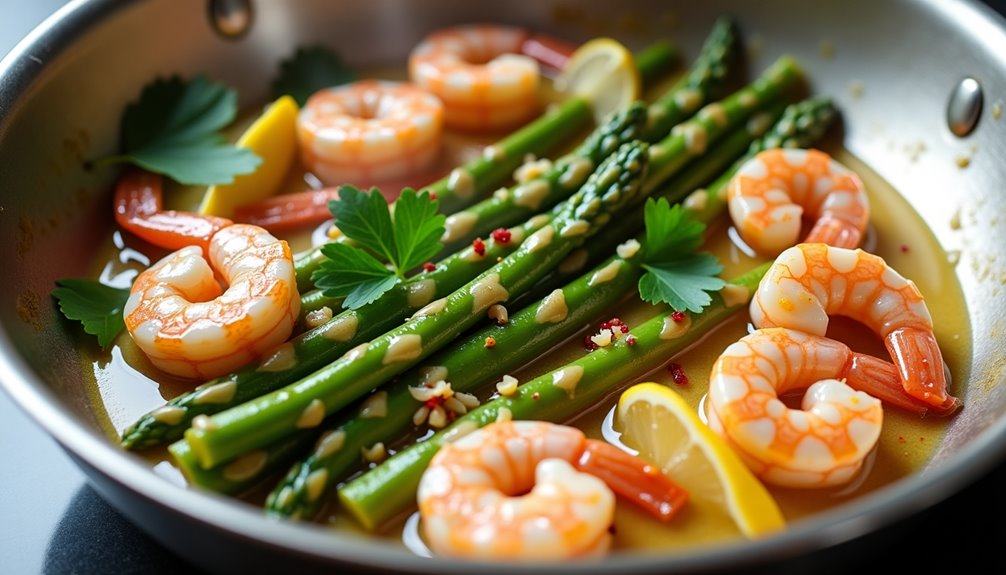
This elegant one-pan lemon garlic shrimp and asparagus dish combines succulent seafood with crisp vegetables, creating a perfect balance of flavors and textures. Ready in just 20 minutes, it's an ideal choice for a romantic dinner or a quick weeknight meal for two.
The dish features tender shrimp cooked in a bright, citrusy sauce alongside perfectly crisp-tender asparagus spears. The combination of garlic, lemon, and butter creates a light yet satisfying sauce that ties all the elements together while keeping the meal healthy and low-carb.
Ingredients:
- 1 pound large shrimp, peeled and deveined
- 1 bunch asparagus, woody ends trimmed
- 4 tablespoons butter
- 4 cloves garlic, minced
- 1 lemon, juiced and zested
- 1/2 teaspoon red pepper flakes
- 1/2 teaspoon salt
- 1/4 teaspoon black pepper
- 2 tablespoons olive oil
- 2 tablespoons fresh parsley, chopped
Heat olive oil in a large skillet over medium-high heat. Add asparagus and cook for 3-4 minutes until bright green and slightly tender. Remove asparagus and set aside. In the same pan, add butter and garlic, cooking until fragrant. Add shrimp, season with salt, pepper, and red pepper flakes, and cook for 2-3 minutes per side until pink and opaque.
Return asparagus to the pan, add lemon juice and zest, and toss everything together until well combined and heated through. Garnish with fresh parsley before serving.
For best results, ensure your shrimp are completely thawed and patted dry before cooking to achieve a better sear. The asparagus should be similar in thickness for even cooking, and the garlic should be freshly minced rather than pre-packaged for the most vibrant flavor. If the sauce becomes too thick, add a splash of white wine or chicken broth to thin it out.
Stovetop Chicken Fajitas
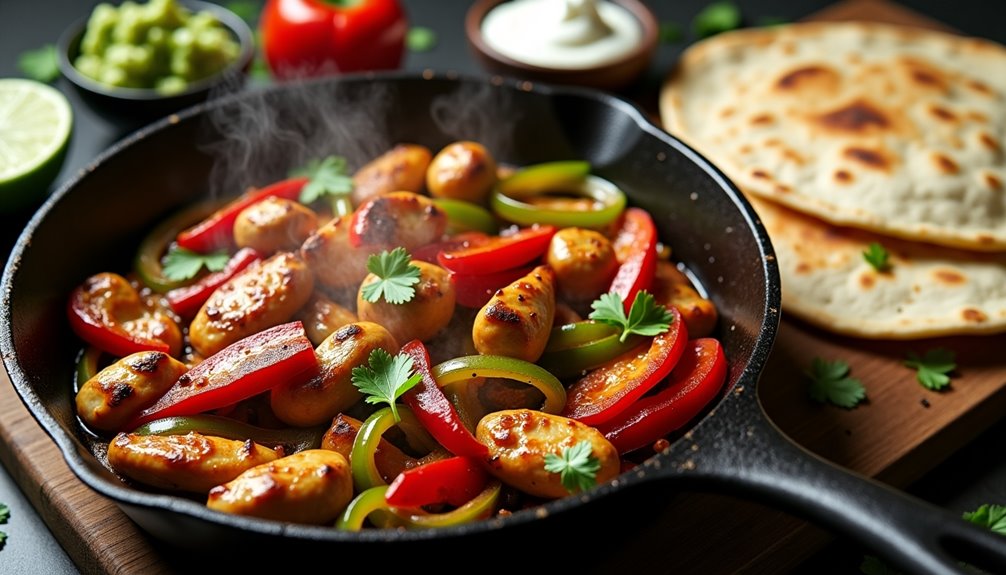
Stovetop Chicken Fajitas are a vibrant Mexican-inspired dish that brings restaurant-quality flavors right to your home kitchen. The combination of seasoned chicken strips, colorful bell peppers, and caramelized onions creates a perfect balance of textures and tastes that's ideal for an intimate dinner for two.
This recipe takes just 30 minutes from start to finish, making it perfect for busy weeknight dinners. The key to great fajitas lies in properly seasoning the meat and achieving the right level of char on both the vegetables and chicken, creating that distinctive fajita flavor that's typically associated with sizzling restaurant skillets.
- 2 chicken breasts, sliced into strips
- 1 red bell pepper, sliced
- 1 green bell pepper, sliced
- 1 medium onion, sliced
- 2 tablespoons olive oil
- 2 cloves garlic, minced
- 1 lime
- 1 tablespoon chili powder
- 1 teaspoon cumin
- 1 teaspoon paprika
- 1/2 teaspoon oregano
- Salt and pepper to taste
- 6 small flour tortillas
- Optional toppings: sour cream, guacamole, shredded cheese
Season the chicken strips with chili powder, cumin, paprika, oregano, salt, and pepper. Heat one tablespoon of oil in a large skillet over medium-high heat. Cook the chicken strips for 6-8 minutes until golden brown and cooked through, then remove from the pan and set aside.
In the same skillet, add the remaining oil and sauté the sliced peppers and onions until they're slightly charred but still crisp, about 5-6 minutes. Add the minced garlic and cook for another minute. Return the chicken to the pan, squeeze fresh lime juice over everything, and toss to combine.
To prevent the chicken from becoming dry, resist the urge to move it around too much while cooking – let it develop a nice sear on each side. Additionally, warming your tortillas in a dry skillet or wrapping them in foil and heating in the oven will make them more pliable and enhance the overall fajita experience.
Creamy Mushroom Pasta
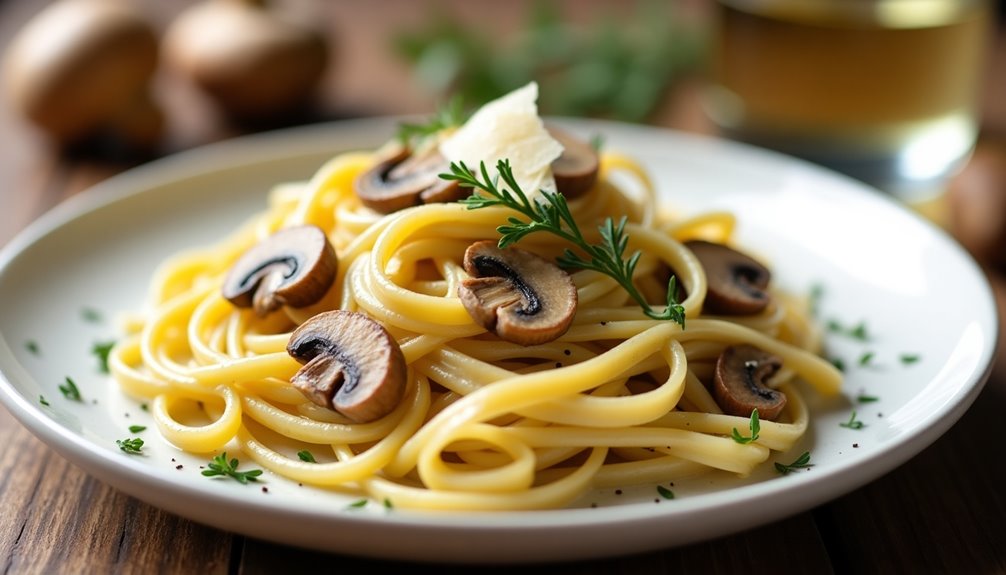
Creamy mushroom pasta combines the earthy richness of mushrooms with the comforting embrace of a silky pasta dish. This simple yet elegant meal takes just 30 minutes to prepare, making it perfect for busy weeknight dinners or romantic date nights at home.
The key to this dish lies in properly sautéing the mushrooms until golden brown, which intensifies their natural umami flavor. When paired with al dente pasta and a velvety cream sauce, the result is a restaurant-quality meal that's surprisingly easy to recreate in your own kitchen.
Ingredients:
- 8 oz fettuccine or penne pasta
- 8 oz fresh mushrooms, sliced
- 3 cloves garlic, minced
- 2 tablespoons butter
- 1 tablespoon olive oil
- 1 cup heavy cream
- 1/2 cup grated Parmesan cheese
- 1/4 cup white wine
- 1 teaspoon fresh thyme
- Salt and black pepper to taste
- Fresh parsley for garnish
Cook pasta in salted water according to package instructions until al dente. While the pasta cooks, heat butter and olive oil in a large skillet over medium-high heat. Add mushrooms and cook until golden brown, about 5-7 minutes. Add garlic and cook for another minute. Pour in the white wine and let it reduce by half. Lower the heat and add the heavy cream, bringing it to a gentle simmer. Stir in the Parmesan cheese, thyme, salt, and pepper.
Drain the pasta, reserving 1/2 cup of pasta water. Add the pasta directly to the mushroom sauce, tossing to combine. If the sauce is too thick, add some reserved pasta water to reach desired consistency. Garnish with fresh parsley before serving.
For best results, avoid washing mushrooms directly under water as they absorb moisture like sponges. Instead, clean them by gently wiping with a damp paper towel. Also, make sure to bring your cream to room temperature before adding it to the pan to prevent curdling, and don't skimp on the Parmesan cheese, as it adds both flavor and helps thicken the sauce.
Asian-Style Salmon Rice Bowls
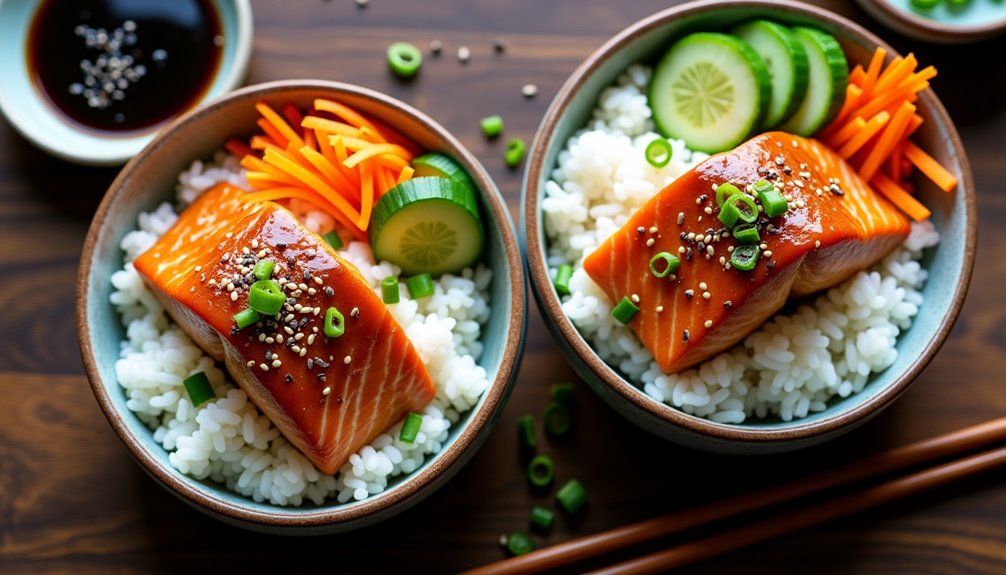
Asian-Style Salmon Rice Bowls blend the richness of fresh salmon with aromatic Asian-inspired flavors, creating a satisfying and nutritious meal perfect for two people. The combination of tender fish, fluffy rice, and vibrant vegetables delivers a restaurant-quality dish that can be prepared in under 30 minutes.
This bowl features a honey-soy glazed salmon served over steamed rice, accompanied by quick-pickled cucumbers and carrots, making it both colorful and balanced. The recipe can be customized with different vegetables or toppings to suit individual preferences while maintaining its essential Asian flavor profile.
Ingredients:
- 2 salmon fillets (6 oz each)
- 1 cup jasmine rice
- 2 tablespoons soy sauce
- 1 tablespoon honey
- 1 tablespoon sesame oil
- 1 tablespoon rice vinegar
- 1 cucumber, thinly sliced
- 1 carrot, julienned
- 2 green onions, chopped
- 1 tablespoon sesame seeds
- 1 tablespoon ginger, minced
- 2 cloves garlic, minced
- Salt and pepper to taste
Start by cooking the jasmine rice according to package instructions. While the rice cooks, combine soy sauce, honey, sesame oil, and half of the minced ginger and garlic in a small bowl to create the salmon glaze. Season the salmon fillets with salt and pepper, then brush them with the glaze. Heat a non-stick pan over medium-high heat and cook the salmon for 4-5 minutes per side until it flakes easily.
For the quick-pickled vegetables, combine rice vinegar with a pinch of salt in a bowl, then add the cucumber and carrots. Let them sit for 10-15 minutes while the other components finish cooking. Assemble the bowls by dividing the rice between two bowls, placing the salmon on top, and arranging the pickled vegetables on the side. Garnish with chopped green onions and sesame seeds.
For best results, ensure the salmon is at room temperature before cooking to promote even heating. The glaze can be made ahead of time and stored in the refrigerator for up to three days. If the salmon starts to brown too quickly while cooking, lower the heat to prevent the honey in the glaze from burning. A digital thermometer can be used to check for doneness – the salmon should reach an internal temperature of 145°F (63°C).
Vegetarian Black Bean Quesadillas
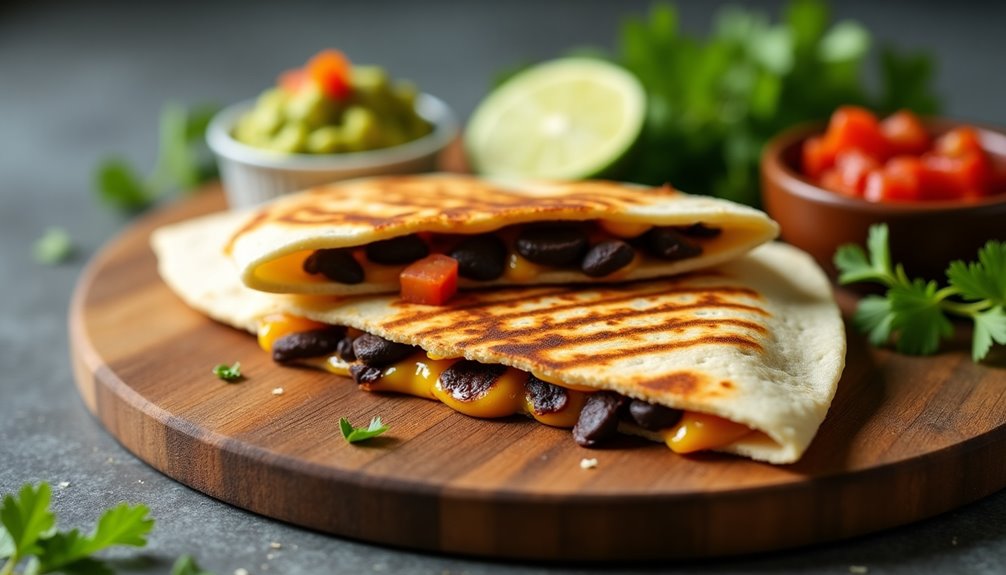
These black bean quesadillas are a perfect weeknight dinner option that combines flavor, nutrition, and convenience. Ready in just 15 minutes, they deliver a satisfying mix of protein-rich black beans, melted cheese, and Mexican-inspired seasonings.
The beauty of these quesadillas lies in their versatility – they can be customized with additional vegetables or served with various toppings like sour cream, guacamole, or fresh salsa. This recipe makes enough for two people, with each person getting two quesadilla triangles.
- 4 large flour tortillas
- 1 can (15 oz) black beans, drained and rinsed
- 2 cups shredded Mexican cheese blend
- 1 red bell pepper, diced
- 1/2 red onion, finely chopped
- 2 cloves garlic, minced
- 1 teaspoon ground cumin
- 1 teaspoon chili powder
- Salt and pepper to taste
- 2 tablespoons olive oil
In a medium bowl, mash half the black beans while leaving the other half whole. Mix in the diced bell pepper, onion, garlic, and seasonings.
Place a large skillet over medium heat and warm the tortillas one at a time to make them more pliable. Lay out the tortillas and distribute the bean mixture evenly on one half of each tortilla, then top with cheese. Fold the empty half over to create a half-moon shape.
Heat olive oil in the skillet over medium heat. Cook quesadillas one at a time for about 2-3 minutes per side, until golden brown and crispy, and the cheese has melted. Cut each quesadilla into two triangles before serving.
For the best results, avoid overfilling the quesadillas as this can make them difficult to flip and cause the filling to spill out. If making these ahead of time, you can prepare the filling mixture and store it in the refrigerator for up to two days, then assemble and cook the quesadillas when ready to serve.
Mediterranean Couscous With Grilled Vegetables
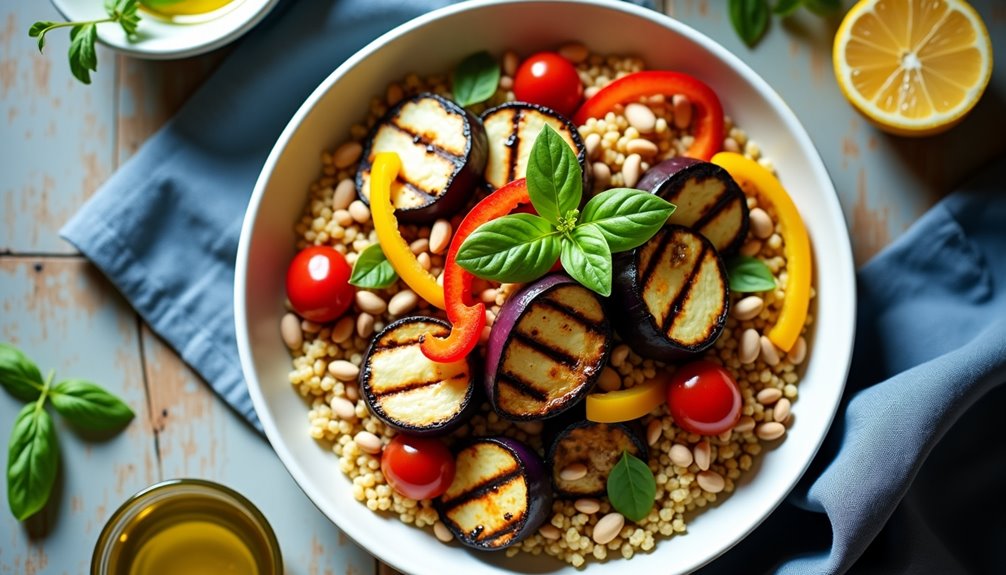
Mediterranean Couscous with Grilled Vegetables transforms simple ingredients into an elegant meal perfect for two. The combination of fluffy couscous and charred vegetables creates a harmonious blend of textures and flavors, while fresh herbs and citrus add brightness to this Mediterranean-inspired dish.
This versatile recipe works well as both a main course and a side dish, taking only 30 minutes to prepare. The vegetables can be grilled outdoors or on a stovetop grill pan, making it suitable for any season. The dish delivers a healthy balance of carbohydrates, vegetables, and proteins while remaining light and satisfying.
Ingredients:
- 1 cup couscous
- 1¼ cups vegetable broth
- 1 zucchini, sliced lengthwise
- 1 red bell pepper, quartered
- 1 small eggplant, sliced into rounds
- 1 red onion, cut into wedges
- 2 tablespoons olive oil
- 2 cloves garlic, minced
- 1 lemon, juiced
- ½ cup cherry tomatoes, halved
- ¼ cup fresh basil, chopped
- ¼ cup fresh parsley, chopped
- 2 tablespoons pine nuts
- Salt and pepper to taste
- ½ teaspoon dried oregano
Brush the vegetables with olive oil and season with salt, pepper, and dried oregano. Grill them on medium-high heat for 4-5 minutes per side until tender and slightly charred. Meanwhile, bring the vegetable broth to a boil in a medium saucepan. Add couscous, remove from heat, cover, and let stand for 5 minutes. Fluff with a fork and add 1 tablespoon of olive oil.
Chop the grilled vegetables into bite-sized pieces and combine them with the couscous. Add minced garlic, lemon juice, cherry tomatoes, fresh herbs, and pine nuts. Toss everything together, adjusting seasoning to taste. Serve warm or at room temperature.
For best results, avoid overcooking the vegetables as they should maintain some firmness. Toast the pine nuts in a dry pan before adding them to enhance their flavor. The dish can be made ahead and reheated, though fresh herbs should be added just before serving to maintain their vibrancy.
Quick Beef Stir-Fry
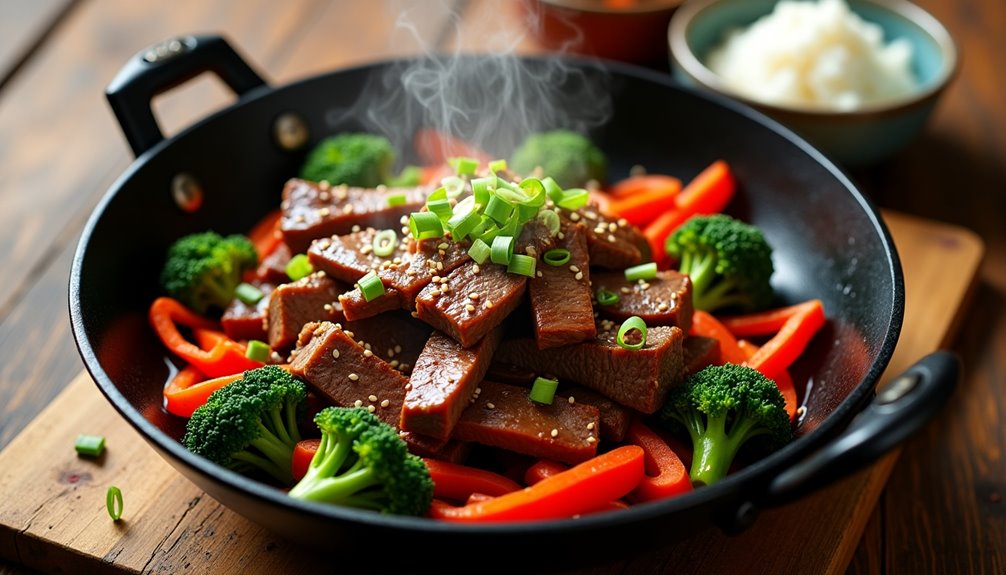
Quick Beef Stir-Fry is a versatile weeknight dinner that combines tender strips of beef with colorful vegetables in a savory sauce. This dish can be prepared in under 30 minutes, making it perfect for busy couples who want a satisfying homemade meal without spending hours in the kitchen.
The key to a successful stir-fry lies in the preparation and timing. Having all ingredients ready before starting to cook ensures the beef stays tender and the vegetables maintain their crispness. This recipe serves two people generously and can be customized with different vegetables based on personal preferences or seasonal availability.
Ingredients:
- 12 oz flank steak, sliced thinly against the grain
- 2 tablespoons vegetable oil
- 1 red bell pepper, sliced
- 2 cups broccoli florets
- 1 carrot, julienned
- 2 cloves garlic, minced
- 1 thumb-sized piece ginger, minced
- 3 tablespoons soy sauce
- 1 tablespoon oyster sauce
- 1 teaspoon cornstarch
- ¼ cup beef broth
- Salt and pepper to taste
- Cooked rice for serving
Start by mixing the soy sauce, oyster sauce, cornstarch, and beef broth in a small bowl. Season the sliced beef with salt and pepper. Heat one tablespoon of oil in a large wok or skillet over high heat until smoking. Add the beef in a single layer and cook for 2-3 minutes until browned. Remove the beef and set aside.
Add the remaining oil to the pan and stir-fry the vegetables in order of cooking time: carrots first, followed by broccoli and bell peppers. Add garlic and ginger when vegetables are almost done. Return the beef to the pan, pour in the sauce mixture, and cook until the sauce thickens and coats everything evenly, about 2-3 minutes.
For best results, slice the beef while it's partially frozen to achieve thin, even strips. The vegetables can be cut and stored in the refrigerator up to a day in advance, and the sauce ingredients can be mixed several hours ahead. Avoid overcrowding the pan to ensure proper browning and prevent the ingredients from steaming instead of stir-frying.
Spinach and Goat Cheese Frittata

A frittata is a versatile Italian egg dish that's perfect for any meal of the day. This protein-rich combination of eggs, fresh spinach, and creamy goat cheese creates a delightful blend of flavors that's both satisfying and elegant.
This spinach and goat cheese frittata serves two people generously and can be prepared in under 30 minutes, making it an ideal choice for busy weeknight dinners or leisurely weekend brunches. The dish requires minimal cleanup since everything cooks in a single oven-safe skillet.
- 6 large eggs
- 4 oz fresh spinach
- 3 oz goat cheese
- 2 tablespoons olive oil
- 1 small onion, diced
- 2 cloves garlic, minced
- 1/4 cup milk
- 1/2 teaspoon salt
- 1/4 teaspoon black pepper
- 1/4 teaspoon dried thyme
Preheat your oven to 375°F (190°C). In a medium bowl, whisk together eggs, milk, salt, pepper, and thyme until well combined.
Heat olive oil in an oven-safe 10-inch skillet over medium heat. Sauté diced onion until translucent, about 3-4 minutes, then add garlic and cook for another minute. Add spinach and cook until wilted, approximately 2 minutes.
Pour the egg mixture over the vegetables, stirring gently to distribute ingredients evenly. Crumble goat cheese over the top. Cook on stovetop for 3-4 minutes until edges begin to set, then transfer skillet to preheated oven. Bake for 10-12 minutes until eggs are fully set and slightly puffed.
For best results, let the frittata rest for 5 minutes before serving. The residual heat will continue cooking the eggs slightly, and the texture will become perfect for slicing. Always use an oven mitt when handling the hot skillet, and consider serving directly from the pan for a rustic presentation.
Thai Red Curry With Tofu
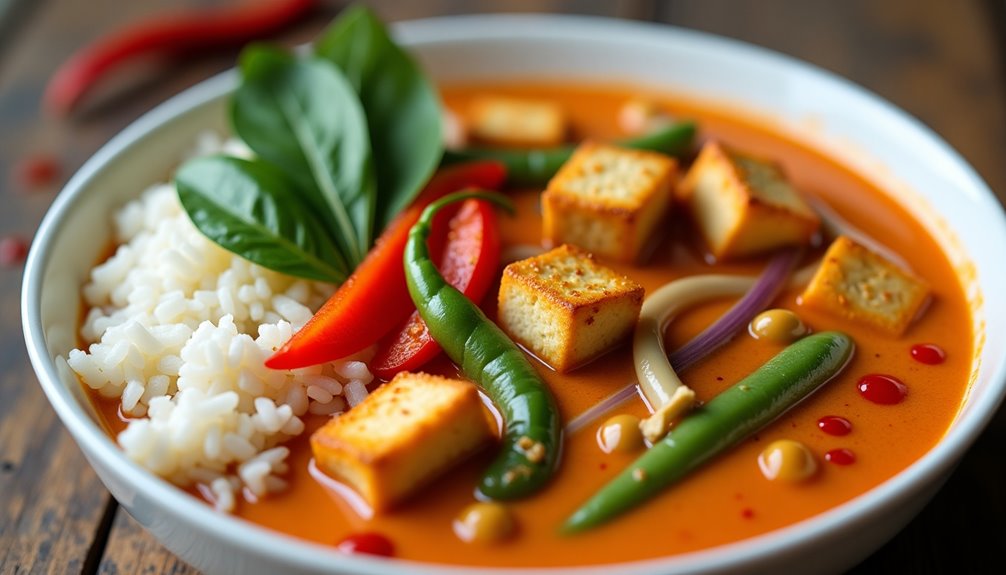
Thai Red Curry with Tofu is a vibrant, flavorful dish that combines the richness of coconut milk with the bold spices of Thai curry paste. This vegetarian-friendly meal delivers a perfect balance of heat, sweetness, and umami flavors, making it an ideal choice for a cozy dinner for two.
The beauty of this recipe lies in its versatility and simplicity. While traditional Thai curries can require numerous ingredients and lengthy preparation times, this streamlined version maintains authentic flavors while being achievable on a busy weeknight. The tofu serves as an excellent protein source, soaking up the curry's aromatic sauce.
Ingredients:
- 14 oz firm tofu, cubed
- 1 can (14 oz) coconut milk
- 2-3 tablespoons Thai red curry paste
- 1 red bell pepper, sliced
- 1 cup bamboo shoots
- 1 cup snap peas
- 2 tablespoons vegetable oil
- 1 tablespoon soy sauce
- 1 tablespoon brown sugar
- 2 kaffir lime leaves (optional)
- Fresh Thai basil leaves
- Jasmine rice for serving
Press the tofu between paper towels for 15 minutes to remove excess moisture. Heat oil in a large pan or wok over medium-high heat. Fry the tofu cubes until golden brown on all sides, then remove and set aside. In the same pan, fry the curry paste until fragrant, then add coconut milk, stirring until well combined. Add vegetables, soy sauce, and brown sugar, simmering until vegetables are tender-crisp. Return tofu to the pan and cook for an additional 3-4 minutes.
For the best results, let the curry rest for 5 minutes before serving to allow the flavors to meld together. The sauce should be rich and creamy but not too thick – if needed, adjust consistency with a splash of water. Serve hot over jasmine rice, garnished with fresh Thai basil leaves.
A crucial tip for success: The quality of your curry paste significantly impacts the final dish. While store-bought paste is convenient, look for authentic Thai brands rather than generic alternatives. Also, remember that different brands vary in heat level, so start with less paste and adjust to taste. Leftover curry can be stored in the refrigerator for up to 3 days, and often tastes even better the next day as the flavors continue to develop.
Pesto Tortellini With Cherry Tomatoes
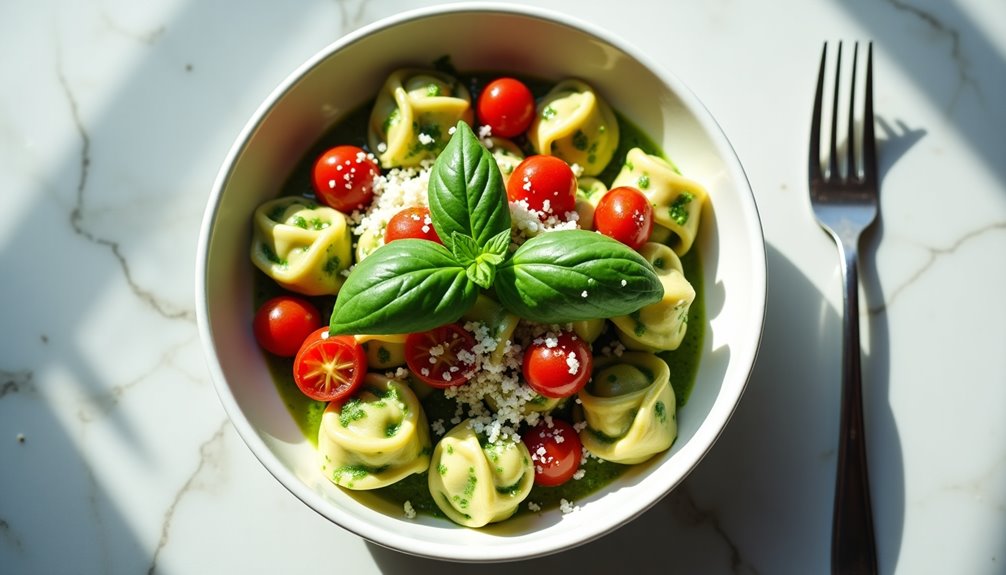
This vibrant and satisfying pasta dish combines the rich flavors of fresh pesto with cheese-filled tortellini and sweet cherry tomatoes. Perfect for a romantic dinner or a quick weeknight meal, it takes less than 20 minutes to prepare and requires minimal cooking skills.
The combination of store-bought tortellini and pesto makes this recipe incredibly convenient while still delivering restaurant-quality taste. The cherry tomatoes add a burst of freshness and color, while also providing a subtle acidity that balances the creamy pesto sauce.
Ingredients:
- 9 oz fresh cheese tortellini
- 1/2 cup basil pesto
- 1 pint cherry tomatoes, halved
- 2 tablespoons olive oil
- 2 cloves garlic, minced
- 1/4 cup grated Parmesan cheese
- Salt and black pepper to taste
- Fresh basil leaves for garnish
Bring a large pot of salted water to boil and cook the tortellini according to package instructions, usually 7-9 minutes. While the pasta cooks, heat olive oil in a large skillet over medium heat. Add minced garlic and halved cherry tomatoes, cooking until the tomatoes begin to soften, about 3-4 minutes. When the tortellini is done, reserve 1/4 cup of pasta water before draining.
Add the cooked tortellini to the skillet with tomatoes, then stir in the pesto. If the sauce seems too thick, add a splash of the reserved pasta water to achieve desired consistency. Toss everything together gently until well combined and heated through. Season with salt and pepper to taste, then transfer to serving plates and top with grated Parmesan and fresh basil leaves.
For best results, avoid rinsing the tortellini after cooking, as the starch helps the pesto sauce adhere better to the pasta. The dish can be made with homemade or store-bought pesto, though fresh pesto will provide the best flavor. If making ahead, save some pasta water to refresh the sauce when reheating, as pesto tends to thicken when it cools.
Pan-Seared Pork Chops With Apple Sauce
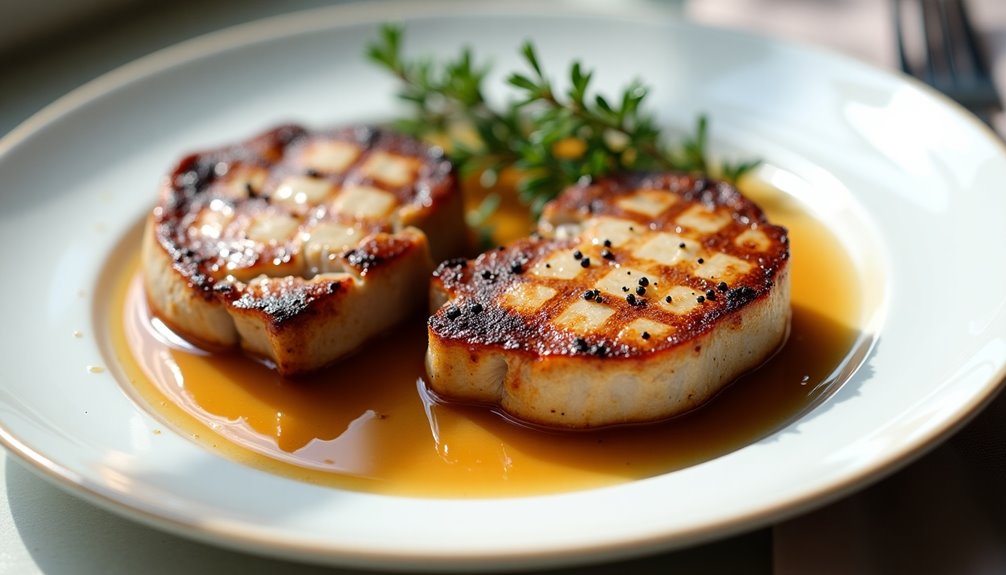
Pan-seared pork chops paired with homemade apple sauce creates a perfect balance of savory and sweet flavors that work harmoniously together. This classic combination has been a favorite for generations, offering a comforting meal that's both satisfying and sophisticated.
The key to this dish lies in achieving the perfect sear on the pork chops while ensuring they remain juicy inside, and creating a smooth, flavorful apple sauce that complements the meat without overpowering it. This recipe serves two people and can be prepared in under 30 minutes, making it ideal for a weeknight dinner or a casual date night at home.
Ingredients:
- 2 bone-in pork chops (1-inch thick)
- 3 medium apples, peeled and diced
- 2 tablespoons butter
- 2 tablespoons olive oil
- 1/4 cup water
- 2 tablespoons brown sugar
- 1/2 teaspoon cinnamon
- 1/4 teaspoon nutmeg
- Salt and pepper to taste
Start by preparing the apple sauce. Place peeled and diced apples in a saucepan with water, brown sugar, cinnamon, and nutmeg. Cook over medium heat for 15-20 minutes, stirring occasionally, until apples are soft and easily mashed.
While the sauce cooks, prepare the pork chops by patting them dry with paper towels and seasoning generously with salt and pepper on both sides.
Heat olive oil and butter in a large skillet over medium-high heat. Once the pan is hot, add the pork chops and sear for 4-5 minutes on each side, or until golden brown and cooked through. The internal temperature should reach 145°F (63°C). Remove from heat and let rest for 5 minutes before serving. While the meat rests, mash the cooked apples until they reach your desired consistency.
For best results, bring the pork chops to room temperature 30 minutes before cooking, and avoid moving them around in the pan while searing. This ensures even cooking and the development of a perfect golden crust. The apple sauce can be made ahead of time and reheated, and any leftover sauce can be stored in the refrigerator for up to a week.
Greek-Style Quinoa Bowls
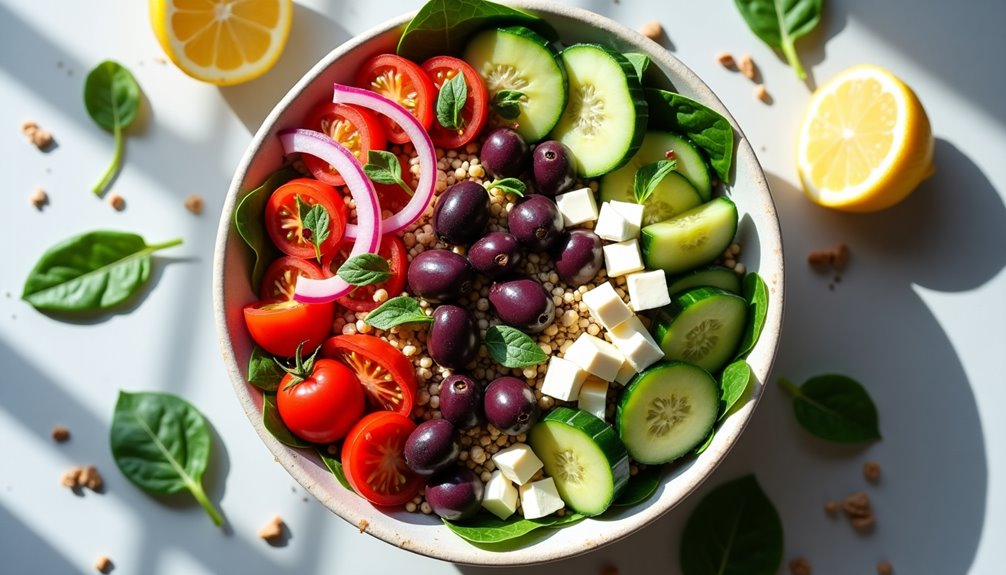
Greek-Style Quinoa Bowls combine the ancient grain's protein-rich goodness with classic Mediterranean flavors. This vibrant dish brings together the nutty taste of quinoa with fresh vegetables, tangy feta cheese, and aromatic herbs that are staples in Greek cuisine.
This healthy and satisfying meal can be prepared in under 30 minutes, making it perfect for busy weeknight dinners. The combination of whole grains, vegetables, and lean proteins creates a well-balanced bowl that's both nutritious and filling for two people.
- 1 cup quinoa
- 2 cups water or vegetable broth
- 1 cucumber, diced
- 1 cup cherry tomatoes, halved
- 1/2 red onion, finely chopped
- 1 cup kalamata olives, pitted
- 4 oz feta cheese, crumbled
- 2 tablespoons extra virgin olive oil
- 1 lemon, juiced
- 2 cloves garlic, minced
- 1 teaspoon dried oregano
- Salt and pepper to taste
- Optional: 2 cups baby spinach
Rinse quinoa thoroughly under cold water using a fine-mesh strainer. In a medium saucepan, combine quinoa with water or broth and bring to a boil. Reduce heat to low, cover, and simmer for 15-20 minutes until the liquid is absorbed and quinoa is tender. Remove from heat and let stand covered for 5 minutes, then fluff with a fork.
While the quinoa cooks, prepare the remaining ingredients. In a large bowl, combine the diced cucumber, halved tomatoes, chopped red onion, and olives. In a small bowl, whisk together olive oil, lemon juice, minced garlic, and oregano to make the dressing. Once the quinoa has cooled slightly, add it to the vegetable mixture, pour the dressing over top, and gently toss to combine. Season with salt and pepper, then divide between two bowls and top with crumbled feta cheese.
For best results, serve this dish at room temperature to allow the flavors to meld together. The quinoa can be cooked ahead of time and stored in the refrigerator for up to two days, making meal prep easier. If adding spinach, mix it in just before serving to prevent wilting, and consider warming the quinoa slightly to create a pleasant contrast between warm grains and cool vegetables.
Sheet Pan Honey Mustard Chicken
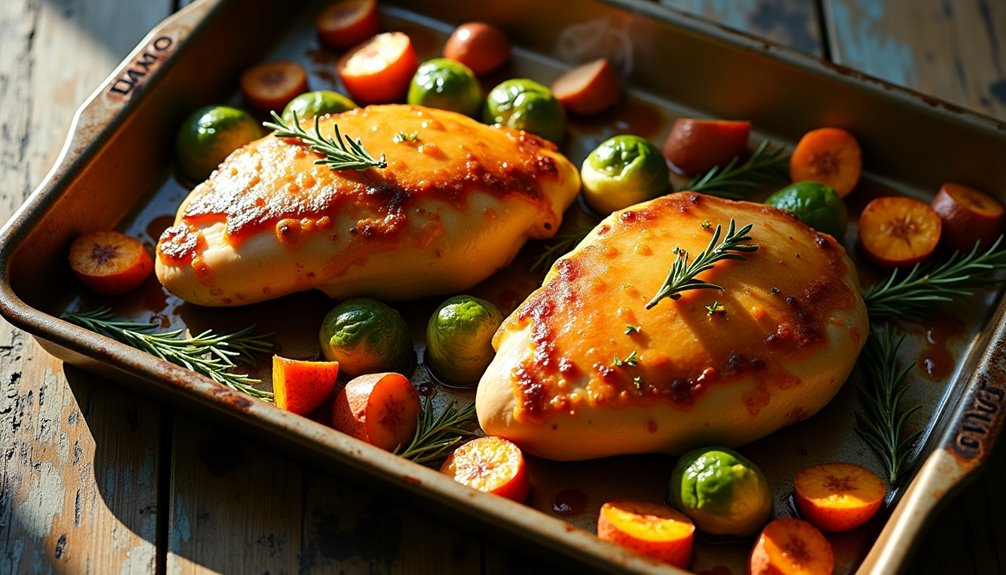
Sheet pan honey mustard chicken offers a perfect balance of sweet and tangy flavors while requiring minimal cleanup. This classic combination of honey and Dijon mustard creates a glaze that caramelizes beautifully on both the chicken and vegetables during roasting.
This recipe is designed for two servings and can be prepared in under an hour, making it ideal for busy weeknight dinners. The vegetables roast alongside the chicken, absorbing the flavorful sauce while developing crispy edges and tender centers.
- 2 chicken breasts, boneless and skinless
- 1 medium sweet potato, cut into 1-inch cubes
- 2 cups Brussels sprouts, halved
- 3 tablespoons honey
- 2 tablespoons Dijon mustard
- 1 tablespoon whole grain mustard
- 2 tablespoons olive oil
- 2 cloves garlic, minced
- 1 teaspoon fresh thyme
- Salt and pepper to taste
Preheat the oven to 425°F (220°C). In a small bowl, whisk together honey, both mustards, 1 tablespoon olive oil, garlic, and thyme to create the sauce. Place the chicken breasts on one side of a lined sheet pan and brush them generously with half of the honey mustard mixture. Toss the sweet potato cubes and Brussels sprouts with the remaining olive oil, salt, and pepper, then arrange them on the other side of the pan.
Roast for 20-25 minutes, then brush the chicken with the remaining honey mustard sauce. Continue cooking for an additional 5-10 minutes, or until the chicken reaches an internal temperature of 165°F (74°C) and the vegetables are tender and caramelized.
For best results, let the chicken rest for 5 minutes before slicing. The vegetables closest to the chicken will absorb more flavor, so consider rotating them halfway through cooking for more even caramelization. If the honey mustard sauce begins to brown too quickly, tent the pan with foil to prevent burning.
Teriyaki Noodle Stir-Fry
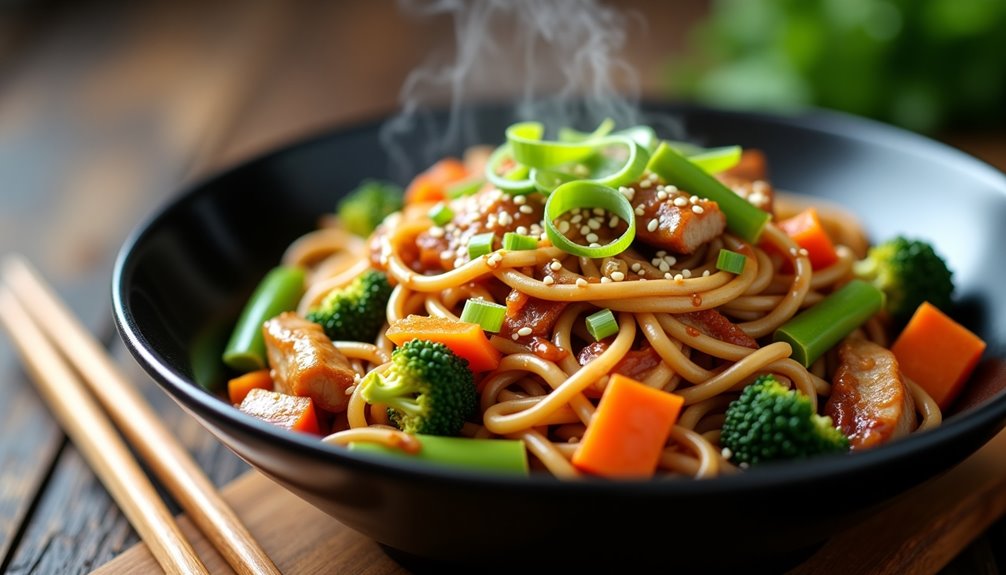
Teriyaki noodle stir-fry brings together the sweet and savory flavors of Japanese cuisine in a quick, satisfying meal perfect for two people. The combination of tender noodles, crisp vegetables, and protein of your choice creates a balanced dish that can be prepared in under 30 minutes.
This versatile recipe allows for customization based on seasonal vegetables and preferred proteins. The signature teriyaki sauce adds a glossy finish and rich umami flavor, while the udon or lo mein noodles provide a substantial base that soaks up all the delicious sauce.
Ingredients:
- 8 oz udon or lo mein noodles
- 1/2 lb protein (chicken, shrimp, or tofu)
- 2 cups mixed vegetables (broccoli, carrots, snap peas)
- 3 cloves garlic, minced
- 1 tbsp ginger, grated
- 1/3 cup teriyaki sauce
- 2 tbsp vegetable oil
- 2 green onions, sliced
- 1 tbsp sesame seeds
- Salt and pepper to taste
Cook noodles according to package instructions until al dente. While noodles cook, cut protein into bite-sized pieces and prepare vegetables. Heat oil in a large wok or skillet over medium-high heat, add protein and cook until nearly done. Add garlic and ginger, stir-fry for 30 seconds until fragrant.
Add vegetables to the wok and stir-fry for 2-3 minutes until crisp-tender. Add drained noodles and teriyaki sauce, tossing everything together until well combined and heated through. Garnish with green onions and sesame seeds before serving.
For best results, prepare all ingredients before starting to cook, as stir-frying moves quickly. The vegetables can be cut in advance and stored in the refrigerator, and the teriyaki sauce can be adjusted with additional soy sauce or honey to taste. Avoid overcrowding the pan to ensure proper heat distribution and prevent ingredients from steaming instead of stir-frying.
Caprese Stuffed Portobello Mushrooms
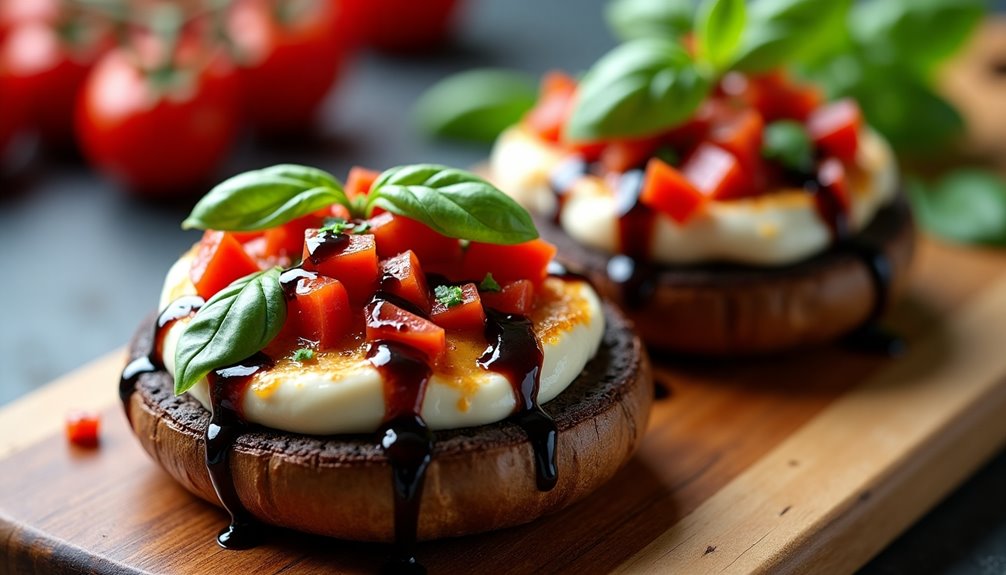
Caprese Stuffed Portobello Mushrooms combine the classic Italian flavors of fresh mozzarella, tomatoes, and basil with meaty portobello caps. This elegant yet simple dish transforms the traditional caprese salad into a satisfying main course that's perfect for a romantic dinner or intimate gathering.
The dish takes only 25 minutes to prepare and requires minimal kitchen skills, making it an ideal choice for both novice and experienced cooks. The mushrooms provide a rich, earthy base that complements the bright, fresh ingredients of the caprese filling, while the balsamic glaze adds a sophisticated touch.
Ingredients:
- 2 large portobello mushroom caps
- 4 oz fresh mozzarella, sliced
- 2 medium tomatoes, diced
- 1/4 cup fresh basil leaves
- 2 tablespoons olive oil
- 2 tablespoons balsamic glaze
- 2 cloves garlic, minced
- Salt and pepper to taste
Clean the mushroom caps by gently removing the stems and scraping out the gills with a spoon. Brush both sides with olive oil and season with salt, pepper, and minced garlic. Place the caps gill-side up on a baking sheet and pre-bake at 400°F for 5 minutes to release excess moisture.
Layer the pre-baked mushroom caps with sliced mozzarella and diced tomatoes. Return to the oven and bake for an additional 8-10 minutes, or until the cheese is melted and bubbly. Remove from the oven, top with fresh basil leaves, and drizzle with balsamic glaze before serving.
For best results, choose firm, fresh portobello mushrooms with intact caps and avoid those that feel slimy or have damaged edges. The mushrooms can be prepared up to 24 hours in advance and stored in the refrigerator, but add the toppings just before baking to prevent the dish from becoming watery.
Cajun Shrimp and Rice Skillet
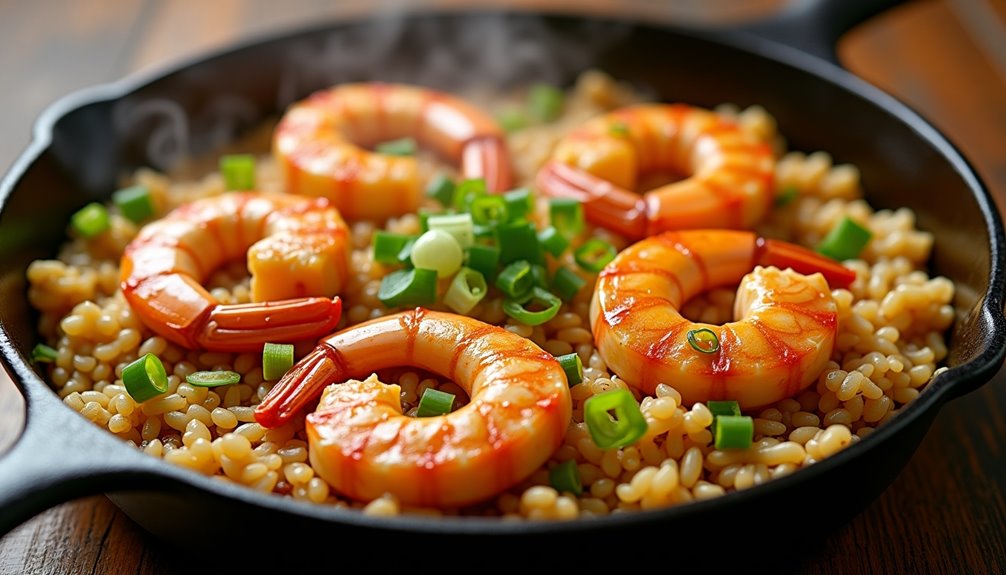
Cajun shrimp and rice skillet combines the bold flavors of Louisiana-style seasoning with succulent shrimp and perfectly cooked rice. This one-pan meal delivers a satisfying blend of proteins and carbohydrates while maintaining the authentic taste of Cajun cuisine.
This 30-minute dish is ideal for busy weeknight dinners, requiring minimal cleanup and preparation time. The combination of aromatic vegetables, known as the "holy trinity" in Cajun cooking (onions, celery, and bell peppers), creates a flavorful base that infuses the entire dish.
- 12 large shrimp, peeled and deveined
- 1 cup long-grain white rice
- 2 tablespoons Cajun seasoning
- 1 medium onion, diced
- 2 celery stalks, chopped
- 1 green bell pepper, diced
- 3 garlic cloves, minced
- 2 tablespoons olive oil
- 2 cups chicken broth
- 1 tablespoon butter
- Salt and pepper to taste
- 2 green onions, sliced (for garnish)
Heat olive oil in a large skillet over medium-high heat. Season shrimp with half the Cajun seasoning and cook for 2 minutes per side until pink and slightly charred. Remove shrimp and set aside.
In the same skillet, add butter and sauté onions, celery, and bell peppers until softened, about 5 minutes. Add garlic and remaining Cajun seasoning, cooking for another minute.
Add rice to the skillet and stir to coat with vegetables and seasonings. Pour in chicken broth, bring to a boil, then reduce heat to low. Cover and simmer for 18-20 minutes until rice is tender. Return shrimp to the skillet, cover, and let stand for 5 minutes. Garnish with green onions before serving.
For best results, avoid stirring the rice while it's cooking, as this can release excess starch and create a gummy texture. If the Cajun seasoning makes the dish too spicy, serve with a dollop of sour cream to balance the heat. The dish can be stored in an airtight container in the refrigerator for up to 2 days, though the shrimp is best consumed fresh.
BBQ Turkey Burgers

BBQ Turkey Burgers are a healthier alternative to traditional beef burgers while still delivering great flavor and satisfaction. These juicy patties combine lean ground turkey with carefully selected seasonings and a touch of BBQ sauce to create a delicious meal that's perfect for two.
The key to making these burgers exceptional lies in proper seasoning and careful cooking to prevent them from becoming dry, a common issue with turkey burgers. When prepared correctly, these burgers rival their beef counterparts in taste while providing a leaner protein option.
Ingredients:
- 1/2 pound ground turkey
- 2 tablespoons BBQ sauce
- 1/4 cup breadcrumbs
- 1 small egg
- 1/4 teaspoon garlic powder
- 1/4 teaspoon onion powder
- 1/4 teaspoon black pepper
- 1/2 teaspoon salt
- 2 hamburger buns
- 2 slices cheese (optional)
- Lettuce, tomato, onion for serving
Mix the ground turkey, BBQ sauce, breadcrumbs, egg, and seasonings in a bowl until well combined, being careful not to overmix. Form the mixture into two equal-sized patties, making a slight depression in the center of each to prevent bulging during cooking. Heat a grill or skillet to medium-high heat and cook the patties for 5-6 minutes per side, or until the internal temperature reaches 165°F. If adding cheese, place it on top of the patties during the last minute of cooking.
For best results, avoid pressing down on the patties while cooking as this will release valuable juices. Let the burgers rest for 3-5 minutes before serving on buns with your choice of toppings.
Pro tip: To ensure the juiciest burgers, avoid using ground turkey that's too lean – 93% lean is ideal. You can also add 1-2 tablespoons of grated onion to the meat mixture for extra moisture and flavor, and always let the meat come to room temperature for about 15 minutes before cooking.
Sesame Ginger Soba Noodles
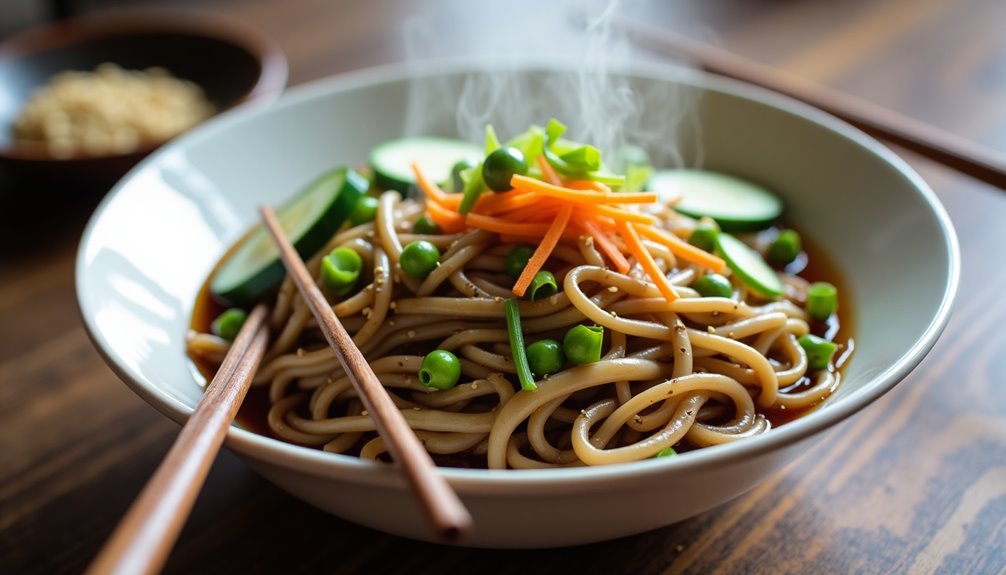
Sesame Ginger Soba Noodles combines the earthy flavor of buckwheat noodles with a vibrant Asian-inspired sauce that's both refreshing and satisfying. This quick-to-prepare dish takes less than 30 minutes to make, perfect for busy couples looking for a wholesome dinner option.
The key to this recipe's success lies in its balance of flavors – nutty sesame oil, spicy ginger, and umami-rich soy sauce create a harmonious blend that coats each strand of soba noodle. The addition of fresh vegetables adds both texture and nutritional value to this vegetarian-friendly meal.
Cook soba noodles in boiling water according to package instructions, typically 4-5 minutes. While the noodles cook, whisk together sesame oil, soy sauce, rice vinegar, ginger, garlic, and honey in a large bowl. Drain the noodles and rinse under cold water to stop the cooking process and prevent them from becoming sticky.
Toss the cooled noodles with the sauce mixture until well coated. Add the carrots, cucumber, edamame, and most of the green onions, mixing gently to combine. Transfer to serving bowls and garnish with remaining green onions, toasted sesame seeds, and red pepper flakes if desired.
For best results, avoid overcooking the soba noodles as they can become mushy quickly. The noodles can be prepared in advance and stored in the refrigerator, but should be brought to room temperature before serving. If the noodles become too dry, refresh them with a small amount of sesame oil or a splash of the sauce mixture.
Ingredients:
- 6 oz soba noodles
- 2 tablespoons sesame oil
- 2 tablespoons soy sauce
- 1 tablespoon rice vinegar
- 1 tablespoon fresh ginger, minced
- 2 cloves garlic, minced
- 1 carrot, julienned
- 1 cucumber, julienned
- 2 green onions, sliced
- 1 tablespoon toasted sesame seeds
- 1 cup edamame, shelled
- 1 teaspoon honey
- Red pepper flakes (optional)