18 Quick Dump Meals
Did you know that "dump meals" originated during the Great Depression, when home cooks needed to maximize every ingredient while minimizing effort? You'll find these modern versions just as practical for your busy lifestyle, offering the perfect balance of convenience and flavor. From creamy ranch chicken to zesty Tex-Mex dishes, these 18 recipes let you create satisfying meals by simply combining ingredients in one pot. Let's explore how these time-saving dishes can transform your weeknight dinner routine.
Creamy Ranch Chicken and Potatoes

Ranch Chicken and Potatoes combines the classic comfort of tender chicken breasts with creamy ranch seasoning and perfectly cooked potatoes. This dump meal requires minimal preparation and delivers maximum flavor, making it an ideal choice for busy weeknights or when you simply want a satisfying meal without the fuss.
The beauty of this recipe lies in its versatility and the way the ingredients work together to create a harmonious blend of flavors. The ranch seasoning infuses both the chicken and potatoes, while the cream sauce keeps everything moist and delicious throughout the cooking process.
- 4 boneless, skinless chicken breasts
- 2 lbs baby potatoes, halved
- 2 packets ranch seasoning mix
- 1 can cream of chicken soup
- 1/2 cup sour cream
- 1/2 cup milk
- 4 tablespoons butter, melted
- 3 cloves garlic, minced
- 1 teaspoon black pepper
- 1/2 teaspoon salt
- Fresh parsley for garnish
Mix the cream of chicken soup, sour cream, milk, melted butter, one packet of ranch seasoning, garlic, salt, and pepper in a bowl until well combined. Place the chicken breasts and halved potatoes in a slow cooker or casserole dish. Pour the creamy mixture over the chicken and potatoes, ensuring everything is evenly coated. Sprinkle the remaining ranch seasoning over the top.
For slow cooker method, cook on low for 6-8 hours or on high for 3-4 hours until chicken is cooked through and potatoes are tender. For oven method, cover with foil and bake at 375°F (190°C) for 45-60 minutes, or until chicken reaches an internal temperature of 165°F (74°C) and potatoes are fork-tender.
To ensure the best results, avoid lifting the lid of the slow cooker or opening the oven frequently during cooking, as this releases heat and moisture. The dish can be made ahead and frozen before cooking, but ensure all ingredients are completely thawed before cooking. For extra flavor, try adding crispy bacon bits or shredded cheese during the last 10 minutes of cooking.
Five-Ingredient Mexican Beef Stew
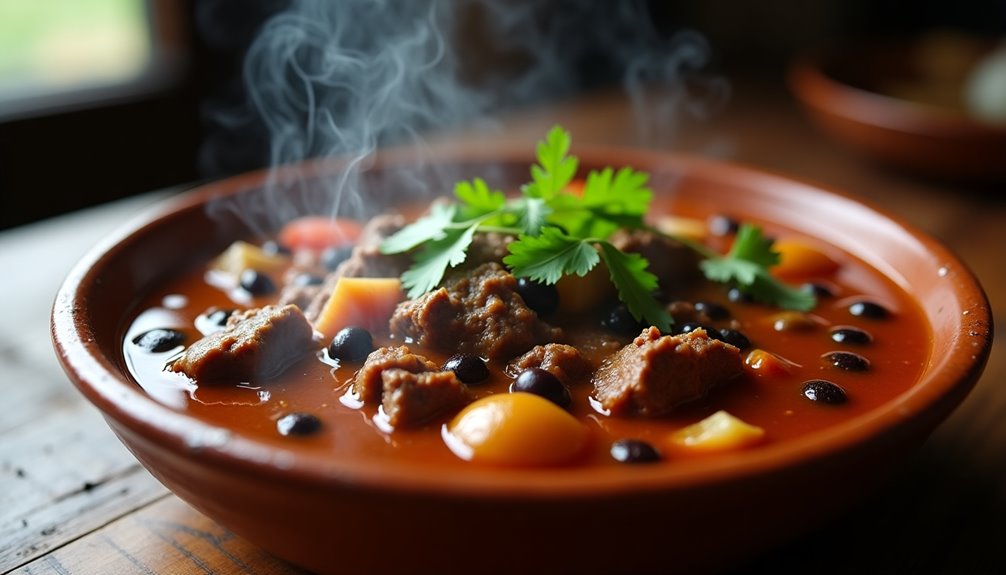
Five-Ingredient Mexican Beef Stew is a hearty, flavorful dish that combines tender chunks of beef with traditional Mexican seasonings. The simplicity of using just five ingredients makes it an ideal choice for busy weeknights, while still delivering rich, satisfying flavors that taste like they've been simmering all day.
This recipe takes advantage of pre-made salsa and taco seasoning to create depth without requiring numerous individual spices. The slow cooking process ensures the meat becomes fork-tender while the flavors meld together perfectly, creating a warming meal that's especially comforting during colder months.
Ingredients:
- 2 pounds beef chuck, cut into 1-inch cubes
- 1 packet taco seasoning (1.25 oz)
- 16 oz jar chunky salsa
- 2 cups beef broth
- 1 can (15 oz) black beans, drained and rinsed
Season the beef cubes with half the taco seasoning packet and brown them in a large pot over medium-high heat for 5-7 minutes, working in batches if necessary to avoid overcrowding. Once all meat is browned, return it to the pot and add the remaining taco seasoning, salsa, and beef broth. Bring to a boil, then reduce heat to low, cover, and simmer for 1.5 hours or until the meat is tender.
Add the drained black beans during the final 15 minutes of cooking, allowing them to heat through and absorb the flavors of the stew. The liquid should reduce and thicken slightly during cooking, creating a rich, stew-like consistency.
For best results, trim excess fat from the beef before cooking to prevent the stew from becoming greasy. The dish can be made ahead and reheated, as the flavors often improve after resting for a day. If the stew becomes too thick during cooking or reheating, simply add a small amount of beef broth or water to reach desired consistency.
Garlic Parmesan Pork Chops

Garlic Parmesan Pork Chops blend the rich, savory flavors of garlic and aged Parmesan cheese with juicy, tender pork. This classic combination creates a restaurant-quality meal that's surprisingly simple to prepare at home, making it perfect for busy weeknights or casual dinner parties.
The key to this dish lies in achieving the perfect sear on the pork while maintaining its moisture, then creating a flavorful crust with the garlic and Parmesan coating. When properly executed, these pork chops develop a golden-brown exterior while staying tender and juicy inside.
Ingredients:
- 4 boneless pork chops (1-inch thick)
- 4 cloves garlic, minced
- 1 cup grated Parmesan cheese
- 2 tablespoons olive oil
- 1 teaspoon dried oregano
- 1 teaspoon paprika
- 1/2 teaspoon black pepper
- 1 teaspoon salt
- 2 tablespoons butter
Season the pork chops generously with salt and pepper. Heat olive oil and butter in a large skillet over medium-high heat. Once hot, add the pork chops and sear for 4-5 minutes on each side until golden brown. Add minced garlic to the pan and cook for 30 seconds until fragrant.
Reduce heat to medium-low and sprinkle each pork chop with Parmesan cheese, oregano, and paprika. Cover the skillet and cook for an additional 3-4 minutes, or until the cheese melts and forms a crust. The internal temperature should reach 145°F (63°C). Let the pork chops rest for 5 minutes before serving.
For best results, bring the pork chops to room temperature 30 minutes before cooking, and avoid moving them around while searing to achieve a proper crust. If the garlic begins to brown too quickly, lower the heat to prevent burning, as burnt garlic can make the dish bitter. The thickness of the pork chops will affect cooking time, so adjust accordingly and always use a meat thermometer for accuracy.
Classic Vegetable Minestrone
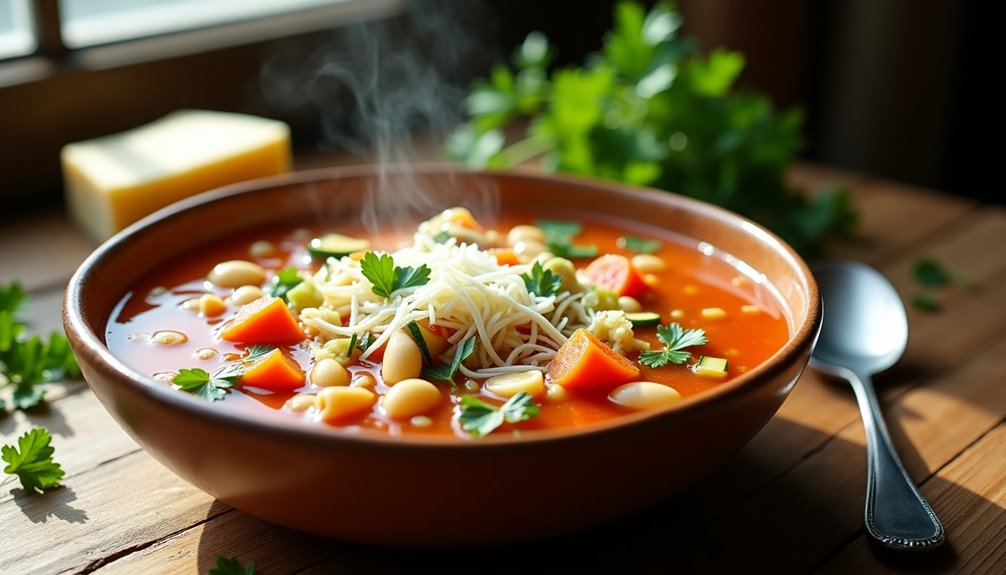
Classic Vegetable Minestrone, a hearty Italian soup, combines the earthiness of vegetables with the comforting warmth of pasta and beans. This traditional dish originated in Italy as a way to use up leftover vegetables, making it both practical and delicious.
The beauty of minestrone lies in its versatility and simplicity. While the base ingredients remain consistent, the vegetables can be adjusted based on seasonal availability or personal preference, making it an ideal year-round meal that's both nutritious and satisfying.
- 2 tablespoons olive oil
- 1 onion, diced
- 2 carrots, chopped
- 2 celery stalks, chopped
- 3 garlic cloves, minced
- 2 zucchini, diced
- 2 cups chopped cabbage
- 2 cans (14 oz each) diced tomatoes
- 1 can (15 oz) kidney beans, drained
- 1 can (15 oz) cannellini beans, drained
- 8 cups vegetable broth
- 1 cup small pasta (shells or ditalini)
- 2 bay leaves
- 1 teaspoon dried oregano
- 1 teaspoon dried basil
- Salt and pepper to taste
- Parmesan cheese for serving
- Fresh parsley for garnish
Heat olive oil in a large pot over medium heat. Sauté onion, carrots, and celery for 5 minutes until softened. Add garlic and cook for another minute. Add remaining vegetables, tomatoes, beans, broth, and seasonings. Bring to a boil, then reduce heat and simmer for 20 minutes. Add pasta and cook until tender, about 8-10 minutes.
Remove bay leaves before serving. Taste and adjust seasoning as needed. Serve hot with freshly grated Parmesan cheese and chopped parsley.
For best results, avoid overcooking the pasta as it will continue to absorb liquid and become mushy. If planning to store leftovers, consider cooking the pasta separately and adding it to individual servings. The soup can be frozen for up to 3 months, though the vegetables may become slightly softer upon thawing.
Buffalo Chicken and Rice
Buffalo Chicken and Rice is a perfect weeknight dinner that combines the bold flavors of classic buffalo wings with the comfort of a hearty rice dish. This one-pot meal brings together tender chicken, fluffy rice, and the signature spicy kick of buffalo sauce, all while keeping preparation and cleanup simple.
Whether you're craving something with a bit of heat or looking for a new way to use leftover chicken, this recipe delivers satisfying results. The combination of creamy elements and tangy buffalo sauce creates a balanced dish that appeals to both spice enthusiasts and those who prefer milder flavors.
Ingredients:
- 2 cups white rice
- 4 cups chicken broth
- 2 pounds chicken breast, diced
- 1 cup buffalo sauce
- 1/2 cup ranch dressing
- 1 cup diced celery
- 1 cup shredded carrots
- 1 diced onion
- 3 cloves minced garlic
- 2 tablespoons butter
- Salt and pepper to taste
- Optional: blue cheese crumbles for garnish
Start by heating butter in a large pot over medium heat. Add the diced onion and garlic, sautéing until translucent. Add the diced chicken and cook until no longer pink, about 5-7 minutes. Stir in the rice, allowing it to toast slightly for 1-2 minutes.
Pour in the chicken broth and buffalo sauce, bringing the mixture to a boil. Reduce heat, cover, and simmer for 20 minutes or until rice is tender. Once the rice is cooked, stir in the celery, carrots, and ranch dressing. Let the mixture stand for 5 minutes to allow the vegetables to slightly soften while maintaining their crunch.
For best results, let the dish rest for 5-10 minutes before serving to allow the flavors to meld. The heat level can be adjusted by varying the amount of buffalo sauce, and the dish can be made ahead and reheated. Store leftovers in an airtight container in the refrigerator for up to three days, adding a splash of broth when reheating to maintain moisture.
Mediterranean Lemon Chicken
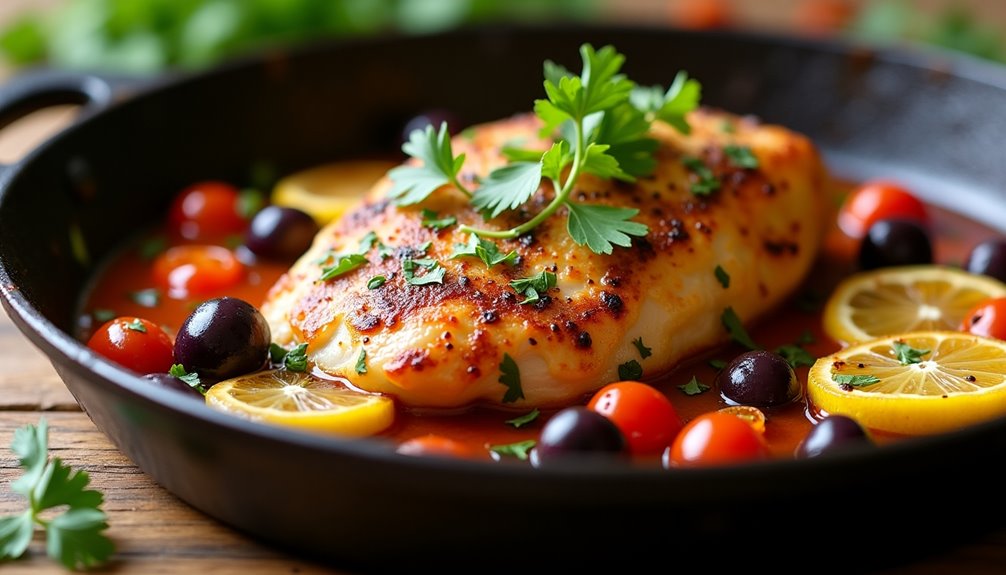
Mediterranean Lemon Chicken embodies the bright, fresh flavors of coastal Mediterranean cuisine, combining zesty citrus with aromatic herbs and garlic. The dish transforms simple chicken breasts into a vibrant, flavorful meal that's both healthy and satisfying.
This one-pan wonder requires minimal preparation and delivers maximum flavor, making it perfect for busy weeknights or elegant dinner parties. The combination of lemon, olive oil, and Mediterranean herbs creates a light yet robust sauce that perfectly complements the tender chicken.
- 4 boneless, skinless chicken breasts
- 3 lemons
- 4 tablespoons olive oil
- 6 garlic cloves, minced
- 2 teaspoons dried oregano
- 1 teaspoon dried thyme
- 1 teaspoon dried rosemary
- 1 cup chicken broth
- 1 cup cherry tomatoes
- 1/2 cup kalamata olives
- Salt and pepper to taste
- Fresh parsley for garnish
Season chicken breasts with salt and pepper. Heat olive oil in a large skillet over medium-high heat. Sear chicken for 5-6 minutes per side until golden brown. Remove chicken and set aside.
In the same pan, add minced garlic and cook until fragrant. Add herbs, chicken broth, juice of two lemons, and sliced lemon rounds from the remaining lemon. Return chicken to the pan, add tomatoes and olives. Reduce heat to medium-low, cover, and simmer for 15-20 minutes until chicken is cooked through and sauce has slightly reduced. The internal temperature of the chicken should reach 165°F (74°C).
For best results, let the chicken rest for 5 minutes before serving to retain juices. The dish can be made ahead and reheated, though the sauce may need thinning with additional broth. Avoid overcooking the chicken to prevent it from becoming dry, and adjust lemon quantity based on personal preference for acidity.
Sweet and Sour Meatballs
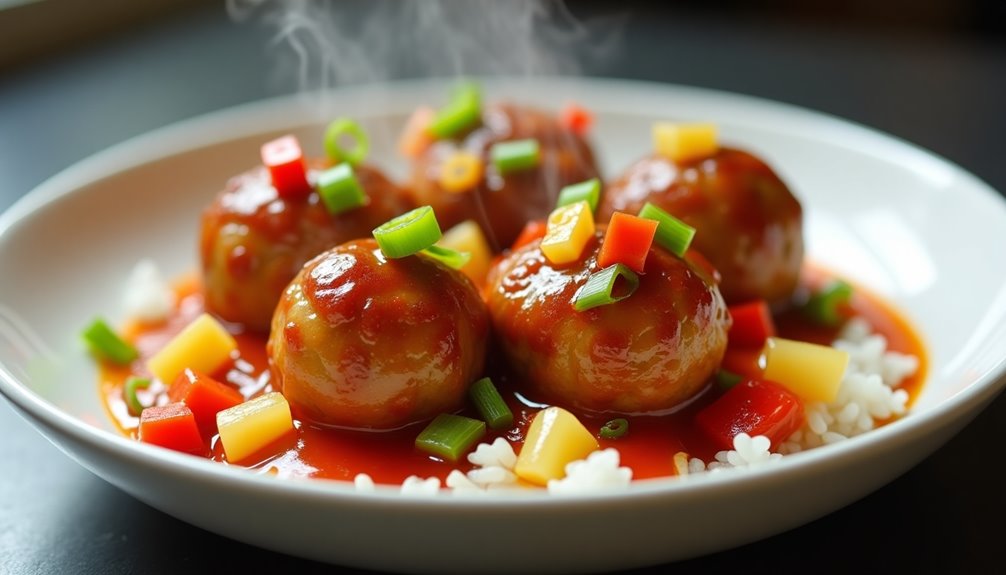
Sweet and Sour Meatballs are a classic comfort food that combines savory meatballs with a tangy, balanced sauce. This dish strikes the perfect harmony between protein-rich meatballs and a vibrant sauce that coats each bite with a delicious mix of sweet and acidic flavors.
This quick dump meal version simplifies the traditional recipe by using frozen meatballs and a sauce that comes together in minutes. While homemade meatballs are delicious, using pre-made ones transforms this into a practical weeknight dinner that delivers restaurant-quality taste with minimal effort.
Ingredients:
- 24 oz frozen meatballs
- 1 cup pineapple juice
- 1/2 cup ketchup
- 1/4 cup rice vinegar
- 1/4 cup brown sugar
- 2 tablespoons soy sauce
- 1 tablespoon cornstarch
- 1 red bell pepper, chopped
- 1 green bell pepper, chopped
- 1 can (20 oz) pineapple chunks, drained
- 1 small onion, chopped
Place frozen meatballs in a slow cooker or large pot. Whisk together pineapple juice, ketchup, rice vinegar, brown sugar, soy sauce, and cornstarch in a bowl until smooth. Pour the sauce mixture over the meatballs. Add the bell peppers, pineapple chunks, and onion to the pot. If using a slow cooker, cook on low for 4-6 hours or on high for 2-3 hours. If using a stovetop, bring to a boil, then reduce heat and simmer for 25-30 minutes, stirring occasionally until the sauce thickens and the meatballs are heated through.
For best results, stir the meatballs occasionally during cooking to ensure even coating with the sauce. The cornstarch helps thicken the sauce, but if it's too thick, add a splash of pineapple juice. If too thin, mix an additional teaspoon of cornstarch with cold water and stir it in. The dish can be served over rice or noodles, and leftovers will keep in the refrigerator for up to 3 days.
Cajun Sausage and Bean Soup
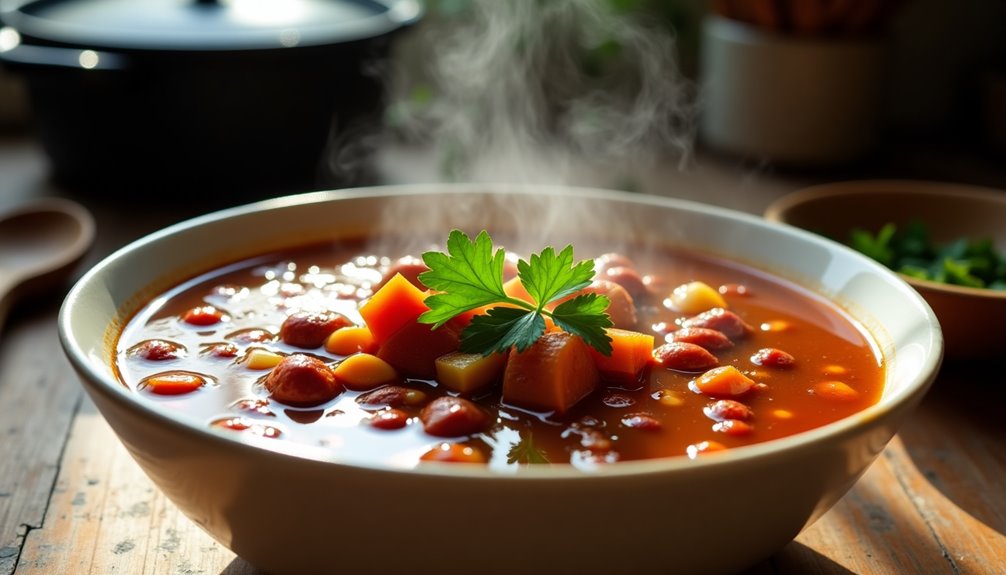
A hearty Cajun Sausage and Bean Soup combines the rich flavors of andouille sausage with creamy beans and aromatic vegetables, creating a satisfying meal that's perfect for cold weather. This Louisiana-inspired dish brings together the holy trinity of Cajun cooking – onions, celery, and bell peppers – with smoky sausage and tender beans.
This dump meal version simplifies the traditional recipe while maintaining authentic flavors, making it an ideal weeknight dinner option that requires minimal prep work. The combination of spices and ingredients creates a thick, flavorful broth that only gets better as leftovers.
- 1 pound andouille sausage, sliced
- 2 cans (15 oz each) red kidney beans, drained and rinsed
- 1 large onion, diced
- 2 celery stalks, chopped
- 1 green bell pepper, diced
- 4 garlic cloves, minced
- 4 cups chicken broth
- 1 can (14.5 oz) diced tomatoes
- 2 tablespoons Cajun seasoning
- 1 bay leaf
- 1 cup long-grain rice
- Salt and pepper to taste
Add the sliced andouille sausage to a large pot over medium-high heat and cook until browned. Add onion, celery, and bell pepper to the pot and sauté until vegetables are softened. Stir in garlic, Cajun seasoning, and bay leaf, cooking for another minute until fragrant. Pour in the chicken broth, diced tomatoes, and kidney beans, bringing the mixture to a boil. Reduce heat, add rice, and simmer covered for 20-25 minutes until rice is tender.
For best results, allow the soup to rest for 5-10 minutes before serving to let the flavors meld and the broth thicken slightly. If the soup becomes too thick, add additional chicken broth or water to reach desired consistency. The level of spiciness can be adjusted by increasing or decreasing the amount of Cajun seasoning.
Honey Garlic Chicken Thighs
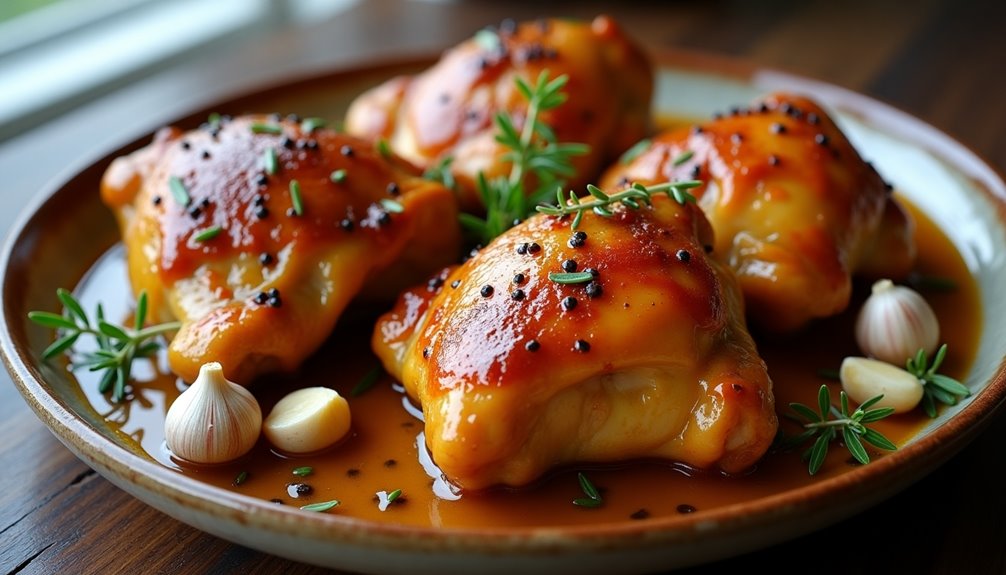
Honey Garlic Chicken Thighs combine sweet and savory flavors in a dish that's both comforting and easy to prepare. The natural juiciness of chicken thighs pairs perfectly with the sticky, caramelized honey garlic sauce, creating a meal that's sure to become a family favorite.
This recipe takes less than 30 minutes to prepare and requires minimal cleanup, making it ideal for busy weeknights. The sauce reduces to a glossy finish that coats the chicken beautifully, while the garlic adds depth and the honey provides a natural sweetness that balances the savory elements.
- 6-8 chicken thighs, bone-in, skin-on
- 1/3 cup honey
- 6 cloves garlic, minced
- 1/4 cup soy sauce
- 1 tablespoon olive oil
- 1 teaspoon dried oregano
- 1/2 teaspoon black pepper
- 1/4 teaspoon red pepper flakes
- Salt to taste
Season chicken thighs with salt and pepper. Heat olive oil in a large skillet over medium-high heat. Place chicken thighs skin-side down and cook for 5-7 minutes until golden brown. Flip and cook for another 5 minutes.
While the chicken cooks, mix honey, minced garlic, soy sauce, oregano, and red pepper flakes in a bowl. Pour the sauce mixture over the chicken thighs and reduce heat to medium-low. Let the chicken simmer in the sauce for 12-15 minutes, occasionally basting the thighs with the pan juices. The sauce will gradually thicken and coat the chicken. The internal temperature should reach 165°F (74°C).
For best results, let the chicken rest for 5 minutes before serving to allow the juices to redistribute. The sauce can burn quickly due to the honey content, so keep a close eye on the heat level and adjust as needed. If the sauce becomes too thick, add a splash of water or chicken broth to thin it out.
Cheesy Taco Pasta
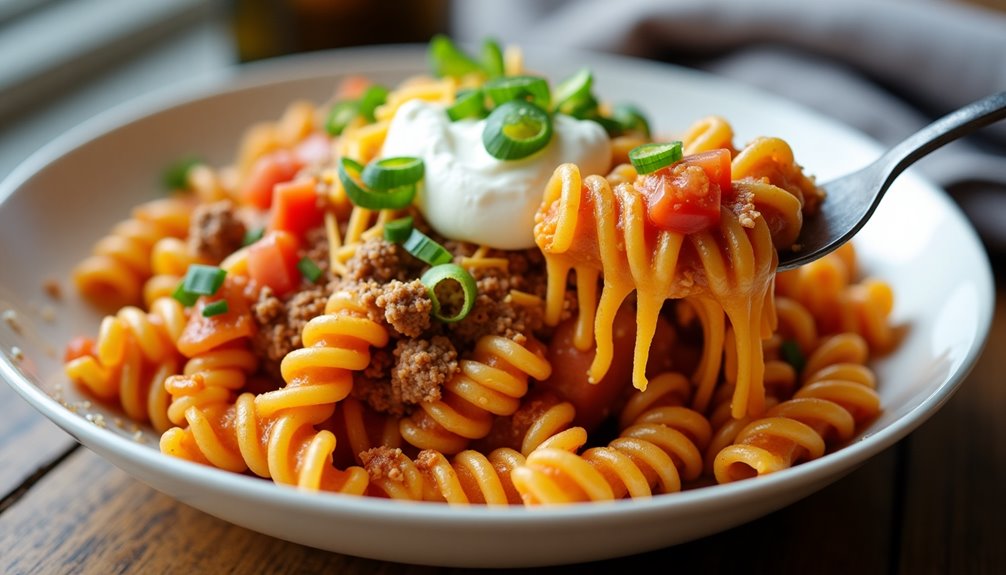
Cheesy Taco Pasta combines the zesty flavors of Mexican-inspired seasonings with the comfort of a hearty pasta dish. This one-pot meal transforms traditional taco ingredients into a creamy, cheesy pasta creation that satisfies both pasta lovers and taco enthusiasts alike.
This quick and easy dinner solution takes less than 30 minutes to prepare, making it perfect for busy weeknights when time is limited. The dish incorporates ground beef, pasta, and a blend of Mexican-style cheeses, creating a filling meal that appeals to both adults and children.
Brown the ground beef in a large skillet over medium-high heat, breaking it into small pieces. Add the diced onion and garlic, cooking until the onion becomes translucent. Stir in the taco seasoning and diced tomatoes with green chilies. Add the uncooked pasta and beef broth to the skillet, bringing the mixture to a boil. Reduce heat, cover, and simmer for 12-15 minutes until the pasta is tender and most of the liquid has been absorbed.
Remove the skillet from heat and stir in the shredded cheese until melted and well combined. Let the dish rest for 5 minutes before serving to allow the sauce to thicken.
For best results, avoid overcooking the pasta as it will continue to soften slightly while the dish rests. The recipe can be customized by adjusting the spiciness with mild or hot taco seasoning, and leftovers can be stored in an airtight container for up to 3 days in the refrigerator.
- 1 pound ground beef
- 1 pound rotini pasta
- 1 packet taco seasoning
- 2 cups shredded Mexican cheese blend
- 1 can (10 oz) diced tomatoes with green chilies
- 2 cups beef broth
- 1 medium onion, diced
- 3 cloves garlic, minced
- 2 tablespoons olive oil
- Salt and pepper to taste
- Optional toppings: sour cream, diced tomatoes, green onions
Asian-Style Beef and Broccoli
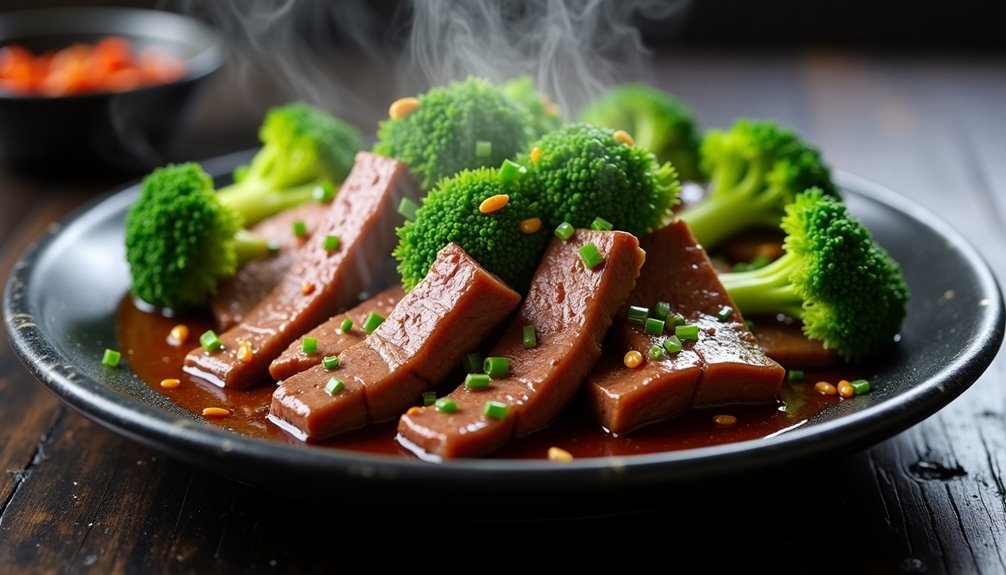
Asian-Style Beef and Broccoli is a classic takeout-inspired dish that combines tender strips of beef with crisp broccoli florets in a savory sauce. The dish derives its rich flavors from a combination of soy sauce, oyster sauce, and garlic, creating a perfect balance of sweet and savory elements that coat both the meat and vegetables.
This dump meal version simplifies the traditional preparation by allowing all ingredients to cook together, eliminating the need for separate cooking steps. While traditional versions require careful timing and separate cooking of meat and vegetables, this adaptation maintains the authentic taste while significantly reducing active cooking time and cleanup.
- 1 pound flank steak, sliced thin against the grain
- 4 cups broccoli florets
- 3 cloves garlic, minced
- 1/2 cup soy sauce
- 1/4 cup oyster sauce
- 2 tablespoons brown sugar
- 1 tablespoon cornstarch
- 1 tablespoon sesame oil
- 1/2 teaspoon ground black pepper
- 1/4 cup beef broth
- 2 tablespoons vegetable oil
- 1 tablespoon ginger, minced
Mix the soy sauce, oyster sauce, brown sugar, cornstarch, sesame oil, and beef broth in a bowl. Place the sliced beef in a large zip-top bag or container and add half the sauce mixture, allowing it to marinate for 15-30 minutes.
Heat vegetable oil in a large skillet or wok over medium-high heat. Add the marinated beef and cook for 2-3 minutes until browned. Add the broccoli, garlic, and ginger to the pan, then pour in the remaining sauce mixture. Cook for an additional 5-7 minutes until the broccoli is tender-crisp and the sauce has thickened.
For best results, slice the beef as thinly as possible while it's still partially frozen, which makes cutting easier and ensures tender meat. Always rest the beef at room temperature for 10 minutes before cooking, and don't overcrowd the pan to achieve proper browning. The cornstarch can be adjusted to control the sauce thickness, and the broccoli can be blanched separately if crispier vegetables are preferred.
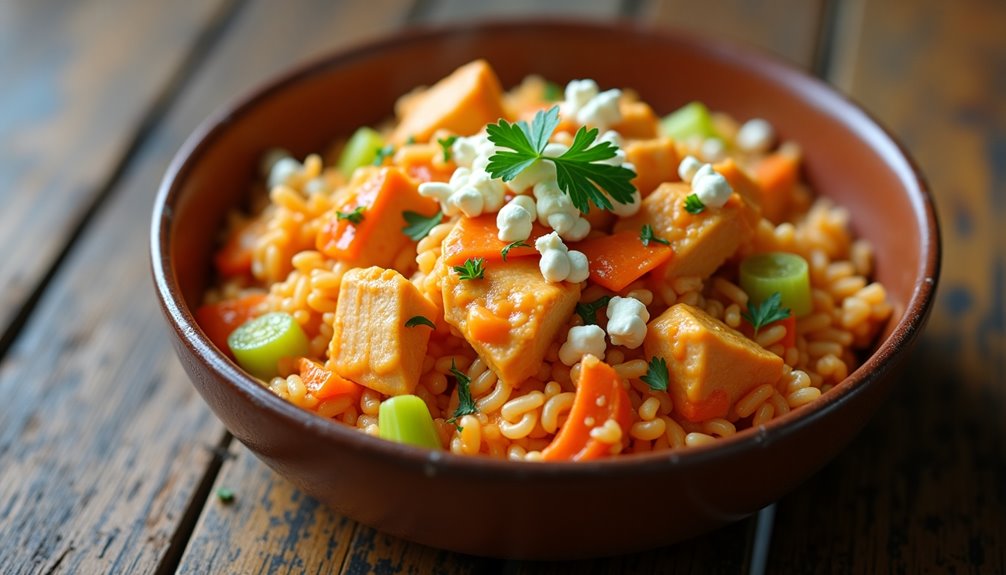
Coconut Curry Chickpeas
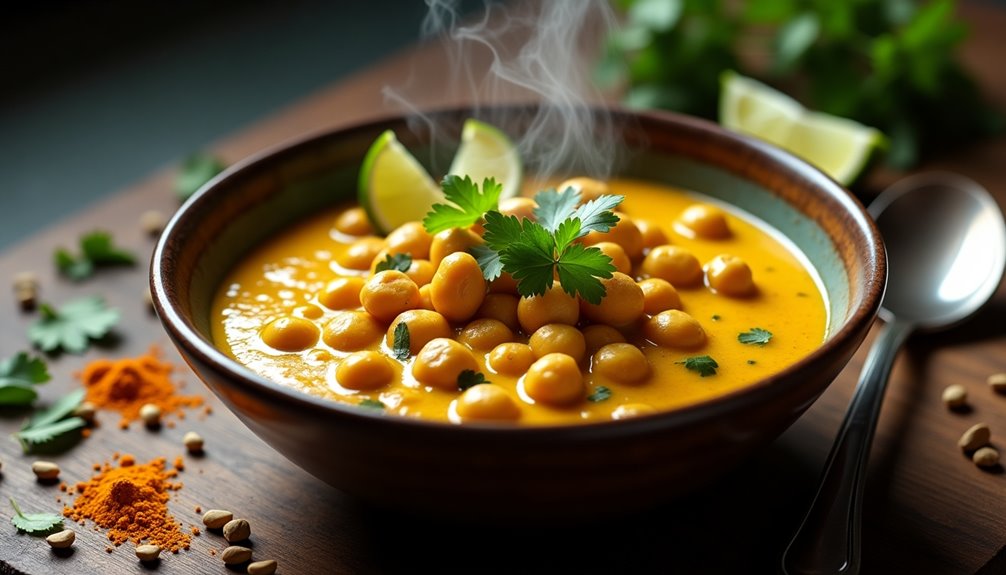
Coconut curry chickpeas is a satisfying plant-based meal that combines the rich, creamy texture of coconut milk with aromatic curry spices and protein-packed chickpeas. This dish originated from Indian cuisine but has evolved into various interpretations across different cultures, making it a versatile addition to any cook's repertoire.
This one-pot wonder takes less than 30 minutes to prepare and can be served over rice, quinoa, or with flatbread. The combination of warming spices and creamy coconut creates a comforting meal that's both nutritious and filling, perfect for busy weeknights or meal prep.
- 2 cans (15 oz each) chickpeas, drained and rinsed
- 1 can (14 oz) coconut milk
- 1 medium onion, diced
- 4 cloves garlic, minced
- 1 tablespoon curry powder
- 1 teaspoon ground cumin
- 1 teaspoon turmeric
- 1 tablespoon vegetable oil
- 1 tablespoon tomato paste
- Salt and pepper to taste
- Fresh cilantro for garnish
- 1 lime, juiced
Heat oil in a large skillet over medium heat. Sauté onions until translucent, about 5 minutes, then add garlic and cook for another minute. Add all the spices and tomato paste, stirring constantly for 30 seconds to bloom the flavors. Pour in the coconut milk and add the chickpeas, stirring to combine.
Bring the mixture to a simmer and cook for 15-20 minutes, stirring occasionally, until the sauce has thickened to your desired consistency. Season with salt and pepper, then finish with lime juice.
For best results, allow the curry to rest for 5-10 minutes before serving to let the flavors meld. The dish can be made spicier by adding cayenne pepper or fresh chilies, and the consistency can be adjusted by using more or less coconut milk. Leftovers will keep in the refrigerator for up to 4 days and often taste even better the next day as the flavors continue to develop.
BBQ Pulled Pork
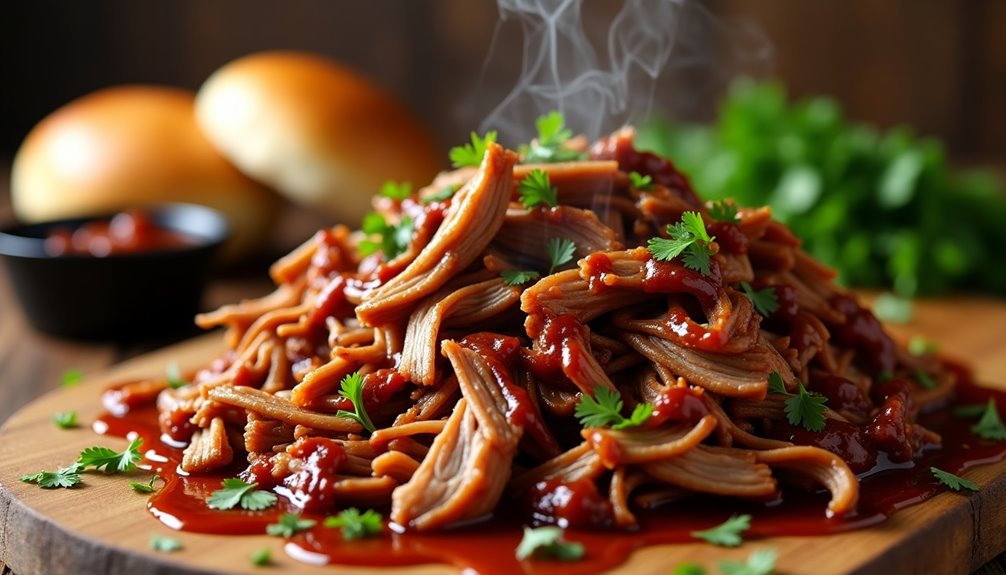
BBQ Pulled Pork is the ultimate comfort food that combines tender, juicy meat with smoky-sweet barbecue flavors. This slow-cooked dish transforms a tough cut of pork into melt-in-your-mouth perfection, making it ideal for sandwiches, tacos, or as a standalone protein with sides.
Using a slow cooker for this recipe makes it practically foolproof and requires minimal hands-on time. The low and slow cooking method allows the connective tissues to break down completely while the meat absorbs all the flavors of the seasonings and sauce, resulting in perfectly pulled pork every time.
Ingredients:
- 4-5 lb pork shoulder (Boston butt)
- 2 cups barbecue sauce
- 1 large onion, diced
- 4 cloves garlic, minced
- 2 tablespoons brown sugar
- 2 tablespoons paprika
- 1 tablespoon chili powder
- 2 teaspoons ground cumin
- 2 teaspoons black pepper
- 2 teaspoons salt
- 1/2 cup chicken broth
- 2 tablespoons apple cider vinegar
Mix all the dry seasonings and rub them thoroughly all over the pork shoulder. Place the diced onion and minced garlic at the bottom of the slow cooker, then put the seasoned pork on top. Pour in the chicken broth and apple cider vinegar. Cook on low for 8-10 hours or on high for 5-6 hours, until the meat is tender enough to shred easily with a fork.
Once the meat is done, remove it from the slow cooker and let it rest for 10-15 minutes. Shred the meat using two forks, discarding any excess fat. Return the shredded meat to the slow cooker, add the barbecue sauce, and stir to combine. Let it cook for an additional 30 minutes on low to allow the meat to absorb the sauce.
For best results, choose a pork shoulder with good marbling and trim excess fat but don't remove it all, as some fat is necessary for flavor and moisture. If the pulled pork seems too liquidy after shredding, remove some of the cooking liquid before adding the barbecue sauce. The meat can be stored in an airtight container in the refrigerator for up to 5 days or frozen for up to 3 months.
Mushroom and Wild Rice Casserole

Mushroom and Wild Rice Casserole combines earthy flavors with hearty grains in a comforting dish that's perfect for busy weeknights. The blend of wild rice and mushrooms creates a rich, satisfying texture while incorporating wholesome ingredients that make this casserole both nutritious and filling.
This classic comfort food takes inspiration from traditional Midwestern cuisine, where wild rice is a staple ingredient. The combination of different mushroom varieties adds depth to the dish, while the creamy sauce brings all the components together into a cohesive, warming meal.
- 2 cups wild rice blend
- 1 pound mixed mushrooms, sliced
- 1 medium onion, diced
- 3 cloves garlic, minced
- 4 cups chicken or vegetable broth
- 1 cup heavy cream
- 2 tablespoons butter
- 2 tablespoons olive oil
- 1 teaspoon dried thyme
- 1/2 teaspoon black pepper
- 1 teaspoon salt
- 1 cup grated Parmesan cheese
- 1/2 cup breadcrumbs
Cook wild rice according to package instructions using broth instead of water. While rice cooks, sauté mushrooms, onions, and garlic in butter and olive oil until golden brown and moisture has evaporated. Combine cooked rice and mushroom mixture in a large casserole dish. Mix in heavy cream, thyme, salt, and pepper.
Top the casserole with Parmesan cheese and breadcrumbs. Bake at 375°F for 25-30 minutes until golden brown and bubbly. Let stand for 5-10 minutes before serving.
For best results, use a variety of mushrooms such as cremini, shiitake, and button mushrooms to create complex flavors. The casserole can be assembled up to 24 hours in advance and refrigerated before baking. If baking from cold, add 10-15 minutes to the cooking time.
Italian Sausage and Peppers

Italian Sausage and Peppers is a classic comfort dish that combines savory Italian sausages with colorful bell peppers and onions, all cooked together until tender and flavorful. This one-pan meal has its roots in Italian-American cuisine and has become a staple at street fairs, family gatherings, and weeknight dinners.
This recipe requires minimal prep work and creates maximum flavor, making it perfect for busy households or anyone looking for a satisfying meal without extensive cooking knowledge. The natural juices from the sausages blend with the caramelized vegetables, creating a delicious sauce that's perfect served over rice, pasta, or stuffed into crusty rolls.
- 6 Italian sausage links (sweet or hot)
- 3 bell peppers (red, yellow, green), sliced
- 2 medium onions, sliced
- 4 cloves garlic, minced
- 2 tablespoons olive oil
- 1 cup chicken broth
- 1 tablespoon Italian seasoning
- 1 teaspoon salt
- 1/2 teaspoon black pepper
- 1 tablespoon tomato paste
Heat olive oil in a large skillet over medium-high heat. Add the sausages and brown them on all sides for about 5 minutes. Remove sausages and set aside. In the same pan, add sliced peppers and onions, cooking until they begin to soften and caramelize, about 8-10 minutes. Add garlic, seasonings, and tomato paste, stirring to combine.
Return sausages to the pan and add chicken broth. Reduce heat to medium-low, cover, and simmer for 15-20 minutes until sausages are cooked through and vegetables are tender. Remove lid and cook for an additional 5 minutes if sauce needs thickening.
For best results, use Italian sausages at room temperature before cooking, and don't overcrowd the pan when browning. If the sausages are particularly fatty, you can pierce them with a fork before cooking to allow excess fat to render out. The dish can be made ahead and reheated, as the flavors often improve over time.
Maple Dijon Chicken

Maple Dijon Chicken offers a perfect balance of sweet and tangy flavors, making it an ideal choice for a quick yet impressive weeknight dinner. The combination of pure maple syrup and Dijon mustard creates a glaze that caramelizes beautifully on the chicken during cooking, resulting in a dish that's both visually appealing and delicious.
This recipe requires minimal prep work and uses common pantry ingredients, making it a reliable go-to meal when time is limited. The entire dish comes together in under 30 minutes, and the sauce can be prepared while the chicken cooks, maximizing efficiency without sacrificing flavor.
- 4 boneless, skinless chicken breasts
- 1/3 cup pure maple syrup
- 3 tablespoons Dijon mustard
- 2 tablespoons olive oil
- 2 cloves garlic, minced
- 1 tablespoon fresh thyme
- 1 teaspoon salt
- 1/2 teaspoon black pepper
- 1/4 teaspoon paprika
Season chicken breasts with salt, pepper, and paprika. Heat olive oil in a large skillet over medium-high heat. Cook chicken for 5-7 minutes per side until golden brown and cooked through.
While chicken cooks, whisk together maple syrup, Dijon mustard, and minced garlic in a small bowl. Once chicken is cooked, reduce heat to medium-low and pour the maple-Dijon mixture over the chicken. Let it simmer for 2-3 minutes, occasionally spooning the sauce over the chicken until the sauce thickens slightly and coats the meat. Sprinkle with fresh thyme before serving.
For best results, ensure chicken breasts are of similar thickness by pounding them gently if needed. The sauce can become too thick if cooked too long, so watch it carefully during the final steps. Store any leftovers in an airtight container in the refrigerator for up to 3 days, reheating gently to prevent the sauce from breaking.
Tex-Mex Black Bean Chili
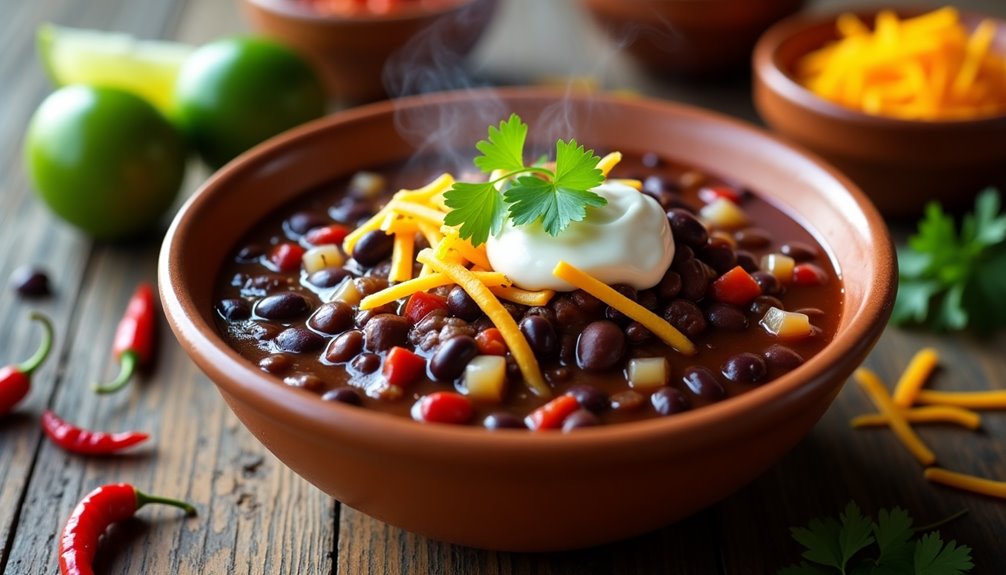
Tex-Mex Black Bean Chili is a hearty, protein-rich vegetarian dish that delivers bold southwestern flavors. The combination of black beans, vegetables, and aromatic spices creates a satisfying meal that can be prepared with minimal effort using pantry staples.
This quick-cooking chili is perfect for busy weeknights and can be easily customized to suit different taste preferences. Whether served on its own, over rice, or with tortilla chips, this versatile dish maintains its robust flavor profile while providing essential nutrients.
- 2 cans (15 oz each) black beans, drained and rinsed
- 1 large onion, diced
- 2 bell peppers, chopped
- 3 cloves garlic, minced
- 2 cans (14.5 oz each) diced tomatoes
- 1 can (4 oz) diced green chilies
- 2 tablespoons chili powder
- 1 tablespoon ground cumin
- 1 teaspoon oregano
- 2 tablespoons olive oil
- 1 cup vegetable broth
- Salt and pepper to taste
- Optional toppings: shredded cheese, sour cream, cilantro, lime wedges
Heat olive oil in a large pot over medium heat. Add onions and bell peppers, cooking until softened, about 5 minutes. Add garlic, chili powder, cumin, and oregano, stirring constantly for 1 minute. Add black beans, tomatoes, green chilies, and vegetable broth. Bring to a boil, then reduce heat and simmer for 20-25 minutes, stirring occasionally.
For best results, allow the chili to rest for 5-10 minutes before serving to let the flavors meld together. This chili can be stored in an airtight container in the refrigerator for up to 5 days, and the flavor often improves the next day. For a thicker consistency, mash some of the beans against the side of the pot while cooking, or use an immersion blender to partially blend the mixture.
Teriyaki Chicken and Vegetables
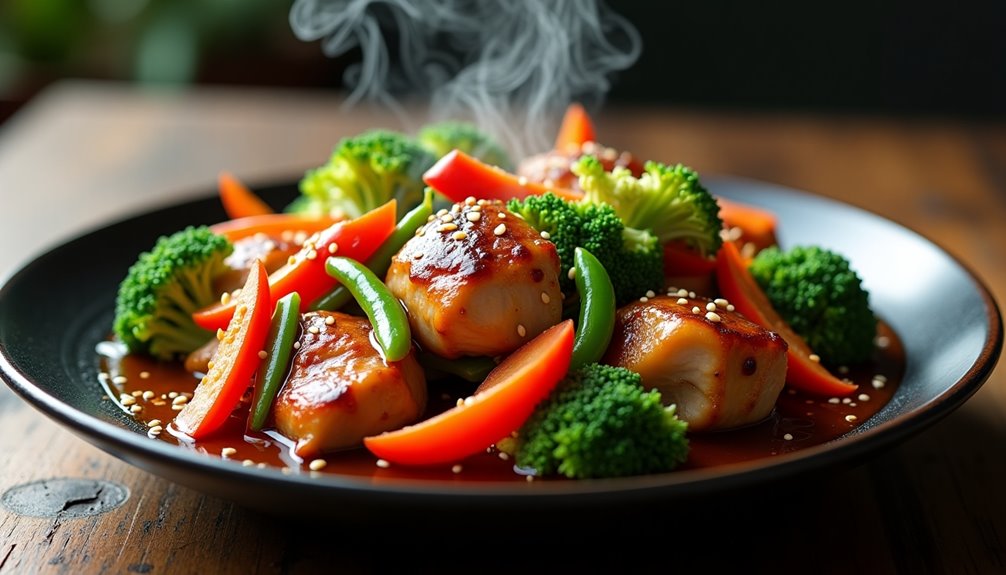
Teriyaki chicken and vegetables is a classic Asian-inspired dish that combines sweet and savory flavors in one convenient meal. The combination of tender chicken, crisp vegetables, and homemade teriyaki sauce creates a satisfying dinner that can be prepared with minimal effort.
This dump meal version simplifies the traditional cooking process by combining all ingredients in one pan, allowing the flavors to meld together while reducing cleanup time. The dish can be served over rice or noodles, making it a complete meal that's both nutritious and filling.
- 2 lbs boneless, skinless chicken thighs, cut into 1-inch pieces
- 1 broccoli crown, cut into florets
- 2 carrots, sliced
- 1 red bell pepper, chopped
- 1 cup snap peas
- 1/2 cup soy sauce
- 1/4 cup mirin
- 1/4 cup brown sugar
- 2 tablespoons rice vinegar
- 2 cloves garlic, minced
- 1 tablespoon ginger, grated
- 2 tablespoons cornstarch
- 2 tablespoons vegetable oil
- Sesame seeds for garnish
Add vegetable oil to a large skillet over medium-high heat. Place chicken pieces in the pan and cook until browned on all sides, approximately 5-7 minutes. While the chicken cooks, whisk together soy sauce, mirin, brown sugar, rice vinegar, garlic, ginger, and cornstarch in a bowl.
Add the vegetables to the pan with the chicken and pour the sauce mixture over everything. Reduce heat to medium-low, cover the pan, and let cook for 10-12 minutes, stirring occasionally, until the vegetables are tender-crisp and the sauce has thickened. The internal temperature of the chicken should reach 165°F (74°C).
For best results, cut all vegetables into similar-sized pieces to ensure even cooking. The sauce can be prepared up to 24 hours in advance and stored in the refrigerator. If the sauce becomes too thick during cooking, add water a tablespoon at a time until desired consistency is reached. Avoid overcooking the vegetables to maintain their crisp texture and vibrant color.