12 Quick Easy Keto Meals
You've probably spent countless hours searching for keto meals that don't require a culinary degree or half your day in the kitchen. Here's the good news: you'll find these 12 quick keto recipes refreshingly simple, with most taking just 15-30 minutes to prepare. From sizzling garlic butter steak bites to creamy Tuscan chicken, each dish delivers the perfect balance of proteins and fats while keeping those carbs in check. Let's explore how you can transform basic ingredients into restaurant-worthy keto meals tonight.
15-Minute Garlic Butter Steak Bites
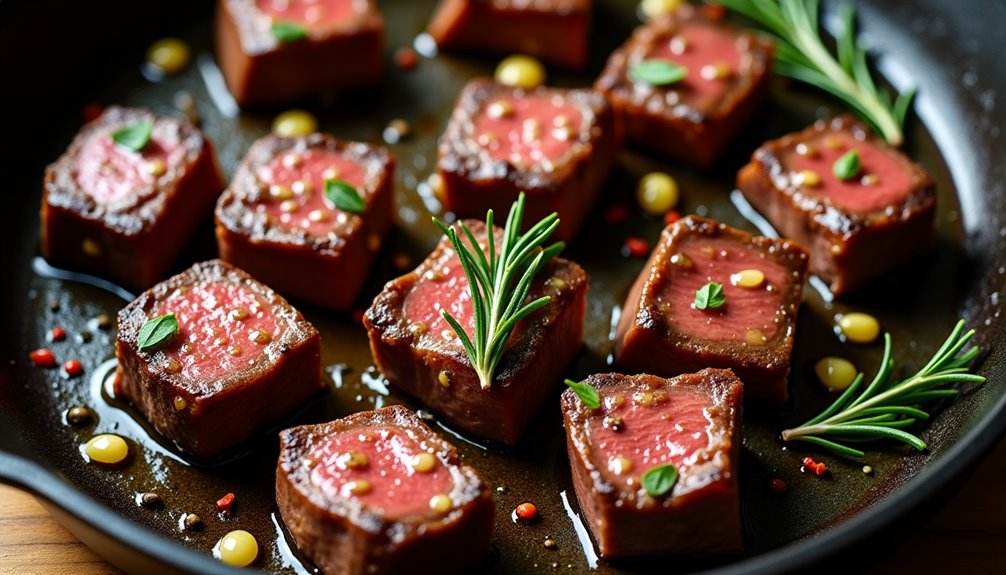
Garlic butter steak bites are a perfect keto-friendly meal that combines tender, juicy pieces of steak with rich, aromatic garlic butter. This dish not only satisfies your protein needs but also provides healthy fats essential for maintaining ketosis while delivering an explosion of flavor in every bite.
This quick and easy recipe takes less than 15 minutes to prepare, making it an ideal choice for busy weeknight dinners or when you're craving a restaurant-quality meal at home. The key to perfect steak bites lies in choosing the right cut of meat and mastering the cooking temperature to achieve the desired level of doneness.
- 1 pound sirloin steak, cut into 1-inch cubes
- 4 tablespoons butter
- 4 cloves garlic, minced
- 1 tablespoon olive oil
- 1 teaspoon salt
- 1 teaspoon black pepper
- 1 teaspoon fresh rosemary (optional)
- 1/2 teaspoon red pepper flakes (optional)
Pat the steak cubes dry with paper towels and season with salt and pepper. Heat olive oil in a large skillet over high heat until smoking. Add the steak bites in a single layer, being careful not to overcrowd the pan, and cook for 2-3 minutes until browned. Flip and cook for an additional 1-2 minutes for medium-rare.
Reduce heat to medium-low, add butter and minced garlic to the pan. Once the butter has melted, toss the steak bites in the garlic butter mixture for 30 seconds to coat evenly. If using, add rosemary and red pepper flakes at this stage. Remove from heat immediately to prevent overcooking.
For best results, allow your steak to come to room temperature before cooking, and use a cast-iron skillet for optimal heat distribution and browning. Don't move the steak pieces too much while cooking to achieve a nice crust, and remember that the residual heat will continue cooking the meat even after removing it from the pan, so it's better to slightly undercook than overcook.
Creamy Tuscan Chicken Skillet

The Creamy Tuscan Chicken Skillet is a luxurious one-pan meal that combines tender chicken breasts with a rich, Italian-inspired cream sauce. This keto-friendly dish features sun-dried tomatoes, fresh spinach, and aromatic herbs that create a restaurant-quality meal right in your own kitchen.
This recipe transforms simple chicken breasts into an impressive main course, with a sauce that's both indulgent and low in carbs. The combination of heavy cream, Parmesan cheese, and garlic creates a velvety foundation, while the sun-dried tomatoes add a subtle sweetness and concentrated flavor that perfectly complements the tender chicken.
Ingredients:
- 4 chicken breasts, boneless and skinless
- 2 tablespoons olive oil
- 4 cloves garlic, minced
- 1 cup heavy cream
- 1 cup chicken broth
- 1 cup grated Parmesan cheese
- 1/2 cup sun-dried tomatoes, chopped
- 2 cups fresh spinach
- 1 teaspoon dried basil
- 1 teaspoon dried oregano
- 1 teaspoon Italian seasoning
- Salt and pepper to taste
- 2 tablespoons butter
Season chicken breasts with salt and pepper, then heat olive oil in a large skillet over medium-high heat. Cook chicken for 5-7 minutes per side until golden brown and cooked through. Remove chicken and set aside.
In the same skillet, add butter and minced garlic, sautéing until fragrant. Add heavy cream, chicken broth, and Parmesan cheese, stirring constantly until the sauce begins to thicken.
Add sun-dried tomatoes, dried herbs, and let the sauce simmer for 3-4 minutes. Return chicken to the skillet and add fresh spinach, allowing it to wilt into the sauce. Continue cooking for an additional 3-4 minutes until the sauce is creamy and the chicken is heated through.
For best results, allow the dish to rest for 5 minutes before serving, as this helps the sauce thicken and the flavors to meld together. If the sauce becomes too thick, thin it with additional chicken broth. The dish can be stored in an airtight container in the refrigerator for up to 3 days, though the sauce may need to be reconstituted with a splash of cream when reheating.
One-Pan Cheesy Ranch Chicken
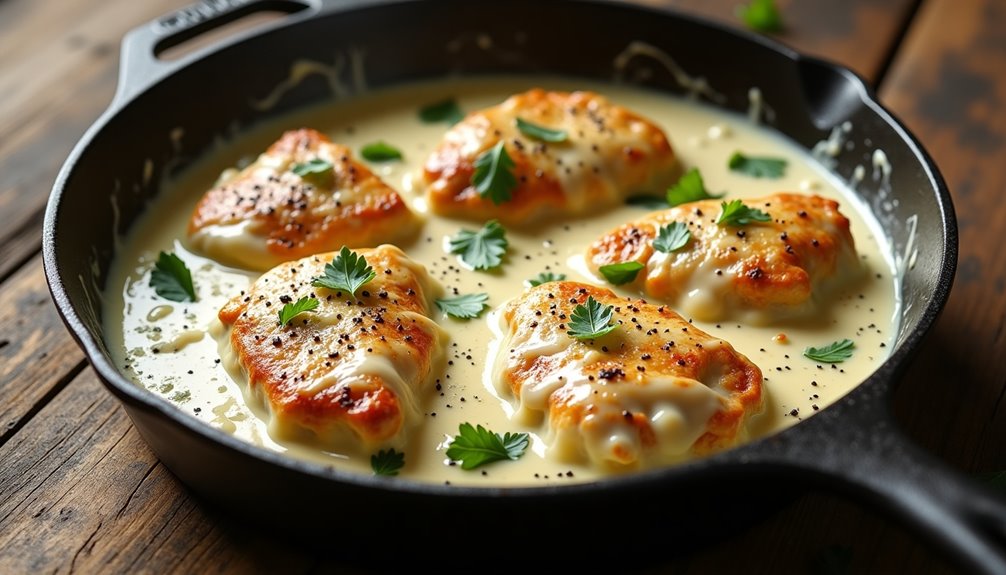
One-Pan Cheesy Ranch Chicken combines the rich flavors of melted cheese and tangy ranch seasoning with juicy chicken breasts, all prepared in a single skillet. This keto-friendly meal delivers the perfect balance of protein and fats while keeping carbs to a minimum.
This dish takes approximately 30 minutes to prepare and serves 4 people. The combination of ranch seasoning and three types of cheese creates a creamy, satisfying sauce that coats each piece of chicken perfectly, making it an ideal choice for family dinners or meal prep.
- 4 medium chicken breasts
- 8 oz cream cheese, softened
- 1 cup shredded mozzarella cheese
- 1/2 cup grated parmesan cheese
- 2 tablespoons ranch seasoning mix
- 4 tablespoons olive oil
- 2 cloves garlic, minced
- 1/2 teaspoon black pepper
- 1/2 teaspoon salt
Heat olive oil in a large skillet over medium-high heat. Season chicken breasts with salt and pepper, then cook for 5-7 minutes on each side until golden brown and cooked through. Remove chicken and set aside.
In the same pan, reduce heat to medium and add minced garlic, cooking for 30 seconds until fragrant. Add cream cheese, stirring until melted. Mix in ranch seasoning, then add mozzarella and parmesan cheese, stirring until smooth and creamy. Return chicken to the pan, spooning the sauce over each piece, and cook for an additional 2-3 minutes until heated through.
For best results, bring the cream cheese to room temperature before cooking, as this prevents the sauce from becoming lumpy. The chicken breasts should be relatively even in thickness; if needed, pound them to achieve uniform thickness. Store leftovers in an airtight container in the refrigerator for up to 3 days, reheating gently to prevent the sauce from separating.
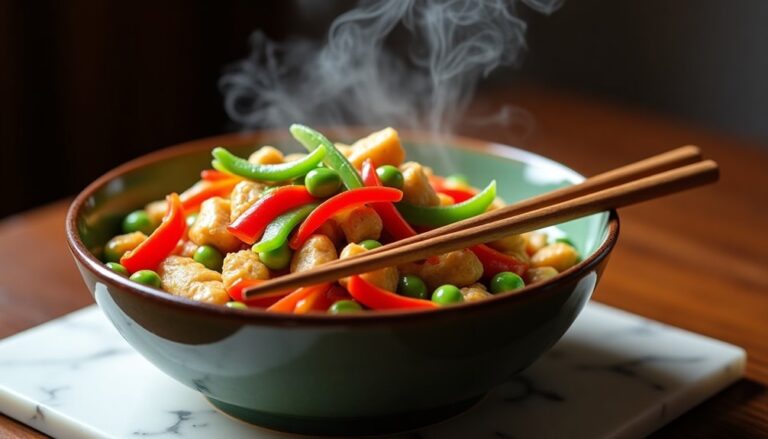
Low-Carb Egg Roll in a Bowl
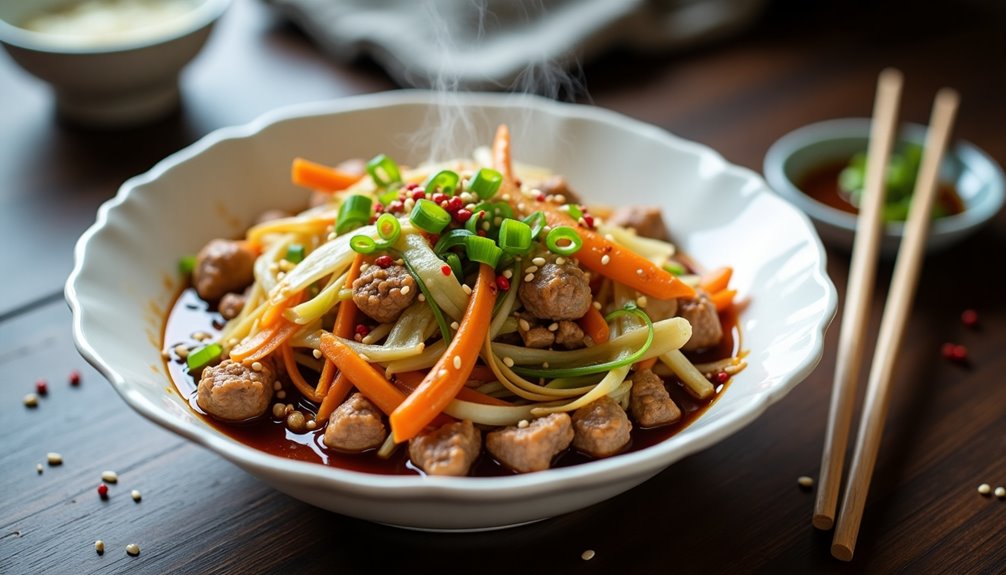
Low-carb egg roll in a bowl is a deconstructed version of the popular Asian appetizer, delivering all the flavors without the carb-heavy wrapper. This quick and satisfying meal combines seasoned ground meat with shredded cabbage and carrots, making it perfect for those following a ketogenic diet while craving Chinese takeout flavors.
The dish takes less than 30 minutes to prepare and can be customized with various proteins and vegetables to suit individual preferences. Its simplicity and versatility make it an excellent option for meal prep, as the flavors often improve after a day in the refrigerator.
Ingredients:
- 1 pound ground pork
- 1 medium head cabbage, shredded
- 2 carrots, julienned
- 3 cloves garlic, minced
- 1 tablespoon ginger, grated
- 3 green onions, sliced
- 2 tablespoons sesame oil
- 3 tablespoons soy sauce
- 1 tablespoon rice vinegar
- 1 teaspoon white pepper
- Salt to taste
- Optional: sriracha sauce
Heat sesame oil in a large skillet over medium-high heat. Add ground pork and break it apart, cooking until browned and crumbly. Add minced garlic and grated ginger, cooking for another minute until fragrant. Add shredded cabbage and carrots to the skillet, stirring frequently until the vegetables are tender-crisp.
Pour in soy sauce and rice vinegar, then season with white pepper and salt. Continue cooking until the cabbage is wilted to your preferred texture and the liquid has slightly reduced. Remove from heat and top with sliced green onions.
For best results, use a large skillet or wok to prevent overcrowding, which can lead to steaming rather than proper sautéing. The vegetables can be prepped in advance and stored in the refrigerator to make cooking time even faster. If following strict keto, consider using coconut aminos instead of soy sauce to reduce carb content further.
Zucchini Noodle Alfredo With Shrimp
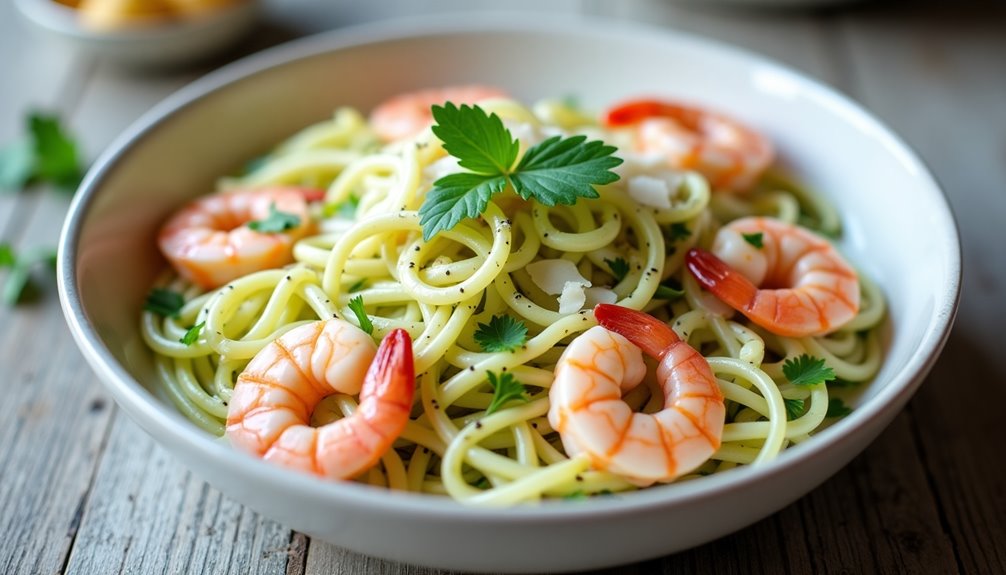
Zucchini noodles, or "zoodles," have become a popular low-carb alternative to traditional pasta, making them perfect for keto dieters. When paired with a rich, creamy alfredo sauce and succulent shrimp, these vegetable noodles transform into a decadent yet healthy meal that satisfies pasta cravings without breaking ketosis.
This keto-friendly version of shrimp alfredo uses a combination of heavy cream, butter, and parmesan cheese to create a silky sauce that clings perfectly to the zucchini noodles. The dish comes together in under 30 minutes, making it an ideal choice for busy weeknight dinners while still feeling special enough for a weekend date night.
- 4 medium zucchini
- 1 pound large shrimp, peeled and deveined
- 4 tablespoons butter
- 3 cloves garlic, minced
- 1 cup heavy cream
- 1 cup freshly grated parmesan cheese
- 1/2 teaspoon salt
- 1/4 teaspoon black pepper
- 1/4 teaspoon red pepper flakes (optional)
- 2 tablespoons olive oil
- Fresh parsley for garnish
Start by spiralizing the zucchini into noodles using a spiralizer or vegetable peeler. Pat the zoodles dry with paper towels to remove excess moisture. Season the shrimp with salt and pepper. In a large skillet, heat olive oil over medium-high heat and cook the shrimp for 2-3 minutes per side until pink and opaque. Remove shrimp and set aside.
In the same skillet, melt butter and add minced garlic, cooking until fragrant. Pour in heavy cream and bring to a simmer, then add parmesan cheese, stirring until melted and smooth. Add the zucchini noodles to the sauce and cook for 2-3 minutes until just tender but still slightly crisp. Return the shrimp to the pan and toss everything together until well combined and heated through.
To prevent watery zoodles, avoid overcooking the zucchini noodles as they release moisture when heated. If needed, serve the dish immediately after cooking, and if you notice excess liquid in the pan, drain it before adding the sauce. For meal prep, store the sauce and cooked shrimp separately from the raw zoodles, combining them only when ready to serve.
Buffalo Chicken Lettuce Wraps
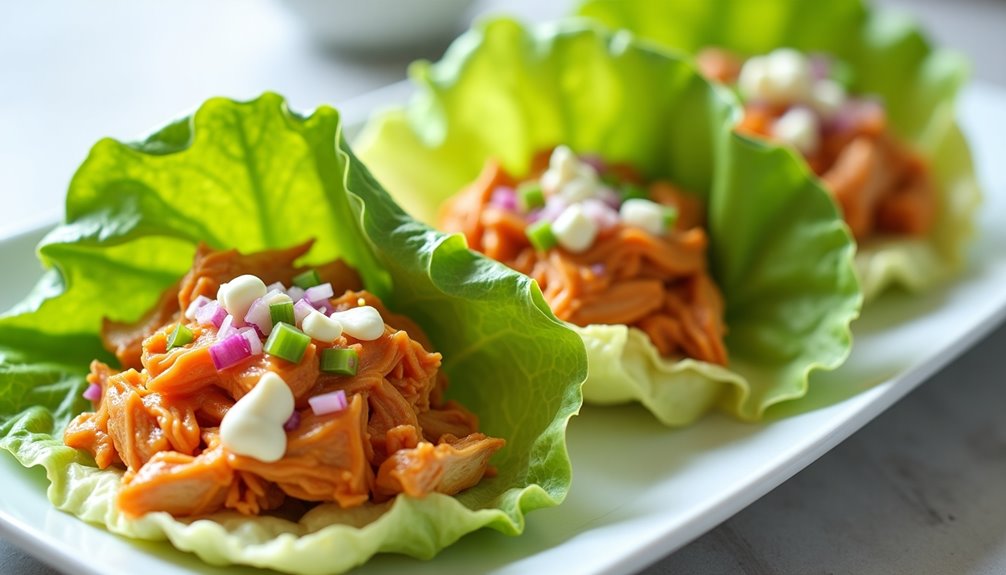
Buffalo Chicken Lettuce Wraps offer a low-carb twist on the classic buffalo chicken experience, delivering all the bold, spicy flavors without the heavy breading or buns. These wraps combine tender, shredded chicken with tangy buffalo sauce, wrapped in crisp lettuce leaves for a refreshing crunch.
This keto-friendly meal is perfect for lunch or dinner, providing a satisfying blend of protein and healthy fats while keeping carbs to a minimum. The cool, crisp lettuce provides a perfect contrast to the warm, spicy chicken filling, and the dish can be customized with various toppings to suit individual preferences.
Season chicken breasts with salt and pepper, then cook them in a slow cooker or instant pot until tender and easily shreddable, approximately 3-4 hours on low in a slow cooker or 15 minutes in an instant pot. Once cooked, shred the chicken using two forks. In a large pan, melt butter over medium heat, add minced garlic and sauté until fragrant. Add the shredded chicken and buffalo sauce, stirring to combine thoroughly and heat through.
Carefully separate and wash whole lettuce leaves, ensuring they remain intact to serve as wraps. Pat the leaves dry to prevent the filling from becoming watery. To assemble, place a generous portion of the buffalo chicken mixture in each lettuce leaf, then top with blue cheese crumbles, diced celery, red onion, and a drizzle of ranch dressing.
For best results, serve the lettuce wraps immediately while the chicken is still warm. The chicken mixture can be made ahead and reheated when needed, but assemble the wraps just before serving to maintain the lettuce's crispness. To control the heat level, adjust the amount of buffalo sauce used, and consider having extra sauce available for those who prefer more spice.
Ingredients:
- 2 lbs chicken breast
- 1/2 cup buffalo sauce
- 4 tablespoons butter
- 1 head iceberg or butter lettuce
- 1/2 cup blue cheese crumbles
- 1/4 cup ranch dressing
- 1/2 cup diced celery
- 1/4 cup diced red onion
- 2 cloves minced garlic
- Salt and pepper to taste
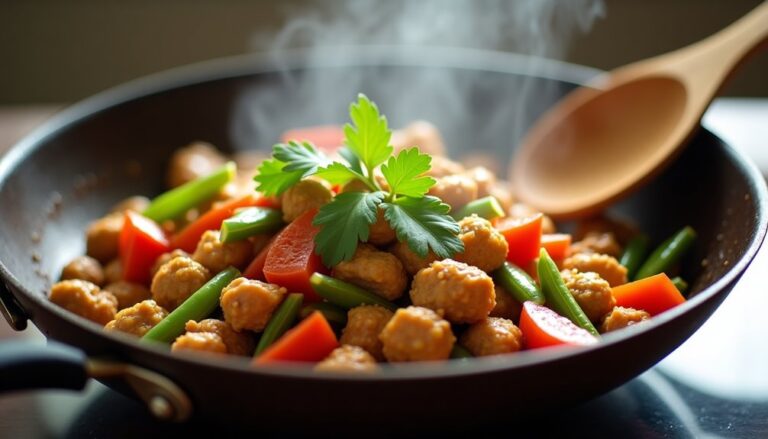
20-Minute Keto Taco Skillet

Minute Keto Taco Skillet is a quick and satisfying low-carb alternative to traditional tacos that delivers all the Mexican flavors without the carbohydrate-heavy shells. This one-pan meal combines seasoned ground beef with fresh vegetables and cheese, making it perfect for busy weeknight dinners while maintaining ketogenic dietary requirements.
This versatile dish can be customized with various toppings and served multiple ways – in lettuce wraps, over cauliflower rice, or simply eaten as is. The combination of protein and healthy fats makes it filling and nutritious, while the cooking process takes less than 30 minutes from start to finish.
- 1 pound ground beef (80/20)
- 1 medium bell pepper, diced
- 1/2 medium onion, diced
- 2 cloves garlic, minced
- 2 tablespoons taco seasoning
- 1 cup shredded cheddar cheese
- 1 tablespoon olive oil
- Salt and pepper to taste
- Optional toppings: sour cream, diced avocado, fresh cilantro, jalapeños
Heat olive oil in a large skillet over medium-high heat. Add ground beef and break it apart with a wooden spoon, cooking until it starts to brown. Add diced onion, bell pepper, and garlic, continuing to cook until the beef is fully browned and vegetables are softened. Drain excess fat if desired. Sprinkle taco seasoning over the mixture and stir to combine thoroughly, cooking for an additional 2-3 minutes to allow the flavors to meld.
Reduce heat to low and sprinkle shredded cheese over the top. Cover the skillet and let it sit for 2-3 minutes until the cheese is fully melted. Remove from heat and add your chosen toppings before serving.
For best results, use a cast-iron skillet to achieve better browning and flavor development. The key to keeping this dish keto-friendly is to check your taco seasoning ingredients, as some commercial blends contain added sugars or starches – consider making your own blend using cumin, chili powder, paprika, and other keto-approved spices. Store leftovers in an airtight container for up to 3 days in the refrigerator.
Pan-Seared Salmon With Lemon Butter
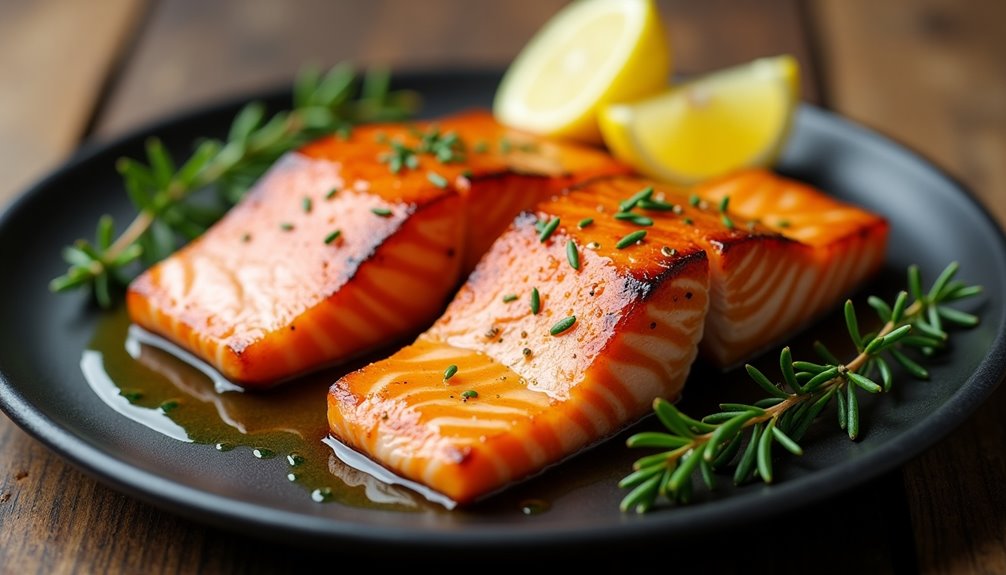
Pan-seared salmon with lemon butter is a delectable keto-friendly dish that combines the rich flavors of fresh salmon with the bright, citrusy notes of lemon. The high-fat content from both the salmon and butter makes this meal perfect for those following a ketogenic diet, while providing essential omega-3 fatty acids and protein.
This recipe takes only 15-20 minutes to prepare and cook, making it an ideal choice for busy weeknight dinners. The crispy, golden-brown exterior and tender, flaky interior create a perfect texture contrast, while the lemon butter sauce adds a luxurious finish that elevates this simple dish to restaurant quality.
- 2 (6-oz) salmon fillets, skin-on
- 4 tablespoons unsalted butter
- 2 tablespoons olive oil
- 1 lemon
- 2 cloves garlic, minced
- 1 teaspoon fresh thyme
- Salt and black pepper to taste
Pat the salmon fillets dry with paper towels and season both sides generously with salt and pepper. Heat olive oil in a large skillet over medium-high heat until shimmering. Place the salmon skin-side up in the pan and cook for 4-5 minutes until golden brown. Flip the salmon and cook for an additional 3-4 minutes, or until the internal temperature reaches 145°F (63°C).
While the salmon cooks, prepare the lemon butter sauce by melting butter in a small saucepan over medium heat. Add minced garlic and cook for 30 seconds until fragrant. Squeeze in the juice of half a lemon and add fresh thyme. Once the salmon is done, transfer it to serving plates and spoon the warm lemon butter sauce over the top. Garnish with lemon slices and additional fresh thyme if desired.
For best results, bring the salmon to room temperature 15-20 minutes before cooking, as this ensures even cooking throughout the fillet. Avoid moving the salmon around in the pan while it cooks – letting it develop a proper crust is key to achieving that perfect sear. If the butter sauce begins to brown too quickly, remove it from heat immediately to prevent burning.
Bacon Wrapped Asparagus Bundles
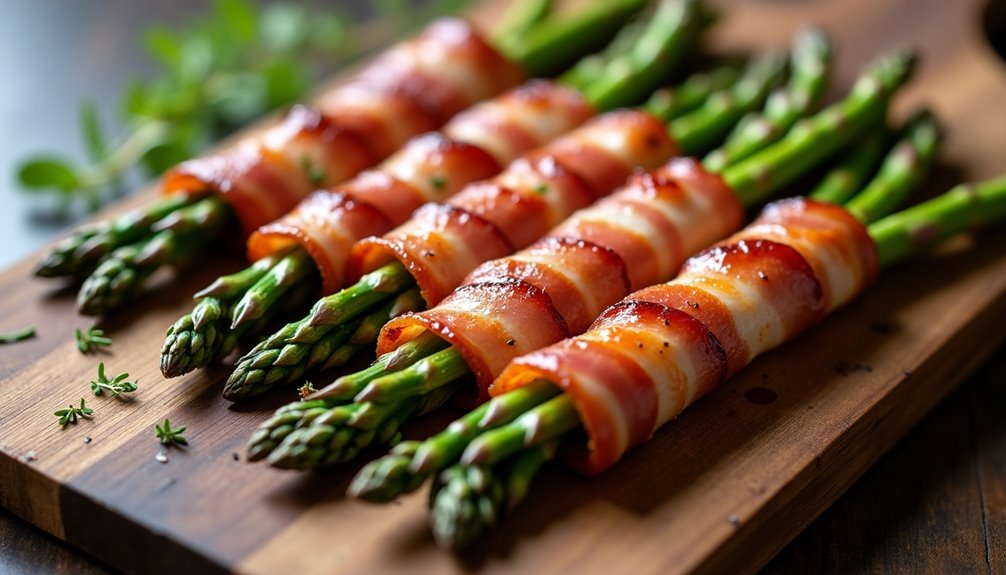
Bacon-wrapped asparagus bundles are a delicious low-carb side dish that perfectly combines the salty, crispy texture of bacon with tender, flavorful asparagus. This elegant yet simple preparation method creates an impressive presentation while keeping the dish keto-friendly and nutrient-rich.
The key to perfect bacon-wrapped asparagus bundles lies in selecting fresh, medium-thickness asparagus spears and high-quality bacon that isn't too thick. This ensures even cooking and allows the bacon to crisp properly while the asparagus maintains a slight crunch without becoming too soft.
- 24 fresh asparagus spears
- 8 slices bacon
- 2 tablespoons olive oil
- 1/2 teaspoon garlic powder
- 1/4 teaspoon black pepper
- 1/4 teaspoon sea salt
- 1/8 teaspoon red pepper flakes (optional)
Preheat the oven to 400°F (200°C). Trim the woody ends from the asparagus spears and divide them into bundles of 3 spears each. Drizzle the asparagus with olive oil and season with garlic powder, black pepper, and salt. Cut each bacon slice into thirds and wrap one piece around each asparagus bundle, securing the end underneath.
Place the wrapped bundles on a baking sheet lined with parchment paper, making sure they don't touch each other. Bake for 20-25 minutes, turning halfway through, until the bacon is crispy and the asparagus is tender but still slightly firm. If desired, broil for the last 1-2 minutes to achieve extra crispiness on the bacon.
For best results, choose bacon that's at room temperature as it will wrap more easily around the asparagus. Avoid overcrowding the baking sheet to ensure even cooking and proper crisping. If making ahead, you can wrap the bundles and refrigerate for up to 8 hours before cooking, but bring them to room temperature before baking for optimal results.
Cauliflower Rice Stir-Fry
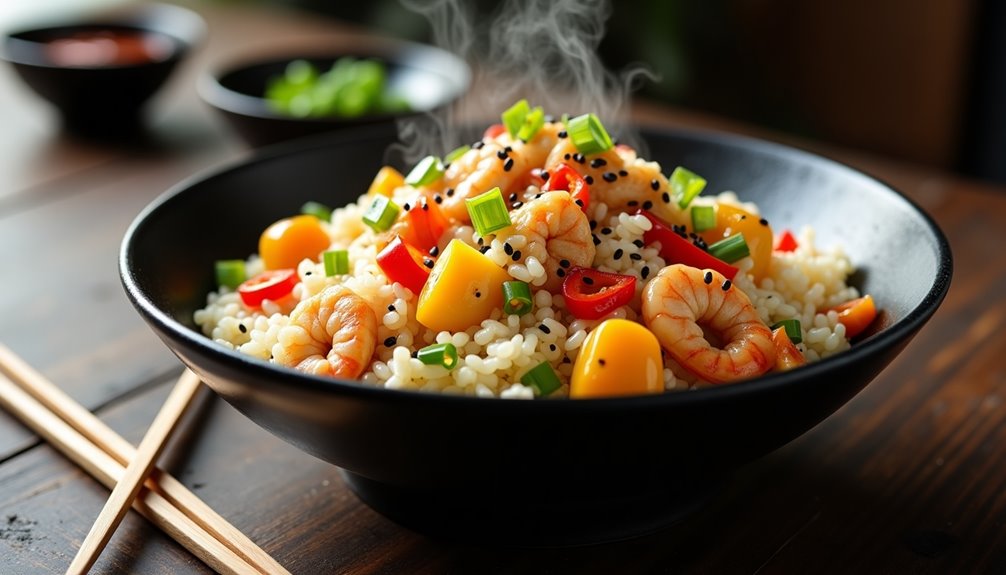
Cauliflower rice stir-fry is a versatile keto-friendly alternative to traditional rice-based dishes, offering the same satisfying texture with significantly fewer carbohydrates. This dish transforms simple cauliflower into rice-sized pieces that absorb flavors beautifully while maintaining the essential principles of a ketogenic diet.
The key to a successful cauliflower rice stir-fry lies in properly preparing the cauliflower and not overcooking it, which can lead to a mushy consistency. By combining the riced cauliflower with select vegetables, proteins, and seasonings, you create a complete meal that's both nutritious and satisfying while staying within keto guidelines.
- 1 large head cauliflower
- 2 tablespoons olive oil
- 2 cloves garlic, minced
- 1/2 cup diced onion
- 1 cup sliced bell peppers
- 2 cups chopped chicken or shrimp
- 2 tablespoons soy sauce (or coconut aminos)
- 1 teaspoon sesame oil
- 1/2 teaspoon black pepper
- 1/4 teaspoon salt
- 2 large eggs
- 2 tablespoons butter
Cut the cauliflower into florets and pulse in a food processor until it reaches a rice-like consistency. Heat olive oil in a large skillet over medium-high heat. Add garlic and onion, sautéing until translucent. Add your protein of choice and cook until nearly done, then add the bell peppers and cook for 2-3 minutes.
Push everything to one side of the pan and crack the eggs into the empty space, scrambling them quickly. Add the riced cauliflower, butter, soy sauce, sesame oil, salt, and pepper. Stir-fry everything together for 5-7 minutes, until the cauliflower is tender but still slightly crisp.
For best results, ensure your pan is hot enough before adding ingredients and don't overcrowd it, as this can lead to steaming rather than stir-frying. The cauliflower rice should be thoroughly dried after processing to prevent sogginess, and it's better to slightly undercook than overcook, as the residual heat will continue cooking the vegetables after removing from heat.
Mediterranean Chicken and Vegetables
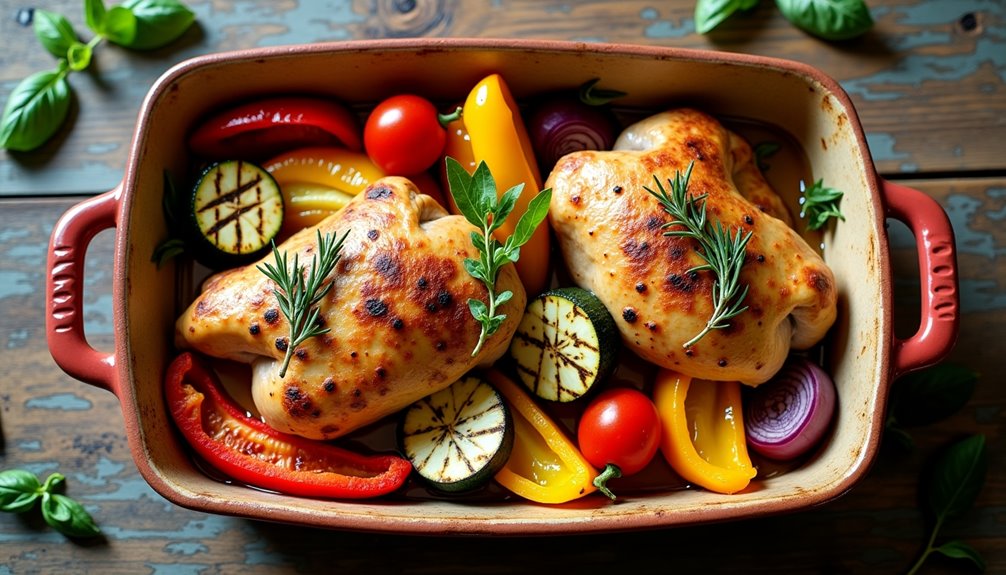
Mediterranean Chicken and Vegetables brings together the vibrant flavors of the Mediterranean region while adhering to keto-friendly principles. This dish combines succulent chicken thighs with colorful low-carb vegetables, all seasoned with herbs like oregano, thyme, and rosemary.
The beauty of this one-pan meal lies in its simplicity and adaptability. While traditional Mediterranean dishes often include higher-carb ingredients like potatoes or pasta, this version focuses on keto-compatible vegetables that maintain the authentic flavors while keeping carbohydrates low.
Ingredients:
- 6 chicken thighs, bone-in and skin-on
- 2 zucchini, sliced
- 1 red bell pepper, chunked
- 1 yellow bell pepper, chunked
- 1 cup cherry tomatoes
- 1 red onion, quartered
- 4 garlic cloves, minced
- 1/4 cup olive oil
- 2 tablespoons fresh lemon juice
- 2 teaspoons dried oregano
- 1 teaspoon dried thyme
- 1 teaspoon dried rosemary
- 1 teaspoon sea salt
- 1/2 teaspoon black pepper
- 1/4 cup fresh basil, chopped
Preheat the oven to 400°F (200°C). In a large bowl, combine olive oil, lemon juice, oregano, thyme, rosemary, salt, and pepper. Add chicken thighs and coat thoroughly. Place chicken skin-side up in a large baking dish. Arrange vegetables around the chicken, then drizzle with the remaining herb mixture. Bake for 35-40 minutes, or until chicken is golden brown and reaches an internal temperature of 165°F (74°C).
For best results, let the chicken rest for 5-10 minutes before serving. The vegetables should be tender but not mushy, and the chicken skin should be crispy. The natural juices from the chicken will have combined with the herbs and olive oil to create a flavorful sauce at the bottom of the pan.
Best when served immediately, this dish can be made ahead and reheated, though the vegetable texture may change slightly. For optimal results, marinate the chicken in the herb mixture for up to 4 hours before cooking. If using chicken breasts instead of thighs, reduce cooking time by 5-7 minutes to prevent drying.
Mushroom and Spinach Frittata

A mushroom and spinach frittata is a perfect keto-friendly breakfast or brunch option that's both satisfying and nutritious. This Italian-inspired egg dish is loaded with healthy fats, protein, and low-carb vegetables, making it an excellent choice for those following a ketogenic diet.
The combination of earthy mushrooms and tender spinach creates a delicious flavor profile, while the eggs provide a fluffy, custard-like texture. This versatile dish can be served hot or at room temperature, making it ideal for meal prep or entertaining guests.
Ingredients:
- 8 large eggs
- 1/4 cup heavy cream
- 8 oz mushrooms, sliced
- 4 cups fresh spinach
- 1/2 cup shredded cheese (cheddar or gruyere)
- 3 tablespoons butter
- 2 cloves garlic, minced
- 1/2 teaspoon salt
- 1/4 teaspoon black pepper
- 1/4 teaspoon dried thyme
Preheat your oven to 375°F (190°C). In a large bowl, whisk together eggs, heavy cream, salt, and pepper until well combined. Heat butter in a 10-inch oven-safe skillet over medium heat. Add mushrooms and garlic, cooking until mushrooms are golden brown. Add spinach and cook until wilted. Pour the egg mixture over the vegetables, sprinkle with cheese and thyme, and let cook on the stovetop for 3-4 minutes until the edges start to set.
Transfer the skillet to the preheated oven and bake for 12-15 minutes, or until the eggs are fully set and the top is lightly golden. Let the frittata rest for 5 minutes before slicing and serving.
For best results, use room temperature eggs and avoid overcooking, as this can make the frittata rubbery. If you don't have an oven-safe skillet, you can transfer the mixture to a greased baking dish before putting it in the oven. The frittata can be stored in an airtight container in the refrigerator for up to 3 days.