18 Quick Nutritious Meals
Just like Einstein simplified complex theories, you can master quick and nutritious meals without spending hours in the kitchen. You'll discover how to transform basic ingredients into satisfying dishes that fuel your body and please your taste buds. From protein-packed quinoa bowls to sheet pan dinners that practically cook themselves, these 18 recipes will revolutionize your weeknight routine. Let's explore how you can create these kitchen masterpieces in 30 minutes or less.
15-Minute Mediterranean Quinoa Bowl
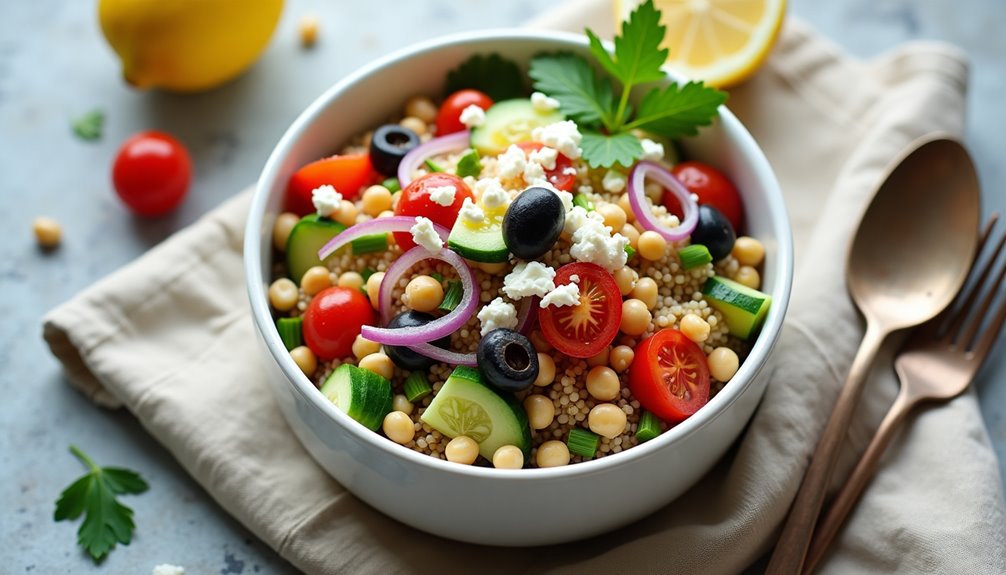
Mediterranean Quinoa Bowl is a vibrant, protein-rich dish that combines the ancient grain-like seed quinoa with classic Mediterranean ingredients. This wholesome meal delivers a perfect balance of nutrients, featuring fresh vegetables, healthy fats, and plant-based protein sources.
This 15-minute meal is ideal for busy weekdays when time is limited but you still want a nutritious, satisfying dish. The combination of warm quinoa and cool, crisp vegetables creates an interesting texture contrast, while the lemon-olive oil dressing ties all the flavors together harmoniously.
- 1 cup quinoa
- 2 cups water
- 1 cucumber, diced
- 1 cup cherry tomatoes, halved
- 1/2 red onion, finely chopped
- 1 cup kalamata olives, pitted
- 1/2 cup feta cheese, crumbled
- 2 tablespoons extra virgin olive oil
- 1 lemon, juiced
- 1 teaspoon dried oregano
- Salt and pepper to taste
- 1/4 cup fresh parsley, chopped
- 1 can chickpeas, drained and rinsed
Rinse quinoa thoroughly under cold water using a fine-mesh strainer. Combine quinoa and water in a medium saucepan, bring to a boil, then reduce heat to low, cover, and simmer for 15 minutes or until water is absorbed. Remove from heat and let stand, covered, for 5 minutes, then fluff with a fork.
While the quinoa cooks, prepare the vegetables and combine them in a large bowl. In a small bowl, whisk together olive oil, lemon juice, oregano, salt, and pepper to create the dressing. Once the quinoa has cooled slightly, add it to the vegetables, pour the dressing over the mixture, and toss gently to combine. Top with feta cheese and fresh parsley before serving.
For best results, ensure the quinoa is slightly cooled before mixing with the vegetables to prevent them from wilting. This dish can be served warm or cold and keeps well in the refrigerator for up to three days. To meal prep, keep the dressing separate and add it just before serving to maintain the optimal texture of the ingredients.
Sheet Pan Lemon Herb Salmon
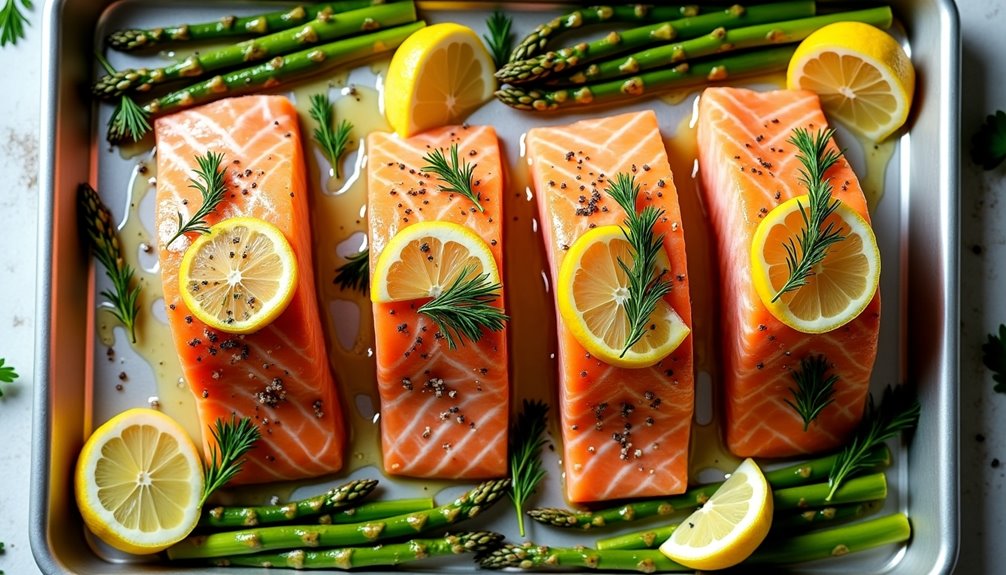
Sheet pan lemon herb salmon is a delightful and healthy meal that combines the rich flavors of fresh salmon with bright citrus and aromatic herbs. The beauty of this dish lies in its simplicity, as everything cooks together on a single sheet pan, making both preparation and cleanup a breeze.
This Mediterranean-inspired recipe creates perfectly cooked, flaky salmon fillets that are infused with lemon, garlic, and a blend of fresh herbs. The sheet pan method ensures even cooking and allows the natural oils of the salmon to blend with the seasonings, creating a moist and flavorful result.
- 4 (6-ounce) salmon fillets, skin-on
- 2 tablespoons olive oil
- 3 lemons (2 sliced, 1 for juice)
- 4 cloves garlic, minced
- 2 tablespoons fresh dill, chopped
- 2 tablespoons fresh parsley, chopped
- 1 tablespoon fresh thyme leaves
- 1 teaspoon sea salt
- 1/2 teaspoon black pepper
- 1 pound asparagus or green beans (optional)
Preheat the oven to 400°F (200°C). Line a large sheet pan with parchment paper or aluminum foil. Place the salmon fillets skin-side down on the prepared pan, leaving space between each piece. Drizzle with olive oil and fresh lemon juice, then sprinkle with minced garlic, herbs, salt, and pepper. Arrange lemon slices around and on top of the salmon. If using vegetables, toss them in olive oil and arrange them around the salmon.
Bake for 12-15 minutes, or until the salmon is cooked through and flakes easily with a fork. The internal temperature should reach 145°F (63°C) at the thickest part. If the vegetables need more time, remove the salmon and continue cooking them for an additional 5-7 minutes.
For best results, bring the salmon to room temperature 15-20 minutes before cooking. Avoid overcooking, as salmon can quickly become dry. The fish will continue to cook slightly after removing it from the oven. If using frozen salmon, thaw completely and pat dry with paper towels before seasoning to ensure proper cooking and browning.
Quick Chickpea Curry
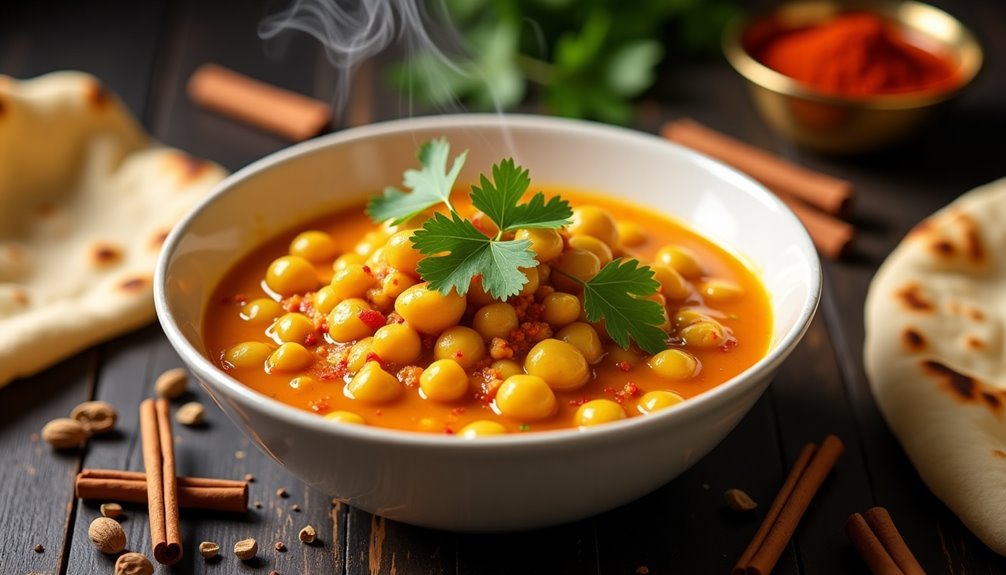
Quick Chickpea Curry is a protein-rich vegetarian dish that combines the heartiness of chickpeas with aromatic Indian spices. This comforting meal can be prepared in under 30 minutes, making it perfect for busy weeknight dinners when you want something flavorful and satisfying.
The combination of tomatoes, onions, and various spices creates a rich, thick curry sauce that coats the chickpeas perfectly. This dish isn't only budget-friendly but also incredibly versatile – it can be served with rice, naan bread, or quinoa, making it suitable for various dietary preferences.
Ingredients:
- 2 cans (15 oz each) chickpeas, drained and rinsed
- 1 large onion, finely chopped
- 3 cloves garlic, minced
- 1 tablespoon ginger, grated
- 2 tomatoes, diced
- 2 tablespoons vegetable oil
- 1 teaspoon cumin seeds
- 2 teaspoons curry powder
- 1 teaspoon turmeric
- 1 teaspoon garam masala
- 1/2 teaspoon red chili powder
- 1 cup water
- Salt to taste
- Fresh cilantro for garnish
Heat oil in a large pan over medium heat and add cumin seeds until they start to sizzle. Add chopped onions and sauté until golden brown, then add garlic and ginger, cooking for another minute. Add the spices and stir for 30 seconds before adding diced tomatoes. Cook until tomatoes soften and oil starts to separate from the mixture.
Add chickpeas and water to the pan, stirring to combine. Simmer for 10-15 minutes until the sauce thickens to desired consistency. Adjust salt to taste and garnish with fresh cilantro before serving.
For best results, allow the curry to rest for 5-10 minutes before serving, as this helps the flavors develop further. The curry can be stored in an airtight container in the refrigerator for up to 3 days, and it often tastes even better the next day as the spices have more time to meld together.
Veggie-Loaded Tofu Stir-Fry
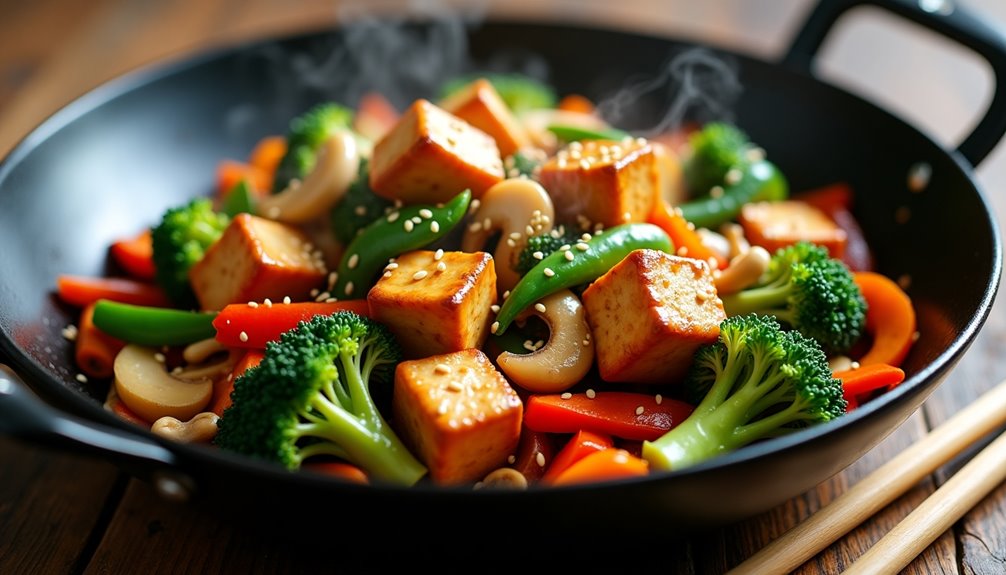
Veggie-Loaded Tofu Stir-Fry combines protein-rich tofu with colorful vegetables in a savory Asian-inspired sauce. This versatile dish provides essential nutrients while remaining low in calories and high in fiber, making it an excellent choice for health-conscious individuals.
The key to a perfect stir-fry lies in proper preparation and timing. The tofu must be pressed and properly seasoned, while vegetables should be cut uniformly to ensure even cooking. This meal comes together quickly once all ingredients are prepped, making it ideal for busy weeknight dinners.
Ingredients:
- 1 block (14 oz) firm tofu
- 2 carrots, julienned
- 2 cups broccoli florets
- 1 red bell pepper, sliced
- 1 cup snap peas
- 2 cups mushrooms, sliced
- 3 cloves garlic, minced
- 1 inch ginger, grated
- 3 tablespoons soy sauce
- 1 tablespoon sesame oil
- 2 tablespoons vegetable oil
- 1 tablespoon cornstarch
- ¼ cup water
- Salt and pepper to taste
Press tofu between paper towels for 30 minutes to remove excess moisture. Cut into 1-inch cubes and season with salt and pepper. Heat vegetable oil in a large wok or skillet over medium-high heat. Cook tofu until golden brown on all sides, about 5-7 minutes. Remove and set aside.
Add sesame oil to the same pan. Stir-fry garlic and ginger until fragrant, then add vegetables in order of cooking time: carrots first, followed by broccoli, bell pepper, mushrooms, and snap peas. Mix cornstarch with water and soy sauce, then add to the pan along with the tofu. Cook until sauce thickens and vegetables are tender-crisp.
For best results, prep all ingredients before starting to cook, as stir-frying moves quickly. The tofu can be pressed and cut several hours in advance and stored in the refrigerator. To prevent sogginess, avoid overcrowding the pan and cook on high heat to achieve the characteristic stir-fry sear while maintaining vegetable crispness.
Black Bean and Sweet Potato Tacos
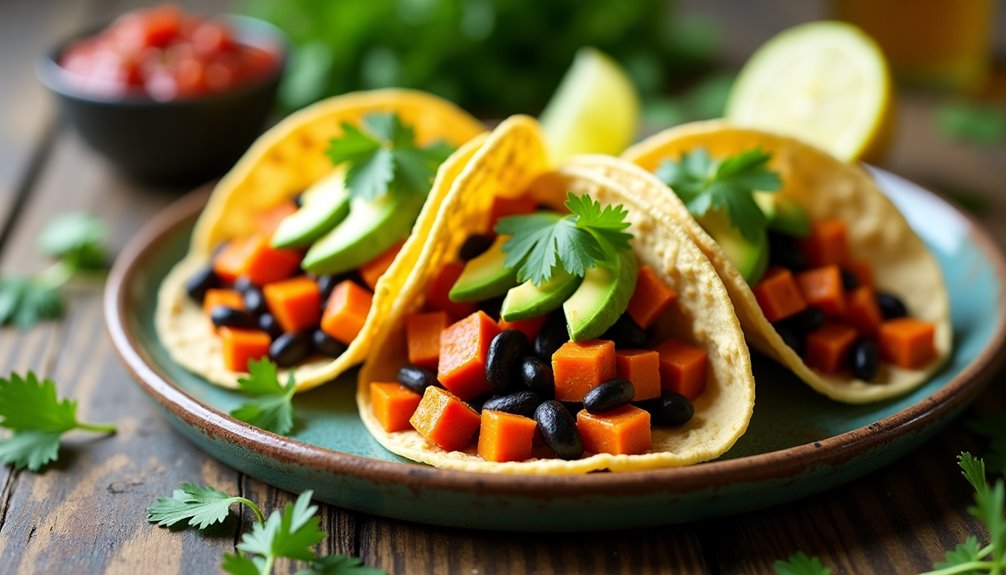
Black Bean and Sweet Potato Tacos combine the earthiness of black beans with the natural sweetness of roasted sweet potatoes, creating a satisfying vegetarian meal that's both nutritious and flavorful. The contrast between the creamy sweet potatoes and the hearty black beans provides a perfect balance of textures and tastes.
This Mexican-inspired dish isn't only economical but also packed with fiber, protein, and vitamins. The combination of ingredients creates a complete protein source, making it an excellent choice for those following a plant-based diet or looking to reduce their meat consumption.
Ingredients:
- 2 large sweet potatoes, cubed
- 2 cans black beans, drained and rinsed
- 12 corn tortillas
- 2 tablespoons olive oil
- 1 onion, diced
- 3 cloves garlic, minced
- 1 tablespoon cumin
- 1 teaspoon chili powder
- 1 teaspoon paprika
- Salt and pepper to taste
- 1 lime
- Fresh cilantro
- 1 avocado, sliced
- Salsa or hot sauce (optional)
Preheat the oven to 400°F (200°C). Toss sweet potato cubes with olive oil, salt, and pepper, then spread them on a baking sheet. Roast for 25-30 minutes until tender and slightly crispy on the edges.
Meanwhile, in a large skillet, sauté onion and garlic until translucent. Add black beans and seasonings, cooking until heated through and well-combined.
Warm the tortillas in a dry skillet or wrapped in foil in the oven. Assemble the tacos by layering the roasted sweet potatoes and seasoned black beans in each tortilla. Top with fresh cilantro, avocado slices, and a squeeze of lime juice.
For best results, prepare the sweet potatoes and black bean mixture slightly ahead of time, allowing the flavors to develop. The components can be stored separately in the refrigerator for up to three days. When reheating, add a splash of water to the black beans to prevent them from drying out, and crisp up the sweet potatoes in the oven rather than the microwave to maintain their texture.
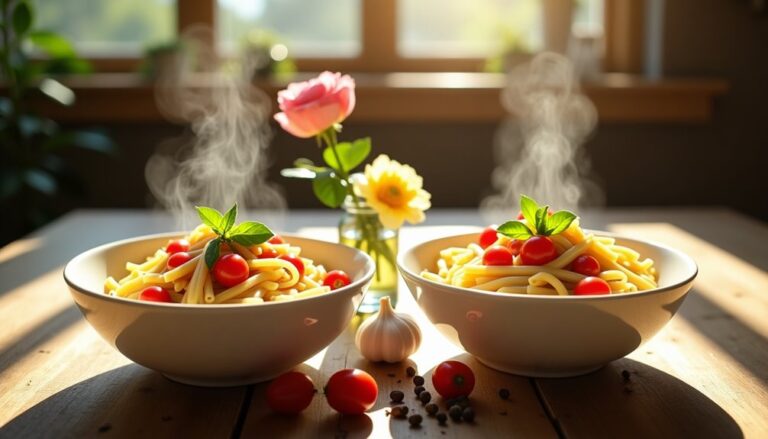
One-Pot Turkey and Vegetable Pasta
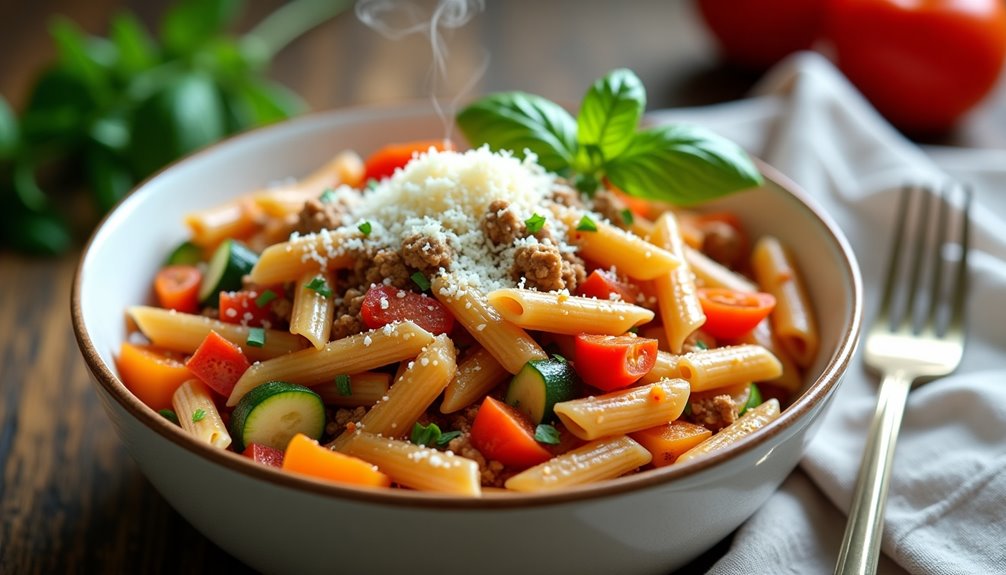
One-pot meals are perfect for busy weeknights when you want to minimize cleanup while still serving a nutritious dinner. This turkey and vegetable pasta combines lean protein, whole grain pasta, and colorful vegetables in a single cooking vessel, making it both convenient and wholesome.
The beauty of this recipe lies in its versatility – you can swap out vegetables based on what's in season or what you have in your refrigerator. The starch from the pasta creates a naturally creamy sauce as it cooks, while the ground turkey adds satisfying protein without excessive fat.
Ingredients:
- 1 lb ground turkey
- 1 medium onion, diced
- 3 cloves garlic, minced
- 2 carrots, sliced
- 2 celery stalks, chopped
- 1 zucchini, diced
- 1 red bell pepper, chopped
- 8 oz whole wheat penne pasta
- 4 cups low-sodium chicken broth
- 1 can (14.5 oz) diced tomatoes
- 2 tbsp olive oil
- 1 tsp Italian seasoning
- 1/2 tsp salt
- 1/4 tsp black pepper
- 1/2 cup grated Parmesan cheese
Heat olive oil in a large pot over medium heat. Add ground turkey, breaking it up with a wooden spoon, and cook until browned. Add onion, garlic, carrots, and celery, cooking until vegetables begin to soften. Stir in the remaining vegetables, pasta, broth, tomatoes, and seasonings. Bring to a boil, then reduce heat and simmer covered for 12-15 minutes, or until pasta is tender and most liquid is absorbed.
For best results, check the pasta's doneness about 2 minutes before the suggested cooking time, as the residual heat will continue cooking the pasta. Stirring occasionally prevents the pasta from sticking to the bottom of the pot. The dish is ready when the pasta is al dente and a small amount of sauce remains.
Greek Yogurt Chicken Salad
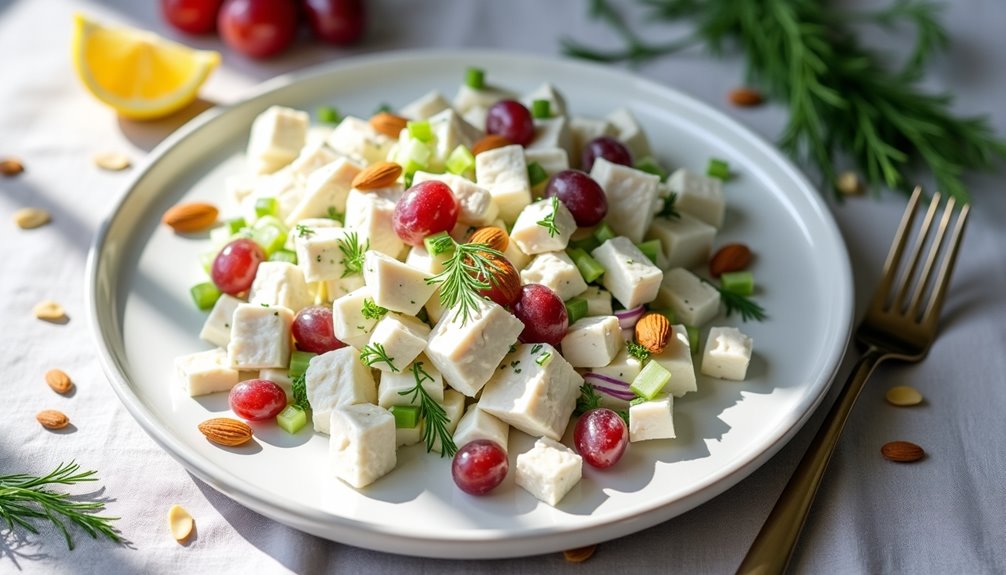
Greek yogurt chicken salad is a healthier twist on the classic chicken salad, replacing mayonnaise with protein-rich Greek yogurt. This substitution not only reduces calories and fat but also adds a tangy flavor profile while maintaining the creamy texture that makes chicken salad so enjoyable.
This versatile dish can be served on a bed of lettuce, between slices of whole-grain bread, or stuffed into a pita pocket. The combination of lean protein from the chicken, calcium from the yogurt, and various vegetables makes it a nutritionally balanced meal that's perfect for lunch or a light dinner.
- 2 cups cooked, diced chicken breast
- 3/4 cup plain Greek yogurt
- 1/4 cup diced red onion
- 1/2 cup diced celery
- 1/2 cup halved grapes
- 1/4 cup chopped almonds
- 1 tablespoon fresh dill
- 1 tablespoon lemon juice
- 1/2 teaspoon garlic powder
- 1/2 teaspoon salt
- 1/4 teaspoon black pepper
- 1/4 teaspoon dried oregano
In a large bowl, combine the Greek yogurt, lemon juice, garlic powder, salt, pepper, and dried oregano. Mix well until all seasonings are evenly distributed throughout the yogurt. Add the diced chicken, red onion, celery, grapes, and almonds to the bowl.
Gently fold all ingredients together until everything is well-coated with the yogurt mixture. Add the fresh dill and give it one final gentle stir. Cover the bowl with plastic wrap and refrigerate for at least 30 minutes to allow the flavors to meld together.
For best results, prepare the chicken salad at least two hours before serving to allow flavors to develop fully. The chicken can be cooked ahead of time – either poached, grilled, or baked – and should be completely cooled before mixing with other ingredients. To prevent the salad from becoming watery, make sure to drain the Greek yogurt and pat the diced vegetables dry before combining them with other ingredients.
20-Minute Teriyaki Rice Bowl
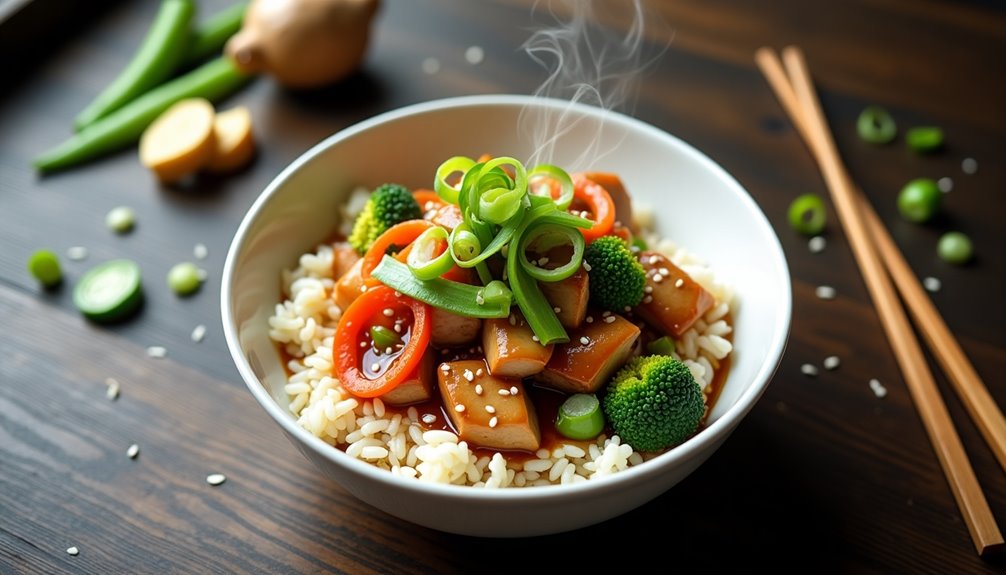
Minute Teriyaki Rice Bowl is a quick and satisfying Asian-inspired dish that combines tender chicken, fresh vegetables, and a savory teriyaki sauce served over steaming rice. This meal delivers the perfect balance of protein, carbohydrates, and vegetables, making it an excellent choice for busy weeknight dinners.
This recipe transforms simple ingredients into a restaurant-quality dish in under 30 minutes. The combination of sweet and savory teriyaki sauce with crisp vegetables and juicy chicken creates a harmonious blend of flavors and textures that will satisfy the whole family.
Ingredients:
- 2 cups cooked white rice
- 1 pound boneless, skinless chicken breasts, cut into bite-sized pieces
- 1 cup broccoli florets
- 1 carrot, julienned
- 1 cup snap peas
- 1/2 cup teriyaki sauce
- 2 tablespoons vegetable oil
- 2 cloves garlic, minced
- 1 tablespoon ginger, grated
- 2 green onions, chopped
- Sesame seeds for garnish
Start by cooking the rice according to package instructions. While the rice cooks, heat vegetable oil in a large skillet over medium-high heat. Add chicken pieces and cook until golden brown, about 5-7 minutes. Add garlic and ginger, cooking for an additional minute until fragrant. Add the vegetables and stir-fry for 3-4 minutes until they're crisp-tender. Pour in the teriyaki sauce, reduce heat to medium-low, and simmer for 2-3 minutes until the sauce thickens slightly and coats the chicken and vegetables evenly.
To serve, divide the rice among bowls, top with the chicken and vegetable mixture, and garnish with chopped green onions and sesame seeds. For best results, make sure the chicken pieces are similar in size for even cooking. Adjust the amount of teriyaki sauce to your taste preference, and don't overcook the vegetables to maintain their crunch and nutritional value.
For optimal results, prep all ingredients before starting to cook, a technique known as "mise en place." This ensures smooth cooking flow and prevents overcooking any components. The dish can be customized with different vegetables based on availability or preference, and leftover rotisserie chicken can be used as a time-saving alternative to raw chicken.
Spinach and Feta Frittata

A spinach and feta frittata combines the rich, savory flavors of eggs and cheese with nutrient-packed spinach. This Mediterranean-inspired dish works perfectly for breakfast, brunch, or even dinner, offering a protein-rich meal that can be served hot or at room temperature.
This versatile recipe can be customized with additional vegetables or herbs, but the classic combination of spinach and feta creates a perfect balance of flavors. The eggs provide a fluffy, custard-like texture while the feta adds a tangy, salty element that complements the earthiness of the spinach.
- 8 large eggs
- 1/2 cup whole milk
- 2 cups fresh spinach, roughly chopped
- 1 cup crumbled feta cheese
- 1 small onion, diced
- 2 cloves garlic, minced
- 2 tablespoons olive oil
- 1/2 teaspoon salt
- 1/4 teaspoon black pepper
- 1/4 teaspoon dried oregano
Preheat the oven to 375°F (190°C). In a large bowl, whisk together eggs, milk, salt, pepper, and oregano until well combined. Heat olive oil in a 10-inch oven-safe skillet over medium heat. Sauté onions until translucent, add garlic and cook for another minute. Add spinach and cook until wilted, about 2-3 minutes.
Pour the egg mixture over the vegetables, then sprinkle feta cheese evenly across the top. Cook on the stovetop for 5-7 minutes until the edges start to set. Transfer the skillet to the preheated oven and bake for 12-15 minutes, or until the eggs are fully set and the top is lightly golden.
For best results, use a well-seasoned cast-iron skillet or non-stick oven-safe pan to prevent sticking. Allow the frittata to rest for 5 minutes before slicing and serving. The leftovers can be stored in an airtight container in the refrigerator for up to 3 days and can be reheated or enjoyed cold.
Quick Tuna and White Bean Salad
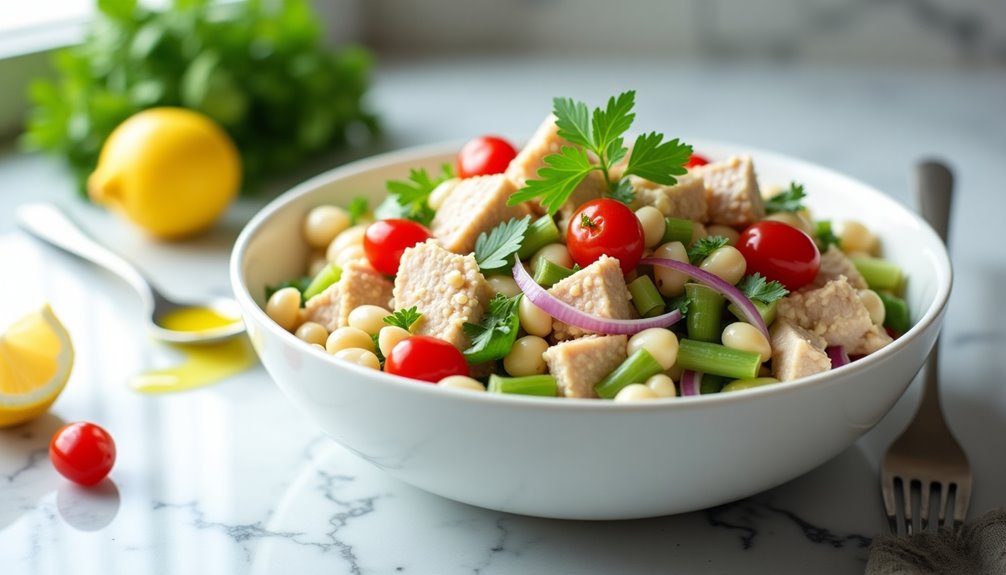
Tuna and white bean salad is a protein-rich Mediterranean-inspired dish that combines the natural flavors of canned tuna with creamy cannellini beans. This refreshing combination creates a satisfying meal that can be prepared in minutes, making it perfect for busy weekdays or light summer dinners.
The beauty of this salad lies in its versatility and simplicity. While the core ingredients remain constant, the dish can be customized with various herbs and vegetables to suit individual tastes, all while maintaining its nutritious profile and quick preparation time.
- 2 (5-ounce) cans chunk light tuna in water, drained
- 1 (15-ounce) can cannellini beans, drained and rinsed
- 1/2 red onion, finely chopped
- 2 celery stalks, diced
- 2 tablespoons extra virgin olive oil
- 2 tablespoons fresh lemon juice
- 1 tablespoon red wine vinegar
- 1 teaspoon dried oregano
- 1/4 cup fresh parsley, chopped
- Salt and black pepper to taste
- Optional: 1 cup cherry tomatoes, halved
Drain and flake the tuna into a large mixing bowl. Add the rinsed cannellini beans, chopped red onion, and diced celery. In a separate small bowl, whisk together the olive oil, lemon juice, red wine vinegar, and oregano to create the dressing. Pour the dressing over the tuna mixture and toss gently to combine. Add the chopped parsley, salt, and pepper, mixing until all ingredients are well incorporated.
Let the salad rest for at least 15 minutes before serving to allow the flavors to meld together. For best results, refrigerate for up to 2 hours before serving, though it can be enjoyed immediately if needed.
For optimal results, use good quality tuna packed in water rather than oil, as this allows better control over the final oil content. The salad can be stored in an airtight container in the refrigerator for up to 3 days, though the vegetables may soften slightly over time. If preparing in advance, consider adding the parsley just before serving to maintain its freshness and color.
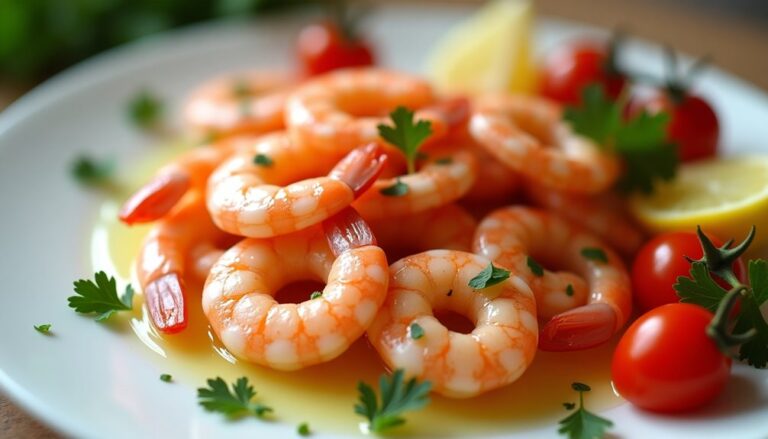
Shrimp and Broccoli Zoodles
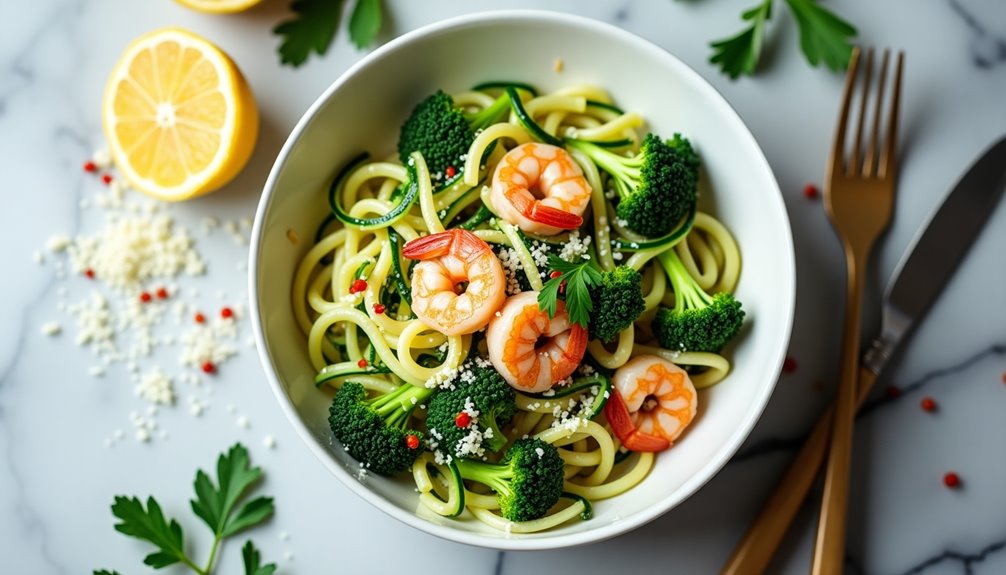
Shrimp and broccoli zoodles combine the fresh taste of spiralized zucchini with succulent seafood and crisp vegetables. This low-carb alternative to traditional pasta dishes delivers a healthy dose of protein, vitamins, and minerals while keeping the calorie count modest.
This quick and easy meal takes less than 30 minutes to prepare, making it perfect for busy weeknight dinners. The combination of garlic, olive oil, and light seasonings creates a delicate sauce that complements the natural flavors of the shrimp and vegetables without overwhelming them.
- 3 medium zucchini
- 1 pound large shrimp, peeled and deveined
- 2 cups broccoli florets
- 4 cloves garlic, minced
- 3 tablespoons olive oil
- 1/2 teaspoon red pepper flakes
- 1 lemon
- Salt and black pepper to taste
- 1/4 cup fresh parsley, chopped
- 2 tablespoons grated Parmesan cheese (optional)
Using a spiralizer, transform the zucchini into noodles and set aside. Heat olive oil in a large skillet over medium heat, then add minced garlic and red pepper flakes. Cook until fragrant, about 30 seconds. Add shrimp to the pan and cook for 2-3 minutes per side until pink. Remove shrimp and set aside. In the same pan, add broccoli florets and cook for 3-4 minutes until bright green and slightly tender. Add the zucchini noodles and cook for 2-3 minutes until just softened but still firm. Return shrimp to the pan, squeeze fresh lemon juice over everything, and toss to combine. Season with salt and pepper, then garnish with fresh parsley and Parmesan if desired.
For best results, avoid overcooking the zoodles as they can become watery and mushy. Pat the spiralized zucchini with paper towels before cooking to remove excess moisture, and consider salting them lightly and letting them sit for 10 minutes to draw out water. The zoodles should be the last ingredient cooked to maintain their texture, and the dish should be served immediately for optimal taste and presentation.
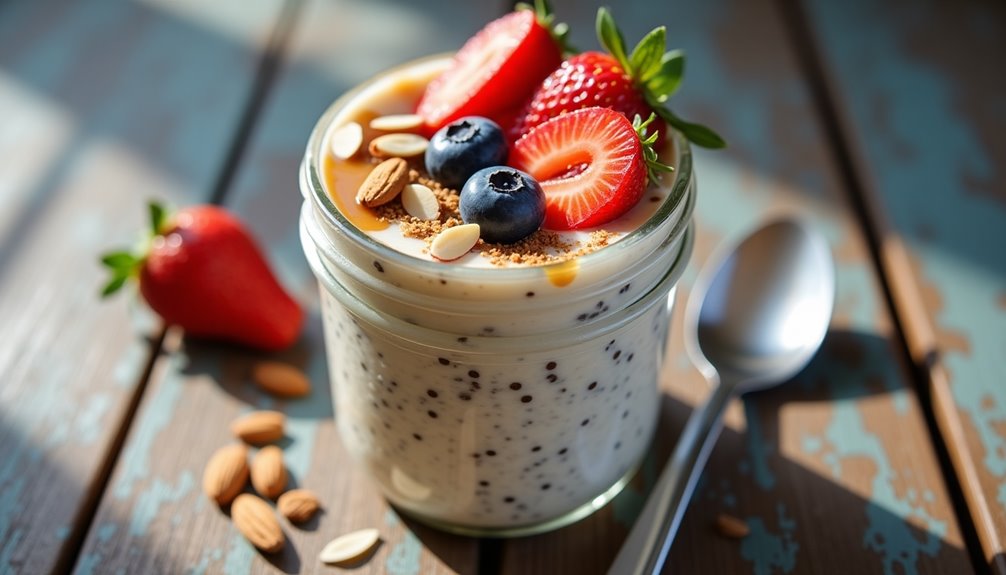
Overnight Chia Protein Oats
[TEXT]:
Overnight chia protein oats is a nutrient-dense breakfast that combines the power of protein-rich ingredients with the convenience of overnight preparation. This no-cook method allows the oats and chia seeds to absorb liquid and soften naturally, creating a creamy, pudding-like consistency by morning.
This versatile dish packs a nutritional punch with complete proteins from both the chia seeds and added protein powder, while offering sustained energy through complex carbohydrates from the oats. The combination also provides essential omega-3 fatty acids, fiber, and various micronutrients that support overall health and keep you feeling satisfied until lunch.
Ingredients:
- 1/2 cup rolled oats
- 1 tablespoon chia seeds
- 1 scoop (30g) protein powder of choice
- 1 cup milk (dairy or plant-based)
- 1 tablespoon maple syrup or honey
- 1/4 teaspoon vanilla extract
- 1/8 teaspoon cinnamon
- Pinch of salt
- Optional toppings: fresh fruits, nuts, seeds, nut butter
In a mason jar or container with a lid, combine the rolled oats, chia seeds, and protein powder. Add the milk, sweetener, vanilla extract, cinnamon, and salt. Stir thoroughly until all ingredients are well combined, making sure there are no protein powder clumps remaining. Seal the container and refrigerate overnight or for at least 6 hours.
In the morning, give the mixture a good stir. If the consistency is too thick, add a splash more milk to achieve your desired texture. Top with your choice of fresh fruits, nuts, seeds, or a drizzle of nut butter before serving.
For best results, use old-fashioned rolled oats rather than quick oats or steel-cut oats, as they provide the ideal texture. The mixture can be stored in the refrigerator for up to 3 days, making it perfect for meal prep. If using flavored protein powder, adjust the sweetener accordingly, and consider mixing the protein powder with a small amount of liquid first to prevent clumping.
[DIRECTIONS]:
Overnight chia protein oats is a nutrient-dense breakfast that combines the power of protein-rich ingredients with the convenience of overnight preparation. This no-cook method allows the oats and chia seeds to absorb liquid and soften naturally, creating a creamy, pudding-like consistency by morning.
This versatile dish packs a nutritional punch with complete proteins from both the chia seeds and added protein powder, while offering sustained energy through complex carbohydrates from the oats. The combination also provides essential omega-3 fatty acids, fiber, and various micronutrients that support overall health and keep you feeling satisfied until lunch.
In a mason jar or container with a lid, combine the rolled oats, chia seeds, and protein powder. Add the milk, sweetener, vanilla extract, cinnamon, and salt. Stir thoroughly until all ingredients are well combined, making sure there are no protein powder clumps remaining. Seal the container and refrigerate overnight or for at least 6 hours.
In the morning, give the mixture a good stir. If the consistency is too thick, add a splash more milk to achieve your desired texture. Top with your choice of fresh fruits, nuts, seeds, or a drizzle of nut butter before serving.
For best results, use old-fashioned rolled oats rather than quick oats or steel-cut oats, as they provide the ideal texture. The mixture can be stored in the refrigerator for up to 3 days, making it perfect for meal prep. If using flavored protein powder, adjust the sweetener accordingly, and consider mixing the protein powder with a small amount of liquid first to prevent clumping.
Thai-Inspired Peanut Noodles
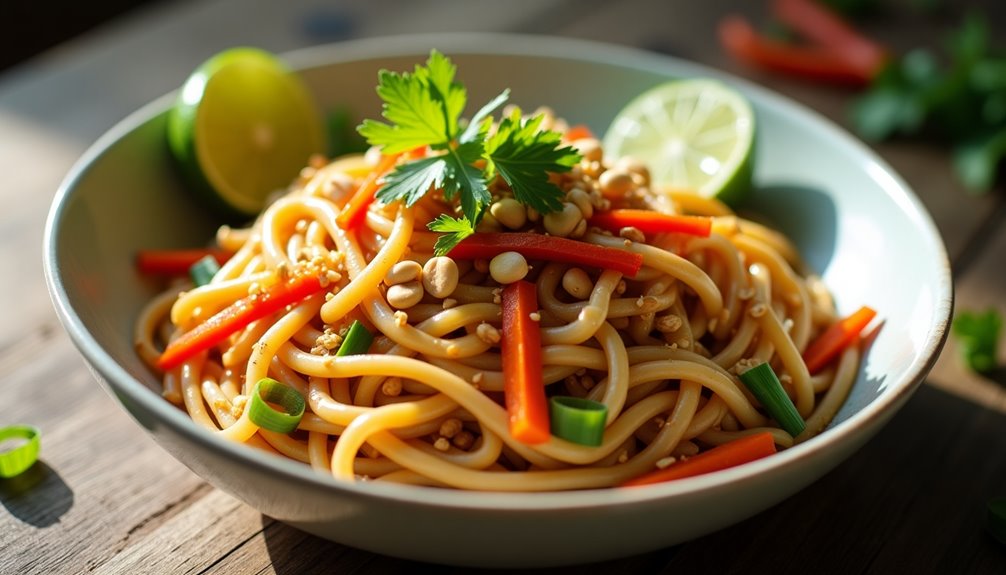
Thai-Inspired Peanut Noodles blend the rich, creamy flavors of peanut sauce with tender noodles and fresh vegetables. This satisfying dish delivers a perfect balance of sweet, savory, and tangy notes that characterize Thai cuisine, while offering a healthy dose of protein and nutrients.
This versatile recipe can be served hot or cold, making it ideal for both dinner and next-day lunch. The dish comes together in under 30 minutes, and the sauce can be prepared ahead of time for even quicker assembly. While rice noodles are traditional, any long pasta like spaghetti or linguine works well.
Ingredients:
- 8 oz rice noodles or linguine
- 1/2 cup natural peanut butter
- 3 tablespoons soy sauce
- 2 tablespoons rice vinegar
- 2 tablespoons honey
- 1 tablespoon sesame oil
- 2 cloves garlic, minced
- 1 tablespoon ginger, grated
- 1/4 cup warm water
- 1 red bell pepper, sliced
- 2 carrots, julienned
- 2 green onions, chopped
- 1/4 cup chopped cilantro
- 1/4 cup crushed peanuts
- 1 lime, cut into wedges
Cook the noodles according to package instructions until al dente. While the noodles cook, whisk together peanut butter, soy sauce, rice vinegar, honey, sesame oil, garlic, ginger, and warm water in a bowl until smooth. Prepare the vegetables and set aside.
Drain the noodles and rinse with cold water to stop the cooking process. Transfer the noodles to a large bowl and toss with the peanut sauce until well coated. Add the bell pepper, carrots, and half of the green onions, mixing gently to combine.
For best results, let the dish sit for 10-15 minutes before serving to allow the flavors to meld. The sauce will thicken as it sits, so reserve some pasta cooking water to thin the sauce if needed. Store leftovers in an airtight container in the refrigerator for up to three days, bringing to room temperature before serving.
Veggie-Packed Turkey Wrap
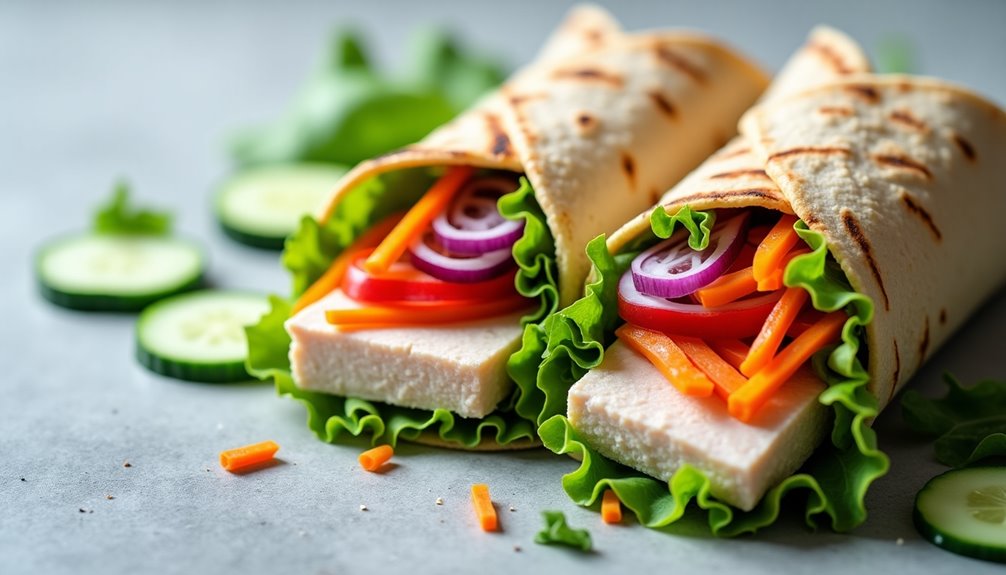
A veggie-packed turkey wrap offers a balanced combination of lean protein and fresh vegetables, making it an ideal choice for a nutritious lunch or light dinner. The versatility of this dish allows for endless customization while maintaining its healthy profile.
This recipe creates two substantial wraps that can be prepared in advance and stored in the refrigerator for up to 24 hours, perfect for meal prep or packed lunches. The key to a successful wrap lies in the proper distribution of ingredients and a careful rolling technique to prevent spillage.
Ingredients:
- 2 large whole wheat tortillas
- 4 slices lean turkey breast
- 1 cup mixed salad greens
- 1/2 cucumber, thinly sliced
- 1 medium carrot, julienned
- 1/2 red bell pepper, thinly sliced
- 1/4 red onion, thinly sliced
- 2 tablespoons hummus
- 1 tablespoon olive oil
- 1 teaspoon Dijon mustard
- Salt and pepper to taste
Lay out the tortillas on a clean, flat surface and spread one tablespoon of hummus on each tortilla, leaving a one-inch border around the edges. Layer the turkey slices evenly across the hummus. Arrange the vegetables in neat rows across the turkey, starting with the salad greens, followed by cucumber, carrot, bell pepper, and red onion.
Drizzle the olive oil over the vegetables and add a small amount of Dijon mustard. Season with salt and pepper to taste. To roll the wrap, fold in both sides of the tortilla about an inch, then tightly roll from the bottom up, keeping the ingredients compact as you go. Cut each wrap diagonally in half before serving.
For best results, slightly warm the tortillas before assembling to make them more pliable and less likely to tear. If preparing in advance, wrap tightly in parchment paper or plastic wrap, and store in an airtight container. Avoid using too many wet ingredients as they can make the tortilla soggy, and consider patting vegetables dry with paper towels before adding them to the wrap.
5-Ingredient Lentil Soup

Lentil soup is a hearty, nutritious dish that has been a staple in many cultures for thousands of years. This protein-rich legume creates a filling meal that's perfect for cold weather and can be easily customized with various vegetables and seasonings.
The beauty of lentil soup lies in its simplicity and affordability. Red lentils cook quickly and break down to create a creamy texture, while green or brown lentils hold their shape better and provide more texture. This recipe uses brown lentils for a traditional, rustic soup that maintains its consistency even after reheating.
- 2 cups brown lentils
- 2 tablespoons olive oil
- 1 large onion, diced
- 3 carrots, chopped
- 3 celery stalks, chopped
- 4 garlic cloves, minced
- 2 bay leaves
- 1 teaspoon ground cumin
- 1 teaspoon paprika
- 8 cups vegetable or chicken broth
- 1 can (14 oz) diced tomatoes
- Salt and pepper to taste
- Fresh parsley for garnish
Sort and rinse the lentils, removing any debris or damaged ones. Heat olive oil in a large pot over medium heat and sauté onions, carrots, and celery until softened, about 5-7 minutes. Add garlic, cumin, and paprika, cooking for another minute until fragrant. Pour in the broth, lentils, diced tomatoes, and bay leaves. Bring to a boil, then reduce heat and simmer covered for 35-40 minutes, or until lentils are tender but not mushy.
Season with salt and pepper to taste, remove bay leaves, and garnish with fresh parsley before serving. For a smoother consistency, you can blend a portion of the soup and return it to the pot.
For best results, avoid adding salt until the lentils are fully cooked, as salt can toughen them during cooking. The soup can be stored in an airtight container in the refrigerator for up to 5 days, and it often tastes better the next day as the flavors continue to develop. If the soup becomes too thick during storage, thin it with additional broth when reheating.
Mexican Black Bean Skillet
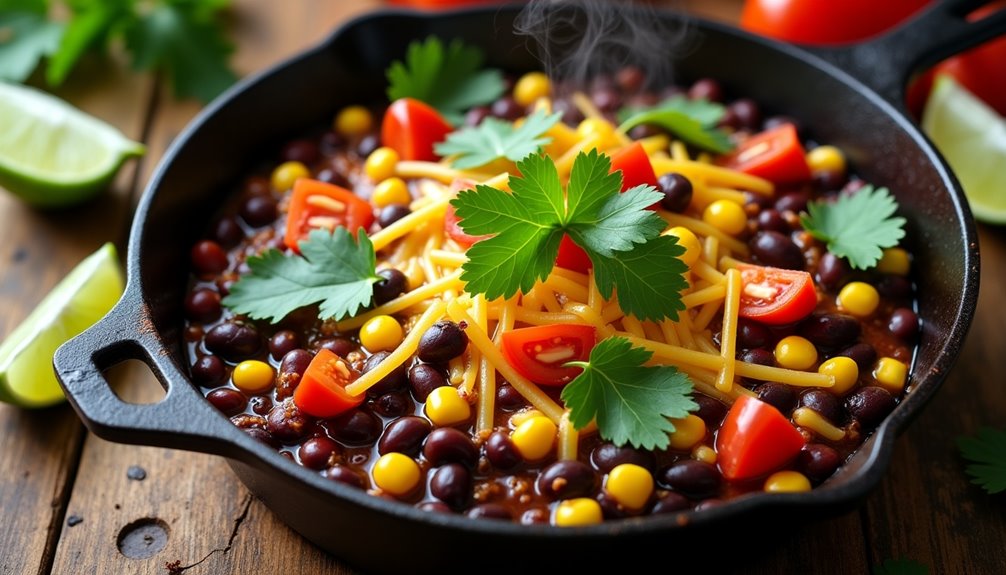
Mexican Black Bean Skillet is a vibrant, protein-rich dish that combines the earthy flavors of black beans with colorful vegetables and Mexican spices. This one-pan meal delivers a satisfying combination of textures and tastes while providing essential nutrients like fiber, protein, and vitamins.
This versatile recipe can be served as a main dish or side dish, working equally well for lunch or dinner. The dish comes together in under 30 minutes, making it perfect for busy weeknights, and any leftovers can be repurposed into burritos or taco fillings the next day.
Ingredients:
- 2 cans (15 oz each) black beans, drained and rinsed
- 1 red bell pepper, diced
- 1 medium onion, chopped
- 3 cloves garlic, minced
- 1 cup corn kernels
- 2 tomatoes, diced
- 2 tablespoons olive oil
- 1 tablespoon chili powder
- 1 teaspoon ground cumin
- 1 teaspoon oregano
- Salt and pepper to taste
- Fresh cilantro for garnish
- 1 lime, cut into wedges
- 1 cup shredded cheese (optional)
Heat olive oil in a large skillet over medium heat. Add onions and bell peppers, cooking until softened, about 5 minutes. Add garlic and spices, stirring frequently for 1 minute until fragrant. Add black beans, corn, and tomatoes to the skillet. Reduce heat to medium-low and simmer for 10-15 minutes, stirring occasionally, until the mixture thickens slightly and the flavors meld together. If using cheese, sprinkle it on top and cover the skillet until melted. Garnish with fresh cilantro and serve with lime wedges.
For best results, don't skip draining and rinsing the black beans, as this removes excess sodium and improves the overall texture of the dish. The skillet can be covered while cooking if the mixture becomes too dry, and a splash of vegetable broth can be added for extra moisture. Store leftovers in an airtight container in the refrigerator for up to 3 days.
Power Green Smoothie Bowl
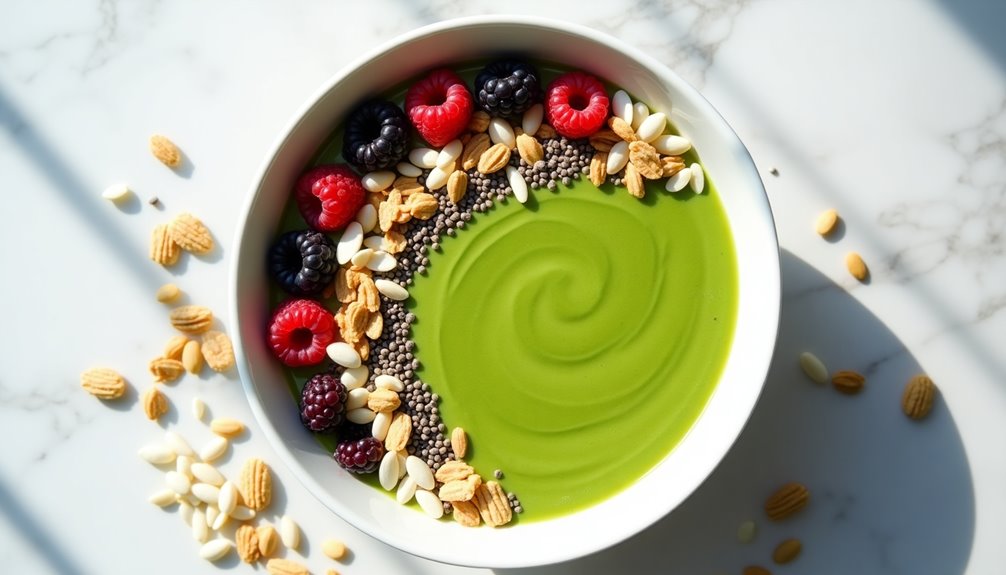
The Power Green Smoothie Bowl is a nutrient-packed breakfast or snack option that combines the goodness of leafy greens with the natural sweetness of fruits. This vibrant bowl provides essential vitamins, minerals, and antioxidants while offering a satisfying and refreshing eating experience.
This recipe is highly customizable and can be adapted based on seasonal ingredients or personal preferences. The thick smoothie base creates the perfect canvas for various toppings, making each bowl both visually appealing and texturally interesting.
Ingredients:
- 2 cups fresh spinach
- 1 ripe banana, frozen
- 1 cup frozen mango chunks
- 1/2 green apple
- 1 tablespoon chia seeds
- 1 cup unsweetened almond milk
- 1 scoop vanilla protein powder (optional)
- 1/2 cup fresh berries for topping
- 2 tablespoons granola
- 1 tablespoon hemp seeds
- 1 tablespoon pumpkin seeds
- 1 tablespoon coconut flakes
Add spinach, frozen banana, mango chunks, green apple, chia seeds, and almond milk to a high-speed blender. Blend on high until smooth and creamy, adding more almond milk if needed to achieve desired consistency. The mixture should be thicker than a regular smoothie to support the toppings.
Pour the smoothie base into a bowl and arrange toppings in sections: fresh berries, granola, hemp seeds, pumpkin seeds, and coconut flakes. For best results, serve immediately while the base is cold and thick.
For optimal texture and temperature, freeze the fruit at least 6 hours before preparation, and use a powerful blender to ensure a smooth consistency. If the mixture becomes too thick during blending, add liquid in small increments to avoid making it too runny. The bowl can be made ahead and frozen for up to 2 hours, but the texture is best when served immediately.
Mushroom and Egg Breakfast Hash

Mushroom and egg breakfast hash is a hearty morning meal that combines earthy mushrooms, crispy potatoes, and perfectly cooked eggs. This versatile dish can be customized with different mushroom varieties and seasonings to suit individual tastes while providing a satisfying blend of proteins and carbohydrates.
The key to a successful breakfast hash lies in achieving the right texture – crispy potatoes on the outside while tender inside, properly sautéed mushrooms that release their natural flavors, and eggs cooked to your preferred doneness. This recipe serves 4 people and takes approximately 30 minutes to prepare.
- 4 medium potatoes, diced
- 8 oz mixed mushrooms, sliced
- 4 large eggs
- 1 medium onion, diced
- 3 cloves garlic, minced
- 2 tablespoons olive oil
- 1 tablespoon butter
- 1 teaspoon paprika
- 1 teaspoon thyme
- Salt and pepper to taste
- Fresh parsley for garnish
Heat olive oil in a large skillet over medium-high heat. Add diced potatoes and cook for 10-12 minutes, stirring occasionally until they begin to crisp. Add onions and continue cooking for 5 minutes until they become translucent. Stir in mushrooms, garlic, paprika, and thyme, cooking for another 5-7 minutes until mushrooms are golden brown.
Create four wells in the hash mixture and crack an egg into each. Reduce heat to medium-low, cover the skillet, and cook for 4-5 minutes until egg whites are set but yolks remain runny. Season with salt and pepper, and garnish with fresh parsley before serving.
For best results, pat the diced potatoes dry with paper towels before cooking to achieve maximum crispiness. If using different mushroom varieties, adjust cooking times accordingly as some mushrooms release more moisture than others. The dish can be made ahead up to the egg-adding stage and reheated when ready to serve, adding fresh eggs at that time.