15 Quick Sports Night Meals
You've got a packed sports schedule, and your family needs quick, nutritious meals to stay energized. These 15 sports night dinners will help you get food on the table in 30 minutes or less, without sacrificing flavor or nutrition. From sheet pan fajitas to power-packed pasta bowls, each recipe combines lean proteins, complex carbs, and colorful vegetables. Let's explore how these make-ahead friendly options can transform your busy weeknight routine.
Sheet Pan Chicken Fajitas
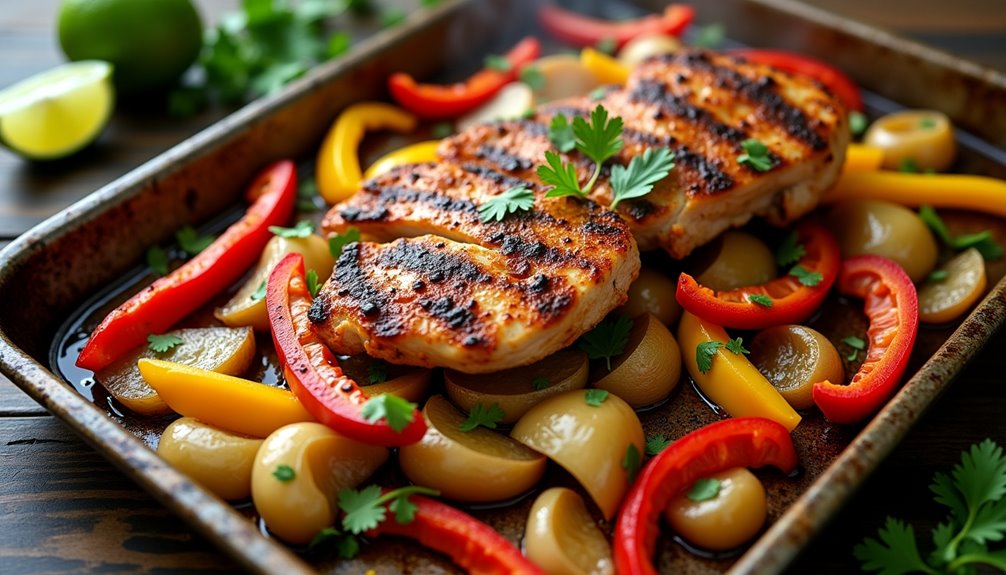
Sheet Pan Chicken Fajitas are a game-changing weeknight meal that brings the sizzling flavors of Mexican cuisine to your dinner table with minimal cleanup. The combination of well-seasoned chicken strips, colorful bell peppers, and onions creates a delicious blend of textures and tastes that's perfect for busy families.
This one-pan wonder transforms traditional stovetop fajitas into an oven-baked feast that requires less attention and produces consistently excellent results. The high heat of the sheet pan creates a beautiful caramelization on the vegetables while keeping the chicken tender and juicy.
- 2 lbs chicken breasts, sliced into strips
- 3 bell peppers (red, yellow, green), sliced
- 2 large onions, sliced
- 3 tablespoons olive oil
- 2 teaspoons chili powder
- 1 teaspoon cumin
- 1 teaspoon paprika
- 1 teaspoon garlic powder
- 1 teaspoon oregano
- 1 teaspoon salt
- ½ teaspoon black pepper
- 12 flour tortillas
- Lime wedges for serving
Preheat your oven to 425°F (220°C). In a large bowl, combine the chicken strips, sliced peppers, and onions with olive oil and all the seasonings, ensuring everything is evenly coated. Spread the mixture onto a large sheet pan in a single layer, making sure not to overcrowd the pan.
Bake for 20-25 minutes, stirring halfway through, until the chicken is cooked through and the vegetables are tender with slightly charred edges. While the fajita mixture cooks, warm the tortillas either in the microwave or in a dry skillet.
For best results, use a heavy-duty sheet pan to prevent warping at high temperatures, and avoid lining it with parchment paper as this can prevent proper caramelization. If serving a larger group, consider using two sheet pans rather than overcrowding one, as overcrowding will lead to steaming rather than roasting, resulting in less flavorful fajitas.
20-Minute Turkey Taco Bowls
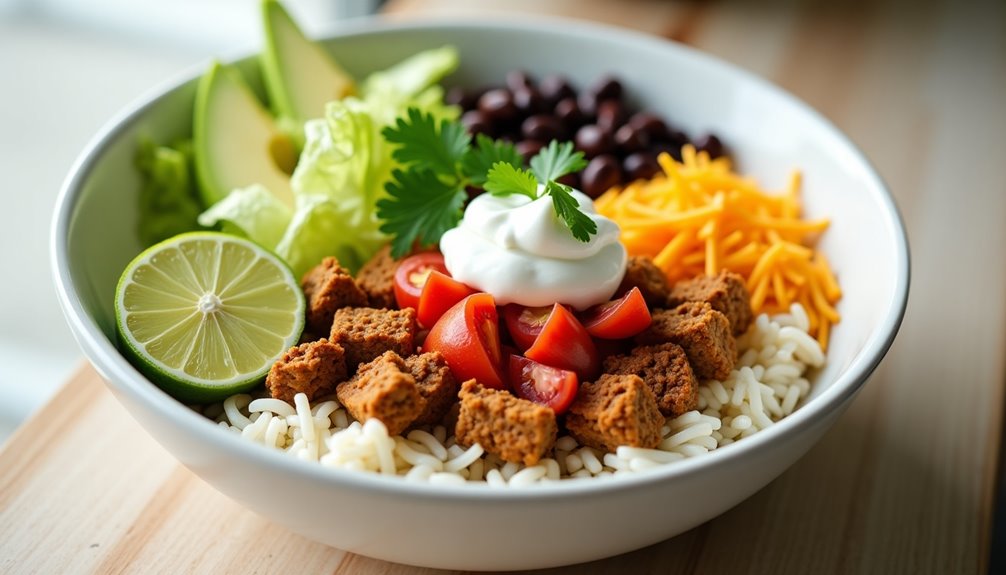
Minute Turkey Taco Bowls create a perfect balance of protein, carbs, and fresh vegetables in a convenient bowl format that's ideal for busy athletes and active families. This quick-assembly meal delivers essential nutrients while satisfying those Mexican food cravings, all in a healthier package than traditional tacos.
The beauty of these taco bowls lies in their versatility and prep speed. Ready in about 15 minutes, they're customizable to individual preferences and dietary needs, making them an excellent choice for feeding a diverse group of hungry athletes or family members after practice or games.
- 1 pound lean ground turkey
- 1 packet taco seasoning
- 2 cups cooked rice
- 1 can black beans, drained and rinsed
- 2 cups chopped lettuce
- 1 cup diced tomatoes
- 1 cup shredded cheddar cheese
- 1 cup corn kernels
- 1 avocado, sliced
- Sour cream for topping
- Fresh cilantro
- Lime wedges
Brown the ground turkey in a large skillet over medium-high heat, breaking it into small pieces as it cooks. Once no pink remains, drain any excess fat and add the taco seasoning along with water according to the packet instructions. Simmer for 3-5 minutes until the sauce thickens around the meat.
Assemble the bowls by starting with a base of warm rice, followed by a generous portion of the seasoned turkey. Layer on the black beans, corn, lettuce, tomatoes, cheese, and avocado slices. Top with a dollop of sour cream, fresh cilantro, and a squeeze of lime juice.
To maximize efficiency and nutrition, prep ingredients in advance and store them separately in the refrigerator. The rice can be made ahead and reheated, while the turkey mixture stays good for up to three days when properly stored. Consider using brown rice for added fiber and nutrients, and don't skip the lime juice – it adds brightness and helps prevent the avocado from browning.
Quick Pesto Pasta With Rotisserie Chicken
The beauty of this recipe lies in its versatility and speed. While homemade pesto is wonderful, using quality store-bought pesto saves precious minutes without compromising taste. The rotisserie chicken adds lean protein and can be picked up from the grocery store on your way home.
Ingredients:
- 1 pound penne pasta
- 1 rotisserie chicken, meat removed and shredded
- 1 cup prepared pesto
- 2 tablespoons olive oil
- 1 cup cherry tomatoes, halved
- 1/2 cup grated Parmesan cheese
- 1/4 cup pine nuts (optional)
- Salt and black pepper to taste
- Red pepper flakes (optional)
Cook the pasta in salted water according to package directions until al dente. While the pasta cooks, shred the rotisserie chicken and halve the tomatoes. Reserve 1 cup of pasta cooking water before draining.
Return the pasta to the pot and toss with olive oil, pesto, shredded chicken, and tomatoes. If the mixture seems dry, add pasta water a few tablespoons at a time until you reach desired consistency.
Top each serving with grated Parmesan, pine nuts if using, and season with salt and pepper to taste. For those who enjoy a bit of heat, sprinkle with red pepper flakes.
For best results, don't rinse the pasta after cooking – the starch helps the sauce cling better. The dish can be made ahead and reheated, though you may need to add a splash of olive oil or pasta water when rewarming. To add more vegetables, consider mixing in baby spinach, roasted red peppers, or sautéed mushrooms.
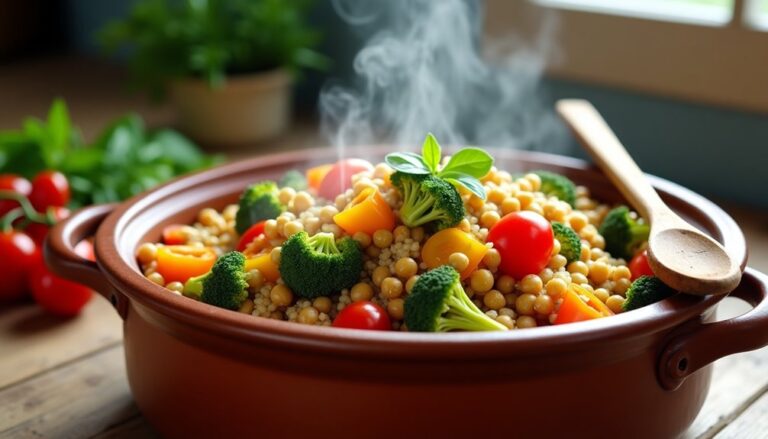
One-Pot Mediterranean Quinoa

One-Pot Mediterranean Quinoa combines the protein-rich ancient grain with classic Mediterranean flavors for a wholesome and satisfying meal. This versatile dish incorporates sun-dried tomatoes, olives, artichokes, and feta cheese, creating a perfect balance of savory, tangy, and salty notes.
This recipe is ideal for busy weeknights when you need a nutritious meal but don't want to spend hours in the kitchen or clean multiple pots and pans. The quinoa absorbs the flavors of the Mediterranean ingredients while cooking, resulting in a dish that's both filling and flavorful.
- 1 cup quinoa, rinsed
- 2 cups vegetable broth
- 1/2 cup sun-dried tomatoes, chopped
- 1 cup artichoke hearts, quartered
- 1/2 cup Kalamata olives, pitted and halved
- 1 cup cherry tomatoes, halved
- 2 cloves garlic, minced
- 1 tablespoon olive oil
- 1 teaspoon dried oregano
- 1/2 teaspoon dried basil
- 1/4 cup fresh parsley, chopped
- 1/2 cup crumbled feta cheese
- Salt and pepper to taste
- 2 cups fresh spinach
Heat olive oil in a large pot over medium heat. Add minced garlic and sauté until fragrant, about 1 minute. Add the rinsed quinoa and toast for 2-3 minutes, stirring frequently. Pour in the vegetable broth, sun-dried tomatoes, oregano, and basil. Bring to a boil, then reduce heat to low, cover, and simmer for 15 minutes.
Once the quinoa is almost done, stir in the artichoke hearts, olives, cherry tomatoes, and spinach. Cover and cook for an additional 3-5 minutes until the spinach wilts and the quinoa is fully cooked. Remove from heat and let stand covered for 5 minutes. Fluff with a fork, then gently fold in the fresh parsley and feta cheese.
For best results, rinse the quinoa thoroughly before cooking to remove its natural coating called saponin, which can make it taste bitter. This dish can be served hot or cold, and leftovers will keep well in the refrigerator for up to 4 days. If you're meal prepping, consider adding the feta cheese just before serving to maintain its texture.
Easy Beef and Broccoli Stir-Fry
Sports nights call for quick, nutritious meals that can fuel young athletes while fitting into busy schedules. This easy beef and broccoli stir-fry delivers protein, vegetables, and carbohydrates in a single dish that can be prepared in under 30 minutes.
This classic Asian-inspired dish combines tender strips of beef with crisp broccoli florets in a savory sauce. The meal provides essential nutrients for active individuals and can be served over rice or noodles to create a complete dinner that satisfies hungry athletes and their families.
- 1 pound flank steak, sliced thin against the grain
- 4 cups fresh broccoli florets
- 3 tablespoons vegetable oil
- 3 cloves garlic, minced
- 1 tablespoon fresh ginger, minced
- 1/4 cup soy sauce
- 2 tablespoons oyster sauce
- 1 tablespoon cornstarch
- 1/2 cup beef broth
- 1 tablespoon brown sugar
- Salt and pepper to taste
Marinate the sliced beef in 1 tablespoon soy sauce and 1 teaspoon cornstarch for 15 minutes. Heat oil in a large wok or skillet over high heat. Cook the beef in batches until browned, about 2-3 minutes per batch, then remove and set aside. In the same pan, stir-fry garlic and ginger for 30 seconds, then add broccoli and cook for 3-4 minutes.
Mix remaining soy sauce, oyster sauce, cornstarch, beef broth, and brown sugar in a bowl. Return beef to the pan with broccoli, pour in the sauce mixture, and cook until the sauce thickens and coats the ingredients evenly, about 2-3 minutes. Season with salt and pepper to taste.
For best results, slice the beef as thinly as possible and ensure the wok or skillet is very hot before cooking. This helps achieve the proper sear on the meat while keeping it tender. The broccoli should remain crisp-tender rather than overcooked, and the sauce can be adjusted with additional broth if it becomes too thick.
Loaded Sweet Potato Bar
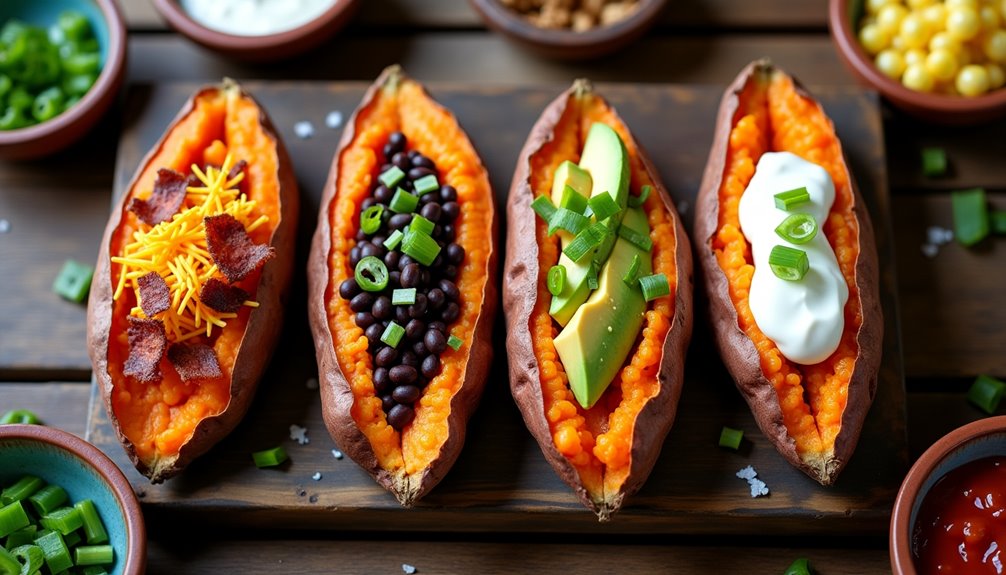
A loaded sweet potato bar is a versatile and nutritious meal option that's perfect for sports nights when you need to feed a crowd. The natural sweetness of the potatoes pairs wonderfully with both savory and sweet toppings, making it an excellent choice for picky eaters and health-conscious athletes alike.
The beauty of this dish lies in its customization potential. While the sweet potatoes serve as the foundation, the toppings can be adjusted to accommodate various dietary preferences and nutritional needs, from protein-rich options for muscle recovery to complex carbohydrates for sustained energy.
Ingredients:
- 8 medium sweet potatoes
- 2 tablespoons olive oil
- 1 teaspoon sea salt
- 1/2 cup sour cream
- 1 cup black beans, drained and rinsed
- 1 cup corn kernels
- 1 cup shredded cheese
- 4 green onions, chopped
- 1/2 cup crispy bacon bits
- 1 avocado, diced
- 2 tablespoons butter
- Salt and pepper to taste
Preheat the oven to 400°F (200°C). Wash the sweet potatoes and pat them dry. Prick each potato several times with a fork, then rub them with olive oil and sprinkle with sea salt. Place the potatoes directly on the oven rack or on a baking sheet lined with foil. Bake for 45-60 minutes, or until they're tender when pierced with a fork.
While the potatoes are baking, prepare your toppings by warming the black beans, cooking the bacon if using fresh, and chopping the vegetables. Once the potatoes are done, slice them lengthwise and gently squeeze the ends to open them up. Add a pat of butter to each potato while still hot, then let your guests customize their potatoes with their preferred toppings.
When preparing this dish for a sports night, timing is crucial. The potatoes can be baked up to 2 hours in advance and kept warm in a low-temperature oven (170°F). To maintain food safety, keep cold toppings refrigerated until serving time, and hot toppings should be kept warm in slow cookers or chafing dishes if serving a larger group.
Five-Ingredient Chicken Teriyaki Rice
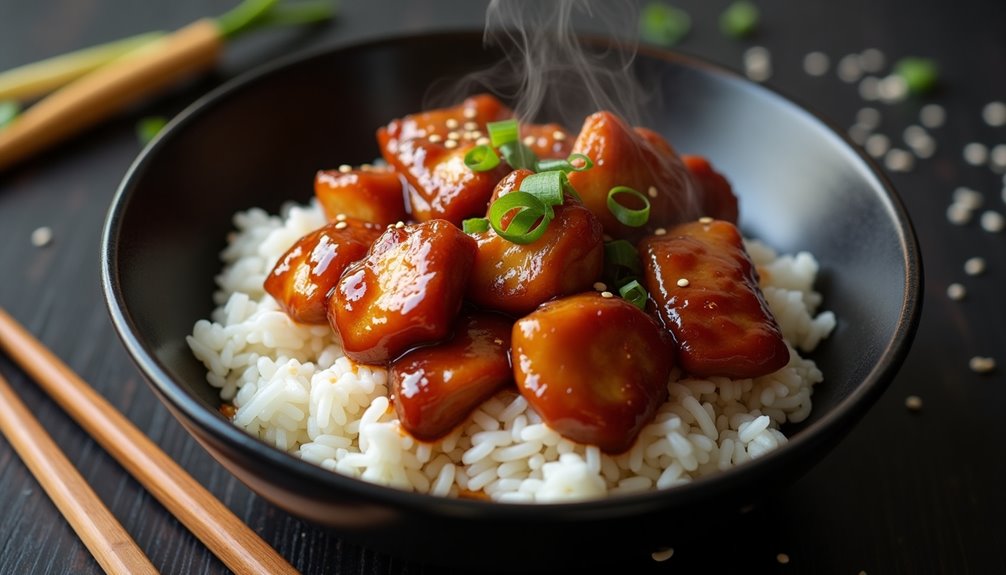
Five-Ingredient Chicken Teriyaki Rice delivers the perfect balance of sweet and savory flavors in a convenient one-pan meal. This simplified version of the classic Japanese dish requires minimal ingredients while maintaining the authentic taste that makes teriyaki chicken a family favorite.
This recipe specifically caters to busy weeknight dinners, taking less than 30 minutes to prepare from start to finish. The combination of tender chicken pieces, fluffy rice, and homemade teriyaki sauce creates a satisfying meal that rivals takeout versions while being more economical and healthier.
- 2 chicken breasts, cut into bite-sized pieces
- 2 cups white rice
- 1/2 cup teriyaki sauce
- 4 cups water
- 2 tablespoons vegetable oil
Start by rinsing the rice thoroughly until the water runs clear. Heat vegetable oil in a large skillet over medium-high heat. Add the chicken pieces and cook until golden brown on all sides, approximately 5-7 minutes. Remove the chicken and set aside.
Add the rice to the same skillet, followed by water and half of the teriyaki sauce. Bring to a boil, then reduce heat to low and cover. Simmer for 15 minutes or until rice is tender. Return the chicken to the pan, add the remaining teriyaki sauce, and cook for an additional 3-5 minutes until everything is heated through and well combined.
For best results, use jasmine or short-grain rice for optimal texture, and allow the dish to rest for 5 minutes after cooking before serving. If the sauce becomes too thick, add a tablespoon of water at a time to reach desired consistency. Store leftovers in an airtight container in the refrigerator for up to three days.
Protein-Packed Black Bean Burritos
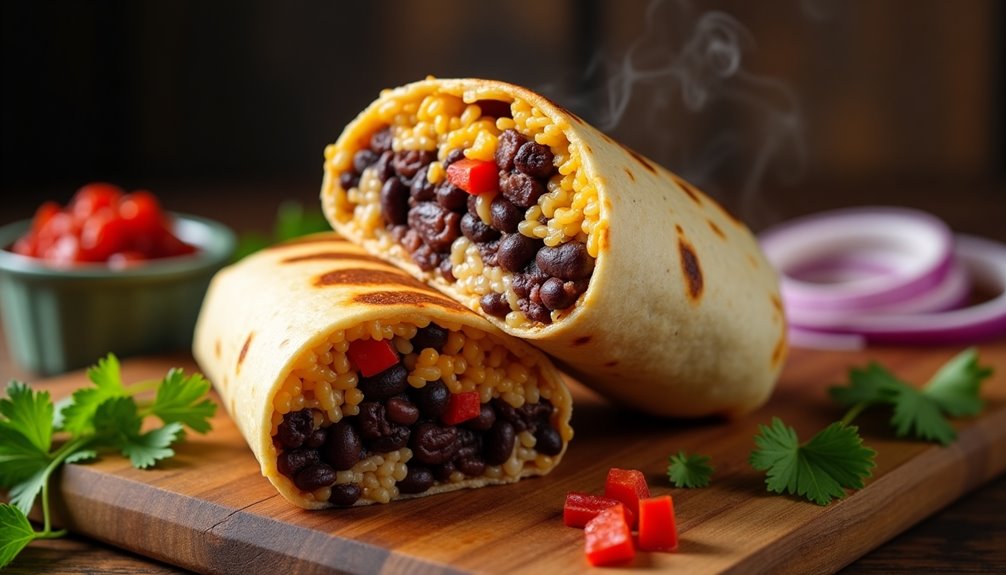
Black bean burritos are a perfect choice for athletes seeking a balanced meal before evening games or practices. These protein-rich wraps provide sustained energy through complex carbohydrates while delivering essential nutrients needed for performance and recovery.
This vegetarian-friendly recipe combines the heartiness of black beans with fresh vegetables and warm Mexican spices, all wrapped in a soft tortilla. The combination creates a portable meal that can be eaten 2-3 hours before physical activity without causing digestive discomfort.
- 8 large flour tortillas
- 2 cans (15 oz each) black beans, drained and rinsed
- 1 cup cooked brown rice
- 1 red bell pepper, diced
- 1 small onion, diced
- 2 cloves garlic, minced
- 1 cup shredded cheese
- 1 tablespoon olive oil
- 1 teaspoon ground cumin
- 1 teaspoon chili powder
- ½ teaspoon paprika
- Salt and pepper to taste
- Optional: salsa, guacamole, sour cream
Heat olive oil in a large skillet over medium heat. Sauté onions and bell peppers until softened, about 5 minutes. Add garlic and cook for another minute. Add black beans, spices, and 2 tablespoons of water. Simmer for 5-7 minutes, mashing some beans slightly to create a creamy texture. Stir in the cooked rice and heat through.
Warm tortillas according to package directions. Place about ½ cup of the bean mixture in the center of each tortilla. Top with cheese and any optional ingredients. Fold the sides of the tortilla over the filling, then roll from bottom to top, creating a tight wrap. If desired, return filled burritos to a clean skillet and heat seam-side down until golden brown.
These burritos can be made ahead and frozen for up to three months. To freeze, wrap each burrito individually in foil and place in a freezer bag. When reheating, remove foil and microwave for 1-2 minutes, or heat in a 350°F oven for 15-20 minutes until warmed through.
Greek Turkey Meatballs With Couscous
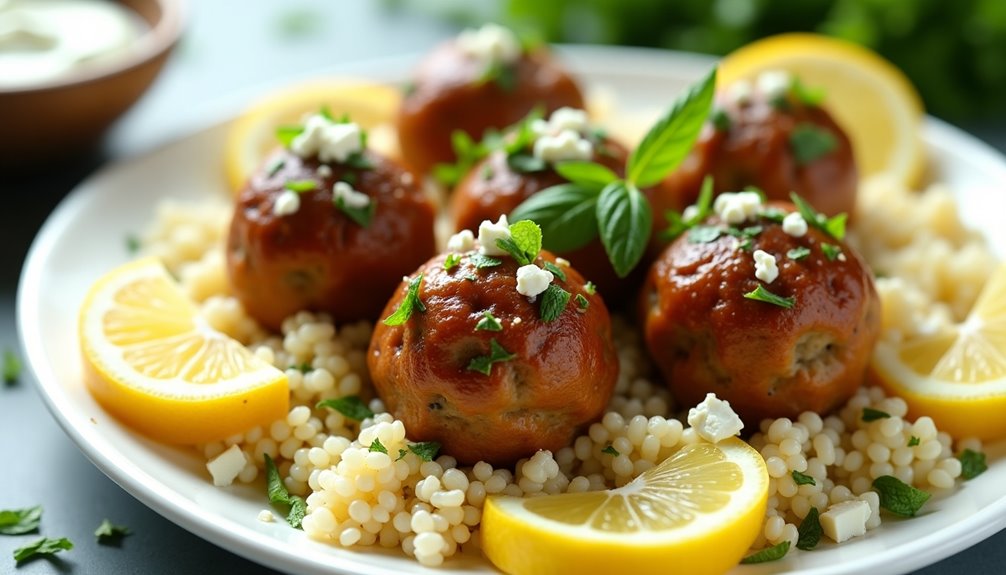
Greek Turkey Meatballs with Couscous combines Mediterranean flavors with lean protein for a perfect pre-game meal that won't weigh athletes down. The dish provides complex carbohydrates from the couscous and quality protein from the turkey, making it an ideal choice for sustained energy during evening sporting events.
This healthier twist on traditional meatballs incorporates Greek seasonings like oregano and fresh mint, while feta cheese adds a tangy depth of flavor and helps keep the meatballs moist. The couscous serves as a quick-cooking base that absorbs the flavors of the dish while providing necessary fuel for athletic performance.
Ingredients:
- 1 pound ground turkey
- 1/2 cup breadcrumbs
- 1 egg
- 1/4 cup crumbled feta cheese
- 2 cloves garlic, minced
- 1 tablespoon dried oregano
- 2 tablespoons fresh mint, chopped
- 1 cup couscous
- 1 1/2 cups chicken broth
- 1 tablespoon olive oil
- 1 lemon, zested and juiced
- Salt and pepper to taste
Mix the ground turkey, breadcrumbs, egg, feta, garlic, oregano, and mint in a large bowl. Form into 1-inch meatballs and place on a lined baking sheet. Bake at 400°F for 20-25 minutes until cooked through. Meanwhile, bring chicken broth to a boil in a medium saucepan. Add couscous, remove from heat, cover, and let stand for 5 minutes. Fluff with a fork and stir in olive oil, lemon zest, and juice.
For best texture and consistency, avoid overworking the meatball mixture and use slightly wet hands when forming the balls. The meatballs can be made ahead and frozen raw or cooked, making this an excellent meal prep option for busy athletes and families. Serve with tzatziki sauce or a simple Greek salad for a complete meal.
High-Energy Tuna Melt Sandwiches
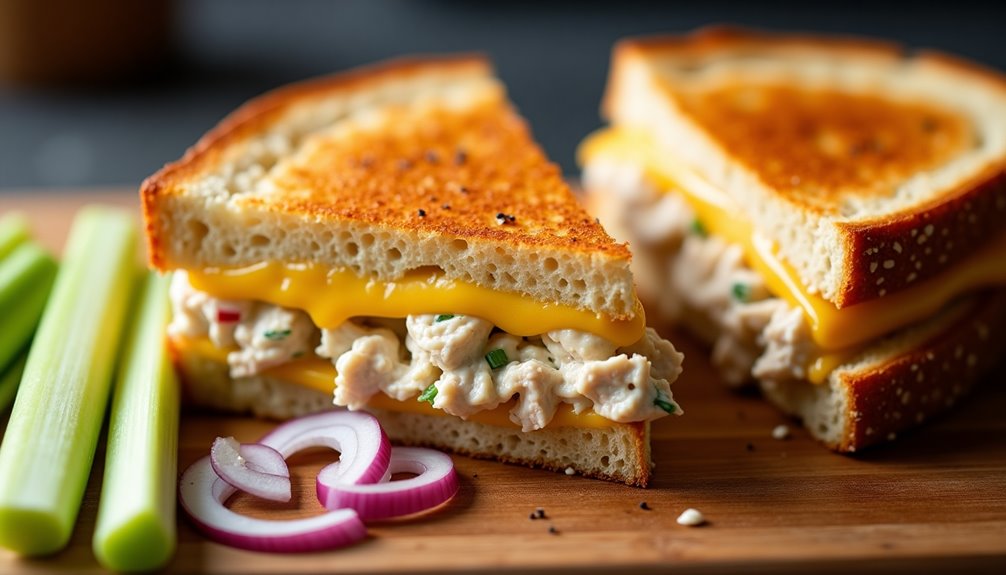
The classic tuna melt gets a nutritious upgrade with the addition of finely diced vegetables and a Greek yogurt-based dressing that reduces calories while maintaining the creamy texture athletes love. This version delivers approximately 24 grams of protein per serving while keeping saturated fats in check.
- 2 cans (5 oz each) chunk light tuna in water, drained
- 1/4 cup Greek yogurt
- 2 tablespoons mayonnaise
- 1/4 cup finely diced celery
- 1/4 cup finely diced red onion
- 1 tablespoon fresh lemon juice
- 1/2 teaspoon black pepper
- 8 slices whole grain bread
- 8 slices cheddar cheese
- 2 tablespoons butter, softened
Mix the drained tuna, Greek yogurt, and mayonnaise in a medium bowl until well combined. Add the diced celery, red onion, lemon juice, and black pepper, stirring until evenly distributed. Butter one side of each bread slice. On the non-buttered side of four slices, divide the tuna mixture evenly. Top each with two slices of cheddar cheese and cover with remaining bread slices, buttered side up.
Heat a large skillet or griddle over medium heat. Place sandwiches butter-side down and cook for 3-4 minutes until golden brown. Carefully flip and cook an additional 2-3 minutes until the cheese is fully melted and the second side is golden brown. Cut diagonally and serve immediately.
For best results, drain the tuna thoroughly to prevent soggy sandwiches, and avoid overloading the bread with filling. The sandwiches can be assembled up to 4 hours in advance and refrigerated, but should be cooked just before serving. If preparing for a team, keep sandwiches warm in a low-temperature oven (170°F) for up to 15 minutes.
Three-Bean Turkey Chili
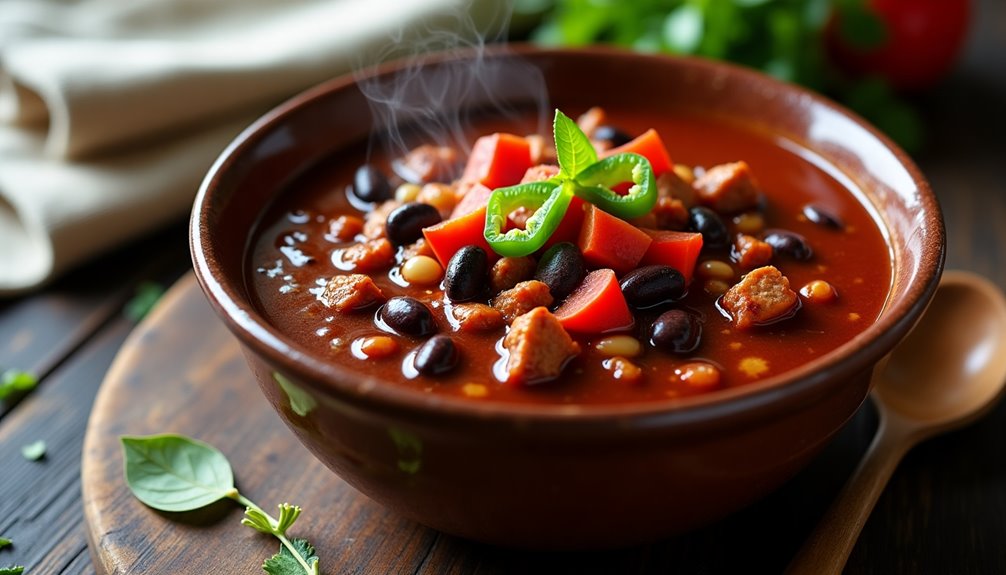
Three-Bean Turkey Chili is a hearty and nutritious meal that's perfect for athletes and active individuals who need sustained energy throughout their sporting events. This protein-rich dish combines lean ground turkey with a variety of beans, creating a balanced meal that provides both immediate and slow-releasing energy.
This healthier alternative to traditional beef chili doesn't sacrifice flavor while cutting down on saturated fat. The combination of different beans adds texture and fiber, while the blend of spices creates a warm, comforting dish that can be prepared ahead and easily reheated when needed.
- 1 pound lean ground turkey
- 1 can (15 oz) black beans, drained and rinsed
- 1 can (15 oz) kidney beans, drained and rinsed
- 1 can (15 oz) pinto beans, drained and rinsed
- 1 large onion, diced
- 2 bell peppers, diced
- 3 cloves garlic, minced
- 2 tablespoons olive oil
- 2 cans (14.5 oz each) diced tomatoes
- 2 tablespoons chili powder
- 1 tablespoon ground cumin
- 1 teaspoon paprika
- 1 teaspoon oregano
- Salt and pepper to taste
- 2 cups chicken broth
Heat olive oil in a large pot over medium heat and brown the ground turkey, breaking it into small pieces. Add onions, bell peppers, and garlic, cooking until vegetables are softened. Stir in the spices and cook for an additional minute to release their flavors.
Add the diced tomatoes, chicken broth, and all three types of beans to the pot. Bring the mixture to a boil, then reduce heat and simmer for 45-60 minutes, stirring occasionally. The chili should thicken as it cooks, and the flavors will develop and meld together.
For best results, prepare this chili at least 2 hours before serving, as the flavors continue to develop as it sits. The recipe can be doubled and frozen in portions for up to 3 months. When reheating, add a small amount of water or broth if the chili seems too thick. Consider serving with whole grain rice or cornbread for additional carbohydrates before sporting events.
Asian Salmon Rice Bowls

Asian Salmon Rice Bowls transform a simple piece of fish into an exciting and nutritious meal that's perfect for active individuals and athletes. The combination of protein-rich salmon, complex carbohydrates from rice, and vibrant vegetables creates a balanced dish that provides sustained energy for evening sports activities.
This meal can be prepared in advance and assembled just before serving, making it ideal for busy schedules. The marinade infuses the salmon with classic Asian flavors like soy sauce, ginger, and sesame oil, while the rice base absorbs all the delicious sauce that makes this dish so satisfying.
Ingredients:
- 4 salmon fillets (6 oz each)
- 2 cups jasmine rice
- 1/4 cup soy sauce
- 2 tablespoons sesame oil
- 2 tablespoons rice vinegar
- 2 tablespoons honey
- 2 cloves garlic, minced
- 1 tablespoon fresh ginger, grated
- 2 cups broccoli florets
- 1 cup shredded carrots
- 2 green onions, sliced
- 1 tablespoon sesame seeds
- 1 avocado, sliced
- Nori strips for garnish
Start by combining soy sauce, sesame oil, rice vinegar, honey, garlic, and ginger in a bowl to create the marinade. Place the salmon fillets in the marinade for 20-30 minutes while preparing other components. Cook rice according to package instructions. Steam broccoli until tender-crisp, and prepare other vegetables. Preheat the oven to 400°F (200°C).
Remove salmon from marinade (reserve the liquid) and place on a lined baking sheet. Bake for 12-15 minutes until the fish flakes easily. While the salmon cooks, heat the reserved marinade in a small saucepan until it thickens slightly. Assemble the bowls by layering rice, vegetables, and salmon, then drizzle with the reduced marinade. Garnish with sesame seeds, green onions, and nori strips.
For best results, ensure the salmon is at room temperature before cooking to promote even heat distribution. The rice can be made in advance and reheated, but the salmon should be cooked just before serving to maintain its optimal texture. If preparing for post-sports consumption, consider packing the components separately and assembling just before eating to maintain freshness and prevent sogginess.
BBQ Chicken Quesadillas
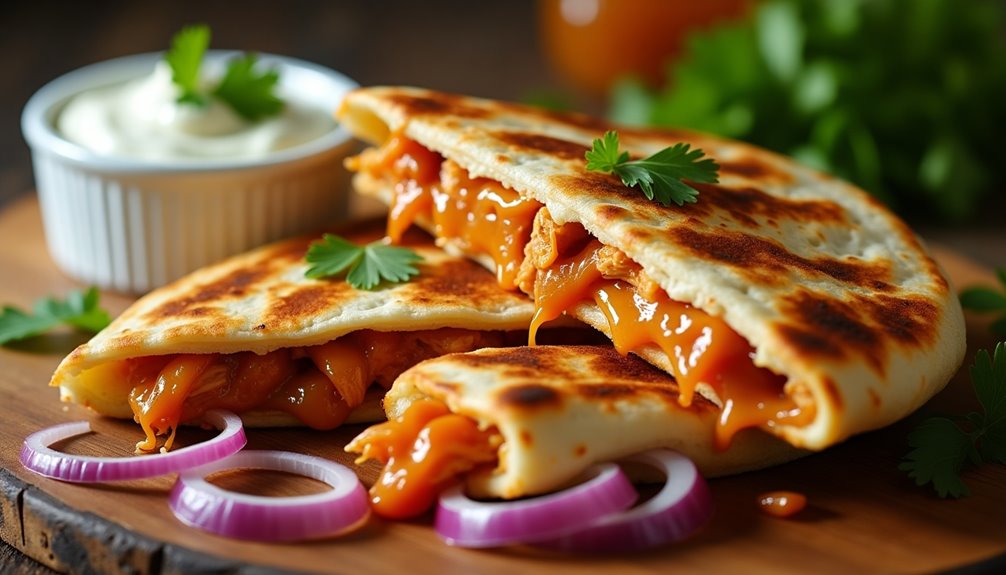
BBQ Chicken Quesadillas are a perfect solution for busy sports nights when you need a quick, satisfying meal that the whole family will enjoy. The combination of tender chicken, tangy BBQ sauce, and melted cheese wrapped in a crispy tortilla creates a handheld meal that's both convenient and delicious.
This recipe can be prepared in advance by cooking the chicken ahead of time, making it ideal for hectic weeknight schedules. The quesadillas can be assembled quickly when needed, and they're easily customizable with different cheese blends and additional toppings to suit individual preferences.
- 4 large flour tortillas
- 2 cups cooked, shredded chicken
- 1 cup BBQ sauce
- 2 cups shredded cheese (Mexican blend or cheddar)
- 1/2 red onion, thinly sliced
- 1/4 cup fresh cilantro, chopped
- 2 tablespoons butter
- 1/4 cup sour cream (for serving)
Mix the shredded chicken with BBQ sauce in a bowl until well combined. Heat a large skillet over medium heat and lightly butter one side of each tortilla. Place one tortilla butter-side down in the skillet and layer with chicken mixture, cheese, red onion, and cilantro on one half. Fold the empty half over the filling and cook for 2-3 minutes until golden brown. Carefully flip the quesadilla and cook for an additional 2 minutes until the cheese is melted and both sides are crispy.
For best results, let the quesadillas rest for 1-2 minutes before cutting into wedges. This allows the cheese to set slightly, making them easier to handle. Serve with additional BBQ sauce, sour cream, or your favorite dipping sauce on the side. The key to perfect quesadillas isn't overfilling them and ensuring even distribution of ingredients.
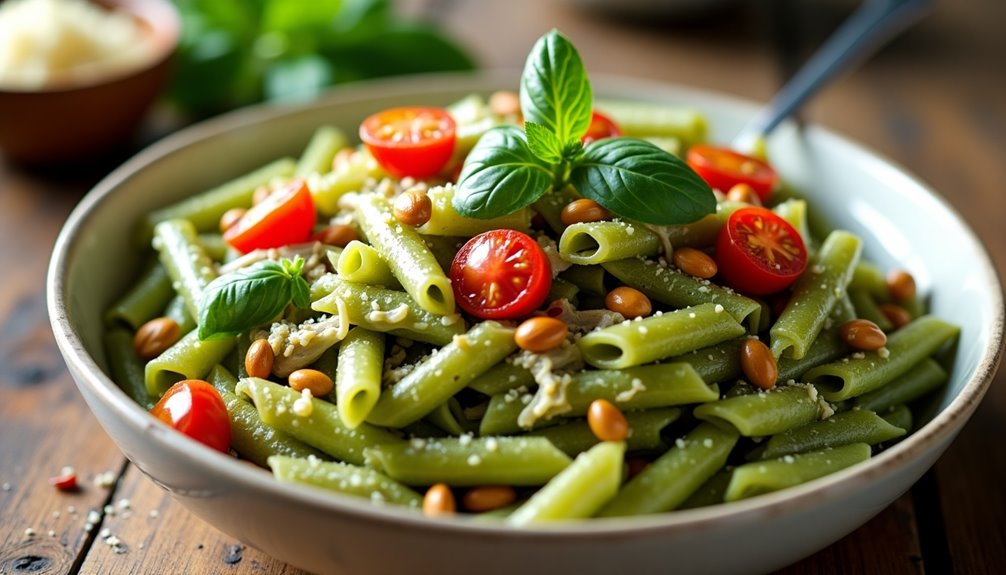
Power-Packed Veggie Pasta
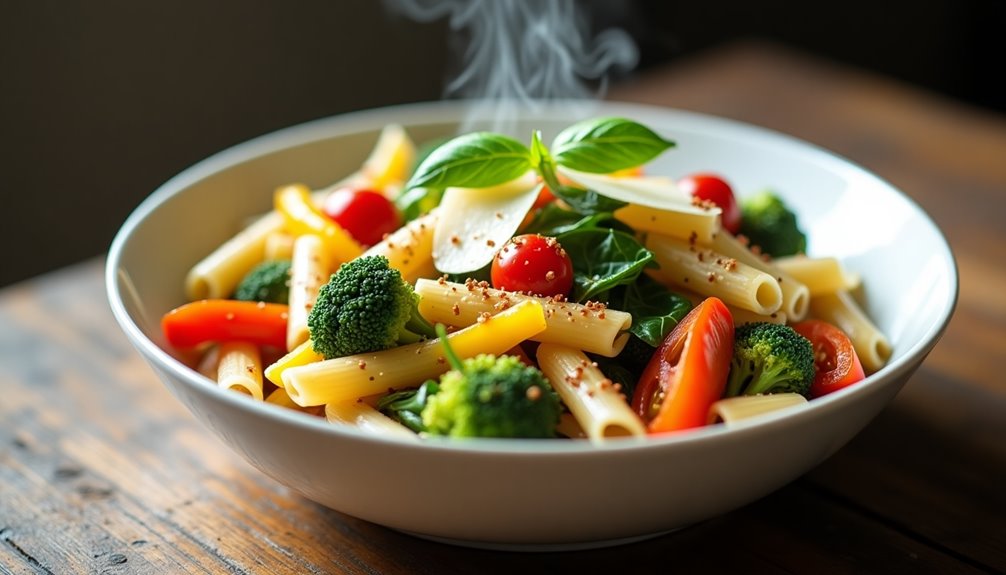
Power-packed veggie pasta is a nutrient-dense meal perfect for athletes and active individuals looking to fuel their performance. This dish combines complex carbohydrates from whole grain pasta with a variety of colorful vegetables, providing essential vitamins, minerals, and fiber.
The combination of protein-rich ingredients and vegetables creates a balanced meal that helps maintain energy levels throughout sporting events or training sessions. The dish can be served hot or cold, making it versatile for different schedules and preferences.
- 16 oz whole grain pasta
- 2 cups broccoli florets
- 1 red bell pepper, sliced
- 1 yellow bell pepper, sliced
- 2 cups cherry tomatoes, halved
- 2 cups baby spinach
- 4 cloves garlic, minced
- 3 tablespoons olive oil
- 1 cup grated Parmesan cheese
- 1 teaspoon red pepper flakes
- Salt and black pepper to taste
- 2 tablespoons fresh basil, chopped
Cook pasta according to package instructions in salted water until al dente. Meanwhile, heat olive oil in a large skillet over medium heat. Add garlic and sauté for 1 minute, then add broccoli and bell peppers. Cook for 5 minutes until vegetables begin to soften.
Add cherry tomatoes and cook for another 3 minutes. Drain the pasta, reserving 1/2 cup of pasta water. Add pasta to the skillet with vegetables, along with spinach and half the Parmesan cheese. Stir until spinach wilts and cheese begins to melt. Add pasta water as needed to create a light sauce. Season with salt, pepper, and red pepper flakes. Top with remaining Parmesan and fresh basil before serving.
For best results, slightly undercook the pasta as it will continue to cook when combined with the hot vegetables. The dish can be prepared up to 2 days in advance and stored in an airtight container in the refrigerator. If serving cold, toss with additional olive oil just before serving to prevent the pasta from sticking together.
Speedy Shrimp and Rice Skillet
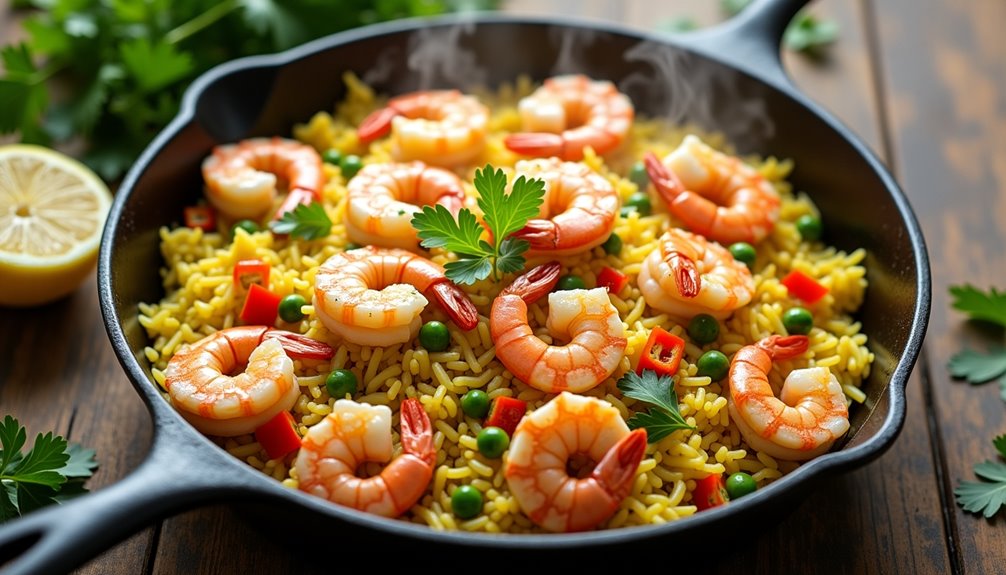
Shrimp and rice skillet is the perfect solution for busy sports nights when time is limited but a nutritious meal is essential. This one-pan dish combines lean protein from shrimp with complex carbohydrates from rice, creating an ideal balance for athletes and active families.
The beauty of this meal lies in its versatility and quick cooking time. While traditional rice dishes can take 45 minutes or more, this streamlined version uses instant rice and pre-cleaned shrimp to cut preparation time significantly without sacrificing flavor or nutritional value.
- 1 pound medium shrimp, peeled and deveined
- 2 cups instant white rice
- 2½ cups chicken broth
- 2 tablespoons olive oil
- 1 medium onion, diced
- 3 cloves garlic, minced
- 1 red bell pepper, chopped
- 1 cup frozen peas
- 1 lemon
- 1 teaspoon paprika
- ½ teaspoon dried oregano
- Salt and pepper to taste
- Fresh parsley for garnish
Heat olive oil in a large skillet over medium-high heat. Sauté onions and bell peppers until softened, then add garlic and cook for another minute. Add instant rice, broth, paprika, and oregano, bringing the mixture to a boil. Reduce heat, cover, and simmer for 5 minutes. Add shrimp and peas to the skillet, cooking until shrimp turn pink and rice is tender, approximately 3-4 minutes.
Finish by squeezing fresh lemon juice over the dish and garnishing with parsley. The entire meal comes together in roughly 15-20 minutes, making it perfect for hectic weeknight schedules.
For best results, avoid overcooking the shrimp as they can become tough and rubbery. If using frozen shrimp, thaw completely and pat dry before cooking to prevent excess water from diluting the flavors. The dish can be made ahead and reheated, though the shrimp are best when freshly cooked.