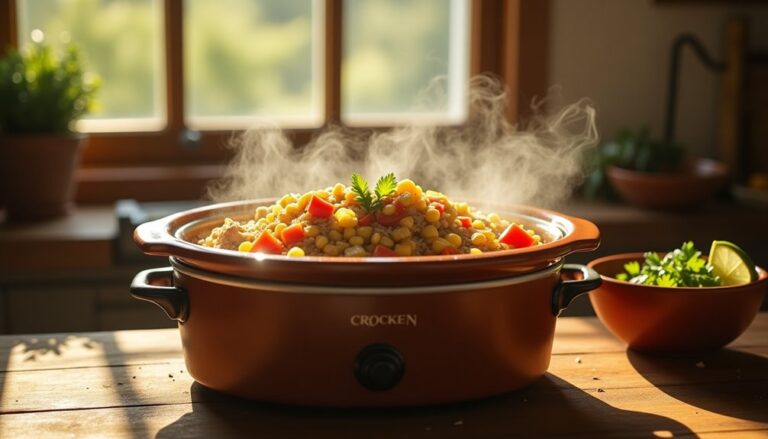
15 Quick Sunday Meals
You're about to discover a collection of Sunday meals that'll transform your weekend cooking routine. These aren't just quick fixes – they're well-crafted recipes that strike the perfect balance between efficiency and flavor. From a 30-minute garlic shrimp pasta to a foolproof sheet pan chicken dinner, each dish has been tested to ensure you'll get restaurant-quality results without spending hours in the kitchen. Let's explore how you can make your Sunday dinners both memorable and manageable.
Sheet Pan Lemon Herb Chicken and Vegetables
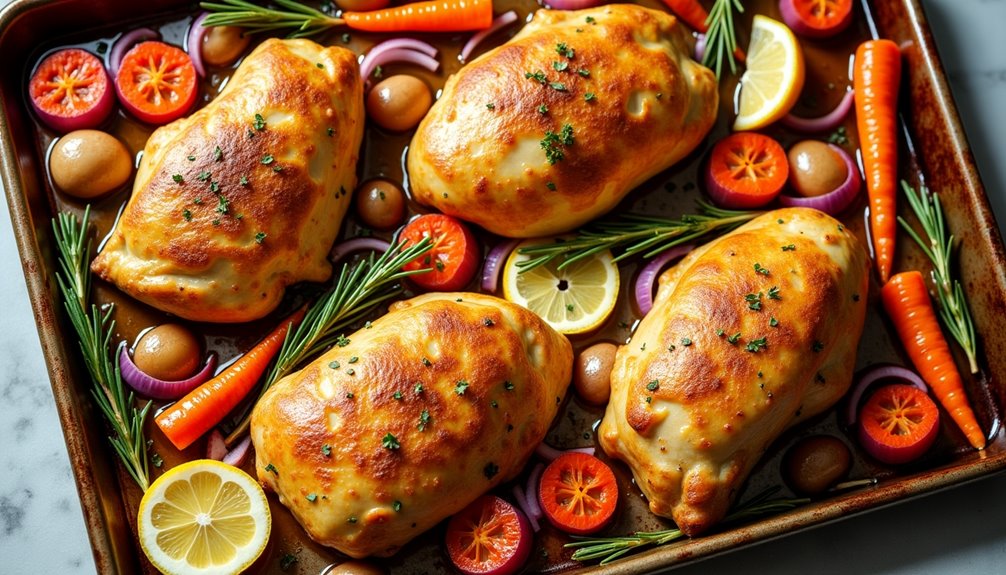
Sheet Pan Lemon Herb Chicken and Vegetables is the perfect solution for busy weeknight dinners, combining the bright flavors of citrus with aromatic herbs in a simple one-pan preparation. The natural juices from the chicken baste the vegetables as they roast, creating a harmonious blend of flavors while requiring minimal cleanup.
This versatile dish can be customized with seasonal vegetables and pairs wonderfully with any starch of your choice. The key to success lies in arranging the ingredients properly on the sheet pan to ensure even cooking and maximum flavor development.
- 4 chicken breasts, bone-in and skin-on
- 2 lemons
- 4 tablespoons olive oil
- 4 garlic cloves, minced
- 1 tablespoon fresh rosemary, chopped
- 1 tablespoon fresh thyme
- 2 cups baby potatoes, halved
- 2 cups carrots, cut into 2-inch pieces
- 1 large red onion, cut into wedges
- 1 tablespoon dried oregano
- Salt and black pepper to taste
Preheat the oven to 425°F (220°C). In a large bowl, combine 2 tablespoons olive oil, minced garlic, rosemary, thyme, juice of one lemon, salt, and pepper. Add the chicken breasts and coat thoroughly.
In a separate bowl, toss the vegetables with remaining olive oil, dried oregano, salt, and pepper.
Arrange the chicken and vegetables on a large sheet pan, ensuring nothing overlaps. Slice the remaining lemon into thin rounds and distribute them across the pan. Roast for 35-40 minutes, or until the chicken reaches an internal temperature of 165°F (74°C) and the vegetables are tender and lightly caramelized.
For best results, let the sheet pan come to room temperature before cooking to ensure even heating. Position larger pieces of chicken and vegetables around the edges of the pan where the heat is typically stronger, and smaller pieces toward the center. If the chicken skin begins to brown too quickly, loosely cover with foil while continuing to cook.
30-Minute Garlic Shrimp Pasta
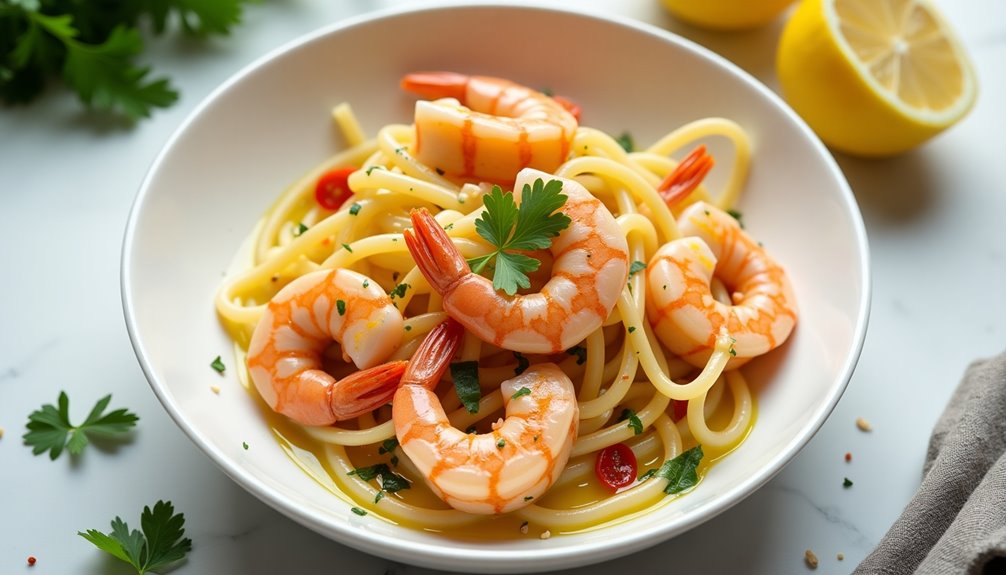
Minute Garlic Shrimp Pasta combines the perfect blend of succulent shrimp, aromatic garlic, and al dente pasta in a light, flavorful sauce. This Mediterranean-inspired dish delivers restaurant-quality results in just minutes, making it ideal for busy weeknight dinners or quick Sunday meals.
This recipe requires minimal preparation and cooking time, yet delivers maximum flavor impact. The key lies in properly timing the pasta cooking with the shrimp preparation, ensuring neither component becomes overcooked while waiting for the other to finish.
Ingredients:
- 12 oz linguine or spaghetti
- 1 lb large shrimp, peeled and deveined
- 6 cloves garlic, minced
- 1/4 cup olive oil
- 1/4 cup butter
- 1/2 cup white wine
- 1/2 teaspoon red pepper flakes
- Salt and black pepper to taste
- 1/4 cup fresh parsley, chopped
- 1 lemon, juiced
- 1/2 cup pasta water (reserved)
Bring a large pot of salted water to boil and cook pasta according to package instructions until al dente. Meanwhile, in a large skillet over medium-high heat, melt butter with olive oil. Add garlic and red pepper flakes, sautéing until fragrant but not brown, about 1 minute. Add shrimp to the pan and cook until they turn pink, approximately 2-3 minutes per side.
Add white wine to the skillet and let it reduce for 2 minutes. Drain pasta, reserving 1/2 cup of pasta water. Add the pasta to the skillet with shrimp, tossing to combine. Add lemon juice, parsley, and enough reserved pasta water to create a light sauce. Season with salt and black pepper to taste.
For best results, avoid overcooking the shrimp as they can become tough and rubbery. The pasta should be slightly undercooked when drained as it will continue cooking when tossed with the hot shrimp mixture. The reserved pasta water is crucial for achieving the right sauce consistency – add it gradually while stirring to reach desired thickness.
Quick Pan-Seared Steak With Chimichurri
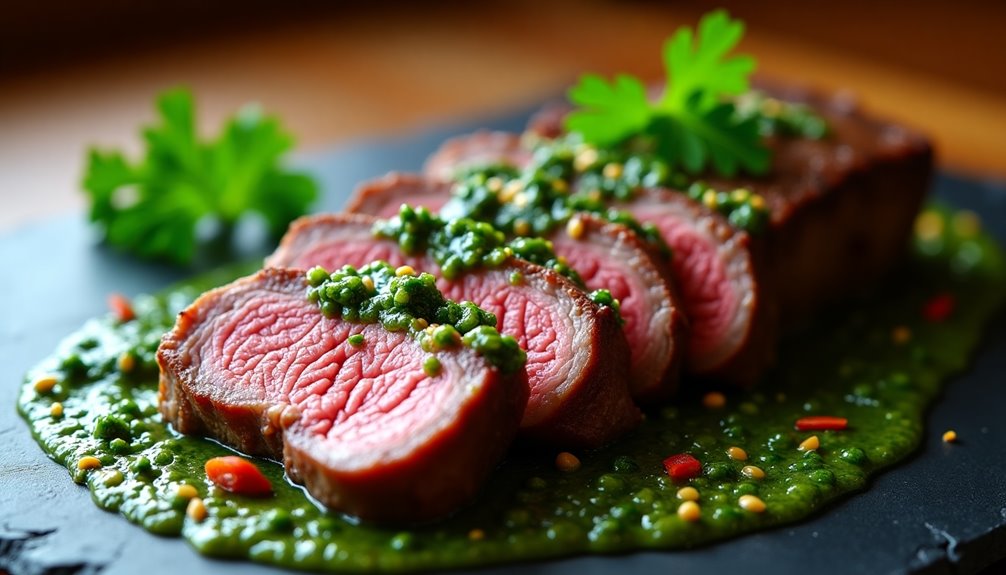
Pan-seared steak with chimichurri is a flavorful combination that brings together the rich, savory taste of perfectly cooked beef with the bright, herbaceous notes of an Argentinian-style sauce. This dish can be prepared in under 30 minutes, making it an ideal choice for a satisfying Sunday dinner that doesn't require hours in the kitchen.
The key to this recipe's success lies in two main components: achieving the right doneness for your steak through proper searing techniques, and preparing a fresh chimichurri sauce that balances parsley, garlic, and acidic elements. When combined, these elements create a restaurant-quality meal that's both impressive and straightforward to prepare.
Ingredients:
- 2 ribeye or New York strip steaks (1-inch thick)
- 2 cups fresh parsley, finely chopped
- 4 garlic cloves, minced
- 2 tablespoons fresh oregano
- 1/2 cup olive oil
- 3 tablespoons red wine vinegar
- 1 teaspoon red pepper flakes
- Salt and black pepper to taste
- 2 tablespoons vegetable oil (for searing)
Start by preparing the chimichurri sauce: combine parsley, garlic, oregano, olive oil, vinegar, and red pepper flakes in a bowl. Season with salt and pepper, then let it sit at room temperature while cooking the steak. This allows the flavors to meld together.
For the steak, remove it from the refrigerator 30 minutes before cooking to reach room temperature. Pat the meat dry with paper towels and season generously with salt and pepper. Heat vegetable oil in a heavy-bottomed skillet over high heat until smoking. Sear the steak for 4-5 minutes on each side for medium-rare, adjusting the time based on your preferred doneness. Let the meat rest for 5-10 minutes before slicing against the grain.
To achieve the best results, invest in a meat thermometer and remember these temperature targets: rare (125°F), medium-rare (135°F), medium (145°F). The chimichurri sauce can be made up to 24 hours in advance and stored in an airtight container in the refrigerator, though it's best served at room temperature. Allow the sauce to warm up before serving if refrigerated.
Rotisserie Chicken Fajita Bowls
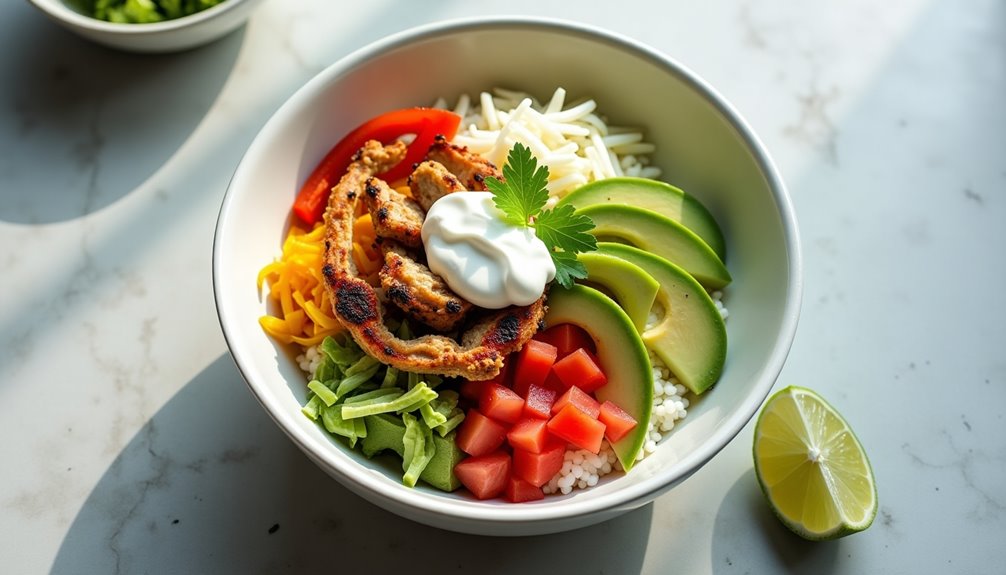
Transform a store-bought rotisserie chicken into vibrant, flavorful fajita bowls that bring restaurant quality to your dining table. This quick and satisfying meal combines tender, pre-cooked chicken with colorful bell peppers and onions, served over a bed of rice with classic Mexican-inspired toppings.
Perfect for busy weeknights or lazy Sundays, these fajita bowls allow for customization while minimizing cooking time. The combination of warm chicken and rice with fresh vegetables creates a balanced meal that's both nutritious and satisfying, without requiring hours in the kitchen.
- 1 rotisserie chicken, meat removed and shredded
- 3 bell peppers (mixed colors), sliced
- 2 large onions, sliced
- 3 cups cooked rice
- 2 tablespoons olive oil
- 2 tablespoons fajita seasoning
- 1 lime
- 1 cup shredded lettuce
- 1 cup diced tomatoes
- 1 cup shredded cheese
- 1 avocado, sliced
- Sour cream for serving
- Fresh cilantro for garnish
Heat olive oil in a large skillet over medium-high heat. Add sliced bell peppers and onions, cooking until they begin to soften and develop a slight char, about 8-10 minutes. Season with half the fajita seasoning. Remove vegetables and set aside. In the same pan, add the shredded rotisserie chicken and remaining fajita seasoning, heating until warm and slightly crispy on the edges, about 5 minutes.
To assemble, divide the cooked rice among bowls. Top with the seasoned chicken, sautéed peppers and onions. Add fresh toppings: lettuce, tomatoes, cheese, and avocado. Finish with a dollop of sour cream, a squeeze of lime, and fresh cilantro.
For best results, prep all toppings while the vegetables are cooking to streamline the assembly process. The chicken can be shredded up to a day in advance and stored in an airtight container. To add extra flavor, consider warming the tortillas separately and serving them on the side, allowing diners to create their own wrap-style variations of this bowl.
One-Pot Mediterranean Fish Stew
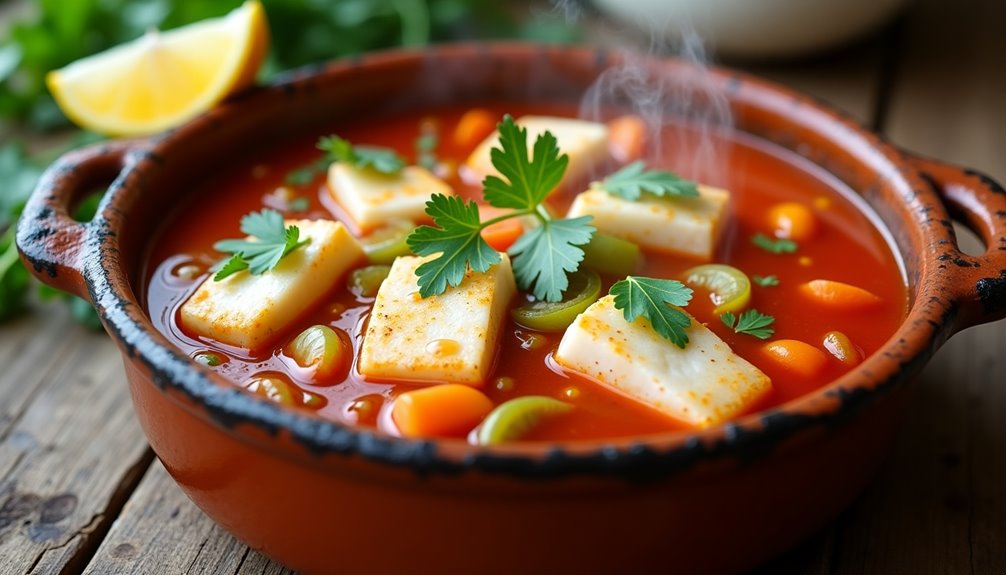
One-Pot Mediterranean Fish Stew is a rustic and flavorful dish that combines fresh seafood with Mediterranean herbs and vegetables in a rich tomato-based broth. Perfect for busy weekends, this stew comes together in under an hour while delivering complex flavors that taste like they've been simmering all day.
This versatile recipe works well with any firm white fish and can be customized with additional seafood like mussels, clams, or shrimp. The key to its distinctive taste lies in the combination of fennel, garlic, and herbs, which create a fragrant base that complements the delicate fish without overpowering it.
Ingredients:
- 1.5 lbs firm white fish (cod, halibut, or sea bass), cut into chunks
- 2 tablespoons olive oil
- 1 large onion, diced
- 1 fennel bulb, sliced
- 4 garlic cloves, minced
- 2 celery stalks, chopped
- 2 carrots, sliced
- 1 can (14 oz) diced tomatoes
- 2 cups fish stock
- 1/2 cup white wine
- 2 bay leaves
- 1 teaspoon dried oregano
- 1 teaspoon dried thyme
- Salt and pepper to taste
- Fresh parsley for garnish
- Lemon wedges for serving
Heat olive oil in a large pot over medium heat. Sauté onion, fennel, celery, and carrots until softened, about 5-7 minutes. Add garlic and cook for another minute. Pour in the white wine and let it reduce by half. Add tomatoes, fish stock, bay leaves, oregano, and thyme. Bring to a simmer and cook for 15-20 minutes until vegetables are tender.
Season the fish chunks with salt and pepper, then gently add them to the pot. Cook for 5-7 minutes until the fish is opaque and flakes easily. Avoid stirring too much to keep the fish pieces intact. Adjust seasoning to taste, garnish with fresh parsley, and serve hot with lemon wedges.
For best results, choose fish fillets of similar thickness to ensure even cooking, and avoid overcooking the fish as it can become tough and fall apart. The stew can be made ahead up to the point of adding the fish, then reheated gently before adding the fish just before serving. Store leftovers in an airtight container in the refrigerator for up to 2 days.
Pesto Turkey Meatballs With Zucchini Noodles
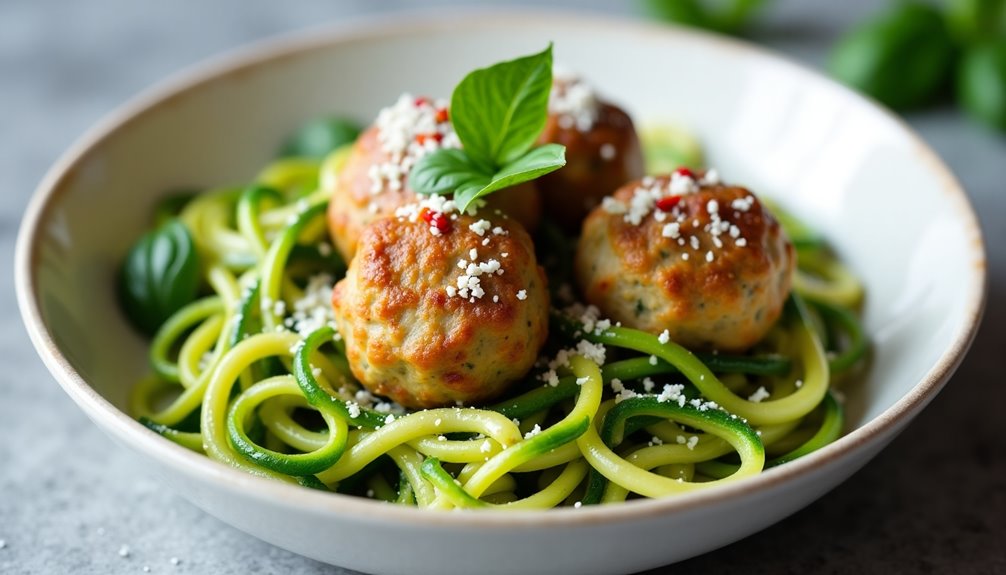
Pesto turkey meatballs paired with zucchini noodles offer a lighter alternative to traditional spaghetti and meatballs while maintaining the comforting essence of the classic dish. This protein-rich, low-carb meal combines lean ground turkey with fresh basil pesto for flavorful, juicy meatballs that perfectly complement the tender spiralized zucchini.
The dish comes together in under 30 minutes, making it an ideal choice for busy weeknight dinners or quick Sunday meal prep. The zucchini noodles provide a fresh, vegetal element that balances the savory meatballs, while keeping the meal light and nutritious.
- 1 pound ground turkey
- 1/3 cup basil pesto
- 1/2 cup breadcrumbs
- 1 large egg
- 1/2 teaspoon salt
- 1/4 teaspoon black pepper
- 4 medium zucchini
- 2 tablespoons olive oil
- 3 cloves garlic, minced
- 1/4 cup grated Parmesan cheese
- Red pepper flakes (optional)
Mix ground turkey, 1/4 cup pesto, breadcrumbs, egg, salt, and pepper in a large bowl. Form into 1-inch meatballs. Heat olive oil in a large skillet over medium heat and cook meatballs for 12-15 minutes, turning occasionally until golden brown and cooked through. Remove meatballs and set aside.
While the meatballs cook, spiralize the zucchini into noodles. In the same skillet, sauté garlic until fragrant, then add zucchini noodles. Cook for 3-4 minutes until just tender but still slightly crisp. Return meatballs to the pan, add remaining pesto, and toss to combine. Top with Parmesan cheese and red pepper flakes if desired.
For best results, avoid overcooking the zucchini noodles as they can become watery and mushy. To prevent this, salt the noodles and let them sit in a colander for 10 minutes before cooking to draw out excess moisture. Pat them dry with paper towels before adding to the pan. The meatballs can be made ahead and frozen for up to three months for convenient meal prep.
Honey Glazed Salmon With Roasted Broccoli
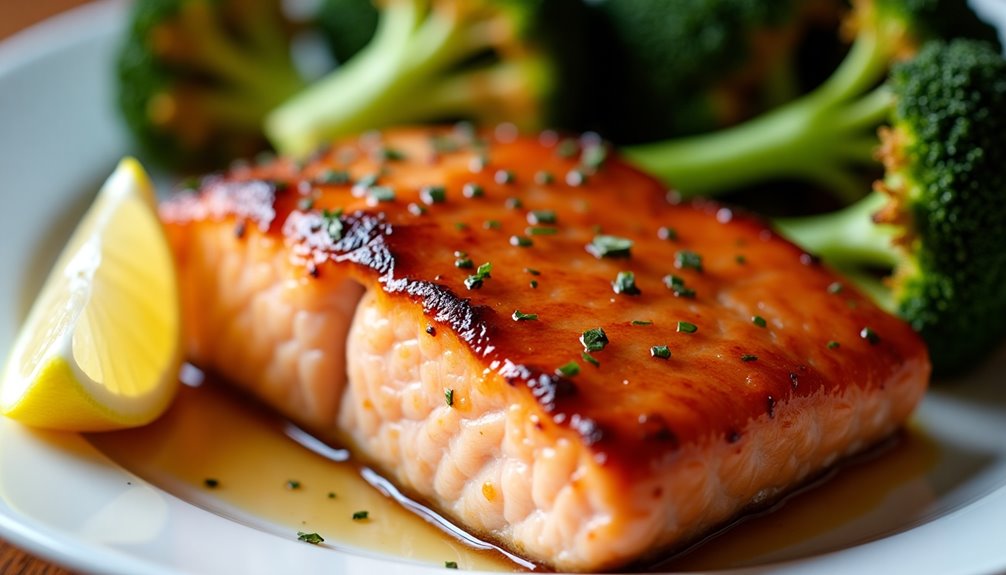
A perfectly glazed salmon paired with crispy roasted broccoli is an ideal Sunday dinner that combines elegance with minimal effort. This dish delivers a beautiful balance of sweet and savory flavors while providing essential omega-3 fatty acids and various nutrients.
The key to this recipe's success lies in achieving the right caramelization on the salmon while ensuring the broccoli reaches that perfect state of tenderness with slightly charred edges. The honey glaze creates a beautiful golden crust on the salmon, while high-heat roasting brings out the natural sweetness of the broccoli.
Ingredients:
- 4 salmon fillets (6 oz each)
- 4 cups broccoli florets
- 3 tablespoons honey
- 2 tablespoons soy sauce
- 1 tablespoon olive oil
- 2 cloves garlic, minced
- 1 tablespoon lemon juice
- Salt and pepper to taste
- 2 tablespoons vegetable oil
- 1 lemon, sliced (for garnish)
Preheat the oven to 400°F (200°C). Toss broccoli florets with olive oil, salt, and pepper, then spread them on one side of a large baking sheet. In a small bowl, whisk together honey, soy sauce, minced garlic, and lemon juice.
Pat the salmon fillets dry and season with salt and pepper. Heat vegetable oil in an oven-safe skillet over medium-high heat. Place salmon skin-side up and sear for 3 minutes until golden brown. Flip the salmon, brush with the honey mixture, and transfer both the salmon skillet and the prepared broccoli sheet to the oven.
Roast for 12-15 minutes, or until the salmon is cooked through and the broccoli is tender with crispy edges. During the last 5 minutes of cooking, brush the salmon with additional glaze to create a shiny finish.
For best results, ensure the salmon fillets are similar in size for even cooking, and don't overcrowd the broccoli on the baking sheet as this will cause steaming instead of roasting. The salmon is done when it flakes easily with a fork but still maintains a slightly translucent center for optimal moisture.
Skillet Mushroom and Spinach Frittata

A frittata is the perfect solution for a quick yet satisfying Sunday meal that bridges breakfast and lunch. This Italian egg dish transforms simple ingredients into an elegant meal that can be served hot or at room temperature.
The combination of earthy mushrooms and nutrient-rich spinach creates a healthy, flavorful dish that comes together in one pan. The beauty of a frittata lies in its versatility – it works equally well for a weekend brunch or a light dinner, and leftovers make excellent next-day meals.
- 8 large eggs
- 1/4 cup whole milk
- 8 oz mushrooms, sliced
- 6 oz fresh spinach
- 1 small onion, diced
- 2 cloves garlic, minced
- 1/2 cup grated Parmesan cheese
- 2 tablespoons olive oil
- Salt and pepper to taste
- 1/4 teaspoon dried thyme
Preheat the oven to 375°F (190°C). In a medium bowl, whisk together eggs, milk, salt, and pepper until well combined.
Heat olive oil in a 10-inch oven-safe skillet over medium heat. Sauté onions until translucent, add mushrooms and cook until they release their moisture and begin to brown. Add garlic and thyme, then incorporate spinach in batches until wilted.
Pour the egg mixture over the vegetables, tilting the pan to distribute evenly. Cook without stirring for 3-4 minutes until edges begin to set. Sprinkle Parmesan cheese on top and transfer the skillet to the preheated oven. Bake for 10-12 minutes until the eggs are fully set and the top is lightly golden.
For best results, use a well-seasoned cast iron skillet or non-stick oven-safe pan to prevent sticking. Let the frittata rest for 5 minutes before slicing – this allows it to set properly and makes for cleaner cuts. The frittata can be stored in an airtight container in the refrigerator for up to 3 days.
Easy Thai Red Curry With Shrimp
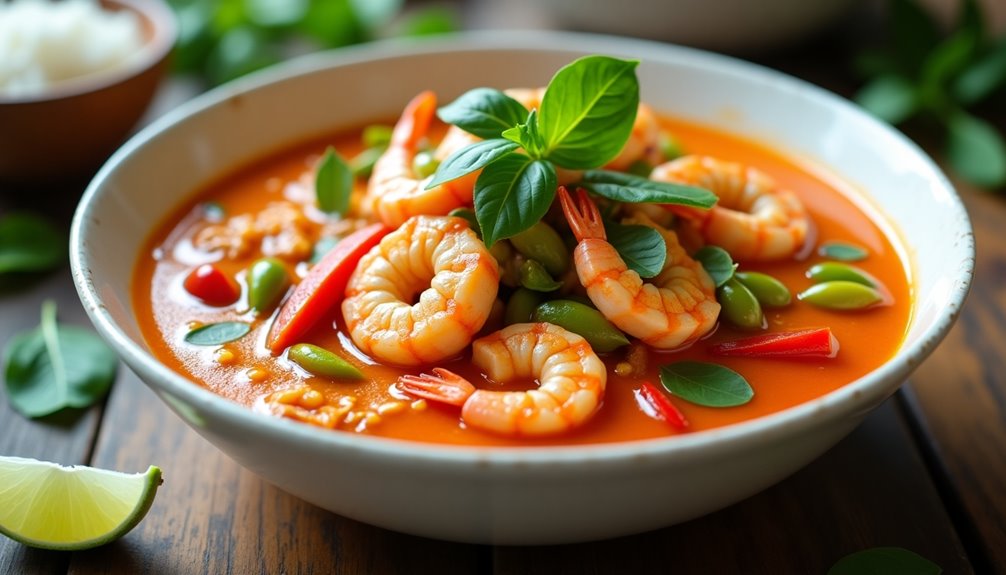
Thai Red Curry with Shrimp brings the vibrant flavors of Thailand right to your dinner table in under 30 minutes. This aromatic dish combines succulent shrimp with creamy coconut milk, spicy red curry paste, and tender vegetables, creating a perfect balance of heat, sweetness, and savory elements that dance on your palate.
The beauty of this curry lies in its versatility and forgiving nature. Whether you're a novice cook or an experienced chef, this recipe delivers consistently delicious results while allowing for adaptations based on available ingredients and personal preferences. The recipe serves 4 people and pairs perfectly with jasmine rice.
- 1 pound large shrimp, peeled and deveined
- 2 tablespoons Thai red curry paste
- 2 cans (14 oz each) coconut milk
- 1 red bell pepper, sliced
- 1 cup bamboo shoots
- 1 cup snap peas
- 2 tablespoons fish sauce
- 1 tablespoon brown sugar
- 4 kaffir lime leaves (or 1 tablespoon lime zest)
- 2 tablespoons vegetable oil
- 1 cup Thai basil leaves
- 2 tablespoons lime juice
- Salt to taste
Heat vegetable oil in a large skillet or wok over medium heat. Add the curry paste and fry for 1-2 minutes until fragrant. Pour in the coconut milk and stir until the paste is fully incorporated. Bring to a gentle simmer and add fish sauce, brown sugar, and kaffir lime leaves.
Add the bell peppers and bamboo shoots, cooking for 3-4 minutes until slightly tender. Add the shrimp and snap peas, cooking for another 3-4 minutes until the shrimp turn pink and are cooked through. Remove from heat and stir in the Thai basil leaves and lime juice.
For best results, use full-fat coconut milk as it provides the richest and creamiest texture. The curry paste can be adjusted according to your heat preference – start with less and add more to taste. If Thai basil is unavailable, regular basil can be substituted, though the flavor will be slightly different. Always add the basil at the end to preserve its aromatic properties.
Herb-Crusted Pork Tenderloin

Herb-crusted pork tenderloin combines the naturally mild flavor of pork with a vibrant coating of fresh herbs and seasonings. This elegant yet simple dish delivers a restaurant-quality meal that can be prepared in under an hour, making it perfect for Sunday dinner or special occasions.
The key to this recipe's success lies in creating a flavorful herb crust that adheres well to the meat while keeping the tenderloin itself moist and tender. The combination of herbs can be adjusted based on personal preference or availability, but the core technique remains the same.
- 1 pork tenderloin (about 1-1.5 pounds)
- 2 tablespoons olive oil
- 2 tablespoons Dijon mustard
- 3 cloves garlic, minced
- 2 tablespoons fresh rosemary, chopped
- 2 tablespoons fresh thyme leaves
- 1 tablespoon fresh sage, chopped
- 1 cup breadcrumbs
- 1 teaspoon salt
- 1/2 teaspoon black pepper
Preheat the oven to 400°F (200°C). Pat the tenderloin dry with paper towels and brush it with olive oil and Dijon mustard. In a shallow dish, combine the minced garlic, chopped herbs, breadcrumbs, salt, and pepper. Roll the mustard-coated tenderloin in the herb mixture, pressing gently to ensure the coating adheres well.
Place the coated tenderloin on a rack in a roasting pan and cook for 25-30 minutes, or until an instant-read thermometer registers 145°F (63°C) at the thickest part. Let the meat rest for 10 minutes before slicing to allow the juices to redistribute and keep the herb crust intact.
For best results, remove the tenderloin from the refrigerator 30 minutes before cooking to ensure even cooking throughout. If the herb crust begins to brown too quickly during cooking, tent the pork loosely with aluminum foil. The tenderloin can also be prepared and coated up to 4 hours in advance and refrigerated until ready to cook.
Black Bean and Sweet Potato Tacos
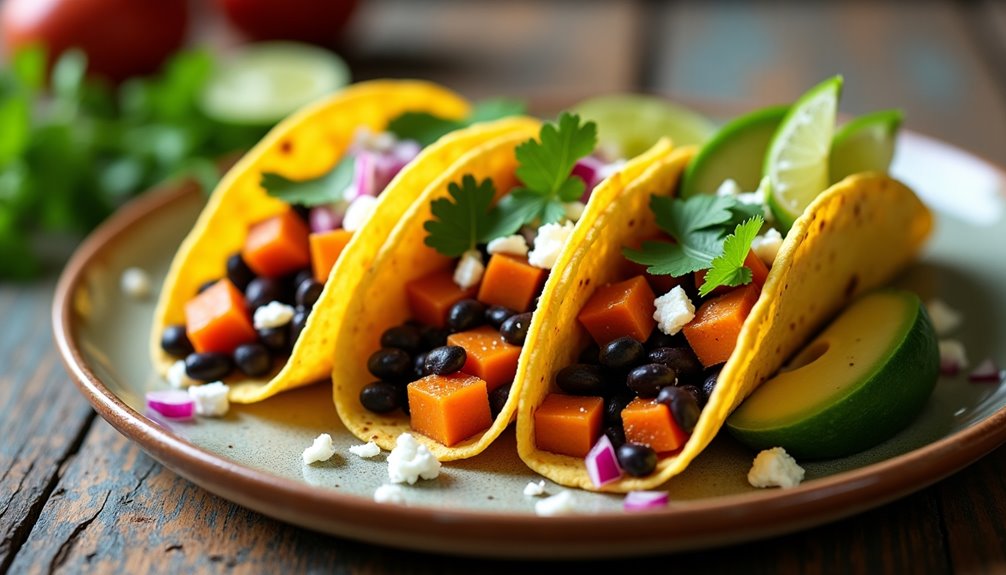
Black Bean and Sweet Potato Tacos are a delicious vegetarian twist on traditional tacos, combining the earthiness of black beans with the natural sweetness of roasted sweet potatoes. This protein-rich meal delivers a satisfying blend of textures and flavors while providing essential nutrients.
These tacos come together in about 30 minutes, making them perfect for busy Sunday evenings when you want something nutritious yet simple. The combination of warm spices, creamy sweet potatoes, and hearty black beans creates a filling that even meat-lovers will appreciate.
Ingredients:
- 2 medium sweet potatoes, diced
- 2 cans black beans, drained and rinsed
- 12 corn tortillas
- 2 tablespoons olive oil
- 1 red onion, diced
- 3 cloves garlic, minced
- 1 tablespoon chili powder
- 1 teaspoon ground cumin
- 1 teaspoon smoked paprika
- Salt and pepper to taste
- 1 lime
- Fresh cilantro
- Avocado for garnish
- Crumbled queso fresco
Preheat the oven to 425°F and toss diced sweet potatoes with olive oil, salt, and pepper. Roast for 20-25 minutes until tender and slightly crispy on the edges.
While the sweet potatoes roast, heat remaining oil in a large skillet over medium heat. Sauté onion until translucent, add garlic and spices, then stir in black beans. Cook until beans are heated through and slightly mashed.
Warm the tortillas and assemble the tacos by layering the black bean mixture and roasted sweet potatoes. Top with fresh cilantro, lime juice, avocado slices, and crumbled queso fresco.
For best results, avoid overcrowding the sweet potato pieces on the baking sheet, as this will cause them to steam rather than roast. The tortillas can be warmed directly over a gas flame for 10-15 seconds per side, or wrapped in damp paper towels and microwaved for 30 seconds. Leftover filling can be stored in the refrigerator for up to 3 days and reheated gently on the stovetop.
Quick Beef and Broccoli Stir-Fry
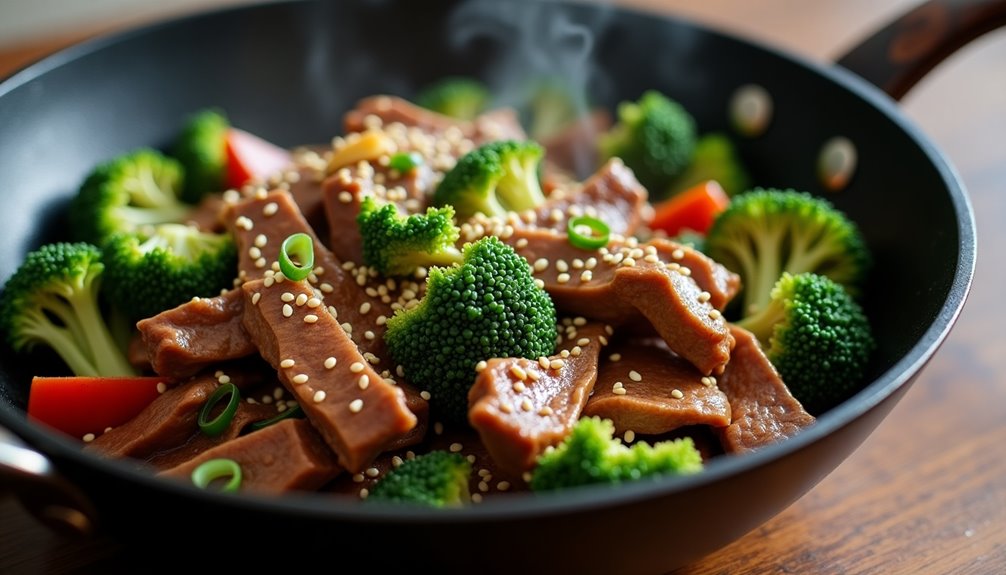
Quick Beef and Broccoli Stir-Fry transforms a Chinese takeout favorite into a home-cooked meal that can be prepared in under 30 minutes. The combination of tender sliced beef, crisp-tender broccoli, and a savory sauce creates a perfect balance of flavors and textures that pair wonderfully with steamed rice.
This dish relies on high heat and quick cooking to achieve the ideal result – beef that remains juicy while the broccoli maintains its vibrant color and slight crunch. The sauce, made with soy sauce, oyster sauce, and other Asian pantry staples, coats each ingredient evenly and creates that signature glossy finish.
Ingredients:
- 1 pound flank steak, thinly sliced against the grain
- 4 cups broccoli florets
- 3 tablespoons vegetable oil
- 4 cloves garlic, minced
- 1 tablespoon ginger, minced
- 1/3 cup soy sauce
- 2 tablespoons oyster sauce
- 1/4 cup beef broth
- 2 tablespoons cornstarch
- 1 tablespoon brown sugar
- 1/4 teaspoon black pepper
Start by mixing the sauce ingredients in a bowl: soy sauce, oyster sauce, beef broth, cornstarch, brown sugar, and black pepper. Heat your wok or large skillet over high heat until very hot, then add 2 tablespoons of oil. Stir-fry the beef in batches until browned but still slightly pink inside, about 2-3 minutes per batch. Remove the beef and set aside.
Add the remaining oil to the pan and stir-fry the garlic and ginger for 30 seconds. Add the broccoli and stir-fry for 2-3 minutes until bright green. Return the beef to the pan, pour in the sauce mixture, and cook while stirring until the sauce thickens and coats everything evenly, about 2 minutes.
For best results, slice the beef while it's partially frozen – this makes it easier to get thin, even slices. Also, avoid overcrowding the pan when stir-frying, as this will cause the meat to steam rather than sear. Having all ingredients prepped and ready before starting to cook is essential, as the cooking process moves quickly once you begin.
Creamy Sun-Dried Tomato Chicken
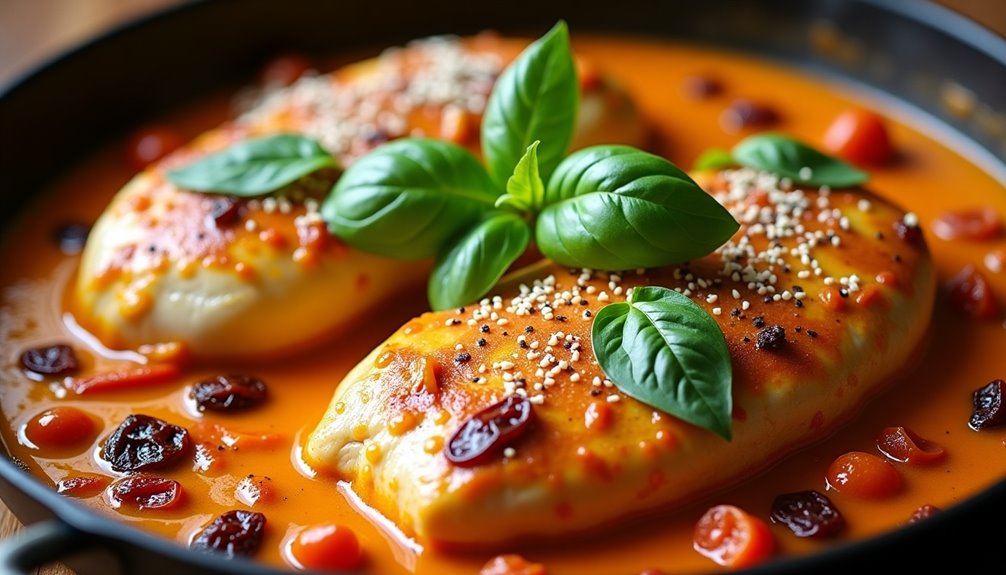
Creamy sun-dried tomato chicken transforms simple chicken breasts into an elegant Italian-inspired dish that's perfect for a relaxing Sunday dinner. The combination of tangy sun-dried tomatoes and rich cream sauce creates a restaurant-quality meal that comes together in under 30 minutes.
This versatile recipe works equally well for family dinners or entertaining guests, as it plates beautifully and pairs wonderfully with pasta, rice, or crusty bread. The sauce is the star of the show, featuring a blend of garlic, herbs, and Parmesan that complement the concentrated flavors of sun-dried tomatoes.
- 4 chicken breasts, boneless and skinless
- 1 cup sun-dried tomatoes, julienned
- 3 cloves garlic, minced
- 1 cup heavy cream
- 1/2 cup chicken broth
- 1/2 cup grated Parmesan cheese
- 1 tablespoon Italian herbs
- 2 tablespoons olive oil
- Salt and pepper to taste
- Fresh basil for garnish
Season chicken breasts with salt and pepper, then heat olive oil in a large skillet over medium-high heat. Cook chicken for 5-6 minutes per side until golden brown and cooked through. Remove chicken and set aside.
In the same pan, add garlic and sun-dried tomatoes, sautéing for 1-2 minutes until fragrant. Pour in chicken broth to deglaze the pan, scraping up any browned bits. Add heavy cream, Parmesan, and Italian herbs, stirring until the sauce thickens slightly.
Return the chicken to the pan, spooning the sauce over top. Simmer for an additional 3-4 minutes until the chicken is heated through and the sauce has reached desired consistency. Garnish with fresh basil before serving.
For best results, avoid using low-fat cream as it may separate during cooking. Sun-dried tomatoes packed in oil can be used directly, but if using dry-packed tomatoes, soak them in hot water for 30 minutes before cooking. The sauce can be made ahead and reheated gently, though fresh preparation yields the best texture and flavor.
Five-Spice Tofu With Snap Peas
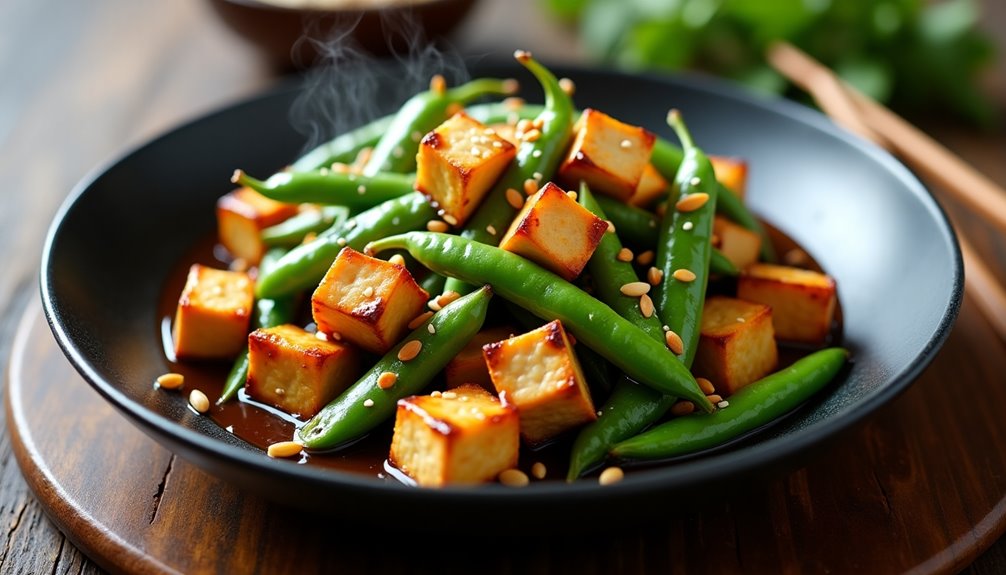
Five-spice tofu with snap peas is a vibrant vegetarian dish that combines the rich flavors of Chinese five-spice powder with crisp vegetables and protein-packed tofu. This aromatic combination creates a perfect balance of textures and tastes, making it an ideal choice for a quick Sunday dinner.
The dish draws inspiration from traditional Chinese cuisine but can be easily adapted to suit modern tastes and time constraints. The key to success lies in properly pressing the tofu to achieve the right texture and using fresh snap peas that provide a satisfying crunch.
Ingredients:
- 14 oz firm tofu, pressed and cubed
- 8 oz fresh snap peas, trimmed
- 3 cloves garlic, minced
- 1 tablespoon ginger, grated
- 2 teaspoons Chinese five-spice powder
- 3 tablespoons soy sauce
- 1 tablespoon rice vinegar
- 2 tablespoons vegetable oil
- 1 teaspoon sesame oil
- 1 teaspoon cornstarch
- 2 tablespoons water
- Salt and pepper to taste
Press the tofu for at least 30 minutes by wrapping it in paper towels and placing a heavy object on top. Once pressed, cut into 1-inch cubes. Heat vegetable oil in a large wok or skillet over medium-high heat. Add the tofu and cook until golden brown on all sides, about 5-7 minutes. Remove and set aside.
In the same pan, add garlic and ginger, stir-frying for 30 seconds until fragrant. Add snap peas and cook for 2-3 minutes until bright green but still crisp.
Mix soy sauce, rice vinegar, five-spice powder, and cornstarch slurry in a small bowl. Return tofu to the pan, add the sauce mixture, and cook for an additional 2 minutes until the sauce thickens. Finish with sesame oil and adjust seasoning if needed.
For best results, ensure your tofu is as dry as possible before cooking to achieve a crispy exterior. Avoid overcooking the snap peas as they can become mushy and lose their bright color. The dish can be stored in an airtight container in the refrigerator for up to 3 days, though the snap peas may lose some of their crispness.
Sausage and Pepper Sheet Pan Dinner

Sheet pan dinners are the ultimate solution for busy weeknight meals, and this Sausage and Pepper combination delivers maximum flavor with minimal effort. The entire meal comes together on a single pan, making cleanup a breeze while ensuring every component is cooked to perfection.
This classic Italian-American combination pairs sweet bell peppers with savory Italian sausages, creating a harmonious blend of flavors that's both comforting and satisfying. The peppers and onions caramelize in the sausage drippings, developing a deep, rich flavor that transforms simple ingredients into an impressive meal.
- 6 Italian sausage links (sweet or hot)
- 3 bell peppers (mixed colors), sliced
- 2 medium onions, sliced
- 4 cloves garlic, minced
- 2 tablespoons olive oil
- 1 teaspoon dried oregano
- 1 teaspoon dried basil
- 1/2 teaspoon red pepper flakes
- Salt and black pepper to taste
- 1 tablespoon balsamic vinegar
Preheat the oven to 400°F (200°C). Line a large sheet pan with parchment paper or foil. Toss the sliced peppers, onions, and garlic with olive oil, oregano, basil, red pepper flakes, salt, and pepper. Spread the vegetable mixture evenly on the sheet pan. Place the sausages on top of the vegetables.
Roast for 35-40 minutes, turning the sausages and stirring the vegetables halfway through cooking. The sausages should be golden brown and cooked through, while the vegetables should be tender and slightly caramelized. During the last 5 minutes of cooking, drizzle the balsamic vinegar over the vegetables and return to the oven.
For best results, choose sausages of similar size to ensure even cooking. If using foil, create a slight lip around the edges to contain any juices. The vegetables can be prepped up to 24 hours in advance and stored in an airtight container in the refrigerator, making dinner assembly even quicker when needed.